|
|
Now that the first beta for SharePoint 2013 is available, I thought it would be a good idea to walk through the process of configuring Forms Based Authentication “out of the box” without an add-on such asExtranetCollaboration Manager (ExCM). Doing this will allow us to see both the similarities and differences between SharePoint 2010 and 2013 as well as highlight the limitations of a “basic” FBA site thatExCMaddresses so well.
One of the most obvious differences between SharePoint 2010 and the 2013 BETA is that Claims Authentication is the ONLY authentication method available in the User Interface (UI) within Central Administration. If necessary, you can still use PowerShellto create a Web App in “classic” mode. However, Windows Authentication is the only method enabled by default…meaning that if you just created a new Web Application with all the default settings, you would basically have a site that only uses Windows Authentication.So in terms of functionality, it’s very similar to the “classic” authentication in earlier versions.
In the screenshots below, you can see the changes we need to make to begin configuring FBA:


In the screenshot above, notice that I have used the “best practices” of assigning a dedicated service account as my Application Pool Identity, as well as renaming my content database from the default cryptic string of characters to one more concise anddescriptive.
Finally, I want to mention the very last setting on this screen:
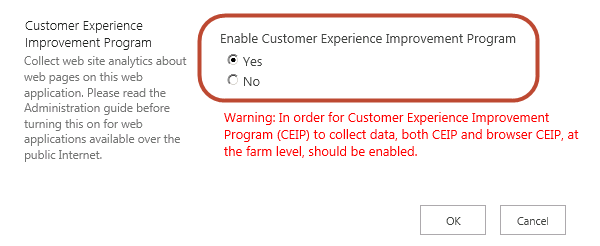
I speak with customers all the time who always answer “no” to this option. As a matter of fact, I used to do it myself not only with SharePoint but in all the applications I managed as a Network Administrator. However, at last year’s SharePoint ConferenceI attended a session and the speakers specifically brought up an instance where they had visited the Microsoft campus and were shown THOUSANDS of bug fixes and performance improvements in SharePoint 2010 that were generated solely by the “Customer ExperienceImprovement Program.” Most of them were very minor, but the cumulative effect of all those improvements was significant. Since then, I ALWAYS answer “yes” to this option and urge our customers to do the same.
Now that we have created a new Web Application with dual authentication, let’s navigate to the site and see what it looks like:

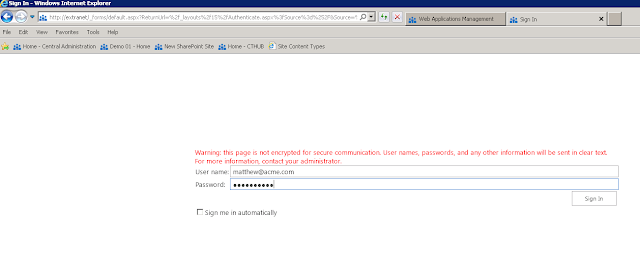
As you can see, it is very similar to the 2010 default sign in page, and still requires us to choose our authentication before continuing any further.
Now that our site is up and running, it’s time to decide on a Membership Provider and make the appropriate edits to our web.config files. For this post, I am going to use the SQL Membership Provider for a couple of reasons. First, it is a more secure wayto store external users than Active Directory. Second, since we recommend using SQL withExtranetCollaboration Manager for SharePoint 2010, I thought it would be a nice way to show you the limitations of the SQL Membership Provider with default settings and how ExCM improves upon them.
First, we need to create our SQL database. SharePoint 2013 uses version 4.0 of the .NET Framework, so we need to use the corresponding “asp_reqsql” application to ensure compatibility and create the proper database structure needed to store informationfor ASP.NET membership, profiles, and roles. You can find the utility in the following location:
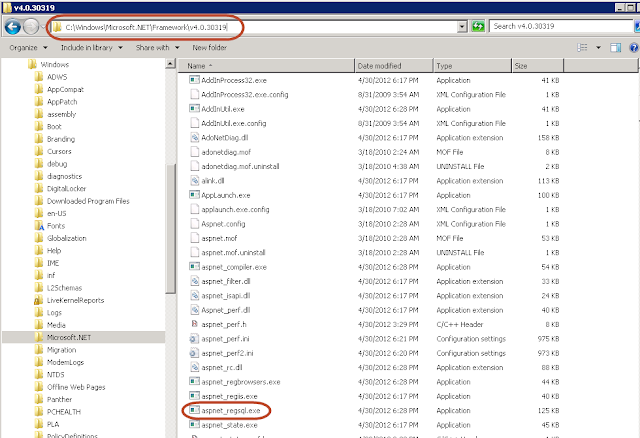
Once we launch it, we see the following screens:


In the following screen, we need to specify both our SQL Server name (and instance if applicable), as well as the name for our FBA database. We can simply type directly over the “<default>” name that initially appears. In my case, SQL is installed on thislocal box and I have chosen to call my database “ExtranetDirectory:”

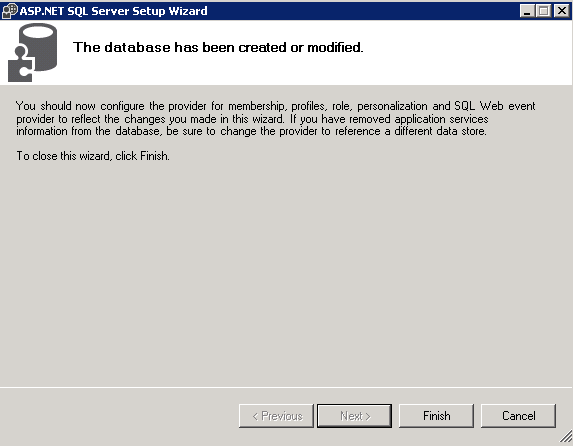
Now we can just continue clicking “Next” and then “Finish” until we see this screen:
Now that we have created our database, we need to grant the appropriate access to the App Pool Identities for both the STS and Content Sites. We know that we are using the “SVC_SPAppPool” for our Content Site because we chose it when creating our Web Application.In some cases, we may be using the same account for all Application Pools, but that’s not always the case. To double-check, we need to open up IIS Manager and the click on “Application Pools:”

As we can see, “AWBIKES\Administrator” is being used for the STS site, so we’ll need to add two accounts to our created “ExtranetDirectory” database in SQL Management Studio.
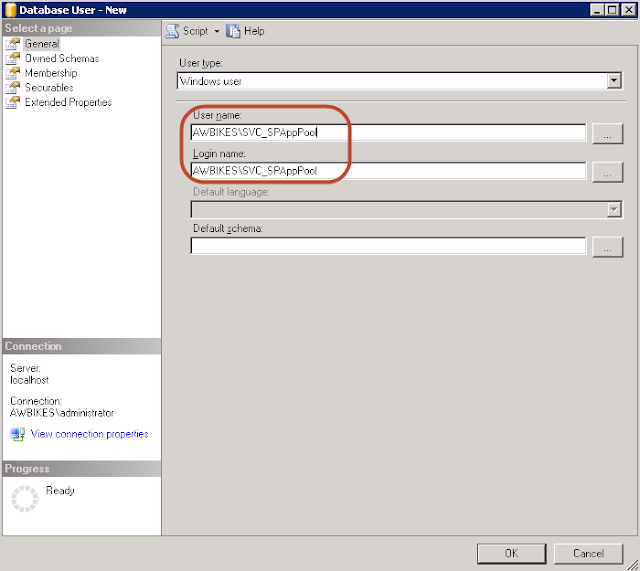
In this new environment, I am also running SQL Server 2012. The process for adding users differs slightly from 2008, so let’s take a closer look. After launching Management Studio, expand “Databases,” then “ExranetDirectory,” then “Security,” and rightclick on “Users” to select “New User:”

From the next screen, we need to select the “User Type” drop down and choose “Windows User:”

I will use “AWBIKES\SVC_SPAppPool” for both the User name and Login name:
Next, we need to click on “Membership” in the left hand menu and place a check by each item that ends in “_FullAccess.” There are five in total:

Once that’s complete, we click on “OK.” We can now see our newly added user listed:

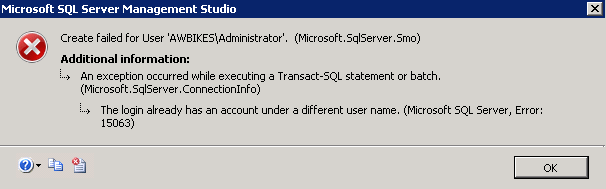
In this particular case, I do not need to add “AWBIKES\Administrator” because that account is a Database Owner (dbo) for all databases and already has the necessary permissions. If you are unsure if a particular account has the appropriate access, simplygo ahead and attempt to add them. If they already exist as a “dbo” you will see an error similar to this:
Simply click “OK” and move on to the next step…editing the web.config files. Yippee!!
To successfully deploy FBA, we need to edit at least two web.config files. Those are the Security Token Service (STS) and the Content Site. The Central Administration file is optional and is only necessary if we need to resolve FBA names from within CentralAdministration. Let’s start with the STS file.
** IMPORTANT: MAKE A BACKUP OF YOUR EXISTING WEB.CONFIG FILES FIRST!!!**
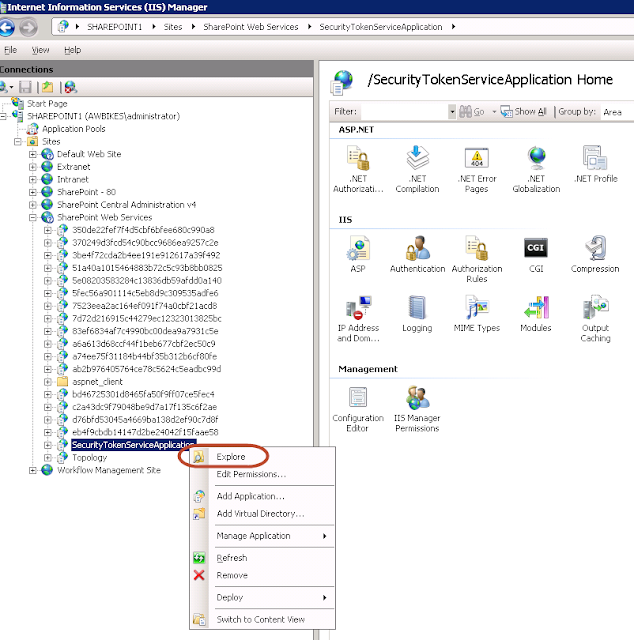
Since we are only doing “out of the box” FBA, the edits to both files will be very minimal. I think the easiest way to navigate to the correct location of the config files is to open IIS Manager, right click on the appropriate site and select “Explore:”

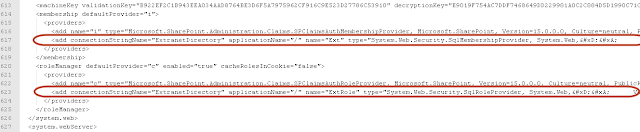
Here is what we need to add to the STS file:
<system.web>
<membership>
<providers>
<add connectionStringName="ExtranetDirectory" applicationName="/" name="Ext" type="System.Web.Security.SqlMembershipProvider, System.Web,
 Version=2.0.3600.0,Culture=neutral, PublicKeyToken=b03f5f7f11d50a3a" />
</providers>
</membership>
<roleManager>
<providers>
<add connectionStringName="ExtranetDirectory" applicationName="/" name="ExtRole" type="System.Web.Security.SqlRoleProvider, System.Web,
 Version=2.0.3600.0,Culture=neutral, PublicKeyToken=b03f5f7f11d50a3a" />
</providers>
</roleManager>
</system.web>
<connectionStrings>
<add name="ExtranetDirectory" connectionString="Data Source=SharePoint1;Initial Catalog=ExtranetDirectory;IntegratedSecurity=SSPI" />
</connectionStrings>
See the screenshot below for placement area:

Now let’s make the appropriate edits to the Content Site web.config. Using the method described above, we can navigate to the Content Site folder and find the file. Here are the necessary edits based on our configuration:
<add connectionStringName="ExtranetDirectory" applicationName="/" name="Ext" type="System.Web.Security.SqlMembershipProvider, System.Web,
 Version=2.0.3600.0,Culture=neutral, PublicKeyToken=b03f5f7f11d50a3a" />
<add connectionStringName="ExtranetDirectory" applicationName="/" name="ExtRole" type="System.Web.Security.SqlRoleProvider, System.Web,
 Version=2.0.3600.0,Culture=neutral, PublicKeyToken=b03f5f7f11d50a3a" />
<connectionStrings>
<add name="ExtranetDirectory" connectionString="Data Source=SharePoint1;Initial Catalog=ExtranetDirectory;IntegratedSecurity=SSPI" />
</connectionStrings>
Additionally, if we want to be able to resolve partial username matches in the People Picker we also need to add the following line in the <PeoplePickerWildcards> section:
<add key="Ext" value="%" />
See the screenshots below for placement areas:


Once all of our edits are made, we save the files. Optionally,we could perform an IIS reset at this point to ensure that our site has loaded the most recent versions.
We are now ready to begin adding some FBA users to our database. This is where things get tricky when using SharePoint’s “out of the box” FBA. There simply is no easy way to add or manage users…and there is NO WAY to allow users to register themselvesor perform any type of self-service (reset passwords). Of course, this is what ExCM has addressed so well in past versions. It allows us to create users manually through the UI, by invitation, and by anonymous (self) registration. ExCM also provides users with many self-service features while also providingadditional security elements for our site. Of course, we don’t yet have a 2013 version of ExCM (we’re working on it) and this blog is strictly “out of the box” FBA, so let’s look at our options for adding users to the SQL database we created.
The first option is to add users directly from within the SQL Management Studio. Basically, we would perform the same steps as previously mentioned when we added our App Pool Identity as a user to the database. However, this can be very tedious and timeconsuming if we want to create several users at once. There are many screens to click through and we would have to repeat the same process for each new user.
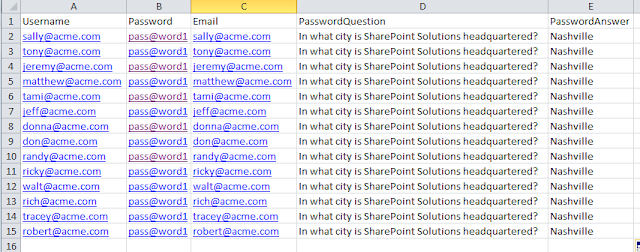
For this example, I am going to use our Import\Export utility that was covered in aprevious blog post to add several newFBA users from the ACME Corporation at once. No need to cover the steps again here, but here is what my import data looked like before exporting it as a CSV file:
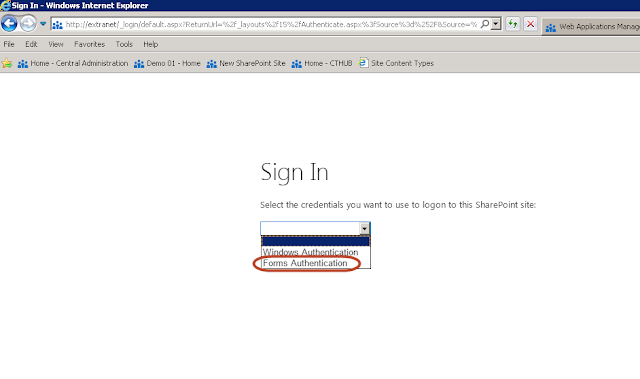
Now we’re ready to test FBA authentication on our site. I will just my ACME username from the screen shot above. After we navigate to the site, we need to select “Forms Authentication:”
Then we enter our credentials and click “Sign In:
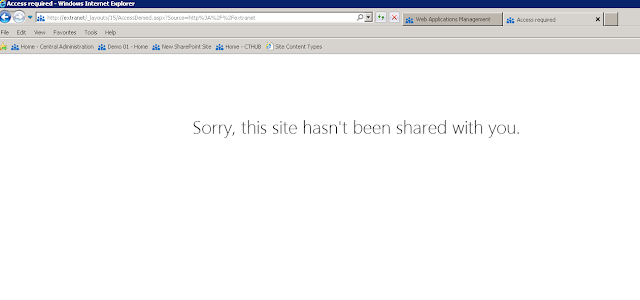
As you can see, we basically receive an “access denied” error because my FBA account does not yet have any permission on the site. Microsoft has, however, made the error a little “nicer” in 2013. This is another example of both the differences betweenSharePoint 2010 and 2013 and the cumbersome management of users with “out of the box” FBA. WithExCM,we could have created our user and assigned permissions all at once. In this instance, we must login to the site and “share” it with our new FBA users:

Notice above that since I added the “Ext” People Picker entry in the web.config file I was able to just type “matt” and then find my FBA user. Also notice that current permissions are set to “Edit” which is Members Group. You can change this by selecting“Show Options:”


I will just accept the “Edit” permissions and add my ACME account. After doing so, I receive the following alert in the upper right hand corner of the screen:


Now if I sign out of the site with the System Account and try my FBA user again, I see this:
So there you have it…”out of the box” FBA configured and working in SharePoint 2013. I will update this post if anything major changes between now and the RTM version. Once ExCM 2013 is available from our development team, I will also do a post on it togive you an idea of where it’s headed in the next version. |
|
 QQ群⑧:
QQ群⑧:


 窥视卡
窥视卡 雷达卡
雷达卡 发表于 2017-5-24 10:58:42
 提升卡
提升卡 置顶卡
置顶卡 沉默卡
沉默卡 喧嚣卡
喧嚣卡 变色卡
变色卡 千斤顶
千斤顶 显身卡
显身卡