|
|
一、环境及软件版本
1
2
3
4
5
6
7
8
9
10
| # cat /etc/redhat-release
CentOS Linux release 7.2.1511 (Core)
# ll /software
jdk-8u60-linux-x64.tar.gz
elasticsearch-5.6.1.tar.gz
filebeat-5.6.1-x86_64.rpm
kafka_2.11-0.11.0.1.tgz
kibana-5.6.1-linux-x86_64.tar.gz
logstash-5.6.1.tar.gz
zookeeper-3.4.10.tar.gz
|
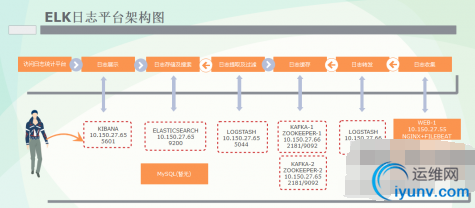
二、架构描述
1、采集层-->日志生产:10.150.27.55
NGINX LOG: /data/log/nginx/
TOMCAT LOG: /opt/tomcat/apache-tomcat-8.0.26/logs/
2、数据处理、缓存层-->日志转发LOGSTASH:10.150.27.66
3、数据处理、缓存层-->日志缓存集群:10.150.27.66/10.150.27.65
KAFKA/ZOOKEEPER
4、检索、展示层-->日志提取及过滤LOGSTASH:10.150.27.65
5、检索、展示层-->日志搜索ELASTICSEARCH:10.150.27.65
6、检索、展示层-->日志展示KIBANA:10.150.27.65
详细系统架构图如下:

三、安装部署
0、系统初始化
1
2
3
4
5
6
7
8
9
| # more /etc/security/limits.conf
root soft nofile 655350
root hard nofile 655350
* soft nofile 655350
* hard nofile 655350
# ulimit -HSn 65530
# more /etc/sysctl.conf
vm.max_map_count= 262144
# sysctl -p
|
1、JAVA环境
1
2
3
4
5
6
7
8
| # tar xf jdk-8u60-linux-x64.tar.gz
# mv jdk1.8.0_60 /usr/local/
# more /etc/profile
export JAVA_HOME=/usr/local/jdk1.8.0_60
export JRE_HOME=${JAVA_HOME}/jre
export CLASSPATH=.:${JAVA_HOME}/lib:${JRE_HOME}/lib
export PATH=${JAVA_HOME}/bin:$PATH
# source /etc/profile
|
解决后面出现的LOGSTASH启动缓慢问题:
修改文件$JAVA_HOME/jre/lib/security/java.security
设置参数securerandom.source=file:/dev/urandom
2、安装ELASTICSEARCH
切换到普通用户 su - king
1
2
| $ tar xf elasticsearch-5.6.1.tar.gz
$ cd elasticsearch-5.6.1
|
安装x-pack插件:
1
| $ ./bin/elasticsearch-plugin install x-pack
|
按照需求调整内存占用参数:
1
2
3
4
5
6
7
8
9
10
11
12
13
14
15
16
17
18
19
20
| $ grep -Ev "#|^$" ./config/jvm.options
-Xms2g
-Xmx2g
-XX:+UseConcMarkSweepGC
-XX:CMSInitiatingOccupancyFraction=75
-XX:+UseCMSInitiatingOccupancyOnly
-XX:+AlwaysPreTouch
-server
-Xss1m
-Djava.awt.headless=true
-Dfile.encoding=UTF-8
-Djna.nosys=true
-Djdk.io.permissionsUseCanonicalPath=true
-Dio.netty.noUnsafe=true
-Dio.netty.noKeySetOptimization=true
-Dio.netty.recycler.maxCapacityPerThread=0
-Dlog4j.shutdownHookEnabled=false
-Dlog4j2.disable.jmx=true
-Dlog4j.skipJansi=true
-XX:+HeapDumpOnOutOfMemoryError
|
修改监听端口,允许外部系统远程访问:
1
2
| $ grep -Ev "#|^$" ./config/elasticsearch.yml
network.host: 10.150.27.65
|
启动ElasticSearch:
验证是否成功启动:
1
2
3
4
5
6
7
8
9
10
11
12
13
14
| $ curl http://elastic:changeme@10.150.27.65:9200
{
"name" : "Z2-xF9U",
"cluster_name" : "elasticsearch",
"cluster_uuid" : "CfPyniZDSv6zJV9ww0Ks5Q",
"version" : {
"number" : "5.6.1",
"build_hash" : "667b497",
"build_date" : "2017-09-14T19:22:05.189Z",
"build_snapshot" : false,
"lucene_version" : "6.6.1"
},
"tagline" : "You Know, for Search"
}
|
3、安装LOGSTASH(10.160.27.65)
切换成root用户
1
2
3
| # tar xf logstash-5.6.1.tar.gz
# cd logstash-5.6.1
# mkdir conf.d/
|
设置接收kafka输入,输出到elasticsearch。(kafka安装配置完成后再配置此处,提前将配置列出。)
1
2
3
4
5
6
7
8
9
10
11
12
13
14
15
16
17
18
| # more ./conf.d/kafka.conf
input {
kafka {
bootstrap_servers => "10.150.27.66:9092,10.150.27.65:9092"
topics => ["ecplogs"]
}
}
output {
elasticsearch {
hosts => ["10.150.27.65:9200"]
user => "elastic"
password => "changeme"
index => "ecp-log-%{+YYYY.MM.dd}"
flush_size => 20000
idle_flush_time => 10
template_overwrite => true
}
}
|
启动Logstash:
1
| # ./bin/logstash -f conf.d/kafka.conf &
|
4、安装KIBANA
1
2
3
| # tar -xf kibana-5.6.1-linux-x86_64.tar.gz
# cd kibana-5.6.1-linux-x86_64/
# ./bin/kibana-plugin install x-pack
|
设置Kibaba对外开放的IP和ElasticSearch的url
1
2
3
| # grep -Ev "#|^$" ./config/kibana.yml
server.host: "10.150.27.65"
elasticsearch.url: "http://10.150.27.65:9200"
|
启动Kibana并验证:
5、安装ZOOKEEPER集群
10.150.27.66:
1
2
3
4
5
6
7
8
9
10
11
12
13
| # tar xf zookeeper-3.4.10.tar.gz -C /usr/local/
# cd /usr/local/zookeeper-3.4.10/config/
# cp zoo_sample.cfg zoo.cfg
# grep -Ev "#|^$" zoo.cfg
tickTime=2000
initLimit=10
syncLimit=5
dataDir=/usr/local/zookeeper-3.4.10/zookeeper
clientPort=2181
server.1=10.150.27.66:12888:13888
server.2=10.150.27.65:12888:13888
# more ../zookeeper/myid
1
|
10.150.27.65:
1
2
| # more ../zookeeper/myid
2
|
启动Zookeeper并验证:
1
2
3
4
5
| # ../bin/zkServer.sh start
# ../bin/zkServer.sh status
ZooKeeper JMX enabled by default
Using config: /usr/local/zookeeper-3.4.10/bin/../conf/zoo.cfg
Mode: follower
|
6、安装KAFKA集群
10.150.27.66:
1
2
3
4
5
6
7
8
9
10
11
12
13
14
15
16
17
18
19
20
21
22
23
24
| # tar xf kafka_2.11-0.11.0.1.tgz -C /usr/local/
# cd /usr/local/kafka_2.11-0.11.0.1/config/
# grep -Ev "#|^$" server.properties
broker.id=1
port=9092
host.name=10.150.27.66
num.network.threads=3
num.io.threads=8
socket.send.buffer.bytes=102400
socket.receive.buffer.bytes=102400
socket.request.max.bytes=104857600
log.dirs=/usr/local/kafka-logs
num.partitions=1
num.recovery.threads.per.data.dir=1
offsets.topic.replication.factor=1
transaction.state.log.replication.factor=1
transaction.state.log.min.isr=1
log.retention.hours=1
log.segment.bytes=1073741824
log.retention.check.interval.ms=300000
zookeeper.connect=10.150.27.66:2181,10.150.26.65:2181
default.replication.factor=2
zookeeper.connection.timeout.ms=6000
group.initial.rebalance.delay.ms=0
|
10.150.27.65:
1
2
3
| # grep -Ev "#|^$" server.properties
broker.id=2
host.name=10.150.27.65
|
启动并验证:
1
2
3
4
| # ../bin/kafka-server-start.sh -daemon server.properties
# ../bin/kafka-topics.sh --create --zookeeper 10.150.27.66:2181 --replication-factor 1 --partitions 2 --topic ecplogs
# ../bin/kafka-console-producer.sh --broker-list 10.150.27.66:2181 --topic ecplogs
# ../bin/kafka-console-consumer.sh --zookeeper 10.150.27.65:2181 --from-beginning --topic ecplogs
|
7、日志中转LOGSTASH安装
1
2
3
4
5
6
7
8
9
10
11
12
13
14
| # pwd
/usr/local/logstash-5.6.1/conf.d
# more kafka.conf
input {
beats {
port => "5044"
}
}
output {
kafka {
bootstrap_servers => "10.150.27.66:9092,10.150.27.65:9092"
topic_id => "ecplogs"
}
}
|
8、FILEBEAT安装配置
1
2
3
4
5
6
7
8
| # rpm -ivh filebeat-5.6.1-x86_64.rpm
[iyunv@appcan-t-app-4 ~]# grep -Ev "#|^$" /etc/filebeat/filebeat.yml
filebeat.prospectors:
- input_type: log
paths:
- /opt/tomcat/apache-tomcat-8.0.26/logs/*
output.logstash:
hosts: ["10.150.27.66:5044"]
|
至此,配置全部完成。
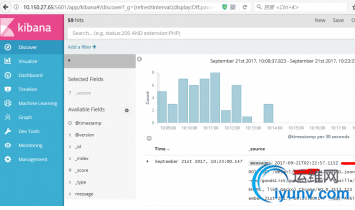
页面展示:

另:TOMCAT日志格式更改为json样式。
cd /opt/tomcat/apache-tomcat-8.0.26/conf/
more server.xml
1
2
3
4
5
6
7
8
9
| <!-- Access log processes all example.
Documentation at: /docs/config/valve.html
Note: The pattern used is equivalent to using pattern="common" -->
<Valve className="org.apache.catalina.valves.AccessLogValve" directory="logs"
prefix="localhost_access_log" suffix=".log"
pattern="{"client":"%h", "client user":"%l", "authenticated":"%u",
"access time":"%t", "method":"%r", "status":"%s", "send bytes":"
;%b", "Query?string":"%q", "partner":"%{Referer}i", "Agent version":"%{User-Agent}i
"}"/>
|
|
|
|