一、tomcat 安装
1、首先安装JDK
下载地址:http://www.oracle.com/technetwork/java/javase/downloads/jdk7-downloads-1637583.html
这里用rpm的安装:
# rpm -ivh jdk-7u5-linux-i586.rpm
安装完成后,定义变量和路径:
- # vim /etc/profile
- JAVA_HOME=/usr/java/jdk1.7.0_05
- PATH=$JAVA_HOME/bin:$PATH
- export PATH USER LOGNAME MAIL HOSTNAME HISTSIZE INPUTRC
之后显示如下信息OK:
- # java -version
- java version "1.7.0_05"
- Java(TM) SE Runtime Environment (build 1.7.0_05-b06)
- Java HotSpot(TM) Client VM (build 23.1-b03, mixed mode, sharing)
2、安装tomcat:
官网下载地址:http://tomcat.apache.org
- # tar xf apache-tomcat-7.0.29.tar.gz -C /usr/local/
- # cd /usr/local/
- # ln -s apache-tomcat-7.0.29/ tomcat
- # cd /usr/local/tomcat/bin/
- # ./catalina.sh start //启动tomcat
可以看到已经启动了,访问下看看:
3、介绍下tomcat各个目录的作用:
- bin 执行文件目录
- conf 配置文件目录
- lib 公共类目录
- logs 日志文件目录
- temp 临时文件目录
- webapps 网页文件目录
- docs 帮助文档目录
- examples 样例存放目录
- host-manager web 管理接口目录,主机定义
- manager web 管理接口目录,部署会话
- ROOT 本地访问的目录
- work JSP的工作目录
4、自定义jsp页面:
- # cd /usr/local/tomcat/webapps/
- # mkdir -p test/WEB-INF/{lib,classes} //建立目录结构
-
- # cat test/index.jsp
-
-
- Hello
-
-
-
-
-
这里要提醒的是tomcat这里是自动部署的,所以不用重启tomcat,直接访问下试试:
5、下面建立个SNS社交网站:
- 首先安装mysql
- # yum -y install mysql-server
- # service mysqld start
-
- # mkdir /www/webapps
- # unzip JavaCenter_Home_2.0_GBK.zip -d /www/webapps/
- # cd /www/webapps/
- # mv JavaCenter_Home_2.0_GBK/ jcenter
-
- 修改主配置文件添加如下信息,定义路径,reloadbale是否自动部署:
- # vim /usr/local/tomcat/conf/server.xml
- ……
-
-
- ……
-
- 重启服务
- # /usr/local/tomcat/bin/catalina.sh stop
- # /usr/local/tomcat/bin/catalina.sh start
-
- 浏览器输入http://192.168.80.143:8080/jcenter/install按步骤安装即可:
最后访问如下:
二、tomcat的两个web管理接口
首页有3个按钮,前两个是基于manager-gui的,后面的是基于admin-gui的:
下面配置下相关用户,之后重启服务:
- # vim /usr/local/tomcat/conf/tomcat-users.xml
-
-
-
-
-
-
下面访问下基于manager-gui的:
输入密码,可以看到部署的信息了:
下面访问基于admin-gui的,这回输入基于admin-gui的用户密码:
可以看到基于主机定义的相关信息了:
下面访问下基于manager-gui的status:
这里可以看到有ajp和http的两个信息,这是tomcat的两个连接器
三、基于tomcat的架构实例
实现负载均衡,拓扑如下:
下面开始配置apache,这里要知道的是apache连接tomcat有两个模块,分别是mode_jk和mode_proxy:
mode_jk只通过ajp的连接tomcat的
mode_proxy可以通过ajp和http的两种方式
1、安装配置apache:
- # yum -y groupinstall "Development Libraries"
- # yum -y install pcre-devel
-
- # tar xf apr-1.4.6.tar.bz2
- # cd apr-1.4.6
- # ./configure --prefix=/usr/local/apr
- # make && make install
-
- # tar xf apr-util-1.4.1.tar.bz2
- # cd apr-util-1.4.1
- # ./configure --prefix=/usr/local/apr-util --with-apr=/usr/local/apr
- # make && make install
-
- # tar xf httpd-2.4.2.tar.bz2
- # cd httpd-2.4.2
- # ./configure --prefix=/usr/local/apache \
- > --sysconfdir=/etc/httpd \
- > --enable-so \
- > --enable-ssl \
- > --enable-cgi \
- > --enable-rewrite \
- > --with-zlib \
- > --with-pcre \
- > --with-apr=/usr/local/apr \
- > --with-apr-util=/usr/local/apr-util \
- > --enable-proxy \
- > --enable-proxy-http \
- > --enable-proxy-ajp
- # make && make install
添加启动脚本
- # vim /etc/rc.d/init.d/httpd
- #!/bin/bash
- #
- # httpd Startup script for the Apache HTTP Server
- #
- # chkconfig: - 85 15
- # description: Apache is a World Wide Web server. It is used to serve \
- # HTML files and CGI.
- # processname: httpd
- # config: /etc/httpd/conf/httpd.conf
- # config: /etc/sysconfig/httpd
- # pidfile: /var/run/httpd.pid
-
- # Source function library.
- . /etc/rc.d/init.d/functions
-
- if [ -f /etc/sysconfig/httpd ]; then
- . /etc/sysconfig/httpd
- fi
-
- # Start httpd in the C locale by default.
- HTTPD_LANG=${HTTPD_LANG-"C"}
-
- # This will prevent initlog from swallowing up a pass-phrase prompt if
- # mod_ssl needs a pass-phrase from the user.
- INITLOG_ARGS=""
-
- # Set HTTPD=/usr/sbin/httpd.worker in /etc/sysconfig/httpd to use a server
- # with the thread-based "worker" MPM; BE WARNED that some modules may not
- # work correctly with a thread-based MPM; notably PHP will refuse to start.
-
- # Path to the apachectl script, server binary, and short-form for messages.
- apachectl=/usr/local/apache/bin/apachectl
- httpd=${HTTPD-/usr/local/apache/bin/httpd}
- prog=httpd
- pidfile=${PIDFILE-/var/run/httpd.pid}
- lockfile=${LOCKFILE-/var/lock/subsys/httpd}
- RETVAL=0
-
- start() {
- echo -n $"Starting $prog: "
- LANG=$HTTPD_LANG daemon --pidfile=${pidfile} $httpd $OPTIONS
- RETVAL=$?
- echo
- [ $RETVAL = 0 ] && touch ${lockfile}
- return $RETVAL
- }
-
- stop() {
- echo -n $"Stopping $prog: "
- killproc -p ${pidfile} -d 10 $httpd
- RETVAL=$?
- echo
- [ $RETVAL = 0 ] && rm -f ${lockfile} ${pidfile}
- }
- reload() {
- echo -n $"Reloading $prog: "
- if ! LANG=$HTTPD_LANG $httpd $OPTIONS -t >&/dev/null; then
- RETVAL=$?
- echo $"not reloading due to configuration syntax error"
- failure $"not reloading $httpd due to configuration syntax error"
- else
- killproc -p ${pidfile} $httpd -HUP
- RETVAL=$?
- fi
- echo
- }
-
- # See how we were called.
- case "$1" in
- start)
- start
- ;;
- stop)
- stop
- ;;
- status)
- status -p ${pidfile} $httpd
- RETVAL=$?
- ;;
- restart)
- stop
- start
- ;;
- condrestart)
- if [ -f ${pidfile} ] ; then
- stop
- start
- fi
- ;;
- reload)
- reload
- ;;
- graceful|help|configtest|fullstatus)
- $apachectl $@
- RETVAL=$?
- ;;
- *)
- echo $"Usage: $prog {start|stop|restart|condrestart|reload|status|fullstatus|graceful|help|configtest}"
- exit 1
- esac
-
- exit $RETVAL
# chmod +x /etc/rc.d/init.d/httpd
添加pidfile,去掉如下行的#号注释:
# vim /etc/httpd/httpd.conf
PidFile "/var/run/httpd.pid"
ServerName www.example.com:80
LoadModule slotmem_shm_module modules/mod_slotmem_shm.so
启动服务
# service httpd start
访问OK:
使用虚拟主机的方式方便管理,在httpd.conf中开启:
# vim /etc/httpd/httpd.conf
# DocumentRoot "/usr/local/apache/htdocs"
Include /etc/httpd/extra/httpd-vhosts.conf
配置基于mode_proxy的负载均衡:
- # vim /etc/httpd/extra/httpd-vhosts.conf
- ProxyRequests Off
- //定义负载均衡,起名cluster
- BalancerMember ajp://192.168.80.143:8009 loadfactor=10 route=TomcatA //定义使用ajp,http的也可以连接,http的端口要改
-
- 8080
- BalancerMember ajp://192.168.80.144:8009 loadfactor=10 route=TomcatB
-
-
- (定义反向代理)
- ProxyPass / balancer://cluster/ stickysession=jsessionid
- ProxyPa***everse / balancer://cluster/
-
- # service httpd restart
2、配置tomcat,两台的配置一样:
- 添加jvmRoute参数 也就是worker名称:
- # vim /usr/local/tomcat/conf/server.xml
-
- (另外一条TomcatB即可)
- 重启tomcat
-
- 安装就不介绍了,先建立jsp页面:
- # cat index.jsp
-
-
- TomcatA
-
- TomcatA
-
-
- Session ID
-
-
-
- Created on
-
-
-
-
-
-
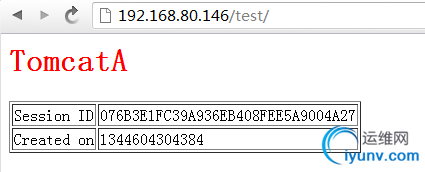
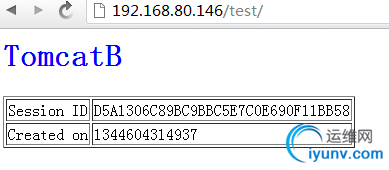
先分别访问看看:
tomcatA的:
tomcatB的:
3、测试负载均衡:


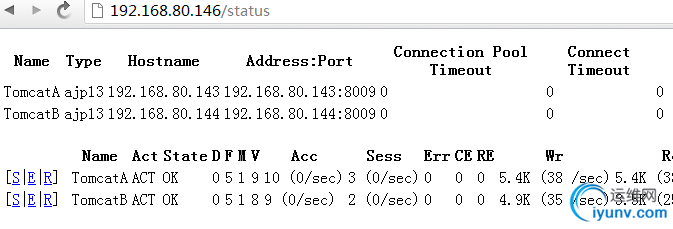
再看看manager的status信息,看到这里有通过AJP连接的信息了:

可以看到有负载均衡的状态了,并且还能状态检测,但是session id也不一样,可以看出没有会话保持的。
基于mode_jk的负载均衡:
在apaches上安装模块:
下载模块:http://tomcat.apache.org/download-connectors.cgi
- # tar xf tomcat-connectors-1.2.37-src.tar.gz
- # cd tomcat-connectors-1.2.37-src/native/
- # ./configure --with-apxs=/usr/local/apache/bin/apxs
- # make && make install
-
- 新建httpd-jk配置文件:
- # vim /etc/httpd/extra/httpd-jk.conf
- LoadModule jk_module modules/mod_jk.so //装载模块
- JkWorkersFile /etc/httpd/extra/workers.properties //定义worker的文件
- JkLogFile logs/mod_jk.log //JK 日志
- JkLogLevel debug //日志级别
- JkMount /* cluster1 //转发所有到clister1
- JkMount /status stat //将status转发到stat
-
- 定义workers信息
- # vim /etc/httpd/extra/workers.properties
- worker.list = cluster1,stat //指定worker名称
- worker.TomcatA.port = 8009 //端口号
- worker.TomcatA.host = 192.168.80.143 //主机
- worker.TomcatA.type = ajp13 //ajp配置
- worker.TomcatA.lbfactor = 1 //权重值
-
- worker.TomcatB.port = 8009
- worker.TomcatB.host = 192.168.80.144
- worker.TomcatB.type = ajp13
- worker.TomcatB.lbfactor = 2
-
- worker.cluster1.type = lb
- worker.cluster1.balance_workers = TomcatA, TomcatB //指定cluster1包含tomcatA和tomcatB
- worker.stat.type = status //定义stat,显示状态信息
-
- 在配置httpd.conf中引用httpd-jk.conf文件,并注释使用proxy模块:
- #Include /etc/httpd/extra/httpd-vhosts.conf
- Include /etc/httpd/extra/httpd-jk.conf
-
- # service httpd restart
下面访问下,可以看到有负载均衡了:


并且可以通过status查看节点状态:

基于apache + tomcat session群集:
一、首先apache的负载均衡信息为前面的mode_proxy和mode_jk两种方式都可以
二、在Tomcat配置文件Engine容器中添加如下信息:
- (web2的jvmRoute="TomcatA")
-
- //定义集群的类型为SimpleTcpCluster,心跳信息传输方式
-
- //配置节点间传递属性
-
-
- //定义发送信息
-
-
- //过滤器
-
-
-
- //于jvmRouter绑定
-
- //监听器,等待事件发生
- //集群监听器
-
- ……
复制个web.xml文件,这里的test就是之前建立的,但是没有web.xml文件
# cp conf/web.xml webapps/test/WEB-INF/
添加
# vim webapps/test/WEB-INF/web.xml
三、测试
重启tomcat先访问下看看各自的信息:
之后再重启apache服务,在访问可以看到serssion id是一直不变,但是在两台tomcat上都有轮询效果:
至此tomcat群集的配置就结束了,如有错误请指出,非常感谢
|