|
|
Install and Create MySQL ODBC Connector on Windows 7 64 bit
 March 31, 2012 | Posted by Hao Nguyen bookmarks
Tweet
inShare

Why install ODBC Connector for MySQL?
ODBC connector works as a standard gateway for programming languages, applications (such as Excel, Access, or OpenOffice) to communicate with database server with ease.
The database behind ODBC Connector could be MySQL, Microsoft SQL, PostgreSQL, Microsoft Access, or FileMaker, and more. You do not have to input the direct connection string into the code. You just need to know how to contact to ODBC Connector in a very simple way; especially, Delphi even makes it simpler with a few clicks.
If you want to see how to connect Delphi to mysql ODBC, click here to link to Connect Delphi to MySQL using ODBC.You could see the usage of MySQL in these two cases.
The first case is to connect to a local MySQL Server. It means you have MySQL Server running on your local computer.

In this case, the grant permission command is not necessary because MySQL allows localhost (127.0.0.1) to connect by default.
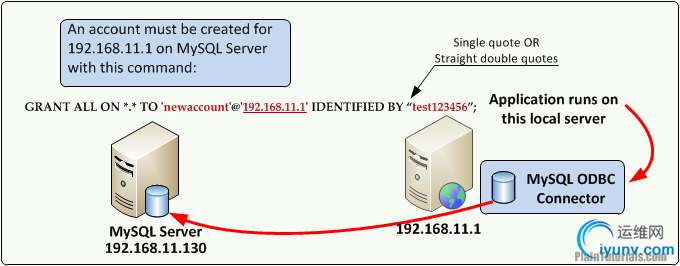
The second case is to connect to a remote MySQL Server. In this case, you want to connect to a remote machine where MySQL is running. Sometimes, we need to access to a remote MySQL to do some automatic tasks, such as maintaining database, checking database, or updating a WordPress blog using an auto web crawler application. If you want to run an application on one server and access database on another server, this case can be used.

In this case, the administrator on the machine 192.168.11.130 must execute the GRANT command. More about GRANT command in MySQL. Back to top
Which version should I go?
As this time of writing, there are two public versions of MySQL Connectors, 3.51 and 5.1. Both versions support Windows from XP to 7 32 bit to 64 bit.
Summary steps
- Download MySQL Connectors
- Install MySQL Connectors on your Windows
- Setup MySQL Grant Permission to allow this computer to connect
- Setup an ODBC Connector from Windows machine.
- Test ODBC Connector
How to install ODBC Connector for MySQL in details
The easiest way to install MySQL ODBC Drivers on Windows is to use MSI Package. MSI package supports both Windows 32 bit and 64 bit.
Step 1. Download MySQL Connectors
- Now, we start the first step is to go to this URL http://www.mysql.com/downloads/connector/odbc/3.51.html#downloads
- Select Microsoft Windows as the platform.
- Select Windows (x86, 64-bit), MSI Installer
- Connector-ODBC if you have 64 bit operating system, otherwise, select 32 bit.
- Click Download.
- Simply click “No thanks, just take me to the downloads!” if MySQL ask you to register an account.
Download from a trusted source

Warning
– If you download the ODCB Connector from some other sources, make sure to check the MD5 hash key
Don’t know how the MD5 hash key works? SeeHow to verify MD5 signature.
Back to top
Step 2. Install MySQL Connectors on your Windows
- Double click on the file “mysql-connector-odbc-3.51.30-winx64.msi” that you just downloaded to run the setup process.
- Click Next and accept the license agreement.
- Select Custom to see what we will have after the installation

- The package MySQL 64 bit allows you to install both 32 and 64 bit Connector. This is just an optional option, you could click Next now to continue another step.

- Click Install to let the Setup Wizard do the rest.
Back to top
Step 3. Setup MySQL Grant Permission to allow this computer to connect
Save your time - You do not have to complete this step if you are connecting to a MySQL Server on your local machine. This task should be done on the remote MySQL Server in the second type. Click here to see the figure again. On MySQL Server, login as root or any account with GRANT permission, issue this command
GRANT ALL ON *.* TO ‘newaccount’@’192.168.11.1′ IDENTIFIED BY “test123456″; newaccount could be replaced by any usernames that you want to use. test123456 is the password for newaccount. The phase ‘192.168.11.1‘ means this account is only valid when connects from the server 192.168.11.1
 Back to top
Step 4. Setup an ODBC Connector from Windows machine.
- Go to Control Panel –> Administrative Tools and select Data Sources (ODBC), execute it.
 This tool allows you to create new ODBC Connector for you or your computer.
The ODBC Data Source Administrator appears, where you could create new DSN for you, or for your computer.
Tips: User DSN is Adds, deletes, or sets up data sources with user data source names (DSNs). These data sources are local to a computer and accessible only by the current user (User level).
System DSN is Adds, deletes, or sets up data sources with system data source names (DSNs). These data sources are local to a computer but not user-dedicated; any user with privileges can access a system DSN (Computer level).
In this case, I would like to setup an DSN (ODBC Connector) that is available to every user account on my computer, I will click the tab System DSN.
- Click Add to add a new ODBC Connector
- Select MySQL ODBC 3.51Driver

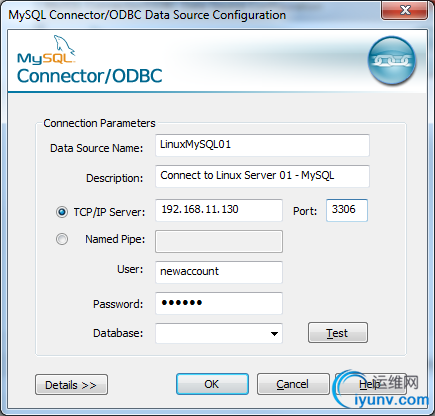
- Click Finish to enter another dialogue where you can setup some necessary parameters.

Leave field Database empty
Stay out of trouble – just leave the field Database empty. If you select some database here, you might run into some weird problems with MySQL ODBC Connector. You must specify database name in your SELECT command. Example: SELECT * FROM plaintutdb.table_employees; Data Source Name – The name that your application will use to communicate with this ODBC Connection.
Description – Anything that for your understanding (useful in case you have so many ODBC Connectors on your machine)
TCP/IP Server – IP address or DNS Name of the MySQL Server. In this case, my remote MySQL Server has the IP of 192.168.11.130.
User – Username on the MySQL box. This is the username in the GRANT command at Step 3. More about GRANT command on MySQL.
Back to top
Step 5. Test ODBC Connector
Click Test button and wait for the success message pop-up. You should expect a pop-up message like this.

If you have some error at this point, go back to Step 3 and make sure you have enough permission.
A common error message could happen is Connection Failed: [HY000] [MySQL][ODBC 3.51 Driver][Host ‘your-ip-address’ is not allowed to connect to this MySQL server.

This problem happen because you do not have permission to connect to the database from the IP address 192.168.11.1, or you entered wrong password. The password is test123456 which I entered on the GRANT command at step 3.
OR, you might have an error message like this: "Connection Failed: [HY000] [MySQL][ODBC 3.51 Driver]Access denied for user ‘newaccount’@’192.168.11.1′ (using password: YES)“. The root causes of this error message are: you type wrong password, OR the password is too complex.
MySQL ODBC 3.51 No-Complex Password
Warning – You might have a serious headache with MySQL ODBC 3.51 if the password in your GRANT command contains special characters, such as ! @ # $ % ^ ?. MySQL ODBC 3.51 ODBC Driver does not support these special characters in the password box. The only error message you would receive is “Access denied” (using password: YES)
To this point, you could connect your database application to MySQL Server using the new ODBC Connector created from this tutorial.
Back to top |
|