|
|
Using WebDAV with IIS
This article walks you through the process of using Web-based Distributed Authoring and Versioning (WebDAV) to publish content to an Internet Information Services (IIS) web server. The article also explains why WebDAV is a more secure and better solution to publishing content than the traditional FTP approach.
The traditional method for uploading content to a web server is File Transfer Protocol (FTP), but using this approach has its disadvantages:
- Using FTP requires that you open additional ports on your perimeter firewall, and this can increase the attack surface of your network and make it more susceptible to penetration by attackers. This is obviously undesirable from the perspective of keeping your network secure.
- FTP has no file locking mechanism, so it’s possible for two users to upload different versions of the same file simultaneously causing one to be overwritten. This can mean lost time troubleshooting why an uploaded file is different from what you expect.
- The FTP approach means you have to edit your content locally on the client. In other words, to edit a page already on the web server you would have to download it to the client, edit it there, and then upload it again to the web server. This is a time-consuming and inefficient approach to managing content.
The solution to these problems is WebDAV, a protocol used for publishing and managing content to web servers. WebDAV is an extension of the HTTP/1.1 protocol described in RFCs 2518 and 3253. WebDAV overcomes the three issues described above as follows:
- WebDAV uses port 80, the same port used by HTTP for web access. So using WebDAV means you don’t have to open any extra ports on your firewall.
- WebDAV lets only one user modify a file at a time, while allowing multiple users to read it. This allows files to be locked while they are being edited, preventing unexpected changes from occurring.
- WebDAV lets you edit files on the server instead of needing to download them first to the client. Editing files remotely using WebDAV is as easy as if they were locally present, and the whole process is transparent to the content producer.
Let’s walk through the steps necessary to have WebDAV enabled on an IIS machine and then show how to publish and remotely modify content using WebDAV. For my web server I’m using a Windows Server 2003 machine with IIS 6 installed, and for simplicity we’ll publish content to the Default Web Site.
Install and Enable WebDAV on the Server
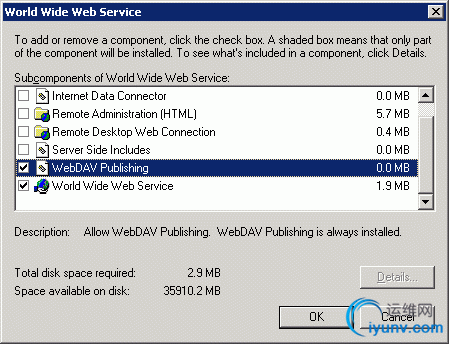
First we need to install WebDAV on the server. Note that when you promote a Windows Server 2003 machine to the role of Application Server, it installs various IIS 6 components but WebDAV isn’t one of these components installed. This is different from the earlier Windows 2000 Server platform where installing IIS 5 automatically installed WebDAV as well. To install WebDAV on the IIS 6 machine, use Add or Remove Programs in Control Panel and run the Windows Components Wizard. You can find WebDAV under Application Server | Internet Information Services | World Wide Web Service | WebDAV Publishing:
Once you’ve installed WebDAV, you need to ensure it is enabled. To verify this, check the WebDAV option under the Web Service Extensions node in IIS Manager:
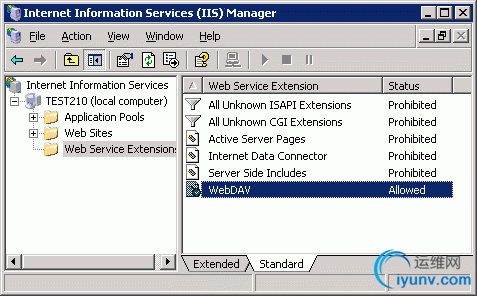
Note that when you allow the WebDAV extension (httpext.dll) you are allowing it for all websites on your server. IIS unfortunately does not let you enable WebDAV on a per-website basis.
Enable WebDAV on the Client
The next step is to enable WebDAV on the client machines that will be used to create and manage content for your website. Windows XP has a built-in WebDAV client that doesn’t need to be installed, only enabled. To enable WebDAV on XP, open the Services console under Administrative Tools and find the WebClient service and double-click on this service to open its Properties sheet:
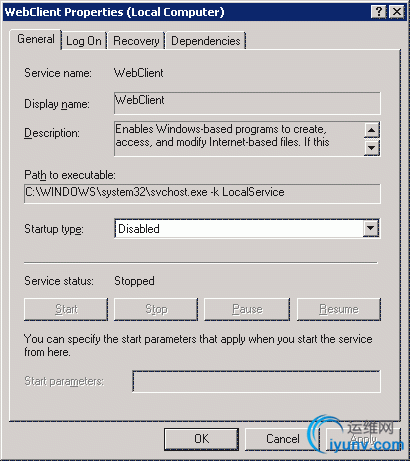
Change the Startup Type to Automatic, then click the Start button to get the service running. You’re ready to start publishing content to your web server.
Tip:
WebDAV is also supported by Windows 2000 with Internet Explorer 5 or higher installed, and it’s also supported by Office 2000 or later. Some of these earlier platforms don’t fully support every feature of WebDAV that Windows Server 2003 and Windows XP support however.
Preparing the Web Server for Publishing
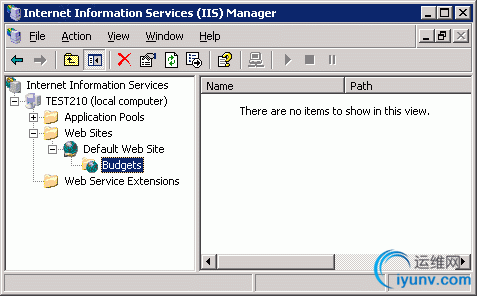
Now let’s do a bit more preparation of our web server to get it ready for publishing content from the client. First, we’ll create a new virtual directory where we’ll be putting our content. I created a local virtual directory named Budgets, which is an alias to the C:\Finance directory on the web server:
Tip:
To learn how to create and configure virtual directories on an IIS web server, see my earlier article called Creating and Configuring Web Sites in Windows Server 2003 here on WindowsNetworking.com.
Now let’s configure the web permissions for this virtual directory so users can publish content. This is done on the Virtual Directory tab of the Properties sheet for the virtual directory:

As you can see from the figure, by default only Read permission is enabled for the virtual directory. This won’t do as it means users will be able to read content in the directory but not upload or edit content. To publish content using WebDAV, you should enable the following web permissions on the directory:
- Read - lets users read what has been published to the server
- Write - lets users upload new content to the server and edit existing content on the server
- Directory listing - lets users view a list of published files on the server so they can select the one they want to view or edit.
Note that enabling Write permission on the virtual directory can constitute a security hole on your web server, as the Write web permission allows anyone to upload content to your server. It’s therefore extremely important that you complete the next and final step of the procedure, namely, configure NTFS permissions on your web server to restrict who has access to the content directory. To do this, open Windows Explorer, open the Properties sheet for your content directory (C:\Finance) and select the Security tab:
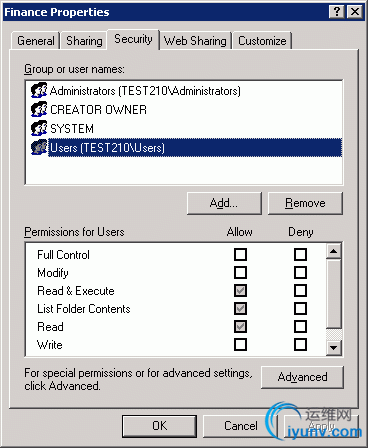
Note that the Users group has Read, Read & Execute, and List Folder Contents permissions. These are necessary for WebDAV users to be able to write and modify content on the web server. There are also two additional special permissions that the Users group has:
- Create Files / Write Data
- Create Folders / Append Data
These permissions too are necessary for WebDAV publishing, so don’t change them.
Since the Users group here is a local group (the web server is a member server that belongs to a domain) its membership includes the Domain Users group, so this means any user in the domain is authorized to publish content to your server using WebDAV. If this is not what you want, then remove the ACE for the Users group from the ACL for your content directory in the figure above and add a different group whose membership contains only those users who are allowed to publish, then give this new group the same permissions that Users has above.
One more tip about permissions:
If your web server is a public-facing one (residing on your DMZ) on the Internet, you should add the Internet guest account (IUSR_servername) to the ACL for your content directory and assign this group Deny Write permission. That way, anonymous users on the Internet will be able to read the content in the directory but won’t be able to modify it.
Publishing Content Using WebDAV
Let’s try out our setup and see if it works. On an XP client machine I have a directory named C:\Stuff with four HTML files in it:
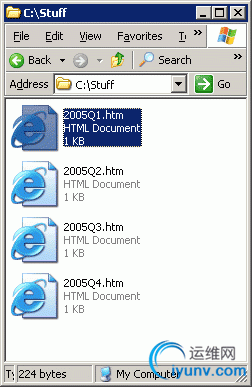
To publish these files to my web server, I select File | Open in Internet Explorer on the client and enter the URL to the virtual directory, which is http://server/Budgets where “server” can be the name, IP address, or DNS name of my web server. The key here is to select the checkbox labeled “Open as Web Folder” as this will enable me to use WebDAV for publishing to the target folder on the server:
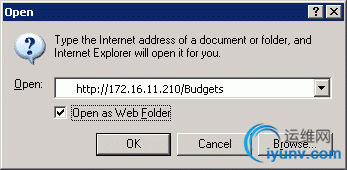
Once the web folder opens on the remote server, it looks like this:
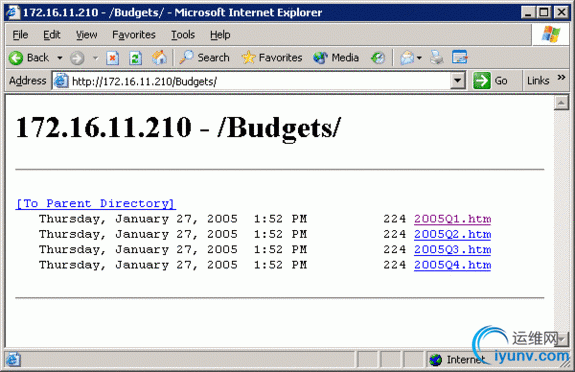
Now I simply select the four HTML files in my C:\Stuff window and drag them into my open Web Folder, and WebDAV does its magic. To verify that the files have been published, I can open the same URL http://server/Budgets again in Internet Explorer but this time as a normal web site (i.e. do not select the “Open as Web Folder” option). Here is the result:

A final tip:
if I need to open this Web Folder often to publish content, I can use Add Network Place in My Network Places to create a shortcut to the http://server/Budgets web folder, then simply copy files from my local Stuff folder to the web folder on the remote machine. If you try this you’ll see that you can even use Notepad open and edit the published pages directly on the web server.
About Mitch Tulloch
Mitch Tulloch is a writer, trainer and consultant specializing in Windows server operating systems, IIS administration, network troubleshooting, and security. He is the author of 15 books including the Microsoft Encyclopedia of Networking (Microsoft Press), the Microsoft Encyclopedia of Security (Microsoft Press), Windows Server Hacks (O'Reilly), Windows Server 2003 in a Nutshell (O'Reilly), Windows 2000 Administration in a Nutshell (O'Reilly), and IIS 6 Administration (Osborne/McGraw-Hill). Mitch is based in Winnipeg, Canada, and you can find more information about his books at his website www.mtit.com
Click here for Mitch Tulloch's section. |
|