|
|
https://communities.intel.com/thread/20667?start=15&tstart=0
This is actually a dirty trick by Intel; someone has decided they don't want us installing server operating systems on desktop motherboards.
There is however a very easy fix for this; all Intel have done is add a few comments to the driver .inf to stop server operating systems picking up desktop motherboard ethernet controllers.
First thing to do is download http://downloadmirror.intel.com/20074/eng/V16_3_CD.zip which
is the full driver set for all Intel ethernet controllers; extract this to a handy location.
Once done navigate to the PRO1000 folder; depending on whether you have a 32bit or 64bit OS you will then want either Win32 or Winx64(not Win64 which is for Itanium).
The choice for the next folder will depend on your OS; NDIS5x is Server2003 or XP, NDIS61 is Server2008 or Vista, NDIS62 is Server2008R2 or 7
In either case once you have chosen the correct folder you need to find the .inf starting e1c ; so for Server2008 64bit it will be called e1c60x64.inf
The part we need to change is below:
; e1c51x64.INF (Intel 64 bit extension Platform Only,
; Windows XP 64 bit extension and Windows Server 2003 64 bit extension)
;
; Intel(R) Gigabit Network connections
;******************************************************************************
;
[Version]
Signature = "$Windows NT$"
Class = Net
ClassGUID = {4d36e972-e325-11ce-bfc1-08002be10318}
Provider = %Intel%
CatalogFile = e1c51x64.cat
DriverVer = 05/04/2011,11.12.36.0
[Manufacturer]
%Intel% = Intel, NTamd64.5.2, NTamd64.5.2.1, NTamd64.6.0
[ControlFlags]
ExcludeFromSelect = \
PCI\VEN_8086&DEV_1502,\
PCI\VEN_8086&DEV_1503
[Intel]
[Intel.NTamd64.5.2]
; DisplayName Section DeviceID
; ----------- ------- --------
%E1502NC.DeviceDesc% = E1502, PCI\VEN_8086&DEV_1502
%E1502NC.DeviceDesc% = E1502, PCI\VEN_8086&DEV_1502&SUBSYS_00011179
[Intel.NTamd64.5.2.1]
; DisplayName Section DeviceID
; ----------- ------- --------
%E1502NC.DeviceDesc% = E1502, PCI\VEN_8086&DEV_1502
%E1502NC.DeviceDesc% = E1502, PCI\VEN_8086&DEV_1502&SUBSYS_00011179
%E1503NC.DeviceDesc% = E1503, PCI\VEN_8086&DEV_1503
%E1503NC.DeviceDesc% = E1503, PCI\VEN_8086&DEV_1503&SUBSYS_00011179
What needs changing first is the [ControlFlags] section, I remove all 3 lines but leave the section header so all it should say is [ControlFlags] and then go on to the [Intel] section.
Next look at the [Intel] section, the [Intel.NTamd64.5.2] relates to Server 2008 and the [Intel.NTamd64.5.2.1] section to Vista; you can see that the E1503 lines are missing from the server section, simply copy/paste those two lines, you should end up with
and [Intel] section looking like:
[Intel]
[Intel.NTamd64.5.2]
; DisplayName Section DeviceID
; ----------- ------- --------
%E1502NC.DeviceDesc% = E1502, PCI\VEN_8086&DEV_1502
%E1502NC.DeviceDesc% = E1502, PCI\VEN_8086&DEV_1502&SUBSYS_00011179
%E1503NC.DeviceDesc% = E1503, PCI\VEN_8086&DEV_1503
%E1503NC.DeviceDesc% = E1503, PCI\VEN_8086&DEV_1503&SUBSYS_00011179
[Intel.NTamd64.5.2.1]
; DisplayName Section DeviceID
; ----------- ------- --------
%E1502NC.DeviceDesc% = E1502, PCI\VEN_8086&DEV_1502
%E1502NC.DeviceDesc% = E1502, PCI\VEN_8086&DEV_1502&SUBSYS_00011179
%E1503NC.DeviceDesc% = E1503, PCI\VEN_8086&DEV_1503
%E1503NC.DeviceDesc% = E1503, PCI\VEN_8086&DEV_1503&SUBSYS_00011179
Save the inf file and you should then find the driver will install perfectly.
Hope this helps
Simon
http://homeservershow.com/forums/index.php?/topic/4025-intel-82579v-nic-on-ga-z77x-ud5h-and-other-motherboards-with-server-oss/
Solution to installing Intel NIC Drivers for the Intel 82579V 2nd NIC
on the GA-Z77X-UD5H
I have discovered that any of the new motherboards with an Intel 82579V NIC – a fairly common situation
– will experience this same problem with all server variants of Server 2008-R2. That’s why I thought I should post this solution – additionally, I know at least a couple of people are looking at the Z77X-UD5H whose 2nd NIC
is the Intel 82579V.
The GA-Z77X-UD5H is looking to be a very nice motherboard to work with as a base to my current build
of a virtual server. I’ll be writing more on this build later.
I updated my BIOS to the most current build – F7.
Loading Windows Server 2008-R2 SP1 went smoothly until I attempted to load the Gigabyte Drivers Disk.
It would not auto-load under 2008-R2 so I began to load the driver individually from the disk but changed over to downloads from Gigabytes website to be sure that I had the newest drivers.
I installed:
Atheros LAN driver 2.0.4.4 8/24/2011 – (for my 1st NIC
on the Motherboard – an Atheros AR8151)
Intel Rapid Storage Technology 11.0.0.1032 3/6/2012 – (for disk acceleration of my VHD drive)
Intel management Engine Interface 8.0.0.1351 3/21/2012
Intel INF installation 9.3.0.1019 3/6/2012
Intel VGA Driver 15.26.1.64.2618 3/6/2012
Realtek Audio Driver 5.10.0.6554 3/6/2012
I then attempted to load the Intel LAN Driver 16.5 11/14/2011 which is the driver for the Intel 82579V
2nd NIC
on the Motherboard.
With the 82579V I got a failed installation that told me: “Cannot install drivers. No Intel® Adapters
are present in this computer.”
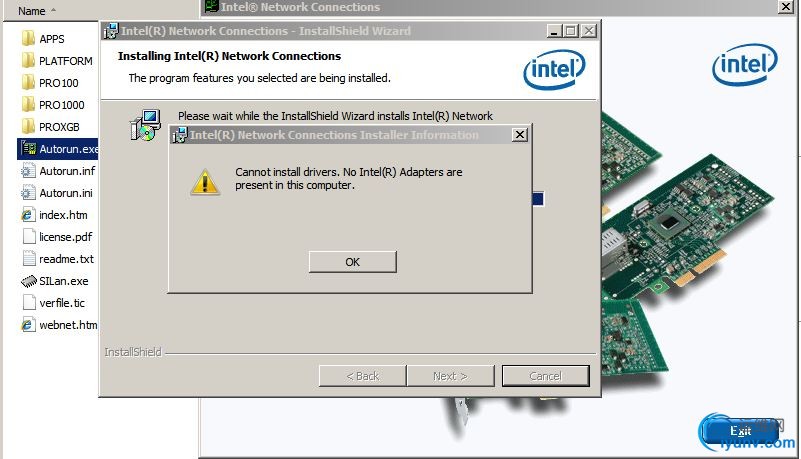
That was a problem for me since I was planning to use the 2nd NIC
on the Motherboard for my Hyper-V machines. I posted an error report on Gigabytes Technical Board several days ago and am awaiting a reply.
In the interim I did a search of Intel’s Communities and found two thread’s on the Intel 82579V here and here.
An explanation and simple solution to the problem was provided by “Simon Wright” on the 2nd page
of the 2nd tread here.
A similar solution is provided by Renethx here for
installing drivers for the Intel 82579V in WHS 2011.
Intel had added code to the driver .inf file to stop server operating systems from picking up desktop
motherboard ethernet controllers like the 82579V.
From Renethx I learned:
- NTamd64.6.1.1 = WINDOWS 7 for 64-bit EXTENDED PLATFORMS
- NTamd64.6.1 = WINDOWS Server 2008 R2 for 64-bit EXTENDED PLATFORMS (This would
also concern all server variants of WINDOWS Server 2008 R2 such as WHS 2011.)
- E1502 = Intel® 82579LM Gigabit Network Connection
- E1503 = Intel® 82579V Gigabit Network Connection (We are concerned with this.)
After reading through Simon’s explanation I did the following for my Server 2008-R2 SP1 installation
of the drivers for the Intel 82579V NIC.
- I went to the directory that I had downloaded from Gigabyte’s website the Window 7-64b drivers for the Intel 82579V NIC version 16.5 and dated 11/14/2011 which has the fine name mb_driver_lan_intel_v16.5.exe.
- Double click the file mb_driver_lan_intel_v16.5.exe to extract the drivers and associated files – I extracted them to a sub folder I named Intel_Mod.
- Open folder Intel_Mod
- Open folder Pro1000
- Open folder Winx64
- Open folder NDIS62
- Open file e1c62x64.inf with Notepad (interestingly when you open it you will see that the file e1c62x64.inf is commented
at the beginning that it is for Windows 7 and Windows Server 2008-R2)
- The first thing you will need to change in the .inf file is the [ControlFlags] section – I deleted all 3 lines of that section following the section header so that all was
left was the section header [ControlFlags] – I left a blank line after [ControlFlags] which then leaves the [Intel] section next.
- At the [Intel] section, the [Intel.NTamd64.6.1] relates to Server 2008R2 and the [Intel.NTamd64.6.1.1] relates to Windows
7; you can see that the three E1503 lines in the Windows 7 section are missing from the server section, I copied/pasted those three lines from the Windows 7 section to the bottom of the 2008R2 section.
This is what e1c62x64.inf looked
like before I made any changes:
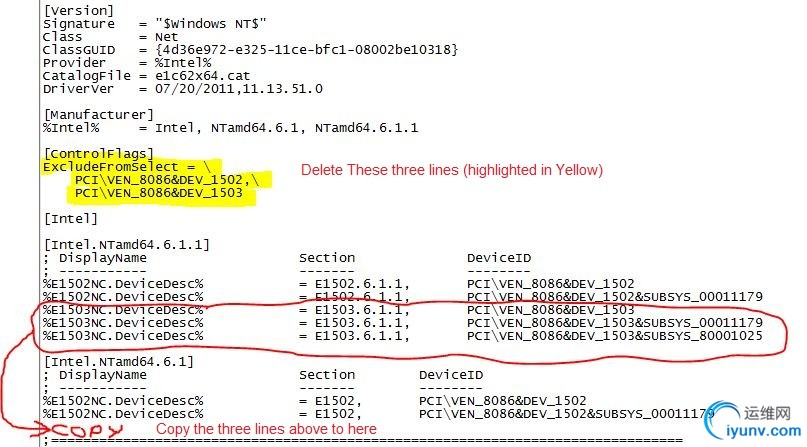
This is what e1c62x64.inf looked
like after I made my changes:
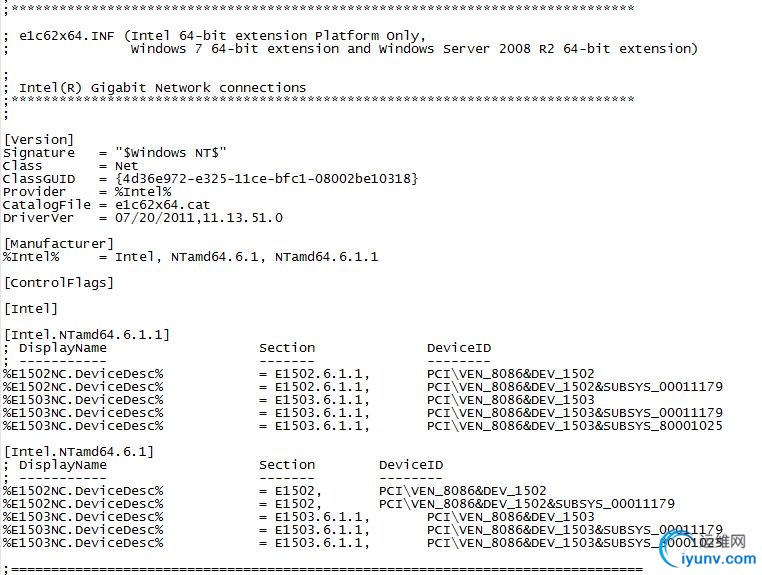
I then saved the e1c62x64.inf file
and then backed out of folders until I was in the sub-folder Intel_Mod where I double clicked Autorun.exe to
install the drivers for the Intel 82579V.
Driver installation went very well and ended successfully.
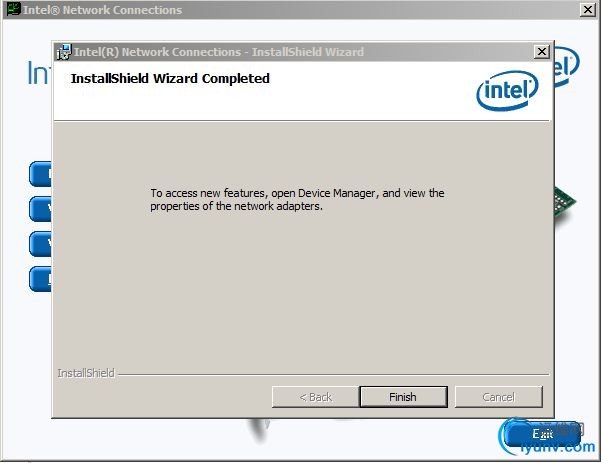
This solved my issue of being to use my 2nd NIC on my Z77 for my Hyper-V server.
======================
The only issue remaining with my Z77 is the installation of the Intel USB 3.0 Extensible Host Controller
Driver. The driver will only install if the OS on the Z77 is Windows 7 -- according to Intel this applies to ALL Z77's. Guess it's back to looking thru it's inf files -- though I did read about a user with an Asus Z77 who was able to manually force the Intel
USB 3.0 drivers to load for his Server 2011 build.
http://www.ivobeerens.nl/2012/08/08/enable-the-intel-82579v-nic-in-windows-server-2012/
Enable the Intel 82579V NIC in Windows Server 2012
Published 08/08/2012 | By Ivo
Beerens
After installing Windows Server 2012 on my homebrew server, the onboard Intel 82579V Gigabit NIC on the Asus P9X79 motherboard was not working. On the Asus site I found Windows 8 Intel drivers for the motherboard. After installing the drivers the NIC was still
not working. To get the Intel 82579V NIC working in Windows Server 2012, I used the this forum
thread as reference for this blog post.
Here are the steps:
To be able to modify the drivers you need to run the the following commands:
bcdedit -set loadoptions DISABLE_INTEGRITY_CHECKS
bcdedit -set TESTSIGNING ON
Reboot
Download the Intel drivers. In my case I used the Intel drivers Asus has available for the Asus P9X79 motherboard
Save them to a map and extract them if needed
Open the folder PRO1000
Open the folder Winx64
Open the folder NDIS63
Open the e1c63x64.inf file, I used Notepad++ to edit the file
In the [ControlFlags] section delete the 3 lines (1)
Select and copy the five %E1503 lines (2)
Paste the 5 lines in the [Intel.NTamd64.6.2] section below the %1502NC lines
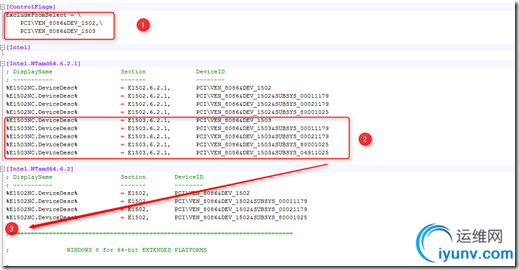
After the modifications the e1c63x64.inf file must look like this:
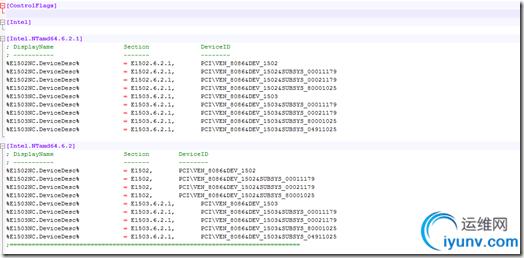
Save the file
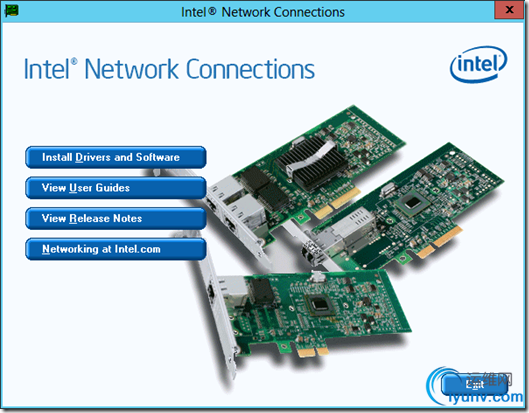
Install the Intel drivers
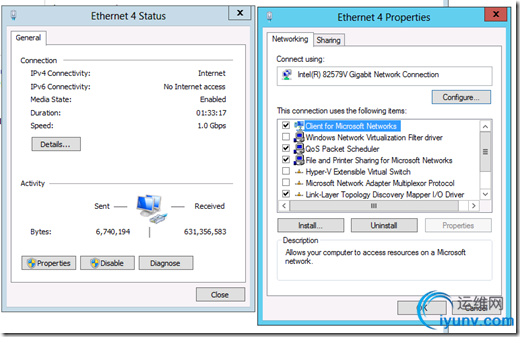
After the installation the Intel 82579V Gigabit NIC is recognized and enabled
Enable the driver integrity checks and disable test signing again by using the following commands:
bcdedit -set loadoptions ENABLE_INTEGRITY_CHECKS
bcdedit -set TESTSIGNING OFF
Now you can use the Intel 82579V Gigabit NIC in Windows Server 2012.
|
|