|
|
原文链接
http://blogs.msdn.com/b/powlo/archive/2007/02/25/displaying-custom-data-through-sharepoint-lists-using-spgridview-and-spmenufield.aspx
Paul Robinson
25 Feb 2007 5:30 PM
Part 1: Using SPGridview, adding menus, grouping and sorting
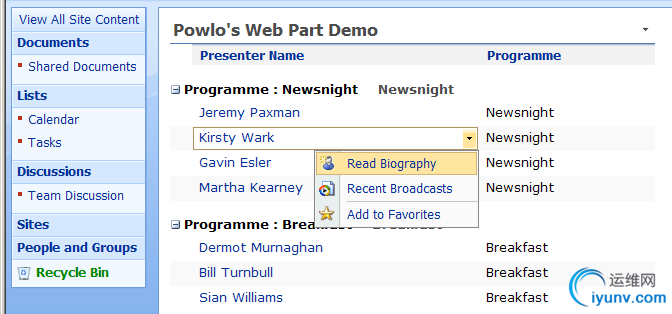
Click along to build this lovely Web Part, taking data directly from a standard .NET DataSet:

SharePoint lists and libraries are great for storing almost everything, but what about if you need to display structured lists in SharePoint where the data is stored elsewhere? If you use Office SharePoint Server (MOSS), one great feature for this purpose is the Business Data Catalogue. However, if you only have Windows SharePoint Services (WSS), or need to dynamically construct data, chances are you'll end up needing to write a Web Part.
Web Parts give you some standard look and feel elements for free, like the ‘crome' or border, plus an ability to add your own properties to the properties grid. After that, you're pretty much on your own. Wouldn't it be nice if you could display your own data in a sexy SharePoint list?
SharePoint uses the Microsoft.SharePoint.WebControls.SPGridView control to display its own lists. This class inherits from System.Web.UI.WebControls.GridView, so the development experience to bind data, adjust columns, perform sorting etc is similar. The key difference is the control renders the grid in the SharePoint style - perfect.
Create a Web Part
Any blank Web Part will do - you could use the template provided by Visual Studio if you have the SharePoint SDK installed. My web part started out life like this:
using System;
using System.Runtime.InteropServices;
using System.Web.UI;
using System.Web.UI.WebControls;
using System.Web.UI.WebControls.WebParts;
using System.Xml.Serialization;
using System.Data;
using Microsoft.SharePoint;
using Microsoft.SharePoint.WebControls;
using Microsoft.SharePoint.WebPartPages;
namespace ListMenuSample
{
public class ListMenuSample : System.Web.UI.WebControls.WebParts.WebPart
{
private SPGridView oGrid;
private TVData oDataset;
private DataView oView;
private void PopulateDataset()
{
// TODO
}
protected override void CreateChildControls()
{
// TODO
}
void oGrid_Sorting(object sender, GridViewSortEventArgs e)
{
// TODO
}
}
}
Create the data source
In this example, we'll create and populate a dataset and use it for data binding. I want a list to keep track of who presents my favourite BBC current affairs programmes, so I'll design and populate a DataSet accordingly.
If you want to bind your SPGridView back to SharePoint data, that's simple too, check out this great article from Share This Point.
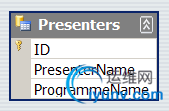
My DataSet, TVProgrammeData has a single table, Presenters, comprising an int and two string columns:

We'll fill the DataTable from code, but obviously you'd want to pull this from somewhere, probably SQL, a filesystem, a web service or XML. Pop this into the PopulateDataset() method.
private void PopulateDataset()
{
oDataset = new TVData();
oDataset.Presenters.AddPresentersRow(1, "Jeremy Paxman", "Newsnight");
oDataset.Presenters.AddPresentersRow(2, "Kirsty Wark", "Newsnight");
oDataset.Presenters.AddPresentersRow(6, "Bill Turnbull", "Breakfast");
oDataset.Presenters.AddPresentersRow(7, "Sian Williams", "Breakfast");
// plus a few more entries
}
Render the Grid
Overriding CreateChildControls() is a good place to create your SPGridView and add it to the controls collection. You'll also need to bind up the columns and specify sorting. To give us magical sorting abilities, we'll bind to a DataView rather than directly back to the DataTable. Pop this into CreateChildControls():
protected override void CreateChildControls()
{
PopulateDataset();
oView = new DataView(oDataset.Presenters);
oGrid = new SPGridView();
oGrid.DataSource = oView;
oGrid.AutoGenerateColumns = false;
oGrid.AllowSorting = true;
oGrid.Sorting += new GridViewSortEventHandler(oGrid_Sorting);
BoundField colName = new BoundField();
colName.DataField = "PresenterName";
colName.HeaderText = "Presenter Name";
colName.SortExpression = "PresenterName";
oGrid.Columns.Add(colName);
// Add the menu control here
BoundField colProgramme = new BoundField();
colProgramme.DataField = "ProgrammeName";
colProgramme.HeaderText = "Programme";
colProgramme.SortExpression = "ProgrammeName";
oGrid.Columns.Add(colProgramme);
Controls.Add(oGrid);
oGrid.DataBind();
base.CreateChildControls();
}
Notice we specify the SortExpression to use, which together with AllowSorting enables users to order the results by clicking the columns headers. We need to perform the sort ourselves though, through the event handler; and we'll need to keep track of the sort direction in ViewState so we can flip it next time the user clicks the same header. I'm not sure my code is very elegant in this area, so leave a comment if you can think of a better way to do it in fewer lines of code.
Add this event handler:
void oGrid_Sorting(object sender, GridViewSortEventArgs e)
{
string lastExpression = "";
if (ViewState["SortExpression"] != null)
lastExpression = ViewState["SortExpression"].ToString();
string lastDirection = "asc";
if (ViewState["SortDirection"] != null)
lastDirection = ViewState["SortDirection"].ToString();
string newDirection = "asc";
if (e.SortExpression == lastExpression)
newDirection = (lastDirection == "asc") ? "desc" : "asc";
ViewState["SortExpression"] = e.SortExpression;
ViewState["SortDirection"] = newDirection;
oView.Sort = e.SortExpression + " " + newDirection;
oGrid.DataBind();
}
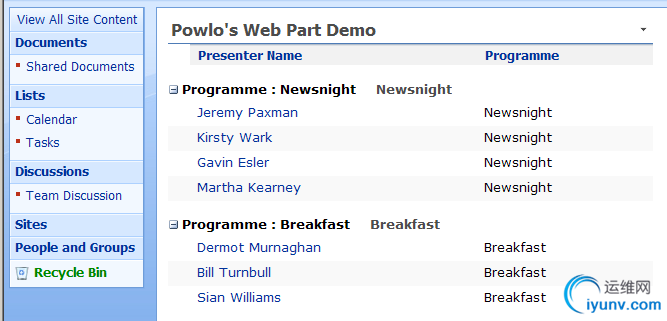
If you build and deploy this web part, you should get something like this (see this post for tips on the debugging process):

That looks alright, and it will adapt correctly if you apply different style sheets, themes or a new master page. But it's still not a very rich interface. How about if you wanted users to edit items, or get more detail. Umm, better add a menu.
Add a menu
It's worth pointing out about now that the documentation around this area is still in production - so I'm coding with a slight emphasis on experimentation for some of the property values - I'll point you to the official source when it's revised.
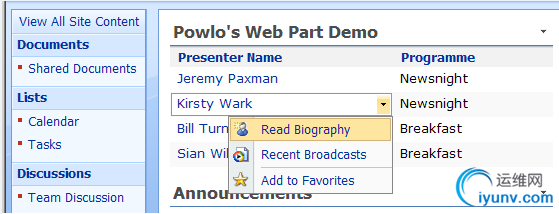
Anyway, SPMenuField is the class we need, and combines the roles of controlling the drop-down menu with the basic display work done by BoundField. Let's replace our boring colName column with a shiny menu that looks like this:

// Replace the Name coloumn with a shiny menu
colName.Visible = false; // You could remove colName completely
SPMenuField colMenu = new SPMenuField();
colMenu.HeaderText = "Presenter Name";
colMenu.TextFields = "PresenterName";
colMenu.MenuTemplateId = "PresenterListMenu";
colMenu.NavigateUrlFields = "ID,PresenterName";
colMenu.NavigateUrlFormat = "do.aspx?p={0}&q={1}";
colMenu.TokenNameAndValueFields = "EDIT=ID,NAME=PresenterName";
colMenu.SortExpression = "PresenterName";
MenuTemplate presenterListMenu = new MenuTemplate();
presenterListMenu.ID = "PresenterListMenu";
MenuItemTemplate biogMenu = new MenuItemTemplate(
"Read Biography", "/_layouts/images/EawfNewUser.gif");
biogMenu.ClientOnClickNavigateUrl = "do.aspx?this=%EDIT%&that=%NAME%";
//entry.ClientOnClickScript = "your javascript here";
presenterListMenu.Controls.Add(biogMenu);
MenuItemTemplate broadcastMenu = new MenuItemTemplate(
"Recent Broadcasts", "/_layouts/images/ICWM.gif");
presenterListMenu.Controls.Add(broadcastMenu);
MenuSeparatorTemplate sepMenu = new MenuSeparatorTemplate();
presenterListMenu.Controls.Add(sepMenu);
MenuItemTemplate favMenu = new MenuItemTemplate(
"Add to Favorites", "/_layouts/images/addtofavorites.gif");
presenterListMenu.Controls.Add(favMenu);
this.Controls.Add(presenterListMenu);
oGrid.Columns.Add(colMenu);
Tip: You can have a poke around the standard icon collection and pick some suitable images from C:\Program Files\Common Files\Microsoft Shared\web server extensions\12\TEMPLATE\IMAGES
SPMenuField serves two purposes - it configures the hyperlink you follow if you click on the item directly and, optionally, links to a snazzy dropdown menu.
This great post at SharePoint Solution Blog gives a good overview of how to extend the Admin interface with custom menus. However, the difference with custom menus on list items is that you're not creating one - you're creating one for each list item, and your menu handling routine needs to know which item you clicked in.
Fortunately, there are a few ways to achieve with. First we setup colMenu to pass in the required parameters when you click on the main item hyperlink:

Here, NavigateUrlFields is a comma-separated list of data bound items we want to use in the URL. Then we replace placeholders starting at {0} with the items in sequence.

Next, we need to decide how to respond to clicks on the drop-down menu. We have two options here - build a click URL similar to the one above, or use our own javascript. We might have a third option to do a sexy postback to an event in the code behind, but I can't decipher exactly how to use that yet - keep tuned.
The URL way uses a modification in syntax but essentially the same principle as above. This time we name the data fields we want and then consume them within % signs on the menu items:

Let's finish off for now by adding some grouping (and a few more presenters):
oGrid.AllowGrouping = true;
oGrid.AllowGroupCollapse = true;
oGrid.GroupField = "ProgrammeName";
oGrid.GroupDescriptionField = "ProgrammeName";
oGrid.GroupFieldDisplayName = "Programme";

|
|