Fixing Debian virtual machines after migration
After import: Debian boots, detects new hardware, and installs new device drivers.
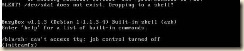
The boot sequence fails at the following error: ALERT! /dev/sda1 does not exist. Dropping to a shell!
This is because the source host (ESX server) presents boot devices as SCSI bus devices by default and the paths have been set within the installation of Debian. To fix the Debian boot loader:
The Grub boot loader has dropped you into the BusyBox recovery shell. At a command prompt under initramfs.
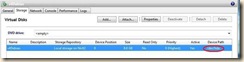
Begin by looking at the Storage tab in XenCenter and note the presentation (device path) of the virtual disk. This describes the bus that is used to present the virtual disk to the virtual machine. This information does not appear for all virtual machines, but in this case it is available so I will use it to save time attempting to discover the interface and volumes.
This shows that the virtual disk is on /dev/hda – this represents the first IDE interface.
I will begin by returning to the virtual machine console and listing the IDE devices. cd /dev ls hd*
Five IDE devices have been identified.
· /hda represents the disk in position 0 IDE controller 0
· /hda1 represents the first partition of the disk /hda
I am going to make an assumption that my Debian installation is on the first partition of the IDE interface. Please note that some Linux installations place the swap on first volume, so some repetition of the follow steps might be necessary to discover the proper volume.
At the command prompt I am going to mount the partition as /root.
This is safe in this case because /root was not loaded as noted by the Alert! message identifying the missing boot device. mount -t ext3 /dev/hda1 /root
Now that the file system is mounted under /root I will verify that it appears to be my Linux installation cd /root ls
Listing the contents I see \boot, \root, \etc, \bin, and so forth. All of these are directories that I expect to find at the root of a Linux installation.
I will first fix the device descriptor file /etc/fstab.
· Change to the /root/etc directory
· Open fstab in an editor cd /root/etc vi fstab
Note the entries that point to /dev/sda; these are the entries that we will be changing to /dev/hda since a SCSI disk controller is no longer available.
Modify the /sda entries and save the file. 把所有的sda改为hda
Similar steps need to be repeated for the Grub boot loader and the device map.
Change to the /grub folder. cd /root/boot/grup
Open the menu.lst file in an editor. *Note: This file name is menu.Lst not menu.1st
Near the end of the file are the entries that we are concerned with.
Find the boot menu options that point to the /sda device. vi menu.Lst
Change the entries to /hda. Then save the file.
The virtual machine is now ready for reboot.
Simply enter ‘reboot’ at the command prompt.
During reboot, you may notice that the boot hangs after detecting the USB Tablet device. Select <Enter> to accept the default identified mouse device.
Previously under VMware, my Debian virtual machine was running X server for a graphical desktop.
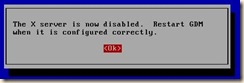
As with RedHat an error that X server failed to start. After selecting No to bypass the detailed troubleshooting screens a dialog is presented that the X server has been disabled.
After selecting OK you are presented with a logon prompt. To repair the X server:
To reconfigure the X server two methods can be used:
1) Edit the file /etc/X11/xorg.conf directly
2) Allow automated reconfiguration and accept the identified devices.
To run the automated reconfiguration:
Login as root and then execute reconfiguration for the xserver package.
Step through the wizard and accept the automatically detected defaults.
When the wizard completes start xserver by entering startx or reboot the virtual machine.
 QQ群⑧:
QQ群⑧:


 窥视卡
窥视卡 雷达卡
雷达卡 发表于 2018-5-15 09:15:08
 cd /dev ls hd*
 mount -t ext3 /dev/hda1 /root
 cd /root ls
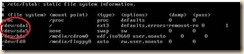 cd /root/etc vi fstab
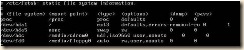 把所有的sda改为hda
 cd /root/boot/grup
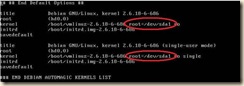 vi menu.Lst

 提升卡
提升卡 置顶卡
置顶卡 沉默卡
沉默卡 喧嚣卡
喧嚣卡 变色卡
变色卡 千斤顶
千斤顶 显身卡
显身卡