|
|
If you want to build a *** to transfer files securely to and from your server and a remote location and you want to use Windows Server 2012, then an SSL oriented *** will be method of choice. SSL is the same technology your bank, Amazon, and the rest of the world uses to keep communication over the internet private. SSL uses encryption technology.Basic information about SSL is available here.
SSL can be used for other forms of secure file transfer in the Windows world, such as WebDAV, but this article is about using and building a secure type of *** known commonly as SSTP. Windows Server has technology built in that make an SSTP *** relatively simple to build. Windows PC does not include SSTP *** server technology as a part of Windows desktop, but you can make a Windows desktop PC a secure WebDAV server, if you want. Windows desktop can easily be made into an SSTP client that connects to an SSTP server.
You Have Choices
Windows Server 2012 allows you to build an SSTP *** in three different ways. They range from ridiculously simple to simple but slightly tedious. By ‘simple’, I mean simple assuming you feel comfortable with SSL and certificates. Enough information to ground you firmly can be found here,here, here, here, and here. I wish I could say the entire concept was ‘snap the fingers easy,’ but if it were, you wouldn’t be reading this and everyone would already know how to do it.
Regardless of the choices you make on the server, the client PC will connect the same way. There’s only one way to make a network connection to an SSTP *** from a Windows PC.
Port 443 on your router will also need to be forwarded to your *** server. Don’t forget to install your root certificate on all clients and the server.
I’m going to try to describe all three methods here.
Choice 1: Anywhere Access
If you have Windows Server 2012 Essentials, then you can use the Anywhere Access wizard to create a secure SSTP *** along with remote access. Read Windows Server 2012 R2 Essentials Anywhere Access. The Anywhere Access wizard is ridiculously simple to use, although managing SSL certificates may be a little confusing if you’ve never been exposed to them in the past. You don’t need to read any more of this page unless you’re curious.
Choice 2: Using the SSL Certificate Bound to Your Web Server
IIS and the Certificate Signing Request describes how to link an SSL certificate to your Windows Server Internet Information Services (IIS) web site. Afterward, you need to load the Routing and Remote Access role and associate the web site certificate with a field on the Security tab of the serverProperties by selecting it from a drop down box.
Choice 3: Using AD CS to Make Your SSTP Certificate Without Involving IIS In Any Way
This is a traditional way to build an SSTP ***. If you look for YouTube videos on this subject, this technique will be the one most often illustrated. You’ll need to load the Active Directory Certificate Services (AD CS) role and the Certification Authority Web Enrollment feature. Since you’re most likely managing a small, one server environment, you’ll configure AD CS as an Enterprise Root Server. If you’re configuring a multi-server environment with many users in an Active Directory domain, then you need more information than I am providing because AD CS can take on an entirely different scope in that instance. After you use AD CS to build your SSTP certificate, you also modify Routing and Remote Access as described above in Choice 2.
How To Do It
Choice 2 & 3: Modify The User Profile
If you are building your own SSTP *** connection, you need to modify the user profile of every user who will access it. This is the same modification you make for PPTP *** users.
 ____________________
Choice 3 only: Use AD CS to Create and Install SSTP Certificate Without IIS
In spite of the 29 pictures below, this is not hard, just tedious. Afterward, you configure Routing and Remote Access in the next section.
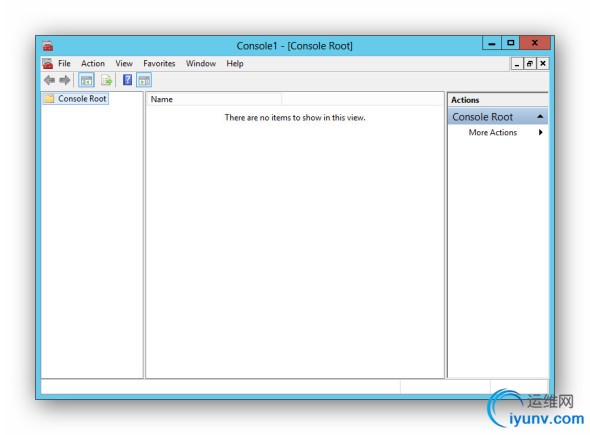
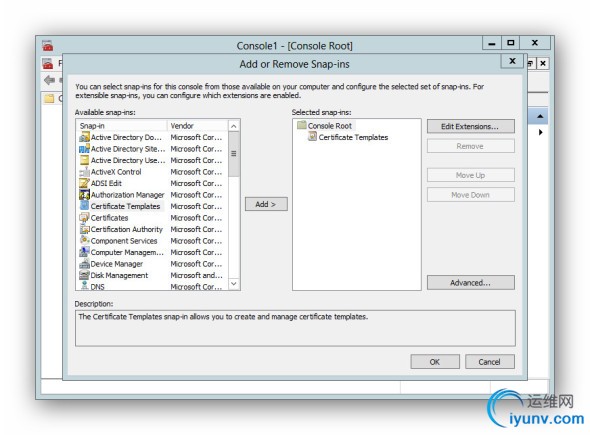
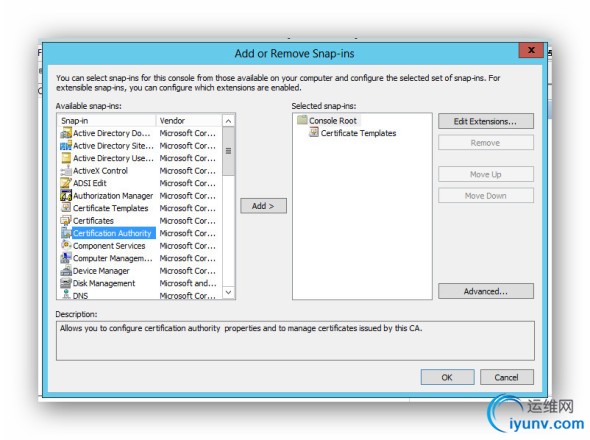
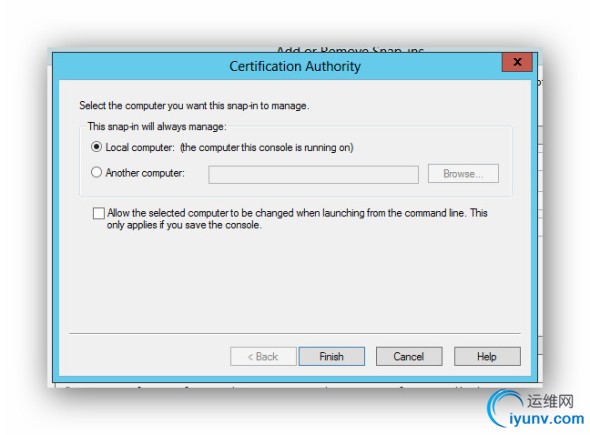
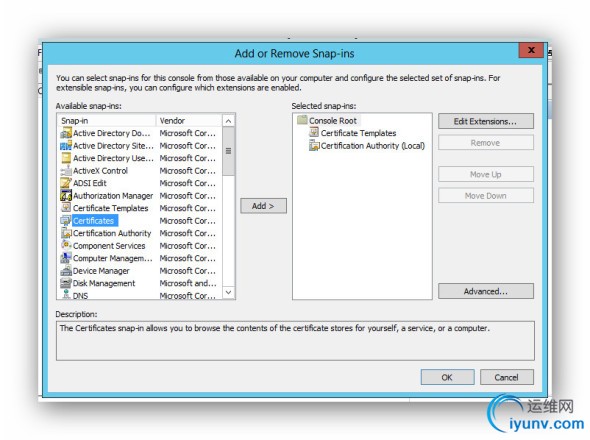
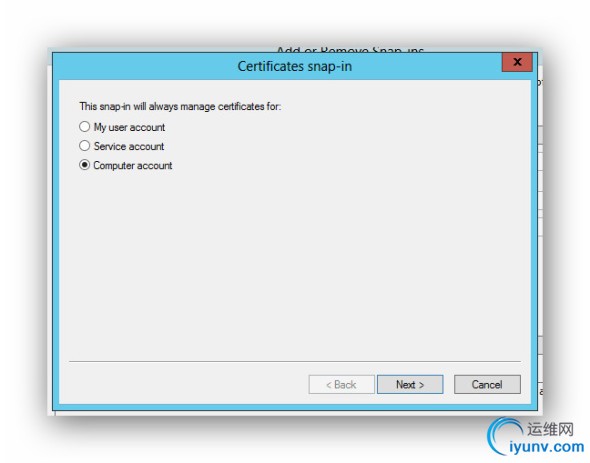
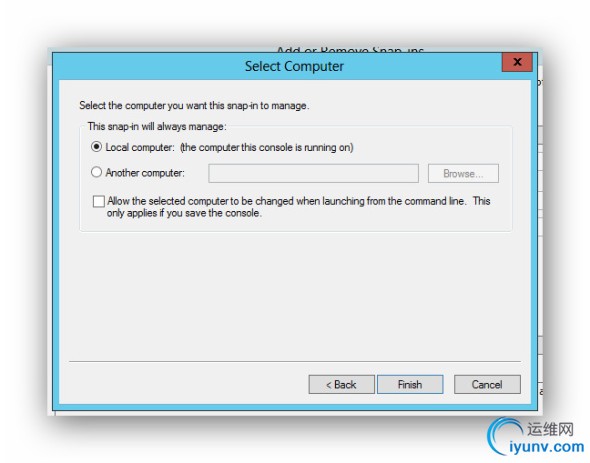
In summary, you first create an MMC console with the Certificate Template, Certificate Authority, andCertificate snap-ins. When given a choice, you add them to the computer account and / or local computer. If you understand that, you’ve eliminated about 1/3 of the pictures.
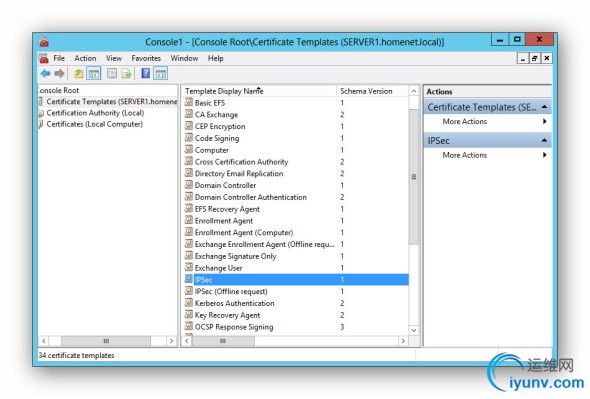
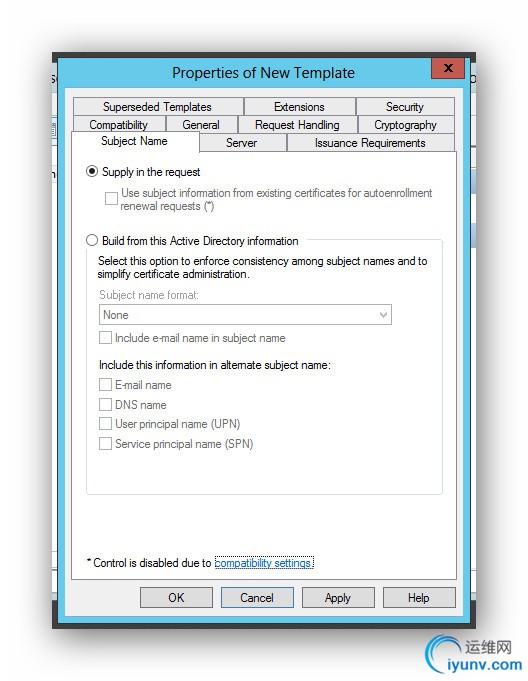
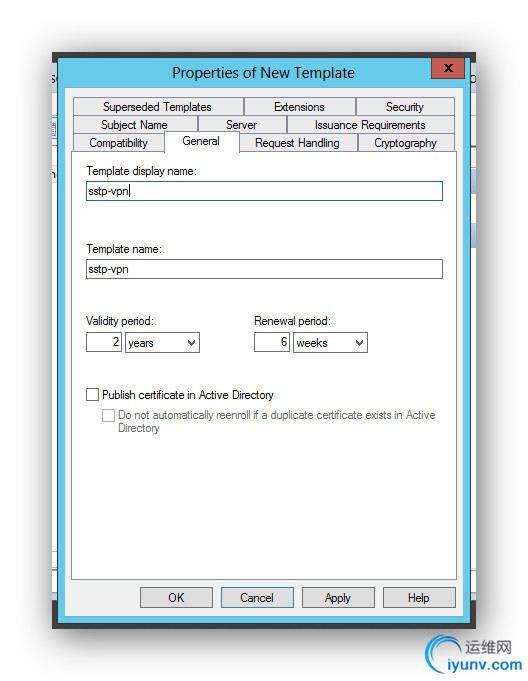
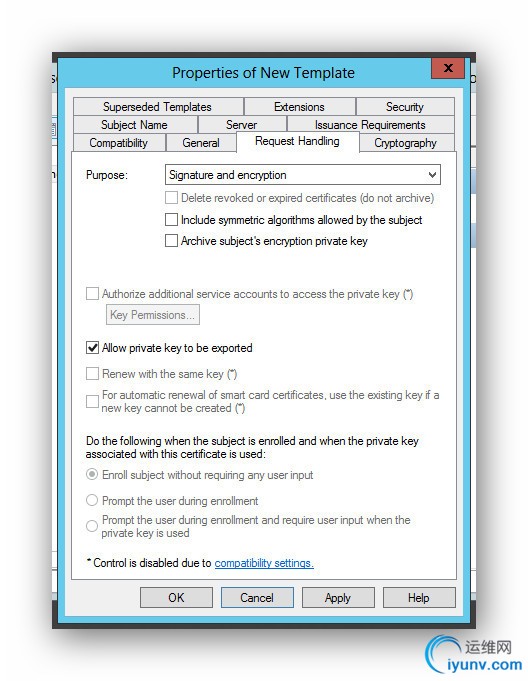
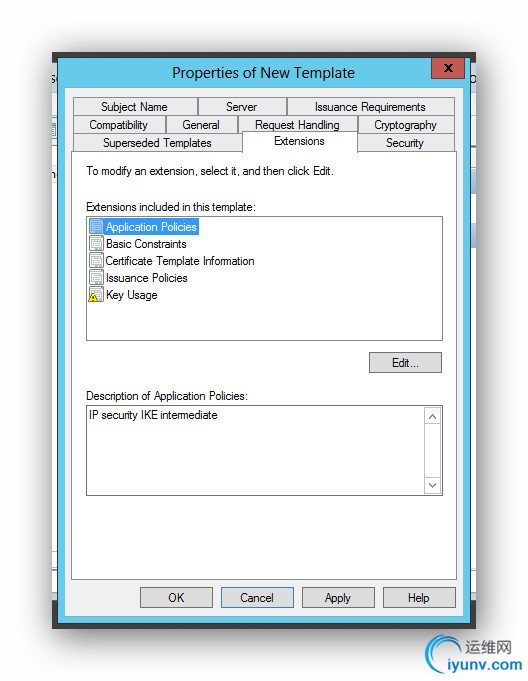
Next you duplicate the IPSec template and give the duplicate specific characteristics by flipping though the tabs.
- Subject Name: Supply in the request
- General: Give the template display name a friendly name
- Request Handling: Allow private key to be exported
- Extensions: Add Server Authentication to Application Policy
Thirdly, you go back to the MMC, select Certificate Authority / Certificate Template, right click, New / Certificate Template To Issue; then select the friendly name you made up in the step above.
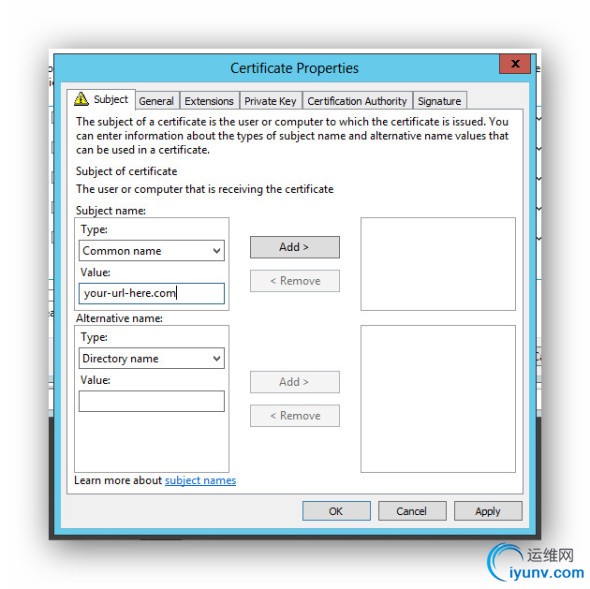
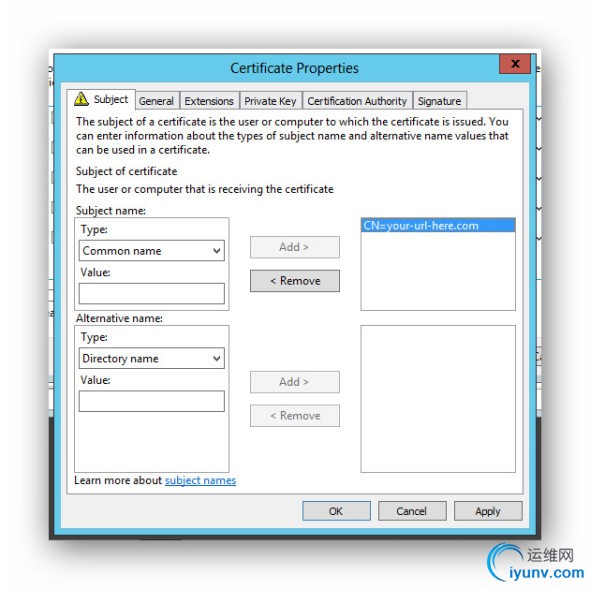
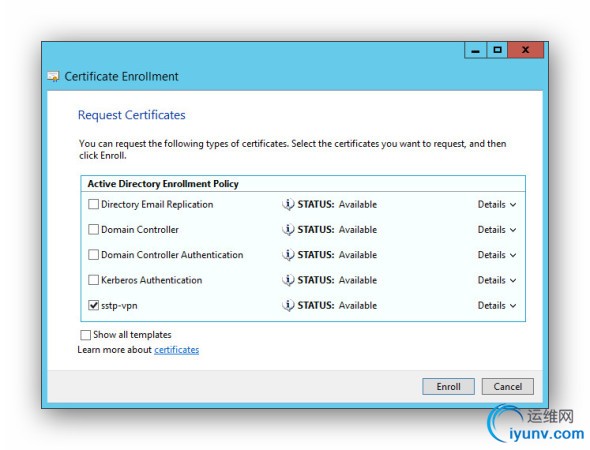
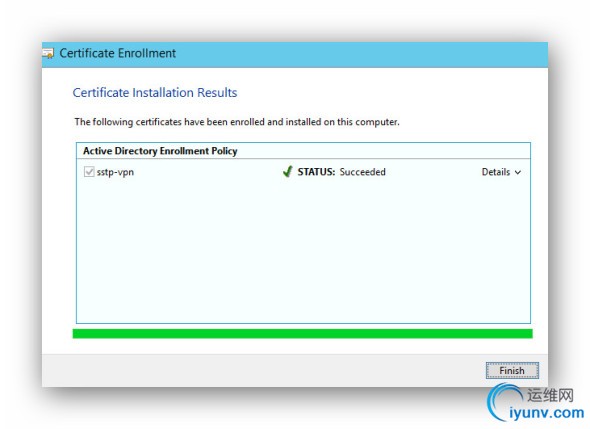
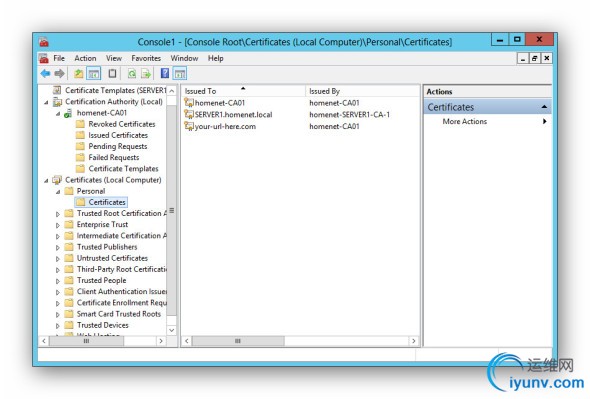
Finally, you go back to the MMC, select the Certificates snap in / Personal / Certificates / right click / All Tasks / Request New Certificate. Click through until you see your friendly name. Underneath you’ll see some blue lines. Click for additional configuration. Add a common name and type your URL in the box underneath. Apply it.
Now you’re ready to configure Routing and Remote Access and link the certificate to your secure ***.
MMC Snap-In Selections:
 ____________________
Duplicate the IPSec Template
In the right, select Certificate Templates. In the center, select IPSec. Right Click. Duplicate Template.
 ###
###
Fill in the following tabs as illustrated below.
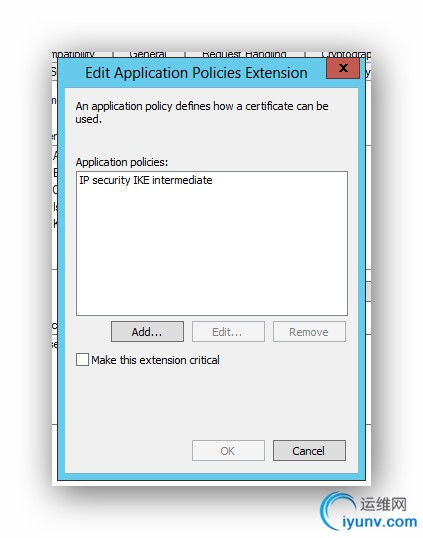
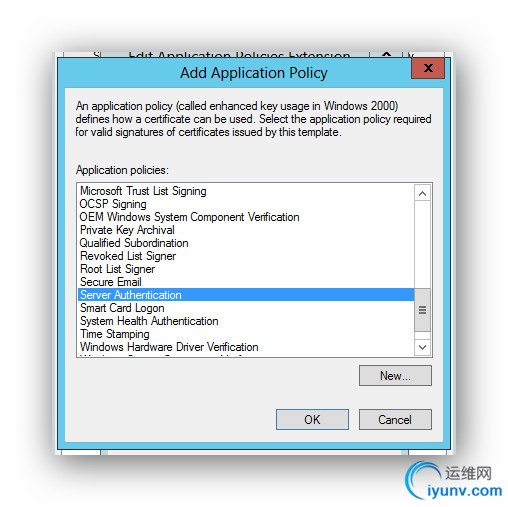
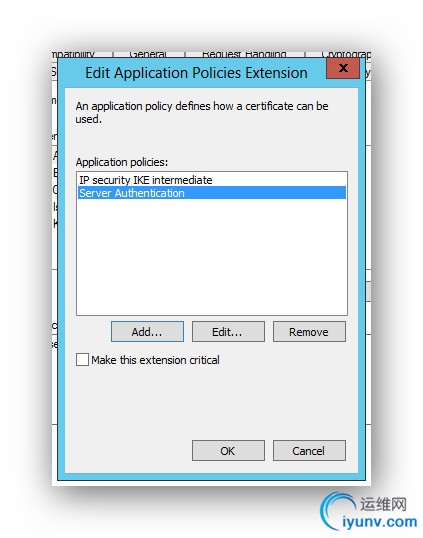
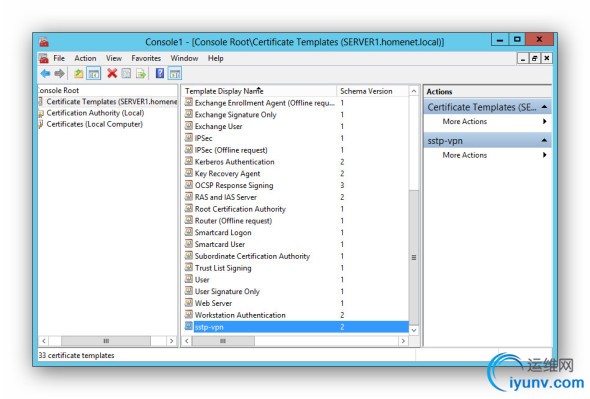 ____________________
Issue the New Template
Return to the MMC and select Certificate Authority. Expand it. Select Certificate Template / Right click / New / Certificate Template to Issue. Select your new template.
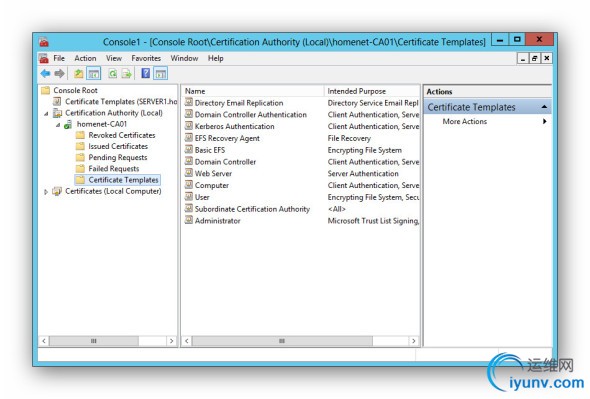
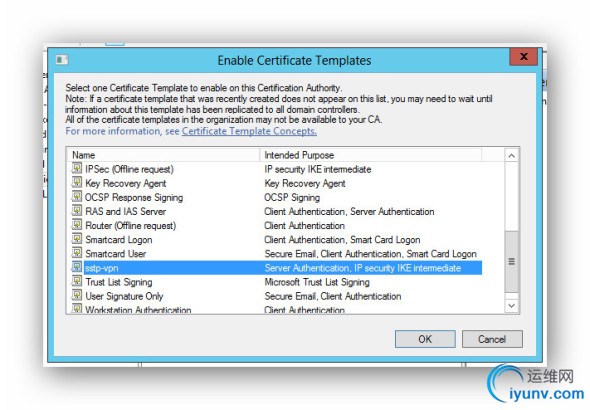
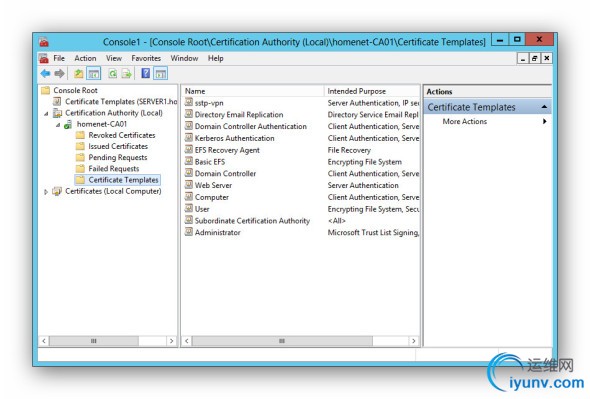 Add the Certificate to the Certificate Store
In these final steps, you go back to the MMC and select the Certificates snap-in. Select Certificates / Personal / Right Click / All Tasks / Request New Certificate. Keep clicking through until you see the screen with your certificate and the blue underlined text. Click on the blue text and configure as illustrated, except use your URL and not the one in the picture.


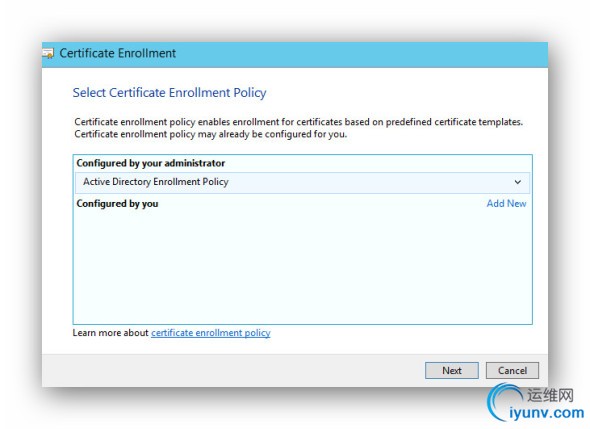

 ____________________
Done. Now for Routing and Remote Access.
Choice 2 and 3: Install and configure Routing and Remote Access
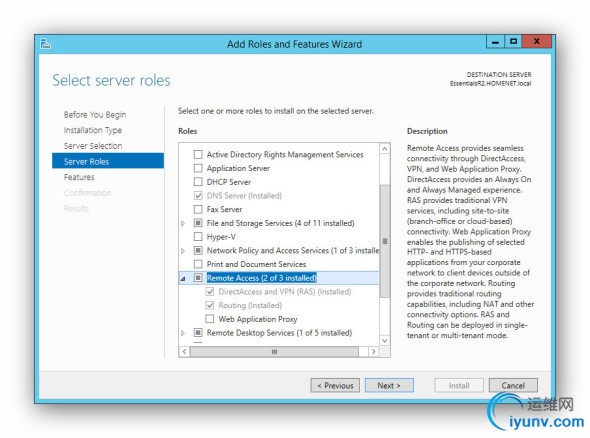
The following images were copied from Windows Server 2012 PPTP *** since, except for the last image, the installations are identical. Once you’ve loaded the Routing and Remote Access role, you could use the following images to configure a *** on Windows Server 2008 R2 if you wanted to.
Install the Routing and Remote Access Role
Configure Routing And Remote Access Services
Right click the selection next to the red mark. Select Configure and Enable Routing and Remote Access. The wizard will nag you about including DirectAccess. Just select *** only. DirectAccess is an always on SSTP ***. The client must be in a domain and running Windows 7 Enterprise or Ultimate or the equivalent Windows 8 version. DirectAccess is more complicated to install than a typical SSTP *** or a secure WebDav Server.

###
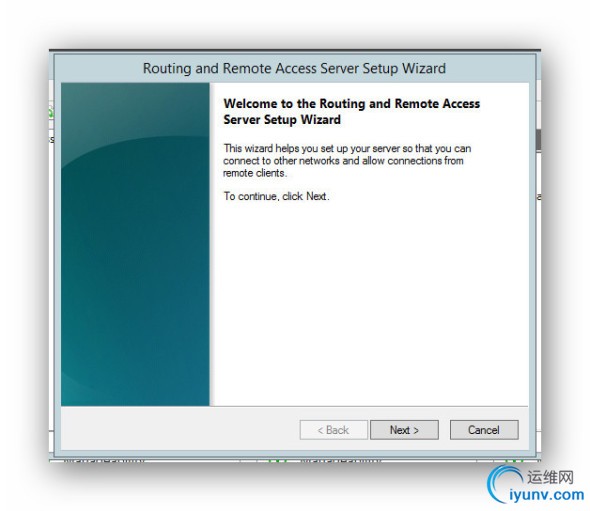
Click Next.
 ###
###
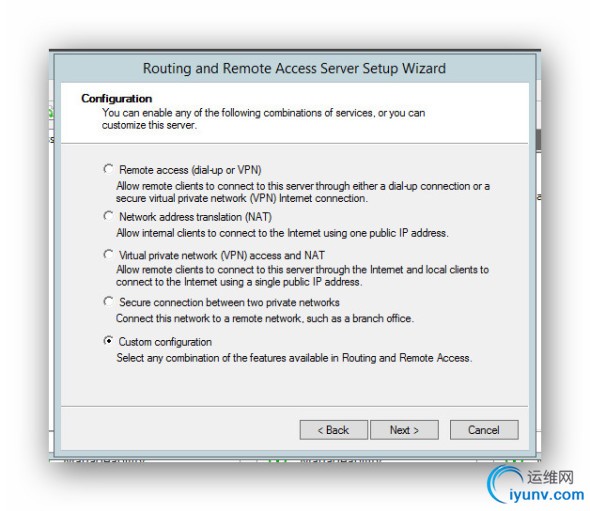
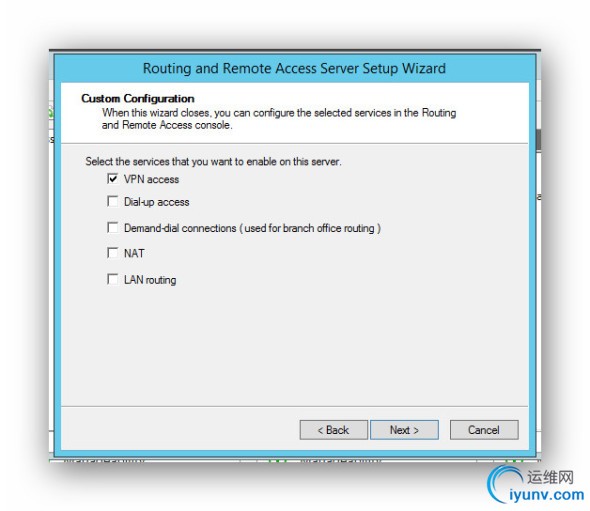
Select Custom Configuration.
 ###
###
Select *** Access
 ###
###
Done.

###
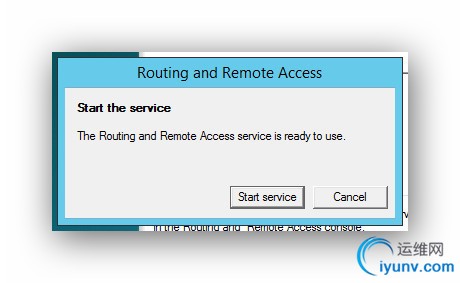
Start the Service.
###
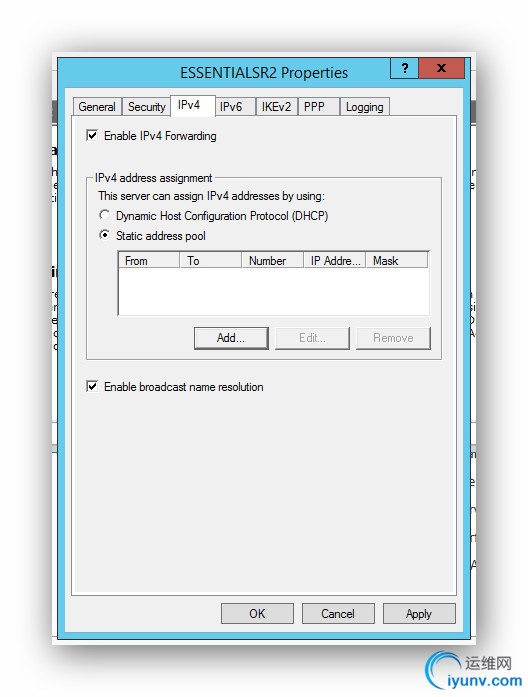
Right click the server name and select Properties.
 ###
###
Select the IPv4 tab. Select static address pool. Click Add.
 ###
###
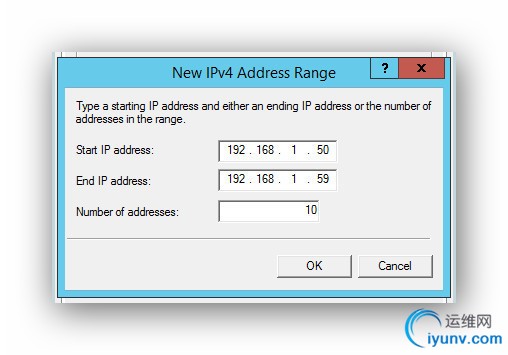
Type in a range on your local network for IP addresses. The *** server will give the client PC a local IP address within this range. Make it relatively wide so it won’t conflict with one already in use on your local network. Or, better yet, sign on to your router and reserve a range if your router has this feature. Enter that range here.
 ###
###
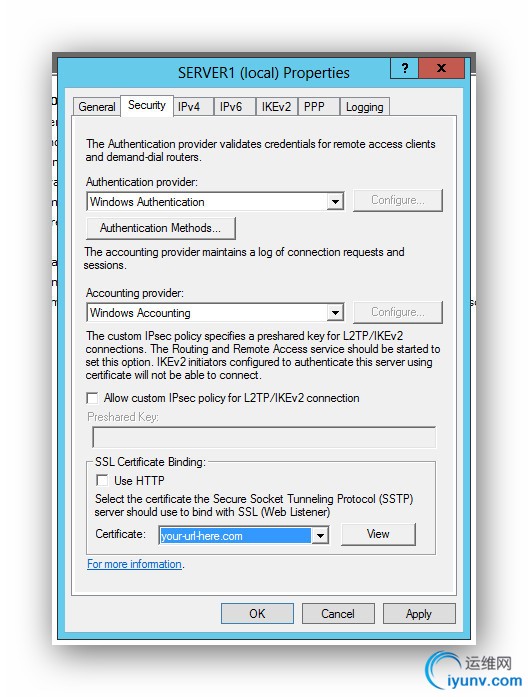
Select the Security tab. In the drop down box toward the bottom, select your SSL certificate.
Done. Now Add A Network Connection to your Client PC.
____________________
Configuring The PC for *** Use
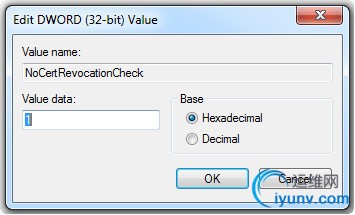
The only tricky part here is to add a value named NoCertRevocationCheck to the Windows registry. The spelling and capitalization have to be identical. Otherwise, the *** will not connect.
HKEY_LOCAL_MACHINE\SYSTEM\CurrentControlSet\services\SstpSvc\Parameters

###
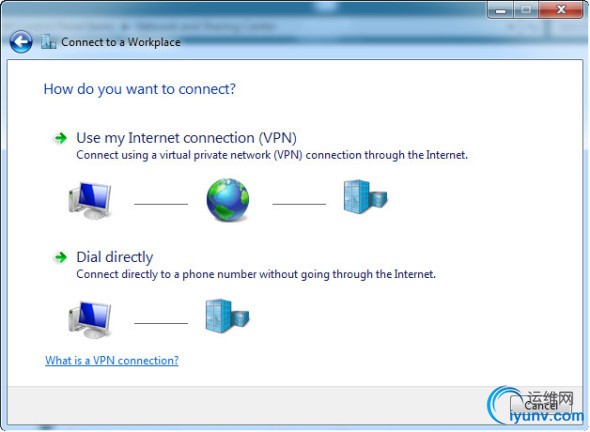
Open the Network and Sharing Center and click Set up A New Connection or Network. Then Connect to a Workplace.
 ###
###
Click Use my Internet Connection (***)
###
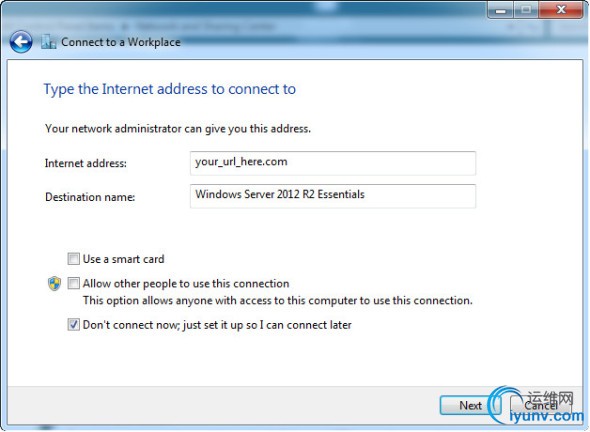
Fill in the blanks. Don’t connect to the internet just yet.
 ###
###
Type in the designated user and password.
 ###
###
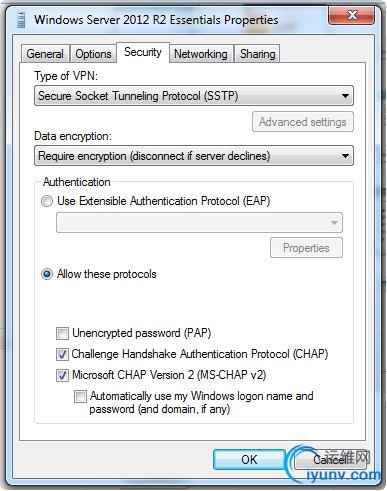
Next, you need to change a tab on the properties of the connection you just created. Find the *** connection by left clicking on the network icon in the lower right corner of the Desktop. Right click on the new *** connection and select Properties. Change it to look like this. Then Connect.
 ###
###
If you return to the Network and Sharing Center and find the connection while it is open, the status should look like this. It confirms you are on a secure ***. Done.
 ____________________
About these ads
转自:https://advancedhomeserver.com/windows-server-2012-sstp-***/ |
|