|
|
构成图
引用
Container | Container | ...
-----------------------
Docker
-----------------------
CoreOS
-----------------------
Virtual Box
-----------------------
Local Machine(Windows)
***CoreOS已经内置了docker,CoreOS也推出新的容器引擎Rocket(rkt)。
准备
・VirtualBox 4.3.20 https://www.virtualbox.org/wiki/Downloads
・Vagrant 1.7.2 http://www.vagrantup.com/downloads.html
・Git 1.8.3 http://git-scm.com/downloads
・Putty 0.64 http://www.chiark.greenend.org.uk/~sgtatham/putty/download.html
(1)下载配置文件coreos-vagrant
F:\>git clone https://github.com/coreos/coreos-vagrant.git
(2)修改配置文件
・config.rb.sample -> config.rb
・user-data.sample -> user-data
・config.rb
$num_instances=1 #如果安装单个coreos就写1,如果是集群就写大于1的数字
$update_channel='stable' #这个是版本,可以改为stable或者beta
・Vagrantfile
# config.vm.box_version = ">= 308.0.1" 注释掉这行
(3)安装coreos
F:\>cd coreos-vagrant
F:\coreos-vagrant>vagrant up
Bringing machine 'core-01' up with 'virtualbox' provider...
==> core-01: Box 'coreos-stable' could not be found. Attempting to find and install...
core-01: Box Provider: virtualbox
core-01: Box Version: >= 0
==> core-01: Loading metadata for box 'http://stable.release.core-os.net/amd64-
usr/current/coreos_production_vagrant.json'
core-01: URL: http://stable.release.core-os.net/amd64-usr/current/coreos_production_vagrant.json
==> core-01: Adding box 'coreos-stable' (v633.1.0) for provider: virtualbox
core-01: Downloading: http://stable.release.core-os.net/amd64-usr/633.1.0/coreos_production_vagrant.box
==> core-01: Box download is resuming from prior download progress
core-01: Progress: 20% (Rate: 62195/s, Estimated time remaining: 0:20:11)
.......第一次需要下载box文件
==> core-01: Importing base box 'coreos-stable'...
.......第二次就不用下载了
==> core-01: Setting the name of the VM: coreos-vagrant_core-01_1430979570265_83365
==> core-01: Clearing any previously set network interfaces...
==> core-01: Preparing network interfaces based on configuration...
core-01: Adapter 1: nat
core-01: Adapter 2: hostonly
==> core-01: Forwarding ports...
core-01: 22 => 2222 (adapter 1)
==> core-01: Running 'pre-boot' VM customizations...
==> core-01: Booting VM...
==> core-01: Waiting for machine to boot. This may take a few minutes...
core-01: SSH address: 127.0.0.1:2222
core-01: SSH username: core
core-01: SSH auth method: private key
core-01: Warning: Connection timeout. Retrying...
==> core-01: Machine booted and ready!
==> core-01: Setting hostname...
==> core-01: Configuring and enabling network interfaces...
==> core-01: Running provisioner: file...
==> core-01: Running provisioner: shell...
core-01: Running: inline script
(4)vagrant连接CoreOS
F:\coreos-vagrant>vagrant ssh
CoreOS stable (633.1.0)
core@core-01 ~ $ cat /etc/os-release
NAME=CoreOS
ID=coreos
VERSION=633.1.0
VERSION_ID=633.1.0
BUILD_ID=
PRETTY_NAME="CoreOS 633.1.0"
ANSI_COLOR="1;32"
HOME_URL="https://coreos.com/"
BUG_REPORT_URL="https://github.com/coreos/bugs/issues"
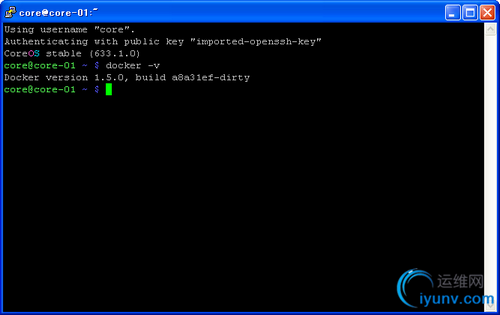
core@core-01 ~ $ docker -v
Docker version 1.5.0, build a8a31ef-dirty
core@core-01 ~ $ exit
logout
'cygwin': unknown terminal type.
Connection to 127.0.0.1 closed.
查看运行状态
F:\coreos-vagrant>vagrant global-status
id name provider state directory
------------------------------------------------------------------------
52bbbd1 core-01 virtualbox running F:/coreos-vagrant
关闭容器
F:\coreos-vagrant>vagrant halt
==> core-01: Attempting graceful shutdown of VM...
(5)Putty连接CoreOS
Private key: C:\Documents and Settings\RenSanNing\.vagrant.d\insecure_private_key
・打开PuTTYgen,通过菜单Conversions > Import key来读入上边的insecure_private_key
・保存密钥为.ppk文件Save private key
・打开PuTTY
【Session】
Host Name: core@127.0.0.1
Port: 2222
【Connection / SSH / Auth】
Private key file for authentication:选择上边的.ppk文件

****XP下Vagrant不能添加box:参考这里
****启动卡在“Booting VM...”:修改config.rb文件“$vm_gui = true”以GUI形式启动。
(6)CentOS 6中安装Docker
# rpm -iUvh http://dl.fedoraproject.org/pub/epel/6/x86_64/epel-release-6-8.noarch.rpm
# yum update -y
# yum -y install docker-io
# service docker start
# chkconfig docker on
(7)Docker基础
■镜像Image
公共registry:https://registry.hub.docker.com/
查找镜像
# docker search centos | more
查看镜像详细信息
# docker inspect centos:latest
下载镜像
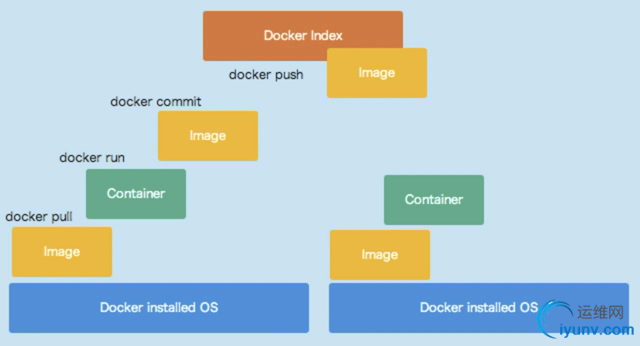
# docker pull centos:latest
# docker pull busybox
# docker pull docker.cn/docker/java
镜像列表
# docker images
删除镜像
# docker rmi centos:latest
■容器Container
从镜像上创建一个容器Container
# docker run centos /bin/echo ok
# docker run -i -t centos /bin/bash
容器列表
# docker ps -a
与运行中的容器交互
# docker start 330ec265ad9d
# docker attach 330ec265ad9d
# docker stop 330ec265ad9d
查看容器日志
# docker logs 330ec265ad9d
删除容器
# docker rm 330ec265ad9d
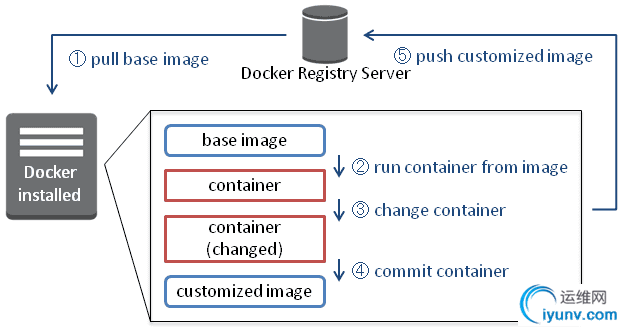
■Container - Image
安装Apache
# docker run -i -t -h centos centos:centos6 /bin/bash
bash-4.1# yum -y install httpd
bash-4.1# exit
提交变更
# docker ps -a
# docker commit abb0ba529ee9 cent6_apache
# docker ps -a
运行Apache
# docker run -p 8080:80 -d cent6_apache /usr/sbin/apachectl -DFOREGROUND
■创建镜像Dockerfile
语法: INSTRUCTTION argument
指令约定为全部大写
必须以FROM命令开始: FROM <image name>
# vi Dockerfile
FROM centos
MAINTAINER rensanning <rensanning@gmail.com>
RUN echo "now building..."
CMD ["echo", "now running..."]
# docker build -t rensanning/test .
# docker images
# docker run rensanning/test
# vi Dockerfile
FROM centos
MAINTAINER rensanning <rensanning@gmail.com>
RUN yum install -y httpd
ADD ./index.html /var/www/html/
EXPOSE 80
CMD ["/usr/sbin/httpd", "-D", "FOREGROUND"]
# vi index.html
<html>hello from Docker!</html>
# docker build -t rensanning/httpd .
# docker images
# docker run -p 8080:80 -d rensanning/httpd
■发布到Registry
# docker login
# docker push rensanning/httpd


更多可以参考:Docker Cheat Sheet |
|
|