|
|
This article begins, post VM creation and OS installation/Patching process.
Assumptions:
- Guest Operating System is Windows 2008 R2
- HyperV Host is running Windows 2008 R2
- Each VM guest has two network adapters presented to it.
- NLB Cluster will be in (UNICAST) Mode
Configuration Steps:
- Configure Network Adapters
- Configure Network Load Balancing
- Validate Configuration
- Decide on you DNS records for Client Access
Reference:
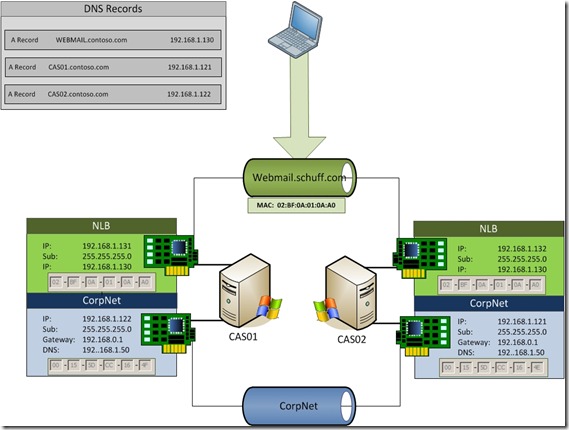
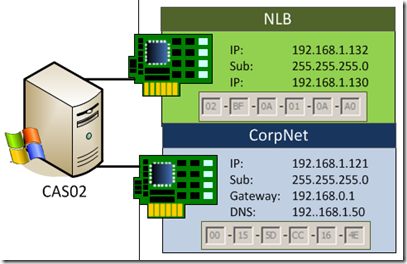
Scenario: Desired NLB Configuration
The image below illustrates the desired NLB topology/configuration for this article.
Note: This particular scenario the NLB and CorpNet networks are on the same network. If we desired external access to the NLB cluster, the NLB and CorpNet would most likely be on seperate networks.
Configure Network Adapters
Note: When running Unicast, the NIC that has NLB enabled will have its’ MAC Address overwritten (Each Node will share the MAC address assigned to the NLB Cluster). Because of this there will be additional configuration required within HyperV for the assigned NLB network interfaces.
1. Install on the Guest VM Windows 2008R2, and install the latest patches and drivers.
2. Create DNS A-Record for the Cluster Name. My cluster name is webmail.contoso.com
3. On each Guest, in Windows Rename the network connections accordingly. I have mine as such: 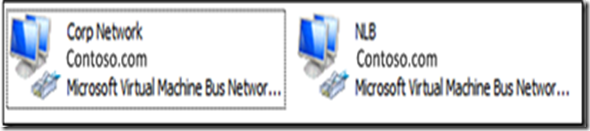
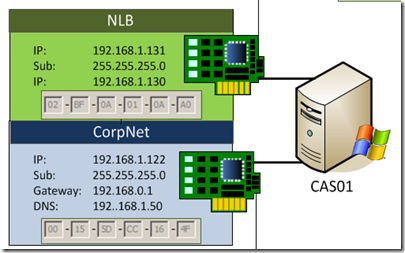
4. On each Guest VM, in Windows, Configure each Network Adapter based on your network address scheme. The required configuration information for each Network adapter is as follows:
- NLB NIC: IP Address and Subnet Only Configured
- Metric: 20
- WINS: Disable Netbios
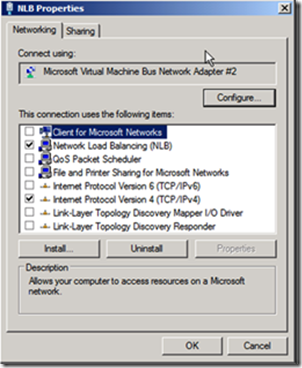
IMPORTANT: DO NOT MANUALLY select the “network load balancing (NLB) connection”!! This will happen automatically during the NL10.1.B Cluster creation process. If its manually selected the NLB Cluster creation will not pick up this network interface as an option. This image is merely to serve as a reference to remove all connections accept NLB and TCP.
- Corp Network NICn: Corporate network configuration (IP, GW, DNS).
- Binding Order
- Corp Network
- NLB
- Remote Access Connections
My Server NIC configuration:
CAS01
CAS02
5. Once the NICs are configured... Run an IPCONFIG /all and note the IP and MAC Address assignment for both Network Interfaces.
Note: Once the cluster is created, the designated cluster Network Interface will receive a new MAC Address, and NLB Property will be Enabled on the Network Interface (NLB)
6. IMPORTANT!!! By default Windows 2008 has IP Forwarding disabled. In order for this configuration with TWO NLB NICs to work and Not Define a Gateway to adhere to best practices, you have to enable IP forwarding on the NLB NIC so that requests sent to it are forwarded to the other; otherwise backend communication will not function. Below is the simple command line to run on each NLB Node.
Note: Be sure to open the command prompt as “Run as Administrator”, also if you are running IPV6 make sure to substitute the ipv4 with ipv6.
netsh interface ipv4 set int “<NLB NIC NAME>” forwarding=enabled My Scenario: netsh interface ipv4 set int “NLB” forwarding=enabled
7. Next proceed with creating and configuring the new NLB Cluster.
Install Client Access (in our case Hub and CAS) Role, Features, Apps, etc.
Installing the Front-end (HUB and CAS) – Loadbalanced using NLB
- Install Prerequisites/Roles/Features
ItemInfoInstall Prerequisites The servers that will hold the Exchange Server 2010 server roles have the following prerequisites:
- The servers need to be running on Windows Server 2008 or Windows Server 2008 R2;
- .Net framework 3.5 with SP1 needs to be installed;
- PowerShell 2.0 needs to be installed;
- Office 2007 Filter packs needs to be installed for the Hub Transport Server role and the Mailbox Server role; Http://go.microsoft.com/fwlink/?LinkId=123380
Make sure that after installing Windows on the servers that they are up-to-date with the latest hotfixes and service packs.
Install Roles/FeaturesFrom a Powershell Command Prompt (With elevated privileges) <prompt> Import-Module ServerManager
<prompt> Add-WindowsFeature NET-Framework,RSAT-ADDS,Web-Server,Web-Basic-Auth,Web-Windows-Auth,Web-Metabase,Web-Net-Ext,Web-Lgcy-Mgmt-Console,WAS-Process-Model,RSAT-Web-Server,Web-ISAPI-Ext,Web-Digest-Auth,Web-Dyn-Compression,NET-HTTP-Activation,RPC-Over-HTTP-Proxy,NLB –Restart
After the servers have rebooted, we must open an elevated Windows PowerShell window again, and set the service to start automatically. This can be accomplished with the following command:
Set-Service NetTcpPortSharing –StartupType Automatic
Since we are going to install both the Hub Transport on these servers, we must also install the Microsoft Filter Pack.
Additional Configurations I will then turn off the Internet Explorer Enhanced Security Configuration for Administrators.
Go to the Server Manager, Scroll down to the Security Information
- Installing Exchange Client Access/Hub Server Role: Automated Install
Setup.com /mode:install /roles:ht,ca /ExternalCASServerDomain:webmail.contoso.com
/LegacyRoutingServer:Ex2003srv.contoso.
Create and Configure Network Load Balancing Cluster
This process will detail the process for creating and configuring the NLB Cluster.
1. Log into one of the Guest Virtual Machines (NLB Nodes). In my case Server1 (First node in the cluster)
2. Right Click Network Load Balancing Manager, and select “RUN AS ADMINSTRATOR”.
3. In the console tree, right-click Network Load Balancing Clusters, and then click New Cluster.
4. In the Host box, type the computer name (CAS01.contoso.com) of the guest virtual machine that will be the first host of the cluster, and then click Connect. (Host Name, not cluster name)
5. In the Interfaces available for configuring a new cluster list, select a network adapter for the NLB cluster, and then click Next.
6. Under interfaces select NLB Network Interface.
Note: If your NLB Network interface does not show up in the list, verify that the “Network Load Balancing” property is un checked within the network interface properties. NLB will not pick up the network interface if that checkbox is already enabled.
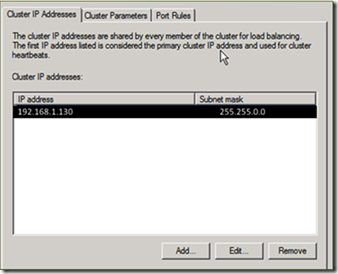
7. On the New Cluster: Cluster IP Addresses screen, define the virtual IP address. In my case its the IP Address assigned to
webmail.contoso.com A-Record (192.168.1.130) for the NLB cluster.
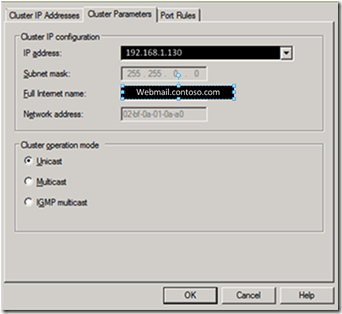
Important:Note the MAC address in the Network Address property, and then click Next. You will use this MAC address later.
8. Under Cluster operation mode, click Unicast, and then click Next.
9. Complete the rest of the NLB configuration, and then shut down the virtual machine.
10. At this point you have a single node within the NLB Cluster, and the MAC Address has been changed. To verify, run an IPCONFIG /ALL, and check to see if the NLB Network Connection changed from what was previously noted, to a new MAC Address. In my case, mine changed from (Previous MAC: 00:15:5D:CC:16:5E to 02:BF:0A:01:0A:A0).
11. If you didn't do it in step 7, be sure to note the new MAC Address, and shutdown the Node (Server1).
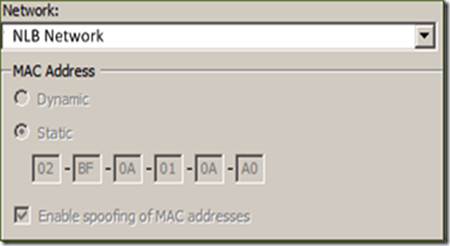
12. Once the Guest (Server1) is shutdown, open HyperV Manager and Select the Server1 > Settings > Network Adapter (The one assigned to NLB).
13. Under MAC Address, set the MAC Address to STATIC, and enter the MAC Address assigned to the NLB Network Interface (Note earlier).
15. Next select “Enable spoofing of MAC addresses”, and select apply.
Add the second VM to the NLB Cluster
1. Continuing from step 15, startup the VM (CAS01) and log into Windows.
2. Open Network Load Balancing Manager (RUN AS ADMINISTRATOR).
3. Right click the NLB cluster, and then click Add Host To Cluster.
4. Specify the name of the new host (CAS02), and then click Connect. The network adapters that are available for the host are listed at the bottom of the dialog box.
5. Click the network adapter that you want to use for Network Load Balancing (In my case NLB), and then click Next.
6. The IP address that is configured on this network adapter is the dedicated IP address (192.168.1.132) for this host.
7. Complete the rest of the NLB configuration, and then shut down the virtual machine (CAS02).
8. Once the Guest (CAS02) is shutdown, open HyperV Manager and Select the CAS01 > Settings > Network Adapter (The one assigned to NLB).
9. Under MAC Address, set the MAC Address to STATIC, and enter the MAC Address assigned to the NLB Network Interface (Note earlier).
10. Next select “Enable spoofing of MAC addresses”, and select apply.
11. Next, Start the virtual machine (CAS02).
12. Open Network Load Balancing Manager.
13. Verify that the NLB cluster is up as well as both nodes.
14. At this point you now have a two-node NLB Cluster, each node sharing the same MAC address on the NLB network interface.
Configure Client Access Array
After the NLB cluster, Exchange is installed you can
Previous Exchange versions (Exchange 2000/2003) did not support to the use the front-end server by internal MAPI clients. They were connected directly to internal Back-End servers via MAPI over RPC. With the introduction of Exchange server 2007 this limitation has decreased significantly. Client Access Server worked for most protocols except MAPI clients.
With Exchange Server 2010 all protocols should go through the Client Access Server and cannot connect to Mailbox servers by MAPI clients directly. This has been done by introducing a new Client Access Server(CAS) service known as the RPC Client Access service.
To configure Exchange Server 2010 CAS array, you should follow the five steps mentioned bellow.
- You must configure internal DNS entry for the name of the CAS array. This name must be unique for the internal network.
- You must configure Network Load Balancing. In this case i use Windows Network Load Balancing technology.
- Create the new Client Access Array.
- Configure a mailbox database to use Cas Array
- Verify the Autodiscover services is working with CAS Array. (This step is optional, but it would be good to verify this)
- To create the ClientAccessArray , Launch the Exchange 2010 Management Shell. Run the following cmdlet:
New-ClientAccessArray -Name “Internal CAS Array” -FQDN webmail.contoso.com
One ClientAccessArray can be created per Active Directory site and, once it has been created, new mailbox databases will automatically detect its existence and configure themselves to use it. However, for any mailbox databases that have already been created, you must update the RPCClientAccessServer attribute on each database to configure client mailboxes hosted on these databases to also use the ClientAccessArray.
Run the following cmdlet:
Set-MailboxDatabase “NAME_OF_DATABASE” -RPCClientAccessServer webmail.contoso.com
Note that you could also set the RPCClientAccessServer attribute by running Get-MailboxDatabase | Set-MailboxDatabase -RPCClientAccessServer internalCASArray.client.local and it would configure this attribute for all mailbox databases in the organization. If you have multiple sites, you would want to restrict this.
4. Check the output of the following cmdlet to confirm that the RPCClientAccessServer attribute was set properly for the appropriate databases:
Get-MailboxDatabase | Select Name,RPCClientAccessServer | fl
Once the above steps have been completed, try creating a MAPI profile for a user hosted in Exchange 2010. Enter your load balanced name (internalCASArray.client.local), a username, and click Check Name. You should see your load balanced name remain and not be replaced by one of your underlying CAS servers!
link:http://idamd.blogspot.hk/2010/07/exchange-2010-nlb-client-access-on.html |
|
 QQ群⑧:
QQ群⑧:


 窥视卡
窥视卡 雷达卡
雷达卡 发表于 2018-7-9 07:11:44


 提升卡
提升卡 置顶卡
置顶卡 沉默卡
沉默卡 喧嚣卡
喧嚣卡 变色卡
变色卡 千斤顶
千斤顶 显身卡
显身卡