|
|
1.ElasticSearch简单说明
a.ElasticSearch是一个基于Lucene开发的搜索服务器,具有分布式多用户的能力,ElasticSearch是用Java开发的开源项目(Apache许可条款),基于RestfulWeb接口,能够达到实时搜索、稳定、可靠、快速、高性能、安装使用方便,同时它的横向扩展能力非常强,不需要重启服务。
b.ElasticSearch是一个非常好用的实时分布式搜索和分析引擎,可以帮助我们快速的处理大规模数据,也可以用于全文检索,结构化搜索以及分析等。
c.目前很多网站都在使用ElasticSearch进行全文检索,例如:GitHub、StackOverflow、Wiki等。
d.ElasticSearch式建立在全文检索引擎Lucene基础上的,而Lucene是最先进、高效的开元搜索引擎框架,但是Lucene只是一个框架,要充分利用它的功能,我们需要很高的学习成本,而ElasticSearch使用Lucene作为内部引擎,在其基础上封装了功能强大的RestfulAPI,让开发人员可以在不需要了解背后复杂的逻辑,即可实现比较高效的搜索。
e.关于Lucene我在前面写过几篇博客,并且在GitHub上开源了一个Demo,博客地址是:http://www.cnblogs.com/hanyinglong/p/5387816.html
f.ElasticSearch官网:https://www.elastic.co/products/elasticsearch/
g.ElasticSearch权威指南 http://www.learnes.net/
回到顶部
2.准备安装文件
a.工欲善其事必先利其器,通过上面简单的描述想必大家已经知道ElasticSearch是干什么的了,那么这时候我们就需要去使用它,而在用它之前则必须先将其安装,故而在这篇博客我将简单描述一下EasticSearch的安装,ElasticSearch_Head的配置,分词插件的配置。
b. ElasticSearch的安装包,下载地址:https://www.elastic.co/downloads/elasticsearch,下载最新的tar包即可。
c. ElasticSearch_Head配置包,下载地址:https://github.com/mobz/elasticsearch-head,下载最新的Zip压缩包即可。
d.分词插件,下载地址:https://github.com/medcl/elasticsearch-analysis-ik,克隆源码进行操作。
e.因Elasticsearch是基于java写的,所以它的运行环境中需要java的支持,在Linux下执行命令:java -version,检查Jar包是否安装,如果安装,则可以继续操作安装工作,否则安装java jar包,如何安装请参看博客:http://www.cnblogs.com/hanyinglong/p/5025635.html。(JDK安装7以上)
f. ElasticSearch_ServiceWrapper配置包,下载地址: https://github.com/elastic/elasticsearch-servicewrapper
g. 本次操作需要用到的软件以及系统如下:虚拟机(Vmware)、虚拟机中安装的Centos系统、Xshell、Xftp、上面的安装包、Git、Maven,至于如何使用它们我们下面会说到。
回到顶部
3.ElasticSearch安装
a.通过上面简单的准备工作之后,现在已经拥有了可以安装和发布的环境,如果没有,请参考上面的说明,自行查询安装。
b.使用XShell连接Centos,连接成功后使用命令跳转到local下面创建属于自己的文件夹kencery,在此文件夹下创建elasticsearch文件夹,命令如下;
b.1 (1):cd usr/local/ (2):mkdir kencery (3):cd kencery/ (4):mkdir elasticsearch (5):cd elasticsearch/
c. 然后使用Xftp将在准备安装文件中下载的Elasticsearch包复制到elasticsearch文件夹西面,如图所示:
d. 将上传的的elasticsearch-2.3.1.tar.gz包解压,解压之后命名为:elasticsearch,至于安装包里面含有上面内容,请自行使用命令ls -l查看。
d.1 tar -zxvf elasticsearch-2.3.1.tar.gz
d.2 mv elasticsearch-2.3.1 elasticsearch
e. 进入elasticsearch文件后运行脚本启动,命令如下:
e.1 cd elasticsearch
e.2 调用启动命令:./bin/elasticsearch(如果以root用户启动,正常情况下这里会报错)。
f.在root账户下面调用启动命令出错的解决方案
f.1 当使用root账户调用启动命令出现错误信息,错误提示信息如下:
f.2 为什么会这样呢?这是因为处于系统安装考虑的设置,由于Elasticsearch可以接收用户输入的脚本并且执行,为了系统安全考虑,不允许root账号启动,所以建议给Elasticsearch单独创建一个用户来运行Elasticsearch。
f.3 创建elasticsearch用户组以及elasticsearch用户,命令如下:
groupadd elasticsearch
useradd elasticsearch(用户名) -g elasticsearch(组名) -p elasticsearch(密码)
f.4 更改Elasticsearch文件夹以及内部文件的所属用户以及组为elasticsearch,修改完成之后如图所示:
chown -R elasticsearch:elasticsearch elasticsearch 注:chown 用户名:组名 文件路径(可以是就对路径也可以是相对路径)
f.5 切换到elasticsearch用户下,再次执行启动命令,如图所示,则说明启动成功
启动遇到的问题:
1)max file descriptors [4096] for elasticsearch process likely too low, increase to at least [65536]
原因:无法创建本地文件问题,用户最大可创建文件数太小
解决方案:切换到root用户,编辑limits.conf配置文件, 添加类似如下内容:
vi /etc/security/limits.conf
添加如下内容:
* soft nofile 65536
* hard nofile 131072
* soft nproc 2048
* hard nproc 4096
备注:* 代表Linux所有用户名称(比如 hadoop)
需要保存、退出、重新登录才可生效。
2)max number of threads [1024] for user [es] likely too low, increase to at least [2048]
原因:无法创建本地线程问题,用户最大可创建线程数太小
解决方案:切换到root用户,进入limits.d目录下,修改90-nproc.conf 配置文件。
vi /etc/security/limits.d/90-nproc.conf
找到如下内容:
* soft nproc 1024
#修改为
* soft nproc 2048
3)max virtual memory areas vm.max_map_count [65530] likely too low, increase to at least [262144]
原因:最大虚拟内存太小
root用户执行命令:
[root@localhost ~]# sysctl -w vm.max_map_count=262144
4)system call filters failed to install; check the logs and fix your
configuration or disable system call filters at your own risk
原因:Centos6不支持SecComp,而ES5.4.1默认bootstrap.system_call_filter为true进行检测,所以导致检测失败,失败后直接导致ES不能启动。
详见 :https://github.com/elastic/elasticsearch/issues/22899
解决方法:在elasticsearch.yml中新增配置bootstrap.system_call_filter,设为false,注意要在Memory下面:
bootstrap.memory_lock: false
bootstrap.system_call_filter: false
以上问题解决后,es启动成功了,
h.安装完成后使用IP访问
h.1 当安装完成之后我们当然希望他在其他局域网内通过IP可以访问,可是执行:http://192.168.37.137:9200/,始终不能连接成功,而且centos下用localhost、127.0.0.1都能够连接成功。
h.2 这时候我们就需要修改配置文件了,首先使用ifconfig查询你的linux的IP是多少,得到IP。
h.3 跳转到Elasticsearch的config配置文件下,使用vim打开elasticsearch.yml,找到里面的"network.host",将其改为你刚才查询得到的IP,保存。
cd elasticsearch/config/
vim elasticsearch.yml
h.4 重启ElasticSearch,然后使用http://192.168.37.137:9200/访问,如果连接不成功则需要考虑是不是端口的原因,配置端口,重启防火墙即可。
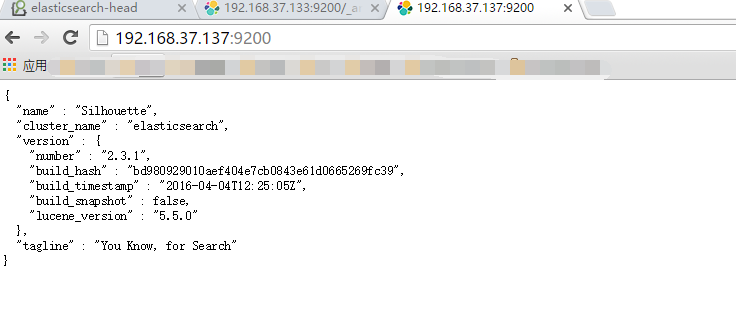
h.5 使用http://192.168.37.137:9200/访问,访问结果如图所示:,则说明ElasticSearch安装成功。'
h.6 Elasticsearch安装完成之后,希望能有一个可视化的环境来操作它,那么下来配置:Elasticsearch Head
i. 如果是使用命令./bin/elasticsearch来启动的Elasticsearch,如果想要停止Elasticsearch的执行,则直接按住键盘Ctrl+C则会停止,停止之后你在浏览器中再次测试发现已不能操作。
4.ElasticSearch_Head配置
1、在/usr/ 中执行
wget https://github.com/mobz/elasticsearch-head/archive/master.zip 2、执行
unzip master.zip 3、执行
mv elasticsearch-head-master /usr/local/elasticsearch/elasticsearch-head(目录跟elasticsearch的目录一样) 4.安装node
wget https://npm.taobao.org/mirrors/node/latest-v4.x/node-v4.5.0-linux-x64.tar.gztar -zxvf node-v4.5.0-linux-x64.tar.gzvim /etc/profile 在文件中添加:
export NODE_HOME=/usr/node-v4.5.0-linux-x64
export PATH=$PATH:$NODE_HOME/bin/
export NODE_PATH=$NODE_HOME/lib/node_modules
执行 source /etc/profile
5.安装grunt
grunt是基于Node.js的项目构建工具,可以进行打包压缩、测试、执行等等的工作,head插件就是通过grunt启动
cd /usr/local/elasticsearch/elasticsearch-headnpm install -g grunt-cli //执行后会生成node_modules文件夹 检查是否安装成功
6、修改head插件源码
[root@localhost elasticsearch-head]# vi Gruntfile.js
[root@localhost elasticsearch-head]# vi _site/app.js
7.运行head
在elasticsearch-head-master目录下
npm install(安装下载下来的包)
grunt server
8.访问http://xxx:9100
如果:集群健康值: 未连接
原因:(1)[elasticsearch@localhost elasticsearch]$ ./elasticsearch/bin/elasticsearch elasticsearch 未启动
(2)修改elasticsearch.yml文件 添加
vi /config/elasticsearch.yml
# 增加如下字段
http.cors.enabled: true
http.cors.allow-origin: "*"
结果:
注:健康颜色为×××主要是未进行集群
分词安装:
- optional 1 - download pre-build package from here: https://github.com/medcl/elasticsearch-analysis-ik/releases
unzip plugin to folder your-es-root/plugins/
即:
根据https://github.com/medcl/elasticsearch-analysis-ik/releases这个网站下载对应的分词库,然后把解压到对应的:/usr/local/elasticsearch/elasticsearch/plugins中既可以
或者执行:./bin/elasticsearch-plugin install https://github.com/medcl/elasticsearch-analysis-ik/releases/download/v6.3.2/elasticsearch-analysis-ik-6.3.2.zip
验证:
1、在shell执行:
Quick Example
1.create a index
curl -XPUT http://localhost:9200/index
2.create a mapping
curl -XPOST http://localhost:9200/index/fulltext/_mapping -H 'Content-Type:application/json' -d'
{
"properties": {
"content": {
"type": "text",
"analyzer": "ik_max_word",
"search_analyzer": "ik_max_word"
}
}
}'
3.index some docs
curl -XPOST http://localhost:9200/index/fulltext/1 -H 'Content-Type:application/json' -d'
{"content":"美国留给伊拉克的是个烂摊子吗"}
'
curl -XPOST http://localhost:9200/index/fulltext/2 -H 'Content-Type:application/json' -d'
{"content":"公安部:各地校车将享最高路权"}
'
curl -XPOST http://localhost:9200/index/fulltext/3 -H 'Content-Type:application/json' -d'
{"content":"中韩渔警冲突调查:韩警平均每天扣1艘中国渔船"}
'
curl -XPOST http://localhost:9200/index/fulltext/4 -H 'Content-Type:application/json' -d'
{"content":"中国驻洛杉矶领事馆遭亚裔男子枪击 嫌犯已自首"}
'
4.query with highlighting
curl -XPOST http://localhost:9200/index/fulltext/_search -H 'Content-Type:application/json' -d'
{
"query" : { "match" : { "content" : "中国" }},
"highlight" : {
"pre_tags" : ["", ""],
"post_tags" : ["", ""],
"fields" : {
"content" : {}
}
}
}
'
Result
{
"took": 14,
"timed_out": false,
"_shards": {
"total": 5,
"successful": 5,
"failed": 0
},
"hits": {
"total": 2,
"max_score": 2,
"hits": [
{
"_index": "index",
"_type": "fulltext",
"_id": "4",
"_score": 2,
"_source": {
"content": "中国驻洛杉矶领事馆遭亚裔男子枪击 嫌犯已自首"
},
"highlight": {
"content": [
"中国驻洛杉矶领事馆遭亚裔男子枪击 嫌犯已自首 "
]
}
},
{
"_index": "index",
"_type": "fulltext",
"_id": "3",
"_score": 2,
"_source": {
"content": "中韩渔警冲突调查:韩警平均每天扣1艘中国渔船"
},
"highlight": {
"content": [
"均每天扣1艘中国渔船 "
]
}
}
]
}
}
结果:
|
|
 QQ群⑧:
QQ群⑧:


 窥视卡
窥视卡 雷达卡
雷达卡 发表于 2019-1-29 10:17:01


 提升卡
提升卡 置顶卡
置顶卡 沉默卡
沉默卡 喧嚣卡
喧嚣卡 变色卡
变色卡 千斤顶
千斤顶 显身卡
显身卡