|
|
一、分布式文件系统:
分布式文件系统(Distributed File System)是指文件系统管理的物理存储资源不一定直接连接在本地节点上,而是通过计算机网络与节点相连。计算机通过文件系统管理、存储数据,单纯通过增加硬盘个数来扩展计算机文件系统的存储容量的方式,在容量大小、容量增长速度、数据备份、数据安全等方面的表现都差强人意。
分布式文件系统可以有效解决数据的存储和管理难题:将固定于某个地点的某个文件系统,扩展到任意多个地点/多个文件系统,众多的节点组成一个文件系统网络。每个节点可以分布在不同的地点,通过网络进行节点间的通信和数据传输。人们在使用分布式文件系统时,无需关心数据是存储在哪个节点上、或者是从哪个节点从获取的,只需要像使用本地文件系统一样管理和存储文件系统中的数据。
二、常见的分布式文件系统:
GFS
(Google File System)
| Google公司为了满足本公司需求而开发的基于Linux的专有分布式文件系统。 | HDFS
(Hadoop Distributed File System)
| Hadoop 实现的一个分布式文件系统 | TFS
(Taobao File System)
| 是一个高可扩展、高可用、高性能、面向互联网服务的分布式文件系统,它构筑在普通的Linux机器 集群上,可为外部提供高可靠和高并发的存储访问,主要针对海量的非结构化数据,TFS为淘宝提供海量小文件存储,通常文件大小不超过1M,满足了淘宝对小文件存储的需求 | GlusterFS
(Gluster File System) | 主要应用在集群系统中,具有很好的可扩展性,通过网络互联成一个并行的网络文件系统;与Hadoop HDFS不同的是:GlusterFS使用了弹性哈希算法来定位文件存储的位置。 由于使用了弹性哈希算法,GlusterFS不需要专门的Meta-Data Server来保存元数据,因此可以避免因为元数据服务器宕机导致的整个集群不可用。也正是因为不需要元数据服务器,所以GlusterFS在多个挂载点同时进行数据读写的时候,其整体性能很突出。 | | ceph | C++编写的代码,支持Fuse,并且没有单点故障依赖, 于是下载安装, 由于 ceph 使用 btrfs 文件系统, 而btrfs 文件系统需要 Linux 2.6.34 以上的内核才支持。 | | MooseFS | mooseFS是一款网络分布式文件系统。它把数据分散在多台服务器上,但对于用户来讲,看到的只是一个源。 | | MogileFS | perl语言研发的; 性能好;海量图片存储 | | FastDFS | c语言研发 |
三、MogileFS介绍
第1个部分: 是server端,包括mogilefsd和mogstored两个程序。前者即是mogilefsd的tracker,它将一些全局信息保存在数据库 里,例如站点domain,class,host等,默认监听在7001端口。后者即是存储节点(store node),它其实是个HTTP Daemon,默认侦听在7500端口,接受客户端的文件备份请求。在安装完后,要运行mogadm工具将所有的store node注册到mogilefsd的数据库里,
mogilefsd会对这些节点进行管理和监控。
| | 第2个部分:是utils(工具集),主要是MogileFS的一些管理工具,例如mogadm等。 | | 第3个部分:是客户端API,目前只有Perl API(MogileFS.pm)、PHP,用这个模块可以编写客户端程序,实现文件的备份管理功能,提供MogileFS.pm。 |
四、Keepalived+Nginx双主模型实现图片分布式存储、访问

| ip地址 | 主机名 | 安装包 | | 172.16.16.3 | ① master1 | keepalived+nginx | | 172.16.16.4 | ② master2 | keepalived+nginx | | 172.16.16.2 | ③ mogilefs1 | mogilefs相关软件包 | | 172.16.16.8 | ④ mogilefs2 | mogilefs相关软件包 | | 172.16.116.233 | ⑤ mysql | mariadb-server |
① mster1
1
2
3
4
5
6
7
8
9
10
11
12
13
14
15
16
17
18
19
20
21
22
23
24
25
26
27
28
29
30
31
32
33
34
35
36
37
38
39
40
41
42
43
44
45
46
47
48
49
50
51
52
53
54
55
56
57
58
59
60
61
62
63
64
65
66
67
| ####keepalived相关配置
[iyunv@master1 ~]# yum install -y keepalived
[iyunv@master1 ~]# vim /etc/keepalived/keepalived.conf
! Configuration File for keepalived
global_defs {
notification_email {
root@localhost
}
notification_email_from keepalived@localhost
smtp_server 127.0.0.1
smtp_connect_timeout 30
router_id LVS_DEVEL
}
vrrp_instance VI_1 {
state MASTER
interface eth0
virtual_router_id 51
priority 100
advert_int 1
authentication {
auth_type PASS
auth_pass 1111aaaa2222
}
virtual_ipaddress {
172.16.16.40/16
}
}
vrrp_instance VI_2 {
state BACKUP
interface eth0
virtual_router_id 52
priority 99
advert_int 1
authentication {
auth_type PASS
auth_pass 2222aaaa1111
}
virtual_ipaddress {
172.16.16.41/16
}
}
####nginx编译安装及配置
[iyunv@master1 ~]# tar xf nginx_mogilefs_module-1.0.2.tar.gz
[iyunv@master1 ~]# yum install openssl-devel pcre-devel
[iyunv@master1 ~]# groupadd -r nginx
[iyunv@master1 ~]# useradd -r -g nginx nginx
[iyunv@master1 ~]# tar xf nginx-1.8.0.tar.gz
[iyunv@master1 ~]# cd nginx-1.8.0
[iyunv@master1 ~]# ./configure --prefix=/usr --sbin-path=/usr/sbin/nginx
--conf-path=/etc/nginx/nginx.conf --error-log-path=/var/log/nginx/error.log
--http-log-path=/var/log/nginx/access.log --pid-path=/var/run/nginx/nginx.pid
--lock-path=/var/lock/nginx.lock --user=nginx --group=nginx --with-http_ssl_module --with-http_flv_module --with-http_stub_status_module --with-http_gzip_static_module --http-client-body-temp-path=/var/tmp/nginx/client/
--http-proxy-temp-path=/var/tmp/nginx/proxy/
--http-fastcgi-temp-path=/var/tmp/nginx/fcgi/
--http-uwsgi-temp-path=/var/tmp/nginx/uwsgi
--http-scgi-temp-path=/var/tmp/nginx/scgi --with-pcre --with-debug
--add-module=/root/nginx_mogilefs_module-1.0.2
[iyunv@master1 ~]# make && make install
[iyunv@master1 ~]# mkdir -p /var/tmp/nginx/{client,proxy,fcgi,uwsgi,scgi}
[iyunv@master1 ~]# nginx -t
|
② mseter2
1
2
3
4
5
6
7
8
9
10
11
12
13
14
15
16
17
18
19
20
21
22
23
24
25
26
27
28
29
30
31
32
33
34
35
36
37
38
39
40
41
42
43
44
45
46
47
48
| ####keepalived相关配置
[iyunv@master1 ~]# yum install -y keepalived
[iyunv@master2 ~]# vim /etc/keepalived/keepalived.conf
! Configuration File for keepalived
global_defs {
notification_email {
root@localhost
}
notification_email_from keepalived@localhost
smtp_server 127.0.0.1
smtp_connect_timeout 30
router_id LVS_DEVEL
}
vrrp_instance VI_1 {
state BACKUP
interface eth0
virtual_router_id 51
priority 99
advert_int 1
authentication {
auth_type PASS
auth_pass 1111aaaa2222
}
virtual_ipaddress {
172.16.16.40/16
}
}
vrrp_instance VI_2 {
state MASTER
interface eth0
virtual_router_id 52
priority 100
advert_int 1
authentication {
auth_type PASS
auth_pass 2222aaaa1111
}
virtual_ipaddress {
172.16.16.41/16
}
}
#####nginx编译过程同master1
|
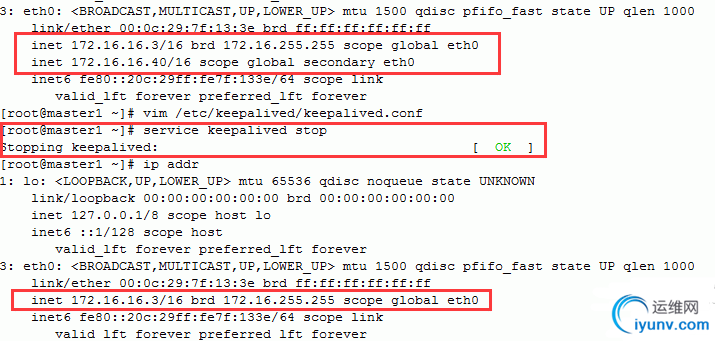
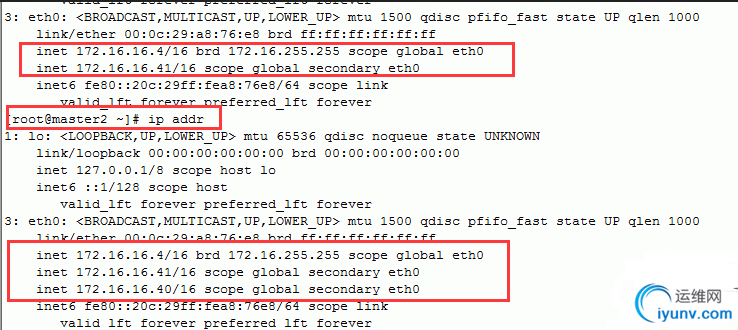
测试如下列图所示:


③ mogilefs1
1
2
3
4
5
6
7
8
9
10
11
12
13
14
15
16
17
18
19
20
21
22
23
24
25
26
27
28
29
30
31
32
33
34
35
36
37
38
39
40
41
42
43
44
45
46
47
48
49
50
51
52
53
54
55
56
57
58
59
60
61
62
63
64
65
66
67
68
69
70
71
72
73
74
75
76
77
78
79
80
81
82
83
84
85
86
| ####
[iyunv@mogilefs1 ~]# mogdbsetup --dbhost=172.16.116.233 --dbuser=mfs --dbpass=mfspass --dbrootpass=123456
### 配置tracker
[iyunv@mogilefs1 ~]# vim /etc/mogilefs/mogilefsd.conf
daemonize = 1
pidfile = /var/run/mogilefsd/mogilefsd.pid
db_dsn = DBI:mysql:mogilefs:host=172.16.116.233
db_user = mfs
db_pass = mfspass
listen = 172.16.16.2:7001
conf_port = 7001
query_jobs = 10
delete_jobs = 1
replicate_jobs = 5
reaper_jobs = 1
####配置存储节点
[iyunv@mogilefs1 ~]# vim /etc/mogilefs/mogstored.conf
maxconns = 10000
httplisten = 0.0.0.0:7500
mgmtlisten = 0.0.0.0:7501
docroot = /mogstore
#####脚本创建逻辑分区作为数据存储使用
#!/bin/bash
pvcreate /dev/sda5
vgcreate myvg /dev/sda5
lvcreate -L 8G -n mogstore myvg
mkdir -p /mogstore
mke2fs -t ext4 /dev/myvg/mogstore
echo "/dev/myvg/mogstore /mogstore ext4 defaults 0 0" >> /etc/fstab
mount -a
mount
#### 创建数据存放位置
[iyunv@mogilefs1 ~]# mkdir /mogstore/dev1
[iyunv@mogilefs1 ~]# chown -R mogilefs.mogilefs /mogstore/dev1/
####启动服务
[iyunv@mogilefs1 ~]# service mogilefsd start
[iyunv@mogilefs1 ~]# service mogstored start
Starting mogstored [ OK ]
[iyunv@mogilefs1 ~]# ss -tanlp
State Recv-Q Send-Q Local Address:Port Peer Address:Port
LISTEN 0 128 172.16.16.2:7001 *:*
users:(("mogilefsd",1247,6))
LISTEN 0 128 *:7500 *:*
users:(("mogstored",1366,4))
LISTEN 0 128 *:7501 *:*
users:(("mogstored",1366,9))
### 配置host
[iyunv@mogilefs1 ~]# mogadm host add 172.16.16.2 --ip=172.16.16.2 --status=alive
[iyunv@mogilefs1 ~]# mogadm host add 172.16.16.8 --ip=172.16.16.8 --status=alive
[iyunv@mogilefs1 ~]# mogadm host list
172.16.16.2 [1]: alive
IP: 172.16.16.2:7500
172.16.16.8 [2]: alive
IP: 172.16.16.8:7500
###配置device
[iyunv@mogilefs1 ~]# mogadm device add 172.16.16.2 1
[iyunv@mogilefs1 ~]# mogadm device add 172.16.16.8 2
####配置domain
[iyunv@mogilefs1 ~]# mogadm domain add images
[iyunv@mogilefs1 ~]# mogadm domain list
domain class mindevcount replpolicy hashtype
-------------------- -------------------- ------------- ------------ -------
images default 2 MultipleHosts() NONE
####配置class
[iyunv@mogilefs1 ~]# mogadm class add images jpg
[iyunv@mogilefs1 ~]# mogadm class list
domain class mindevcount replpolicy hashtype
-------------------- -------------------- ------------- ------------ -------
images default 2 MultipleHosts() NONE
images jpg 2 MultipleHosts() NONE
|
④ mogilefs2
1
2
| [iyunv@mogilefs2 ~]# mkdir /mogstore/dev2
[iyunv@mogilefs2 ~]# chown -R mogilefs.mogilefs /mogstore/dev2/
|
⑤ mysql
1
2
3
4
5
6
7
8
9
10
11
12
13
14
15
| #### 安装mysql
[iyunv@mysql ~]# yum install mariadb-server
[iyunv@mysql ~]# vim /etc/my.cnf
[mysqld]
datadir=/var/lib/mysql
innodb_file_per_table=1
skip_name_resolve=1
log_bin=mysql-bin
#### 授权一个用户可以远程登录mysql数据库并管理mogilefs数据库
MariaDB [(none)]> grant all on *.* to 'mfs'@'172.16.%.%' identified by 'mfspass';
Query OK, 0 rows affected (0.00 sec)
MariaDB [(none)]> flush privileges;
Query OK, 0 rows affected (0.01 sec)
|
nginx的反代还是有问题~~~先这样吧,测试没问题继续上传;放在博客草稿里内容都丢了!!未完待续~~~!!!
|
|