|
|
本帖最后由 wuyvzhang 于 2016-8-2 17:26 编辑
How to use the Hyper-V snapshot Revert, Apply and Delete options, understanding how the Revert and Apply options differ and how they can be used to return a virtual machine to a previous configuration and state.
The Hyper-V snapshot feature allows you to capture the configuration and state of a virtual machine (VM) at any point in time, and return a VM to that state without noticeable interruption. When you take a snapshot of a running VM, Hyper-V briefly pauses the VM to create a new automatic virtual hard disk (AVHD) which is essentially a differencing disk, attaches it to the VM to store changes to the VM data, saves the processor state into a file (.bin), then resumes the VM. Hyper-V also makes a copy of the VM configuration file (.xml), and saves the contents of the VM memory into a file (.vsv). Snapshots can also be created when a VM is turned-off, in which case Hyper-V does not need to capture VM memory or processor state data.
The Hyper-V snapshot feature is principally for use in test and development environments, not in a production infrastructure. You especially do not want to use snapshots as a recovery mechanism for transactional applications like Microsoft Exchange Server or Active Directory Domain Services. However, snapshots can be extremely useful in scenarios where you need to make incremental changes to a virtual machine with the ability to roll back to a previous state. A VM image build lab, help desk, and application testing lab represent excellent candidates for environments that can heavily leverage Hyper-V snapshots to improve their functional efficiency.
You should be aware that there is a limit of 50 snapshots for each virtual machine. By design, if you attempt to create another snapshot once you have reached this limit, you will receive an error reporting that the snapshot has failed.
Creating a Snapshot
Figure 1 shows the Hyper-V Manager console with a single running VM before the creation of the first snapshot. In order to create a snapshot, you just highlight the VM, then right-click and select the Snapshot menu option.
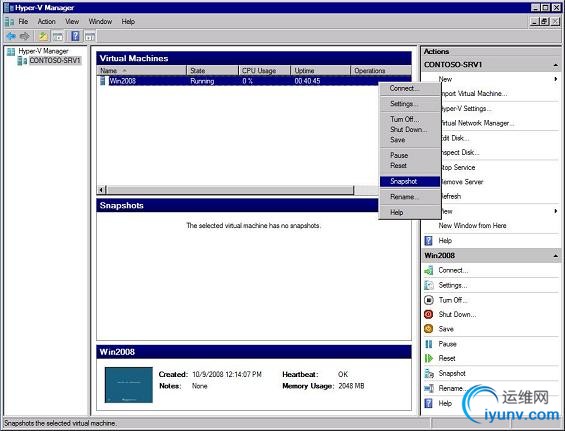 Figure 1: Creating a snapshot in Hyper-V Manager
The Hyper-V Manager Snapshots pane displays a tree structure to represents the VM snapshot hierarchy, as shown in Figure 2. The root node of the tree is the first snapshot that was created. Under the root node, there is a child named Now which represents the running version of the VM. By default, snapshots are labeled using the VM name concatenated with the creation timestamp. In order to rename the snapshot, highlight it, then right-click and select Rename from the menu.
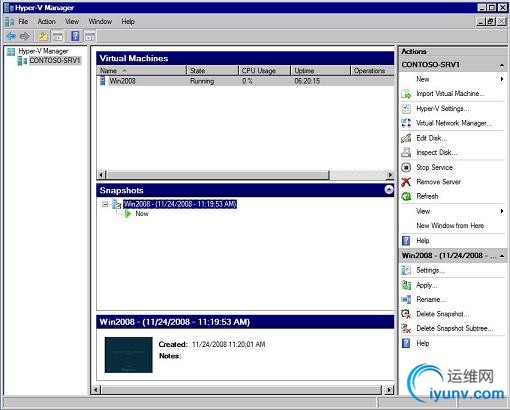 Figure 2: Hyper-V Manager Snapshot Pane Display
Within a snapshot hierarchy, with each new snapshot that is taken, the active AVHD is detached from the VM, and becomes the parent of a new child AVHD that is attached to the VM and captures changes to the VM data until the next snapshot is created.
For more details on the snapshot creation process, you can refer to my previous article, “Understanding and Using Microsoft Windows Server 2008 Hyper-V Snapshots”, and video, “Using Hyper-V Snapshots”.
Using the Revert Option
Using the Revert option allows you to return the VM to the state of the last snapshot that was taken. For example, in Figure 3, you can see that three snapshots were captured for the Win2008 VM. Each snapshot was renamed to indicate the order and state of the VM when the snapshot was taken. The VM was running during Snapshot 1 and Snapshot 2, but powered-off for Snapshot 3, and then restarted when Snapshot 3 was completed. The last object in the hierarchy, marked by Now, indicates the running VM.
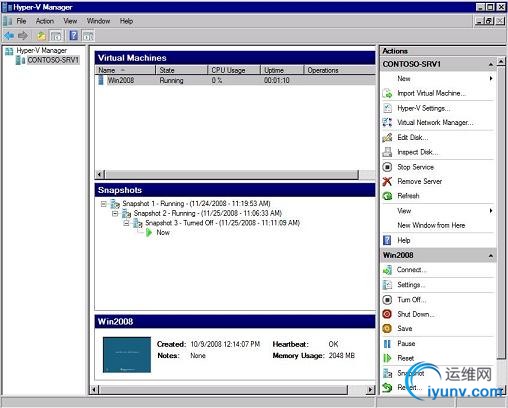 Figure 3: Hyper-V Manager Snapshot Hierarchy
If the Revert option is selected, the configuration and state of the VM are returned to the settings saved in Snapshot 3, since it is the last snapshot that was taken. During the Revert process, the VM is stopped, the current AVHD is deleted, and a new AVHD is created. The VM configuration saved during the snapshot is restored and the name of the new AVHD is updated in the VM configuration file. Because the virtual machine was powered-off when Snapshot 3 was taken, there are no save state files to load and the virtual machine remains powered-off, as shown in Figure 4. It is important to stress that when a Revert is performed, all configuration modifications made to the running VM since the snapshot was taken are discarded. However, you can make changes to the memory, processor, virtual hard disk adapter, or any other VM hardware setting, when the Revert has completed.
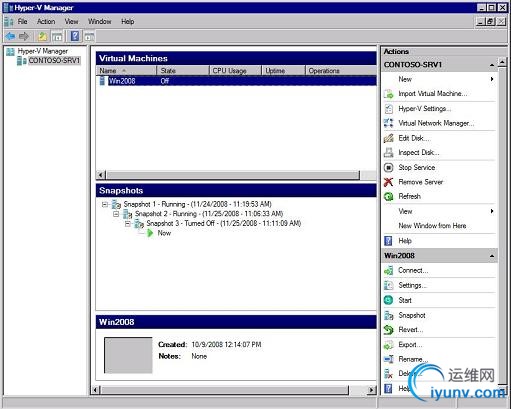 Figure 4: Hyper-V Manager View after Revert to Snapshot 3
Another thing to note in Figure 4 is that the snapshot hierarchy view did not change after the Revert was performed. That is expected since none of the snapshots are altered during this operation. However, using the Revert option again will continue to return the VM to the configuration and state of the last snapshot taken. In this sense, the snapshot Revert feature can be thought of as a single-level undo feature. It cannot be used repeatedly to traverse up the snapshot hierarchy. In the current example, if the VM must be returned to the configuration and state of Snapshot 1 or Snapshot 2, the Apply option must be used.
Using the Apply Option
As shown in Figure 5, to return to a snapshot that is higher than one level up from the running VM (represented by the Now marker in the Snapshot pane), you must highlight the snapshot, right-click, and choose the Apply option from the menu. If you did not create a snapshot of the running virtual machine, you are prompted to do so prior to the Apply operation, or you can choose to continue and apply the selected snapshot without saving the current configuration and state. Just as in the case of the Revert option, if you do not take a snapshot prior to the Apply operation, the running virtual machine configuration and state will be lost.
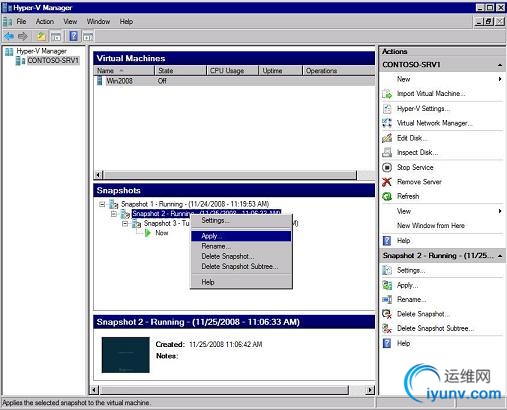 Figure 5: Using the Snapshot Apply Option in Hyper-V Manager
The snapshot Apply process is similar to the Revert process. The virtual machine is stopped, the active AVHD is deleted, and a new AVHD is created. The snapshot virtual machine configuration is restored and the name of the new AVHD is updated in the VM configuration file. As shown in Figure 6, the virtual machine is then restarted, and the save state files (.vsv and .bin) are loaded.
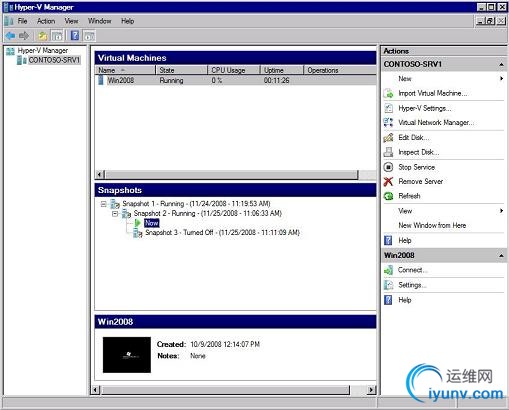 Figure 6: Hyper-V Manager Snapshot Hierarchy after Apply of Snapshot 2
You can also see in Figure 6 that the Now marker moved right under Snapshot 2 to indicate that the running VM is based on Snapshot 2. At this point, if a new snapshot is created, it is placed in the Snapshot 2 hierarchy. After the Apply is performed, Snapshot 2 essentially represents a subtree in the snapshot hierarchy, as shown in Figure 7.
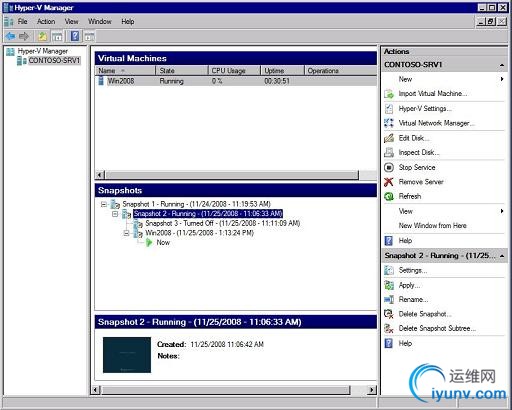 Figure 7: Hyper-V Manager Snapshot Hierarchy with the Snapshot 2 Subtree
Using the Snapshot Delete Option
If you decide that you no longer need a snapshot or snapshot subtree, Hyper-V provides two different Delete options to permanently remove one or more snapshots from the snapshot hierarchy, as shown in Figure 8.
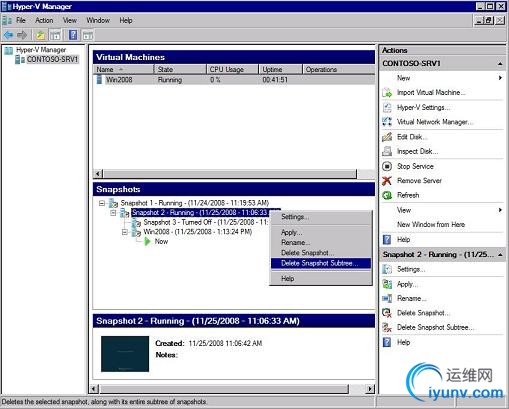 Figure 8: Hyper-V Manager Delete Snapshot and Delete Snapshot Subtree Options
Deleting a single snapshot will not affect other snapshots, but it will immediately delete the configuration file and save state files associated with the snapshot. In a snapshot hierarchy, the snapshot AVHD is related to other snapshot AVHDs through a parent-child relationship. Therefore, a snapshot AVHD is only immediately deleted if it is not the parent of a child AVHD. If there is only one child AVHD, it is merged into the parent AVHD the next time that the VM is powered-off. If a parent AVHD has multiple children, then it is retained until only one of the child AVHD remains. The child AVHD is then merged into the parent AVHD the next time that the VM is powered-off.
Deleting a snapshot subtree immediately deletes the configuration and save state files associated with all the snapshots in the subtree. If the running virtual machine AVHD is not a child of any snapshot in the subtree, then all of the AVHDs in the subtree will also be deleted. If the running virtual machine AVHD depends on a chain of AVHDs in the subtree that is deleted, then the AVHD chain will be merged into the AVHD that is one level above the deleted subtree, the next time that the VM is powered-off.
 SO娱乐城:真_人.足球.彩票齐全| 开户送10元.首存送58元.手机可投z注任何游戏顶级信用z提现即时到账SO.CC SO娱乐城:真_人.足球.彩票齐全| 开户送10元.首存送58元.手机可投z注任何游戏顶级信用z提现即时到账SO.CC |
|