实验概述
什么是nagois?
Nagios是一款开源的免费网络监视工具,能有效监控Windows、Linux和Unix的主机状态,交换机路由器等网络设置,打印机等。在系统或服务状态异常时发出邮件或短信报警第一时间通知网站运维人员,在状态恢复后发出正常的邮件或短信通知
http://www.nagios.org/

运行模式是什么:
搜集信息时是 C/S模式 , 通过浏览器查看时:B/S
nagios运维原理:
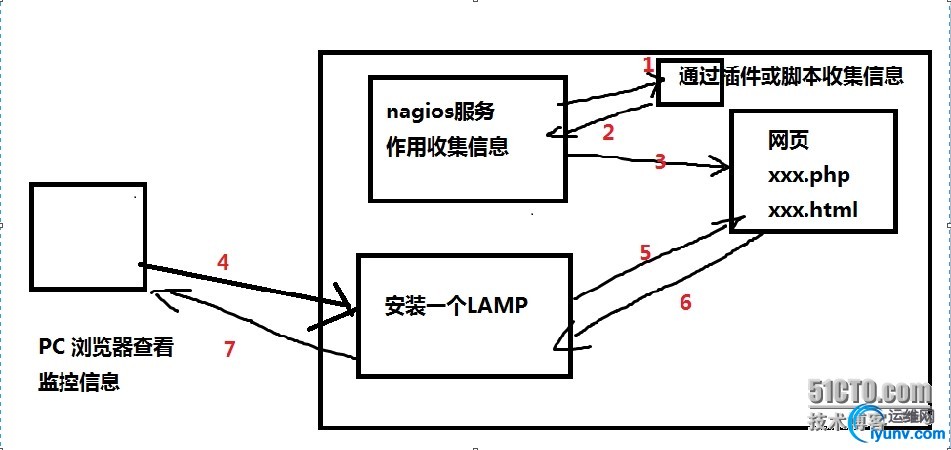
原理解析:
1:nagios服务器通过自身的插件或者编写的脚本收集需要的查看的信息
2:将收集到的信息返还给nagios服务器
3:nagios服务器再讲收集到的信息形成一个网页
4:用户通过PC机上的浏览器来访问这个页面,在这里会先到apache服务器上
5:Apache收到普通用户要访问这个页面,就会到网页上去取走用户需要的一些网页数据
6:Apache服务器再页面上收到信息的时候就会返回,将数据存放于自身的一个数据库中,以便于后面的调用
7:Apache在收集到的数据返回之后就会将数据发送给用户,这样用户就会通过数据直接访问页面。这样用户就可以通过浏览器来监控服务器的信息了。
实验目标
安装nagios 实战1:监控本机对象,监控本地NFS服务运行状态 实战2:监控外部mysql服务器劢行状态
实验环境
服务端:xuegod63.cn IP:192.168.1.63
客户端:xuegod64.cn IP:192.168.1.64
需要软件:
nagios-cn-3.2.3.tar.bz2#nagios 核心文件,nagios服务文件
nagios-plugins-1.4.16.tar.gz# nagios 中的插件。 存放:收集系统信息的脚本和命令
实验步骤
安装: nagios
搭建LAMB环境
安装需要的软件
[iyunv@xuegod63 ~]# yum install -y httpd gccglibc glibc-common php gd gd-devel libpng libmng libjpeg zlib
#这里最重要的是libpng,它是跨平台的png解码库,在后面的实验中,会生成很多的图片。
启动阿帕奇服务
[iyunv@xuegod63 ~]# service httpd restart
停止 httpd: [确定]
正在启动 httpd:httpd: Could not reliably determine the server's fully qualifieddomain name, using 202.102.110.203 for ServerName
[确定]
编写脚本并在浏览器上验证
[iyunv@xuegod63 ~]# vim/var/www/html/index.php
[iyunv@xuegod63 ~]# cat/var/www/html/index.php
<?php
phpinfo();
?>
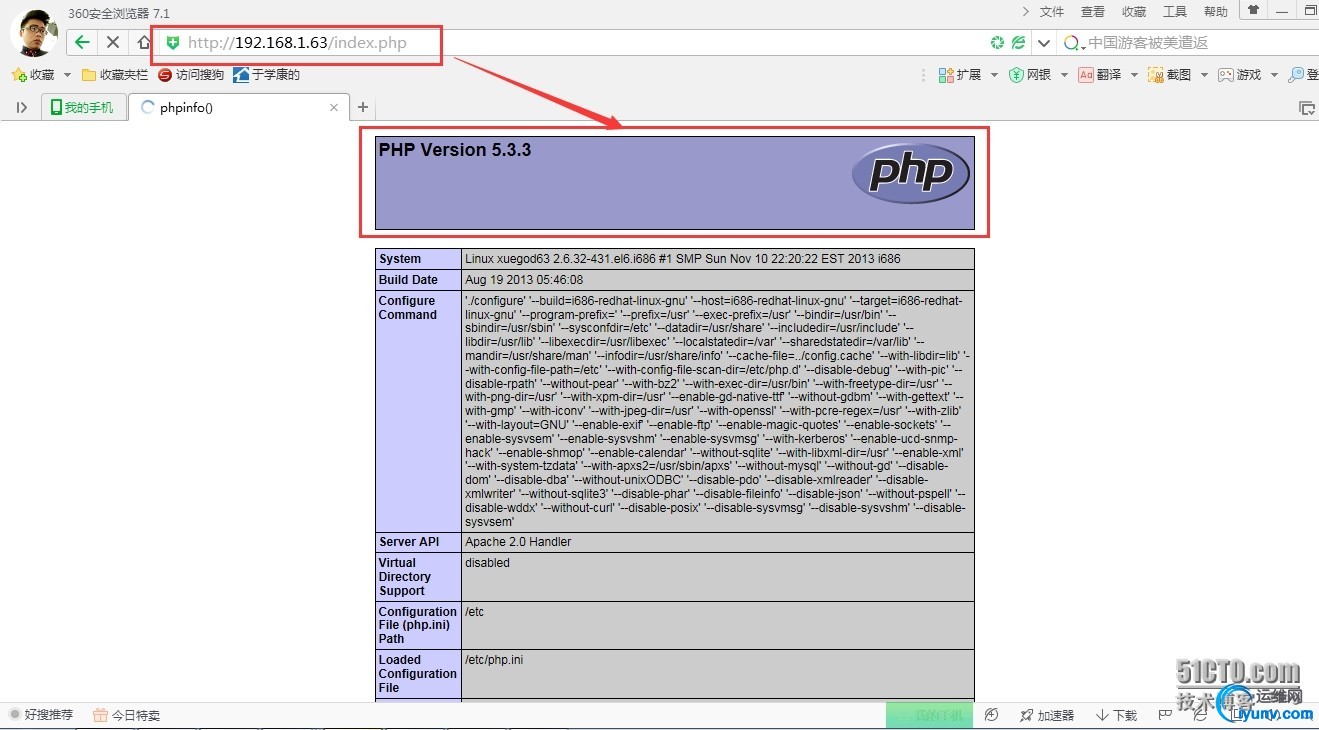
#在这里我们是可以打开的
创建运行nagios进程的用户:
root@xuegod63 ~]# useradd nagios
[iyunv@xuegod63 ~]# groupadd nagcmd
[iyunv@xuegod63 ~]# usermod -G nagcmd nagios
[iyunv@xuegod63 ~]# usermod -G nagcmd apache
[iyunv@xuegod63 ~]# id apache
uid=48(apache) gid=48(apache) groups=48(apache),501(nagcmd)
安装nagios 核心包。:
上传文件包

解压文件包
[iyunv@xuegod63 ~]#tar jxvf nagios-cn-3.2.3.tar.bz2
[iyunv@xuegod63 ~]# cd nagios-cn-3.2.3
[iyunv@xuegod63 nagios-cn-3.2.3]# ./configure--help | grep group
--with-nagios-group=<grp> sets groupname to run nagios
--with-command-group=<grp> sets groupname for command access
执行三步走 ./config make all make install
第一步--./config
[iyunv@xuegod63 nagios-cn-3.2.3]# ./configure--with-command-group=nagcmd
#指定运Nagios进程的用户组为nagcmd组
...
*** Configuration summary for nagios 3.2.0 08-12-2009 ***:
General Options: #概要信息
-------------------------
Nagios executable: nagios
Nagios user/group: nagios,nagios #nagios服务器的用户和组
Command user/group: nagios,nagcmd #执行命令的时候,使用的用户和组是什么
Embedded Perl: no
Event Broker: yes
Install ${prefix}: /usr/local/Nagios #nagios安装的路径
Lock file: ${prefix}/var/nagios.lock
Check result directory: ${prefix}/var/spool/checkresults
Init directory: /etc/rc.d/init.d
Apache conf.d directory: /etc/httpd/conf.d
Review the options above for accuracy. If they look okay,
type 'make all' to compile themain program and CGIs.
#安装之后,我们应该执行的是编译,而这里我们不在使用“make”命令去执行了,这里类型的所有编译主程序是cgi,使用的编译方法是“makeall”
第二步—make all
[iyunv@xuegod63 ~]# make all#编译
。。。
For more information on obtaining support for Nagios, visit:
http://www.nagios.org/support/
*************************************************************
Enjoy.
#这里最后如果出现“enjoy”字样,那么就是说编译的没有问题了,,这个时候我们是可以感觉到我们的服务器的硬盘运行的非常的快
小经验
如果在执行“make all”命令之后,最后出现了一些错误,而在之前的步骤你又没有出现错误,那么这个时候,你只需要将“make all”的错误信息进行清除,使用“make clean”命令即可,然后你再次执行“make all”命令重新进行编译,我想,在这个时候你就会看到你最想要看到的单词“enjoy”了。
第三步—make install
[iyunv@xuegod63 nagios-cn-3.2.3]# makeinstall
#安装生成/usr/local/nagios/ 其中,/usr/local/nagios/share 的目录(即nagiosWEB访问界面的站点目录)
………
*** Main program, CGIs and HTML filesinstalled ***
You can continue with installing Nagios asfollows (type 'make'
without any arguments for a list of allpossible options):
make install-init
- This installs the init script in /etc/rc.d/init.d
make install-commandmode
- This installs and configures permissions on the
directory for holding the external command file
make install-config
- This installs sample config files in /usr/local/nagios/etc
#这里告诉了我们命令并没有结束,还有好多命令没有执行哟!
[iyunv@xuegod63 nagios-cn-3.2.3]# ls/usr/local/nagios/
bin libexec sbin share var
[iyunv@xuegod63 nagios-cn-3.2.3]# ls/usr/local/nagios/share/
config.inc.php images index.php media side.html stylesheets
contexthelp includes main.html Nagios-cn.html side.php
docs index.html main.php robots.txt ssi
#这里share下的页面,就是我们原理图中的页面信息,是nagios服务器通过插件或者脚本收集到的页面信息
执行第三步中未执行结束的命令
生成启动脚本
[iyunv@xuegod63 nagios-cn-3.2.3]# make install-init
#安装生成/etc/rc.d/init.d/nagios 启劢脚本
/usr/bin/install -c -m 755 -d -o root -groot /etc/rc.d/init.d
/usr/bin/install -c -m 755 -o root -g rootdaemon-init/etc/rc.d/init.d/nagios
*** Init script installed ***
#这里会在/etc/rc.d/init.d/nagios下生成一个启动脚本
[iyunv@xuegod63 nagios-cn-3.2.3]# ls/etc/rc.d/init.d/Nagios -l #查看生成的启动脚本
-rwxr-xr-x 1 root root 5178 9月 21 18:43 /etc/rc.d/init.d/nagios
生成commond
[iyunv@xuegod63 nagios-cn-3.2.3]# makeinstall-commandmode
/usr/bin/install -c -m 775 -o nagios -gnagcmd -d /usr/local/nagios/var/rw
chmod g+s /usr/local/nagios/var/rw
*** External command directory configured***
#/usr/local/nagios/var/rw设定相应nagios工作目录的权限
生成nagios的配置文件
[iyunv@xuegod63 nagios-cn-3.2.3]# makeinstall-config
#安装生成/usr/local/nagios/etc下的nagios相关配置文件
[iyunv@xuegod63 nagios-cn-3.2.3]# ls/usr/local/nagios/etc/ #查看生成的配置文件
cgi.cfg htpasswd.users nagios.cfg nagiosgraph.cfg objects resource.cfg
[iyunv@xuegod63 nagios-cn-3.2.3]# cat/usr/local/nagios/etc/htpasswd.users #查看生成的配置文件中的htpasswd的配置文件
nagiosadmin:gCWSDnqEHR45c
#在这里我们可以看到这是一个密码,但是里面的的内容是什么我们是不知道的,我们也不需要知道,在实验后面中我们可以直接将web里设定一个用户和密码。
安装Nagios的WEB配置文件到Apache的conf.d目录下
[iyunv@xuegod63 nagios-cn-3.2.3]# makeinstall-webconf
/usr/bin/install -c -m 644sample-config/httpd.conf /etc/httpd/conf.d/nagios.conf
*** Nagios/Apache conf file installed ***
#这一步的主要目的是把安装文件nagios下的sample-config下的httpd.conf文件变成apache/conf/nagios.conf下的文件,这样Apache服务器在启动的时候的就会将nagios下的sample-config下的httpd.conf文件进行直接启动。
查看配置文件:
[iyunv@xuegod63 nagios-cn-3.2.3]# vim/etc/httpd/conf.d/nagios.conf
ScriptAlias /nagios/cgi-bin"/usr/local/nagios/sbin" #这是配置文件中后添加的命令
<Directory"/usr/local/nagios/sbin"> #这里也是后添加的目录
Allow from all #允许了所有人进行访问
AuthName "Nagios Access"
AuthType Basic
AuthUserFile /usr/local/nagios/etc/htpasswd.users
#这里增加了一些,Apache登录的验证信息。,名字为:Nagios Access。在“/usr/local/nagios/etc/htpasswd.users”在这个目录中,也就是我们上面查看的目录,这里放了一些密码信息,我们是不知道密码是什么的
Alias /nagios"/usr/local/nagios/share" #这里是虚拟目录,这也就是为什么我们知道nagios的页面信息会在/share下的。
生成访问http://192.168.1.63/nagios 目录的用户和密码:
[iyunv@xuegod63 nagios-cn-3.2.3]# htpasswd-c /usr/local/nagios/etc/htpasswd.users nagiosadmin
New password: 123456
Re-type new password: 123456
Adding password for user nagiosadmi
#这里我们可以看到,我们修改的新用户是“nagiosadmin”。密码就是由我们自己来设置了。
[root@xuegod63nagios-cn-3.2.3]# cat /usr/local/nagios/etc/htpasswd.users #查看生成的配置文件中的htpasswd的配置文件
nagiosadmi:v2FxeyimECCqo #这个时候这里再是密文,我们就知道这个密文是我们刚才设置的密码的
nagios相关文件目录作用:
[iyunv@xuegod63 nagios-cn-3.2.3]# ls/usr/local/nagios/
bin etc libexec sbin share var
说明:
bin :存放可执行文件。有一个重要的nagios命令,是nagios服务器主程序,用于启劢,检查nagios主配置文件nagios.cfg是否有语法等
[root@xuegod63nagios-cn-3.2.3]# ls /usr/local/nagios/bin/
nagios nagiostats
etc :配置文件目录
[root@xuegod63nagios-cn-3.2.3]# ls /usr/local/nagios/etc/
cgi.cfg htpasswd.users nagios.cfg nagiosgraph.cfg objects resource.cfg
share: 此目录就是上面WEB接口访问的站点目录,里面存放了很多页面信息
[root@xuegod63nagios-cn-3.2.3]# ls /usr/local/nagios/share/
config.inc.php images index.php media side.html stylesheets
contexthelp includes main.html Nagios-cn.html side.php
docs index.html main.php robots.txt ssi
libexec :此目录下存放所有用于监控的命令(要安装nagios-plugins插件才会有,更多检测系统环境的脚本命令)
[iyunv@xuegod63~]# ls /usr/local/nagios/libexec/
check_sys_temperature.shcheck_traffic.sh #check是用来检查配置文件=是否正确的
编译nagios插件: 生成获取系统信息的脚本
解压文件
[iyunv@xuegod63~]#tar zxvf nagios-plugins-1.4.16.tar.gz
[iyunv@xuegod63~]# cd nagios-plugins-1.4.16
[iyunv@xuegod63 nagios-plugins-1.4.16]#./configure --help | grep user
--bindir=DIR userexecutables [EPREFIX/bin]
--with-nagios-user=USER Installs executables with this user. Defaults to install user
--with-nagios-group=GROUP Installs executables with this group. Defaults to install user
#指定安装的用户和用户所属组
执行三步走--./config make make install
执行第一步-- ./config
[root@xuegod63nagios-plugins-1.4.16]# ./configure --with-nagios-user=nagios--with-nagios-group=nagcmd
#指定的用户是nagios 组属于nagcmd
执行第二步—make
[iyunv@xuegod63 nagios-plugins-1.4.16]# make
执行第三步—make install
[iyunv@xuegod63 nagios-plugins-1.4.16]# makeinstall
到此为此安装结束。……………………………………..
使用nagios流程:
1、指定主配置文件中要加载的配置文件。
2、定义主机,
3、定义服务,
4、定监控的命令
5、检查配置文件
6、启劢nagios
重启httpd服务器
[iyunv@xuegod63 ~]# service httpd restart
停止 httpd: [确定]
正在启动 httpd:httpd: Could not reliably determine the server's fully qualifieddomain name, using 202.102.110.204 for ServerName
[确定]
检查配置文件:
nagios参数-v,--verify-config Verify all configuration data
[iyunv@xuegod63 ~]#/usr/local/nagios/bin/nagios -v /usr/local/nagios/etc/nagios.cfg
………
Checking for circular paths betweenhosts...
Checking for circular host and servicedependencies...
Checking global event handlers...
Checking obsessive compulsive processorcommands...
Checking misc settings...
Total Warnings: 0
Total Errors: 0
Things look okay - No serious problems weredetected during the pre-flight check
#检查配置文件是否配置正确.这里显示了两个“0”表示了检查配置文件是没有错误的
启动nagios
[iyunv@xuegod63 ~]# /etc/init.d/nagiosrestart
Running configuration check...done.
Stopping nagios: No lock file found in/usr/local/nagios/var/nagios.lock
Starting nagios: done.
浏览器上登录nagios:
http://192.168.1.63/nagios/
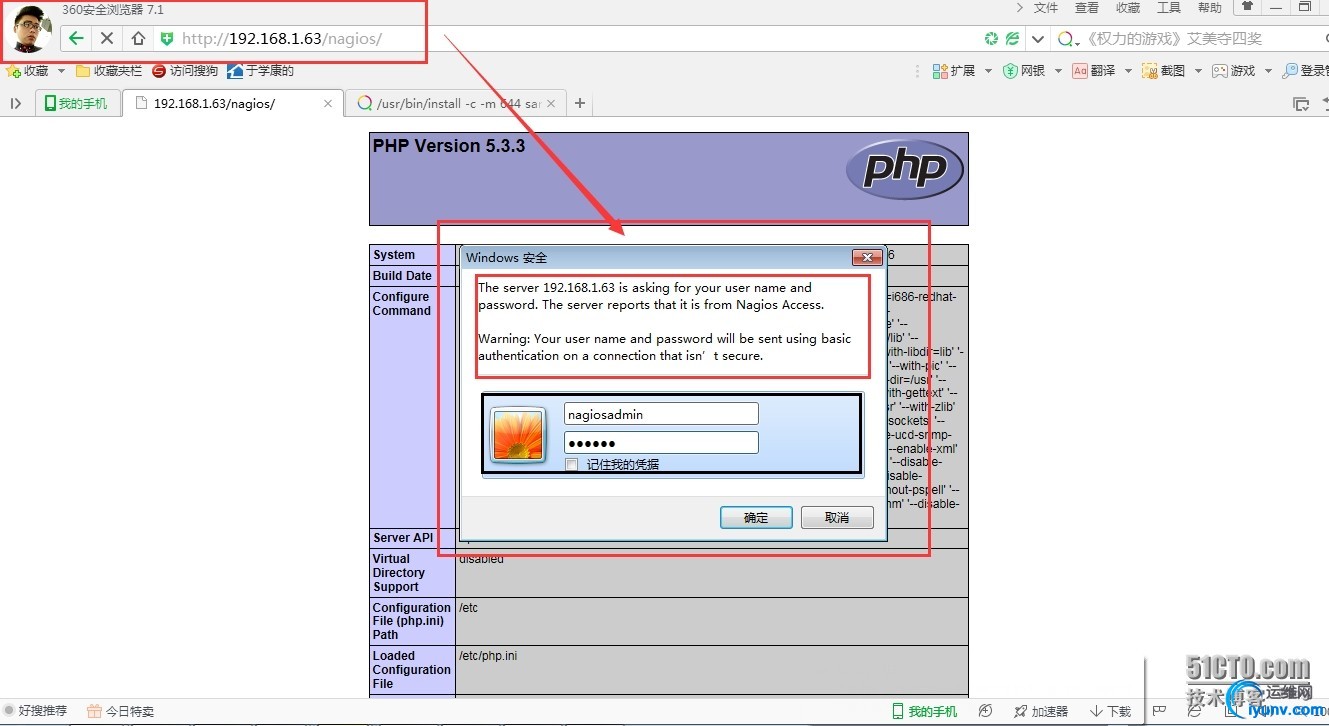
注:用户和密码是执行:
#htpasswd -c/usr/local/nagios/etc/htpasswd.users nagiosadmin 指定的
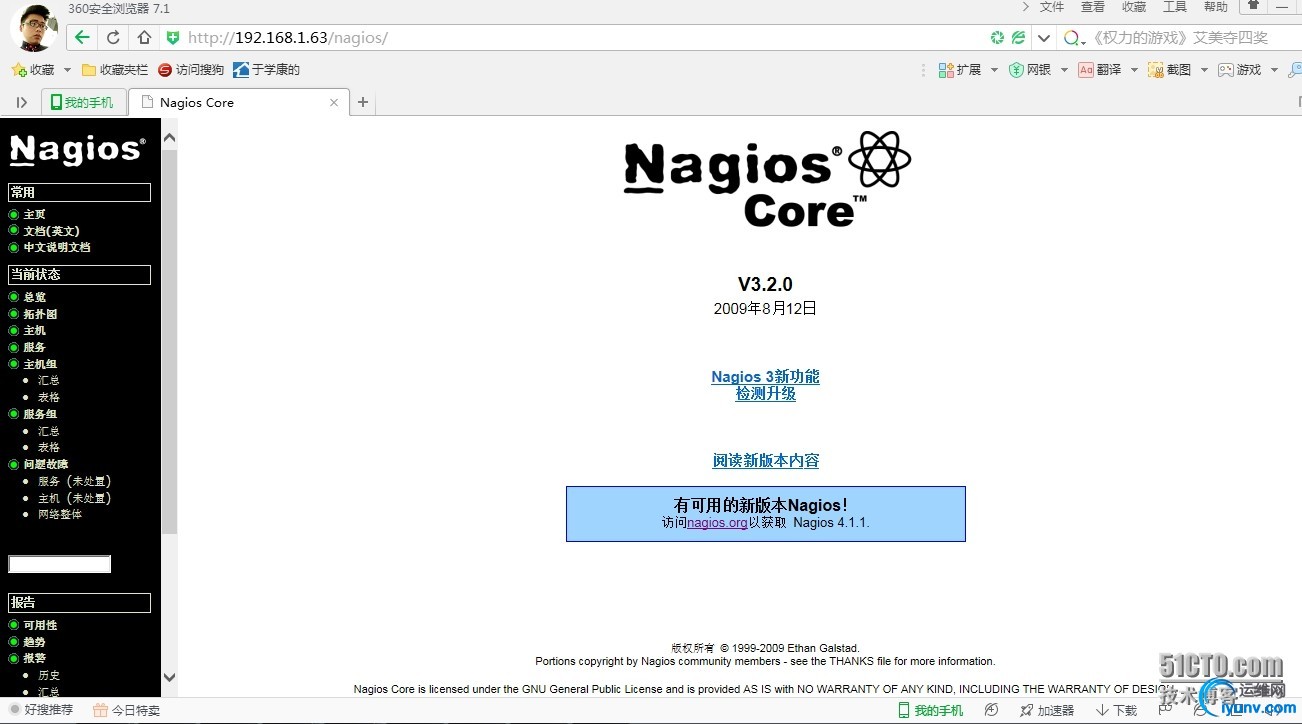
#这样我们就登陆了nagios的页面了,就可以查看我所监控的服务器的信息了,可以在主机和服务中查看到
实战1:--监控本机对象,监控本地NFS服务运行状态 使用nagios流程:
1、指定主配置文件中要加载的配置文件(此配置文件中定义了要监控的主机,服务)。
2、定义主机,主组(丌是必须)
3、定义服务,
4、定监控的命令
5、检查nagios配置文件
6、重启nagios服务
修改配置配置文件前
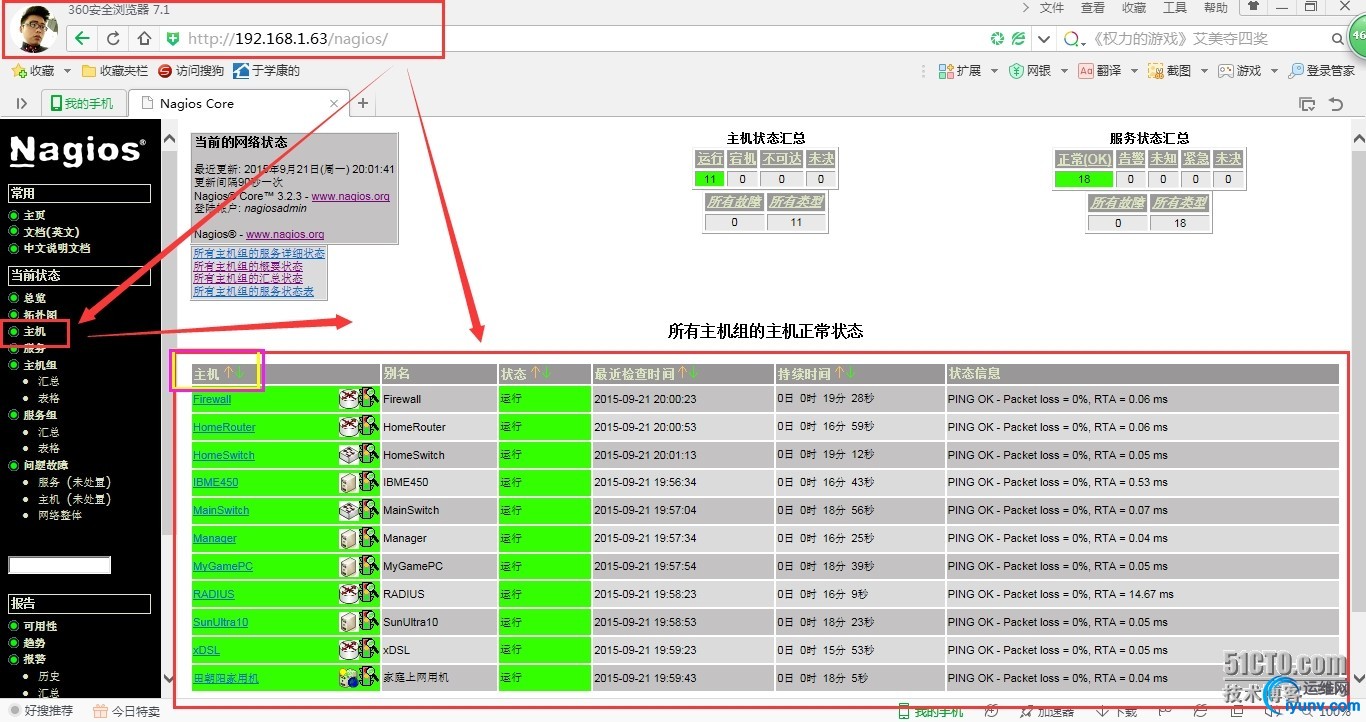
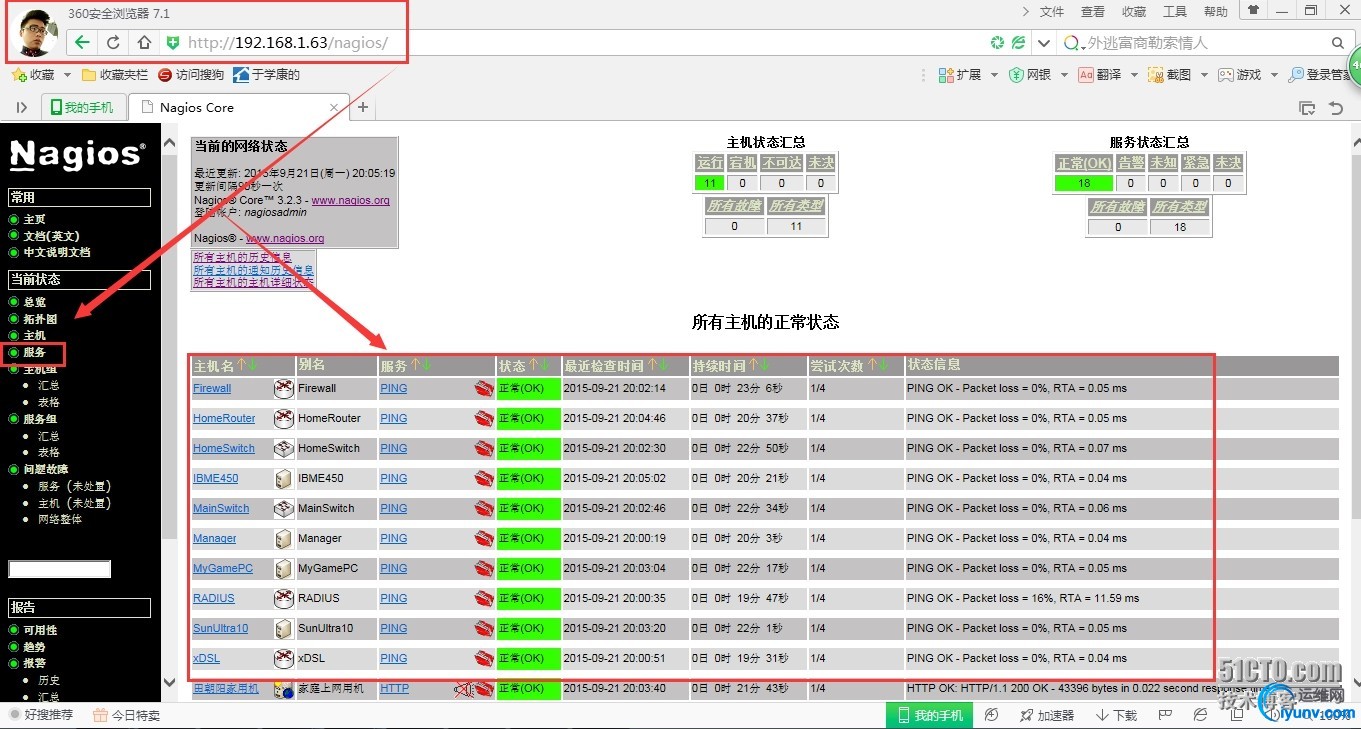
#在修改配置文件之前,点击主机或者服务的时候,会看到他监控了好多的,我们可以看到他监控的允许状态,还有检查时间与持续时间,当然,我们也可以强制修改他的检查时间。这里所显示监控的服务器都是nagios开发者的写的一些模板在里面的,很方便我们来调用与参考,
查看nagios作者写的模板案例信息
[iyunv@xuegod63 ~]# cd /usr/local/nagios/etc/objects/
[iyunv@xuegod63 objects]# ls
commands.cfg localhost.cfg switch.cfg timeperiods.cfg
contacts.cfg printer.cfg templates.cfg windows.cfg
#在此目录下放着很多模板信息,这些模板信息都是nagios的做着写的一些模板,因此在我们写的模板信息的时候,也可以在这里找到自己所写的模板信息
[iyunv@xuegod63 objects]# ls ../ #查看上一级目录下的信息
cgi.cfg htpasswd.users nagios.cfg nagiosgraph.cfg objects resource.cfg
#在这个/usr/local/nagios/etc/目录下,存放着的是定义监控的主机名
[iyunv@xuegod63 objects]# vim ../nagios.cfg
log_file=/usr/local/nagios/var/nagios.log #这里存放了主配置文件
# Definitions for monitoring the local(Linux) host
cfg_file=/usr/local/nagios/etc/objects/localhost.cfg #这里定义了监听的主机
[iyunv@xuegod63 objects]# vim localhost.cfg #查看里面的一个localhost。Cfg模板信息
HOST DEFINITION
HOST GROUP DEFINITION
SERVICE DEFINITIONS
#在这种模板信息中主要包括三种,定义主机,主机所属组和服务器
复制模板并编辑新模板
[iyunv@xuegod63 objects]# cp localhost.cfg localhost.cfg.back
[iyunv@xuegod63 objects]# vim localhost.cfg
# Define ahost for the local machine
define host{
uselinux-server ;
host_namelocalhost #定义的主机名
aliasHomeSwitch #
address127.0.0.1
icon_imageswitch.gif #定义的图片
statusmap_imageswitch.gd2
2d_coords100,200
3d_coords100,200,100
}
# HOST GROUPDEFINITION
definehostgroup{
hostgroup_namelinux-servers ; The name of the hostgroup
alias LinuxServers ; Long name of the group
members localhost ; Comma separated list of hoststhat belong to this group
}#这里定义的组 ,里面的成员要是上面定义的主机名相同
defineservice{
uselocal-service
host_name localhost #定义服务器的名称
service_descriptionNFS
check_command check_tcp!2049 #这里定义了监听的端口 在这里用了命令是“check_tcp”
}
查找check_tcp的命令定义
[iyunv@xuegod63 ~]# cd/usr/local/nagios/etc/objects/
[iyunv@xuegod63 objects]# ls #查找目录下的命令模板
commands.cfg localhost.cfg printer.cfg templates.cfg windows.cfg
contacts.cfg localhost.cfg.back switch.cfg timeperiods.cfg
[iyunv@xuegod63 objects]# vim commands.cfg #
#在这“/usr/local/nagios/etc/objects/ commands.cfg”目录下,我们可以查找到“check_tcp”的定义类型。
注:
在这里定义了监听的命令类型是什么样,在上文中的模板中写的监听命令要同这里的命令一样。
查看nfs的端口
[iyunv@xuegod63nagios]# vim /etc/services

检查配置文件是否成功
[iyunv@xuegod63 bin]# pwd
/usr/local/nagios/bin
[iyunv@xuegod63 bin]# ./nagios -v ../etc/nagios.cfg
…………….
Checking obsessive compulsive processorcommands...
Checking misc settings...
TotalWarnings: 0
TotalErrors: 0
Things look okay - No serious problems weredetected during the pre-flight chec
#,这里显示警告和错误都是0,表示配置文件“/nagios.cfg”正常。
配置本地NFS服务器:
[iyunv@xuegod63 ~]# vim /etc/exports
[iyunv@xuegod63 ~]# cat /etc/exports
/tmp *(rw)
#将/tmp下的文件进行共享出去,并且权限是可读可写的权限
重启nfs服务
[iyunv@xuegod63 ~]# /etc/init.d/nfs restart
关闭 NFS 守护进程: [失败]
关闭 NFS mountd: [失败]
关闭 NFS quotas: [失败]
Shutting down RPC idmapd: [失败]
启动 NFS 服务: [确定]
关掉 NFS 配额: [确定]
启动 NFS mountd: [确定]
启动 NFS 守护进程: [确定]
正在启动 RPC idmapd: [确定]
检查是否共享成功:
[iyunv@xuegod63 ~]# showmount -e 192.168.1.63
Export list for 192.168.1.63:
/tmp *
#共享成功
重启nagios服务
[iyunv@xuegod63 ~]# /etc/init.d/nagiosrestart
Running configuration check...done.
Stopping nagios: done.
Starting nagios: done.
测试:
刚重启nagios后,马上访问会,出以下情况:
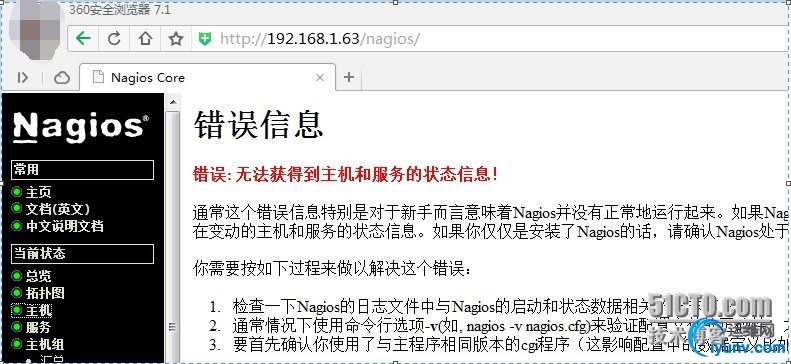
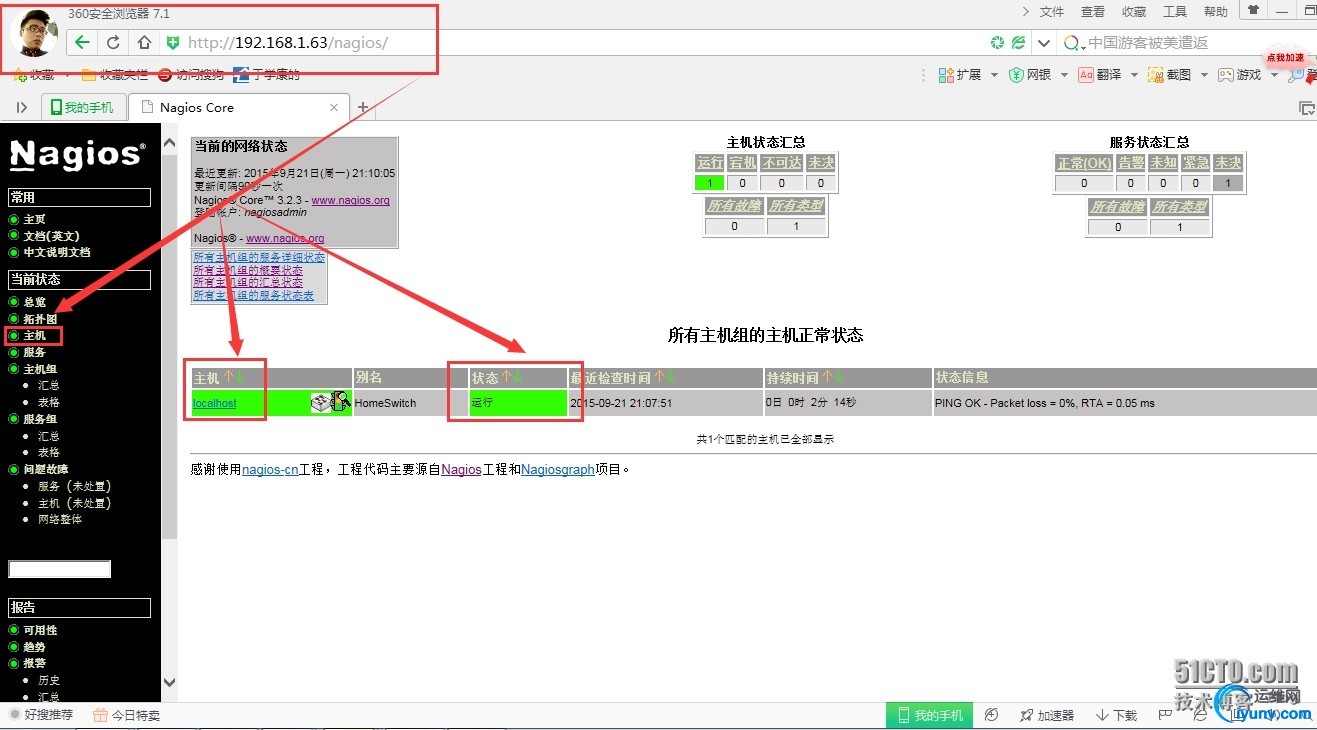
#等待2分钟后,重新访问,发现工作正常。 点击主机,发现状运行中,状态信息栏,可以看到测试主机信息使用的命令:
查看主机
查看服务:
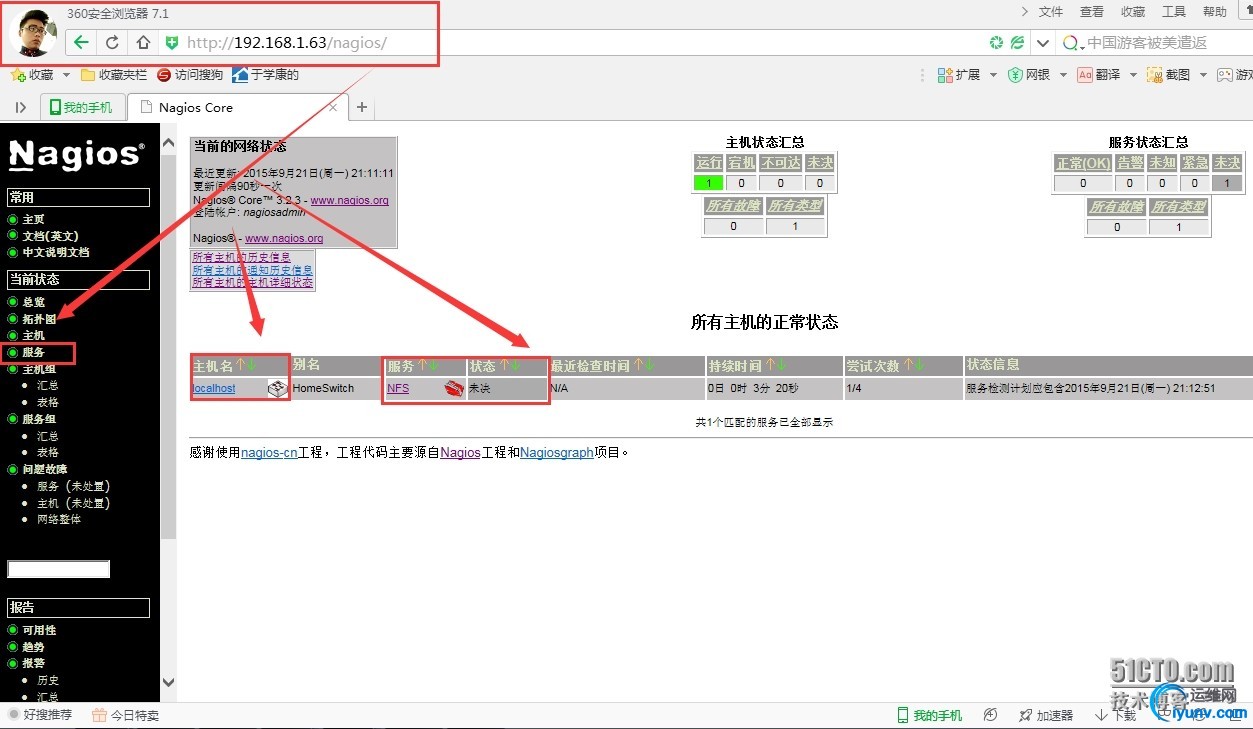
#这里显示未决,表示不知道是好还是坏,如果长时间都不跳转的话,就点击服务器“nfs”在里面设置强制检查。
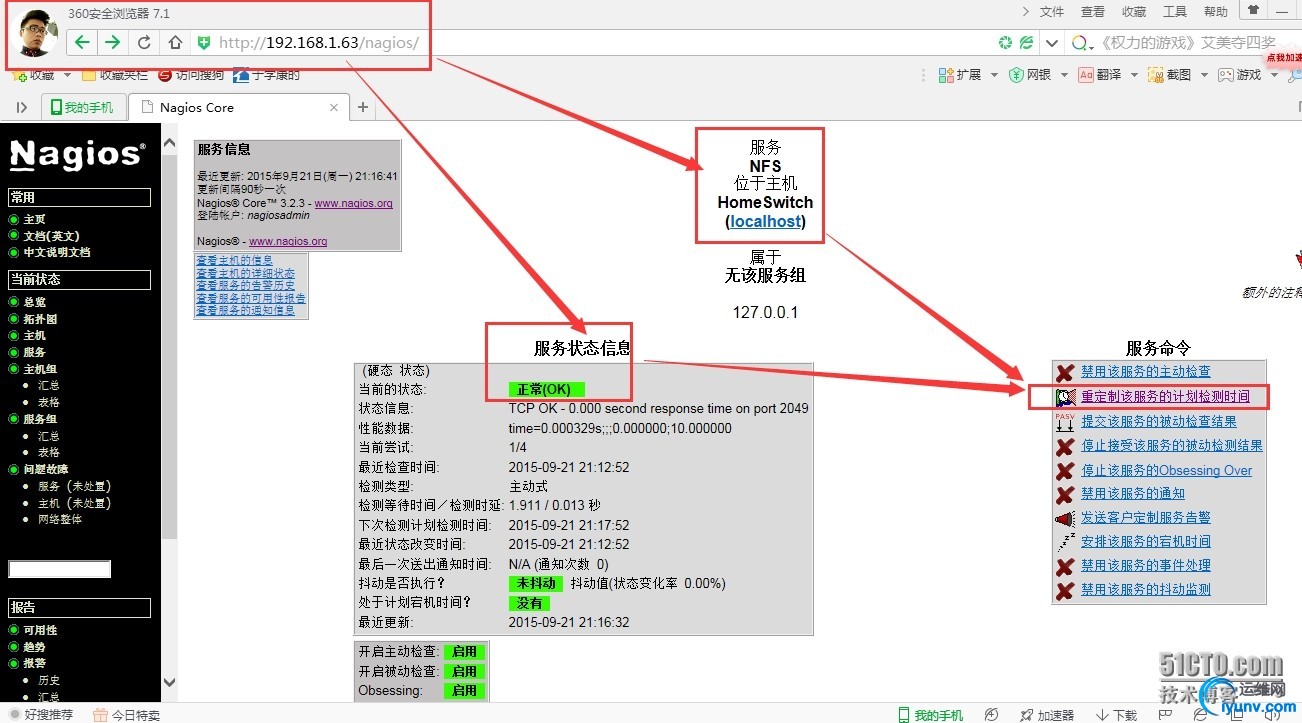
#这里是检查过了的,如果状态还是未决,这里会显示“该服务未被检测,状态信息不可用”的字样。我们可以点击右边的“重新定制检测服务器时间”因为在检测一台服务器的状态是是由时间间隔的,出现上述情况的就是正好处于时间间隔中,因此我们可以缩小检测服务器状态的时间,当然也可以点击强制更新,但是建议不要选择强制更新。
模拟关闭服务并查看监控状态
关闭nfs服务
[iyunv@xuegod63 objects]# /etc/init.d/nfsstop
关闭 NFS 守护进程: [确定]
关闭 NFS mountd: [确定]
关闭 NFS quotas: [确定]
关闭 NFS 服务: [确定]
Shutting down RPC idmapd: [确定]
网页查看
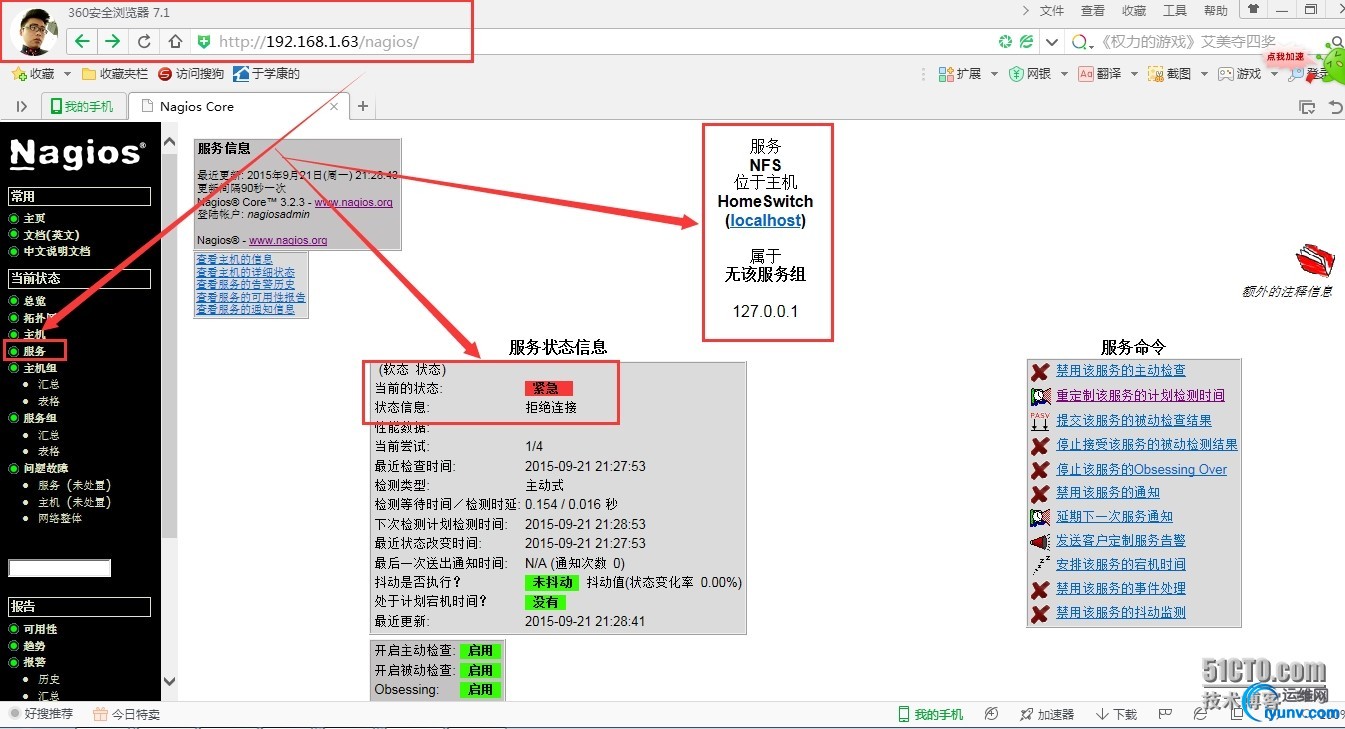
#这里我们看到nfs已经出现紧急情况,他的运行状态已经不在我们的监控范围之内了,告诉我们,nfs服务已经关闭,出现问题了,这也就提示运维人员要去修复它。
注:
[iyunv@xuegod63 objects]# ls ../
cgi.cfg htpasswd.users nagios.cfg nagiosgraph.cfg objects resource.cfg
#在这里的“nagios.cfg ”模板里面的信息不在是nagios作者写的数据了,而是我们刚刚写进去的信息。
实战2:---在xuegod63上,监控外部主机xuegod64上的mysql服务器劢行状态
使用nagios流程:
1、指定主配置文件中要加载的配置文件(此配置文件中定义了要监控的主机,服务)。
2、定义主机,主组(丌是必须)
3、定义服务,
4、定监控的命令
5、检查nagios配置文件
6、重启nagios服务
xuegod63上,配置nagios :
root@xuegod63etc]# pwd
/usr/local/nagios/etc
[iyunv@xuegod63etc]# vim nagios.cfg
改:cfg_file=/usr/local/nagios/etc/objects/localhost.cfg
为:注释localhost这一项,添加以下两行:
#cfg_file=/usr/local/nagios/etc/objects/localhost.cfg
cfg_file=/usr/local/nagios/etc/objects/hosts.cfg
cfg_file=/usr/local/nagios/etc/objects/service.cfg

生成要检测的主机配置文件和服务配置文件:
[iyunv@xuegod63 objects]# vim hosts.cfg# 添加以下内容
[iyunv@xuegod63 objects]# cat hosts.cfg
define host{
uselinux-server
host_name xuegod64.cn
alias mysql服务器
address 192.168.1.64
icon_image server.gif
statusmap_image server.gd2
2d_coords 500,200
3d_coords 500,200,100
}
[iyunv@xuegod63 objects]# vim service.cfg # 添加以下内容
[iyunv@xuegod63 objects]# cat service.cfg
###################check_mysql#############################
define service{
use local-service
host_name xuegod64.cn
service_groups mysql服务组
service_description mysql服务
check_command check_mysql
}
##########################check_mysql_groups#########################
define servicegroup{
servicegroup_name mysql服务组
alias mysql服务器
members xuegod64.cn,mysql服务
}
[iyunv@xuegod63 objects]# vim commands.cfg #在此文件最后添加以下内容:
define command{
command_name check_mysql
command_line $USER1$/check_mysql -H$HOSTADDRESS$ -u nagdb -d nagdb
}
注意:
所有check_command字段中使用的命令都必须事先在/usr/local/nagios/etc/objects/command.cfg中定义好,才可使用。而/usr/local/nagios/etc/objects/command.cfg中的命令是在/usr/local/nagios/libexec/check_* 中存在(这些命令是安装nagios-plugins插件后产生的)。
检测配置文件:
Xuegod63
[iyunv@xuegod63 nagios]# ./bin/nagios -v./etc/nagios.cfg
…….
Checked5 time periods.
Checking obsessive compulsive processor commands...
Checking misc settings...
Total Warnings: 0
Total Errors: 0
#这里出现两个“0”。表示配置文件正常,如果要是有问题的话,就会显示“1”
重启nagios服务
[iyunv@xuegod63 ~]# service nagios restart
Running configuration check...done.
Stopping nagios: done.
Starting nagios: done.
Xuegod64
[iyunv@xuegod64 ~]# yum install mysql-server-y
[iyunv@xuegod64 ~]# service mysqld restart
成用于测试的数据库:nagdb 和用于测试时登录用户:nagdb
[iyunv@xuegod64~]# mysql
mysql>create database nagdb;
Query OK, 1row affected (0.00 sec)
mysql>create database nagdb;
Query OK, 1row affected (0.00 sec)
mysql> grant select on nagdb.* tonagdb@'192.168.1.63';
Query OK, 0 rows affected (0.02 sec)
mysql> exit
Bye
使用check_mysql脚本,手劢检查mysql服务运行状态。
语法: $USER1$/check_mysql-H $HOSTADDRESS$ -u nagdb -d nagdb
重启mysqld服务
[iyunv@xuegod64 ~]# /etc/init.d/mysqldrestart
停止 mysqld: [确定]
正在启动 mysqld: [确定]
[iyunv@xuegod63 objects]#/usr/local/nagios/libexec/check_mysql -H 192.168.1.64 -u nagdb -d nagdb
Uptime: 516 Threads: 1 Questions: 6 Slow queries: 0 Opens: 15 Flush tables: 1 Open tables:8 Queries per second avg: 0.11
#上述命令执行后,出现以下信息,表示正常,连接192.168.1.64的mysql里面的用户是正常的
关闭测试
[iyunv@xuegod64 ~]# /etc/init.d/mysqld stop
停止 mysqld: [确定]
[iyunv@xuegod63 objects]#/usr/local/nagios/libexec/check_mysql -H 192.168.1.64 -u nagdb -d nagdb
Can't connect to MySQL server on'192.168.1.64' (111)
#关闭了mysqld服务之后,再次尝试连接的时候,就连接不上去了
启动mysql服务和Apache服务
[iyunv@xuegod64 ~]# /etc/init.d/mysqldrestart
停止 mysqld: [确定]
正在启动 mysqld: [确定]
[iyunv@xuegod64 ~]# /etc/init.d/httpdrestart
停止 httpd: [确定]
正在启动 httpd:httpd: apr_sockaddr_info_get() failed for xuegod64
httpd: Could not reliably determine theserver's fully qualified domain name, using 127.0.0.1 for ServerName
[确定]
启动nagios
[iyunv@xuegod63 nagios]# /etc/init.d/nagiosrestart
Running configuration check...done.
Stopping nagios: done.
Starting nagios: done.
查看,主机和服务:
http://192.168.1.63/nagios/
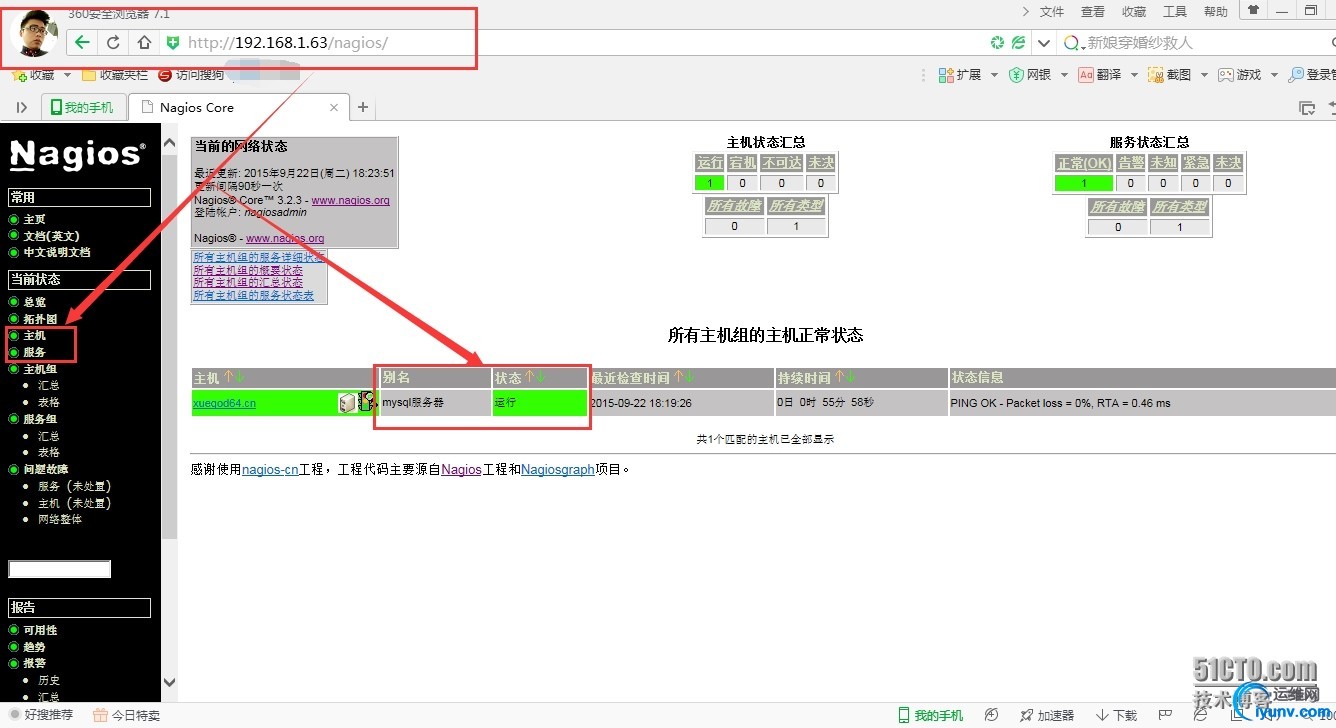
#这样,我们就可以监控mysql数据库的运行状态了。
说明:----状态信息,由以下检测脚本产生:
[iyunv@xuegod63objects]# /usr/local/nagios/libexec/check_mysql -H 192.168.1.64 -u nagdb -dnagdb
Uptime: 222Threads: 1 Questions: 6 Slow queries: 0 Opens: 15 Flush tables: 1 Open tables:8 Queries per second avg: 0.27
实验总结
Nagios作为一个开源性的监控软件,它就是我们运维人员的法宝,不再因为服务器出现某个错误时而一筹莫展,找不到错误的原因,很好的提供了排错思路。在安装nagios软件时,要格外的注意,在安装前提一定要搭建好一个LAMB环境。因为nagios软件是在LAMB环境下工作运行的,再搭建nagios监控服务器运行状态时,要格外的注意安装步骤,里面的三步走,不同于其他服务器的搭建,并且在搭建监控服务器之前要知道自己需要监控的服务器的端口,而且,在最后的时候,要在xuegod64上重新启动Apache服务器,在这样的情况下,我想,安装一个nagios来监控服务器的运行状态就是一件很简单的事情了。
外注:
由于本人正在学习linux,并且是一名学生,没有工作经验,不能够给你提供不同的思路,和方案,本人表示抱歉。同时也希望给位大大看到本人的博客之后,发下有不足,错误之处,欢迎大家指教,我一定会第一时间内进行修改,并学习。
|