|
|
http://msdn.microsoft.com/en-us/library/gg180738.aspx
Microsoft InfoPath 2010 makes designing and publishing electronic forms easier than ever. InfoPath enables you to create powerful, interactive forms without writing any code. With a few clicks, an Office user can customize SharePoint list forms, add custom layout elements, and add business rules to validate the data. In addition to working with the forms online while connected to SharePoint Server 2010, you can also take the list and associated forms offline, and then work with the forms in SharePoint Workspace.
The following technologies are highlighted in this lab:
- InfoPath 2010
- SharePoint Server 2010
- SharePoint Workspace 2010
Lab Objectives
After completing this lab, you will know how to:
- Create a custom layout using out-of-the-box functionality.
- Use the following InfoPath controls:
- Person/Group Picker
- Date and Time picker
- Picture button
- Calculated values
- Create data validation rules.
- Create conditional formatting rules.
- Sync the list to SharePoint Workspace to create and edit list items while offline.
This lab introduces you to some of the key new functionality in InfoPath 2010:
- SharePoint List forms
- Quick Rules
- New controls
- Data validation
Scenario
The recruiting team at Contoso manages interview candidates in a SharePoint list. The team wants more control over the layout of the form, and also wants to customize the form with proprietary data and images. Also, the team wants to add custom validation to their form to prevent common mistakes. Recruiters and interviewers also have to take this list offline to be able to use the form when they are out of the office.
Part 1 ─ Setting up the InfoPath List Lab Site
Before you can start the lab, set up the InfoPath List Lab site that contains the lists and other resources required to complete the lab exercises. To do that, download theInfoPath_List_Lab.wsp solution package that contains the InfoPath List Lab site template solution. Then, upload the WSP file to your SharePoint Server 2010 server. Finally, create a new site based on the template as described in the following steps.
To upload and activate the WSP file to a site collection
- On the top-level site of the site collection, on the Site Actions menu, click Site Settings.
- On the Site Settings page, in the Galleries section, click Solutions.
- On the Solutions tab of the ribbon, in the New group, click Upload Solution.
- In the Upload Document dialog box, click Browse.
- In the Choose File to Upload dialog box, locate the InfoPath_List_Lab.wsp file that you downloaded, select the file, and then click Open.
- In the Upload Document dialog box, click OK.
The Solution Gallery – Activate Solution dialog box appears.
- In the Solution Gallery – Activate Solution dialog box, click Activate.
This makes the site template solution available to create sites in this site collection. The name of the WSP file that you uploaded now appears in the Solutions Gallery withStatus set to Activated.
In the next procedure, you will create a new site based on the InfoPath List Lab site template solution.
To create a new site based on the site template solution
- Open the top-level site in your site collection, and on the Site Actions menu, click New Site.
- In the Create dialog box, under Filter By, click Blank & Custom.
- Click the InfoPath List Lab site.
- In the Title box, type InfoPath List Lab.
- In the URL name box, type InfoPath List Lab, and then click Create.
This will create a new site populated with the lists and items required to perform the lab. The URL for the site will be http://<site collection>/InfoPath%20List%20Lab/.
Part 2 ─ Customizing a SharePoint List Form
In this part of the lab, you will customize the layout of the SharePoint List form by using InfoPath. Your first step is to locate the interview candidate list.
To navigate to the Interview Candidates list
- Navigate to http://<site collection>/InfoPath%20List%20Lab/ in Internet Explorer.
- Select Interview Candidates in the Lists list as shown in Figure 1.
Figure 1. Selecting the Interview Candidates list

After you have found the interview candidate list, open the list form in the InfoPath Designer 2010.
To open the list form in the InfoPath 2010 Designer
- On the List tab of the ribbon, click Customize Form as shown in Figure 2.
Figure 2. Customizing the list form
 The InfoPath Designer opens with an auto-generated layout of the form. Although the auto-generated layout is a legitimate starting point, this exercise starts with a blank form in order to demonstrate how to create your own layout.
- In the InfoPath Designer, select the form design canvas with your cursor.
- Press CTRL+A to select all the content in the form.
- Press the Delete key to delete the form content.
After opening the list in the InfoPath Designer, you can create the basics for a new custom layout.
To create a new custom layout
- On the Page Design tab, click Page Layout Templates, and then click Title Only as shown in Figure 3.
Figure 3. Inserting the Title Only page layout

- Center the page layout by selecting the layout table, and then clicking the Center button on the Home tab of the ribbon.
- Place your cursor in the body of the page layout by clicking the Add tables placeholder text.
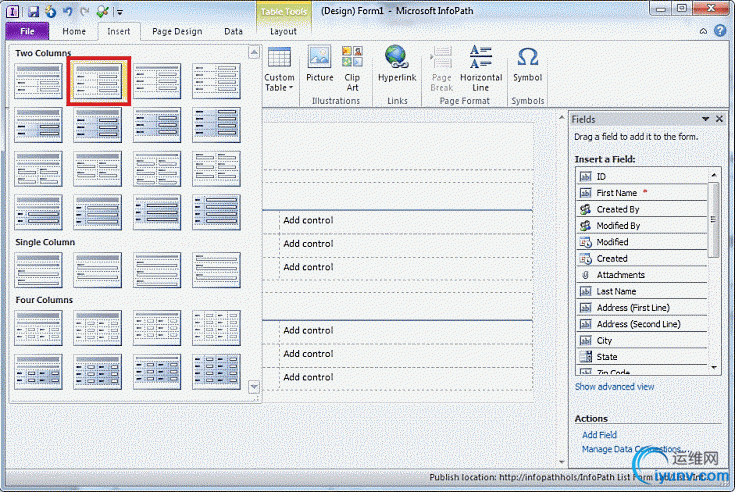
- On the Insert tab, click the arrow at the lower-right corner of Tables section to expand the gallery of tables.
- Insert three Two Column 2 tables as shown in Figure 4.
Figure 4. Inserting the Two Column 2 tables
- Add the following headings to the tables that you previously added:
- Personal Information
- Position and Interview
- Decision
After you create the basic template, you can continue to improve your form by adding a header and applying a theme.
To add a header image to the form and apply a theme
- Place your cursor in the title area of the page layout by clicking the Click to add title placeholder text.
- Add the heading banner to the form by inserting a picture from the Insert tab on the ribbon. The image can be found in the Lab resources library on the site and is called "banner.png".
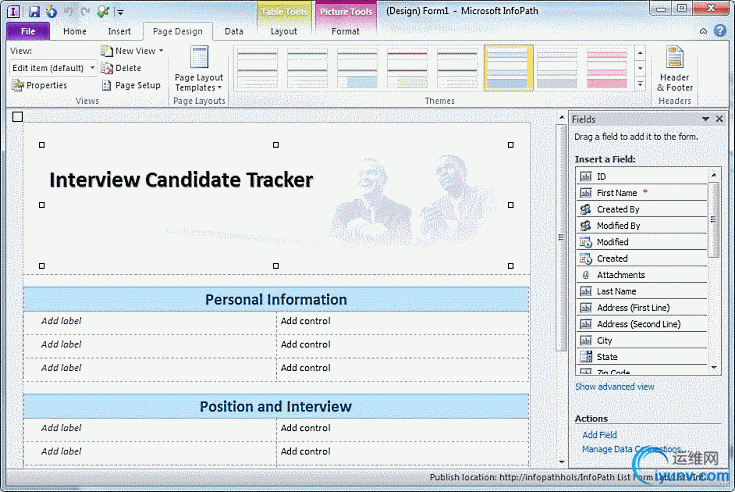
- On the Page Design tab, apply the Professional – Standard theme. The easiest way to select the theme is to expand the Themes gallery by clicking the arrow at the lower-right corner. The Professional – Standard is the first theme in the Professional section.
The heading banner and page design should now resemble Figure 5.
Figure 5. Heading banner and theme
In the next procedure, you will add controls to the Personal Information and Position and Interview sections of the form to make your form resemble Figure 6 shown at the end of the procedure. You will finish the Decision section in the next exercise.
To add controls to your form
- To add controls to your form, drag fields from the Fields task pane onto the canvas. The label for the control will appear automatically in the left column when you drag the field into the right column of the table. However, this is true only if you highlight both columns when you release the mouse.
- Add additional rows in each table by positioning your cursor in the bottom row of the table, and then click Insert Below on the Layout tab under Table Tools.
- Drag the Attachments field to the last row of the Personal Information table for the resume. After you have dragged the field onto the canvas, type in the label Resume.
- Before inserting controls for the Interview Score row, split the right cell into five columns and two rows. To do so, place your cursor in the cell, and then click Split Cells on the Table Tools Layout tab. Because the layout of this part of the form is a bit different, you will have to type in the labels manually.
- Use the Layout tab to control vertical alignment of labels. The labels will look best if they are centered vertically. To do so, select all the labels in a table before you change the alignment. By selecting all the labels, you will not have to reapply the alignment for every cell.
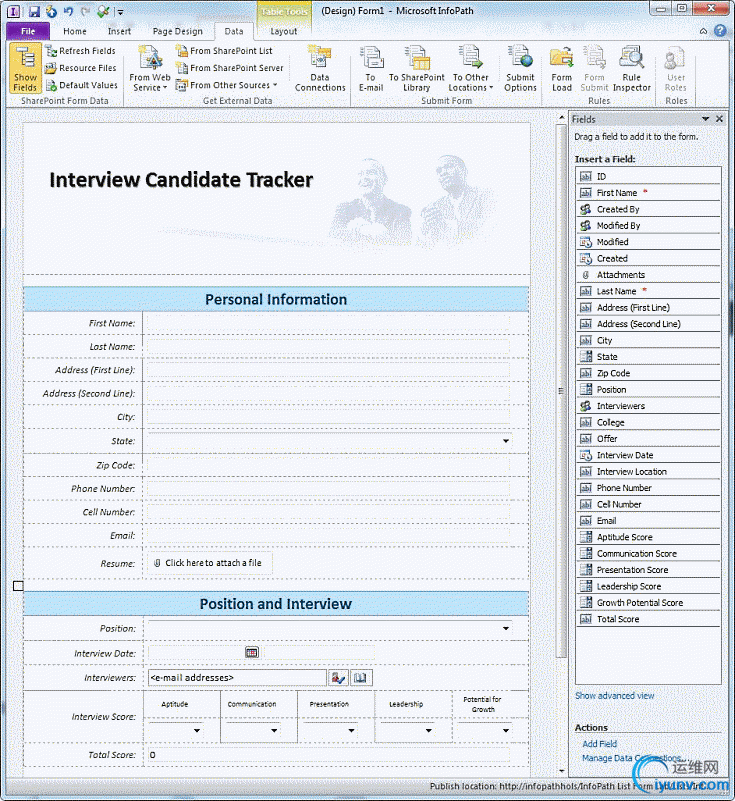
When you have completed these steps, the form should resemble Figure 6.
Figure 6. Personal Information and Position and Interview controls
In the next procedure, you will set up the data source for the Position drop-down so that the control will retrieve data from a SharePoint list named Positions.
To set up the data source for the Position dropdown
- Select the Position control.
- On the Control Tools Properties tab, click Control Properties.
- On the Data tab, in List box choices, select Get Choices from an external source.
- Click the Add button.
- Click Next, keeping the default options in the first page of the wizard.
- Select SharePoint library or list, and then click Next.
- Type in the SharePoint site URL, http://<site collection>/InfoPath List Lab/, and then click Next.
- Select the Positions list, and then click Next.
- Select the Title check box in the fields list (you do not need the other fields in this form), and then click Next.
- On the following page of the wizard, click Next.
- Click Finish on the final page of the wizard. When you have completed these steps, the settings in the Drop-Down List Box Properties dialog box should resemble Figure 7.
Figure 7. Position drop-down list box settings

- Click OK in the Drop-Down List Box Properties dialog box to close it.
At this point, take time to preview your design.
To preview the form
- Press F5 or click the Preview button on the Home tab.
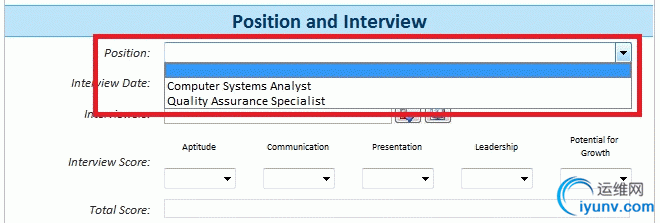
- Notice that the Position drop-down list is populated by data from the Positions SharePoint list as shown in Figure 8.
Figure 8. Position drop-down list box displaying data from the Positions SharePoint list
- To close the preview, click the X in the upper-right corner of the window.
Part 3 ─ Adding Validation, Conditional Formatting, and Logic to Your Form
In this part of the lab, you will customize the layout of the SharePoint List form by using InfoPath.
Use the following steps to add validation to the Email field by using a built-in rule.
To add validation for the email address
- Select the Email text box.
- On the Home tab in the ribbon:
- Click Add Rule.
- Click Is not an E-mail address.
- Click Show validation error.
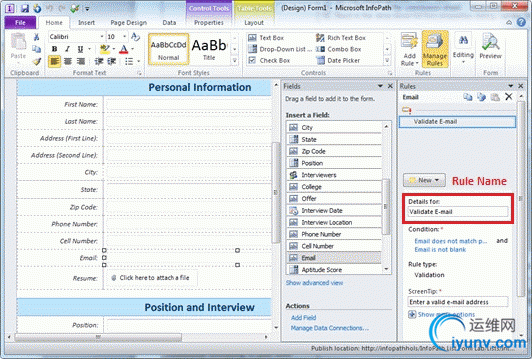
- Change the name of the rule to Validate E-mail in the Rules task pane as shown in Figure 9.
Figure 9. Validate E-mail rule
Use the following steps to build a custom rule to validate the Zip Code field. The goal is to validate that the ZIP code has five digits, and does not require that the field contain a value.
To add validation for the ZIP Code
- Select the Zip Code text box.
- If the Rules task pane is not already showing, click Manage Rules on the Home tab.
- In the Rules task pane, click New then select Validation to create a validation rule action.
- Name the rule Validate ZIP code.
- Click None (under Condition:) to add two conditions:
- Zip Code is not blank.
- Zip Code does not match pattern Zip code.
The settings for rule in the Condition dialog box should resemble Figure 10.
Figure 10. Validate ZIP code rule

- In the Rules task pane, set the ScreenTip for the rule to Enter a valid ZIP code.
Use the following steps to build a custom rule to validate the phone number fields.
To add validation for the phone number fields
- Select the Phone Number text box.
- If the Rules task pane is not already showing, click Manage Rules on the Home tab.
- In the Rules task pane, click New then select Validation to create a validation rule action.
- Name the rule Validate phone.
- Click None to add two conditions:
- Phone Number is not blank.
- Phone Number does not match pattern Phone number.
- Set the ScreenTip for the rule to Enter a valid phone number (###) ###-####.
- Copy and paste the rule to the Cell number field:
- Select the Validate phone rule in the list of rules at the top of the Rules task pane.
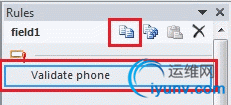
- Click the Copy button in the toolbar at the top of the Rules task pane. This toolbar and button are shown in Figure 11.
Figure 11. Copy button in the Rules task pane
- Select the Cell number text box.
- Click Paste rule in the toolbar at the top of the Rules task pane.
Use the following steps to add conditional formatting to the score fields to make them:
- Red if the score is between 1 and 4.
- Yellow if the score is between 5 and 7.
- Green if the score is between 8 and 10.
Your first step is to create the conditional formatting for the interview score fields.
To add conditional formatting to the Interview Score fields
- Select the Aptitude drop-down list.
- If the Rules task pane is not already showing, click Manage Rules on the Home tab.
- In the Rules task pane, click New then select Formatting to create a conditional formatting rule action.
- Name the rule Color ranges 1-4.
- Click None to add one condition: Aptitude Score is less than or equal to 4.
- In the Formatting section, set the Shading Color to red for this rule. When you have completed these steps, the settings in the Rules task pane should resemble Figure 12.
Figure 12. Color ranges 1-4 conditional formatting rule

- Repeat Steps 3 through 6 for the yellow and green ranges:
- For the yellow range, set the Condition of the rule to Aptitude Score is greater than or equal to 5 and Aptitude Score is less than or equal to 7.
- For the green range, set the Condition of the rule to Aptitude Score is greater than or equal to 8 and Aptitude Score is less than or equal to 10.
After you have created the conditional formatting for the first field, you can apply the formatting to the remaining fields.
To copy and paste the rules to the other score fields
- With the Aptitude drop-down list selected, click the Copy All Rules button at the top of the Rules task pane.
- For the remaining four score fields (Presentation Score, Leadership Score, Growth Potential Score, and Total Score), select the drop-down list for that field, and then click thePaste Rule button at the top of the Rules task pane.
Use the following steps to add logic to make the Total Score field sum up the values from the individual scores and add conditional formatting to the result.
To add logic and conditional formatting to the Total Score field
- Right-click the Total Score text box, point to Change Control, and then click Calculated Value to make the text box appear un-editable.
- With the Total Score control still selected, click Field Properties on the Control Tools | Properties tab.
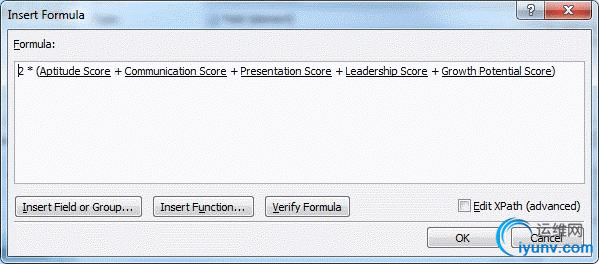
- Set the default value to be the sum of the individual scores. To do so, click the Fx button, and then build the formula shown in the Insert Formula dialog box shown in Figure 13. To add the underlined fields, click Insert Field or Group. The 2X multiplier calculates the final score out of 100 because the five individual scores are each out of 10.
Figure 13. Total Score formula
- In the Field or Group Properties dialog box, select the Refresh value when formula is recalculated check box, and then click OK.
- Finally, add conditional formatting to set the Shading Color of the Total Score calculated value control. You did this previously for individual scores in the "Add conditional formatting to the ‘Interview Score’ fields" procedure. To set formatting for the total score, repeat Steps 3 through 7 with the following ranges and colors: 1-49: red, 50-79: yellow, 80-100: green.
The Decision section of the form will be used for the final "offer" decision. Use the following steps to add two picture buttons: one to offer and one to decline. Your first step is to build the general layout of the Decision section.
To build the Decision section of the form
- Delete all except one row of the Decision table.
- From the Controls group on the Home tab, add two Picture Button controls: one in each column of the Decision table.
- Select the first picture button, and then click Picture on the Control Tool | Properties tab.
- Select "check.png" from the lab resources library on the site.
- Repeat Steps 3 and 4 for the second button, but use the picture "x.png" from the lab resource files.
- Right-align the check mark picture button by selecting the button, and then clicking the Align text right button on Home tab.
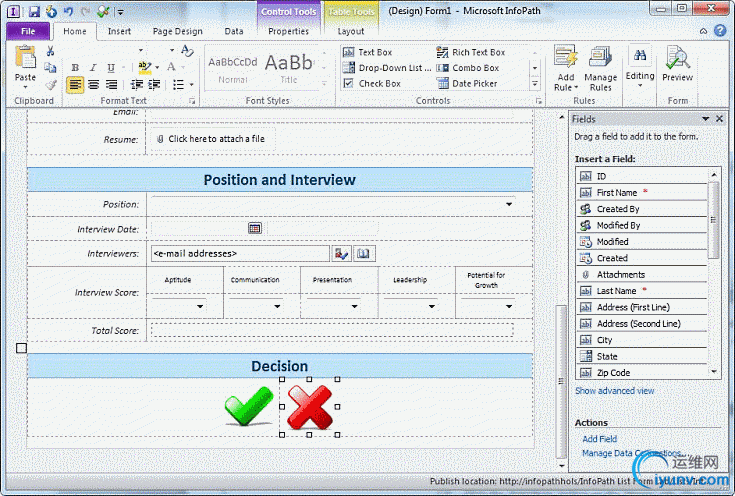
When you have completed these steps, the form should resemble Figure 14.
Figure 14. Decision section of the form
After you have created the general layout of the Decision section, you can add the logic to the Offer field.
To add logic to set the Offer field when the buttons are clicked
- Select the check mark picture, click Add Rule on the Home tab, point to When This Button Is Clicked, and then click Set a Field's Value.
- In the Rule Details dialog box, set the value of the Offer field to Offered. To select the field, click the field selector button, and then select Offer from the list of fields.
- Copy and paste the rule from the check box picture button to the X picture button, and then update the rule to set the value of the Offer field to Declined.
Part 4 ─ Publishing and Filling Out the Form
In this part of the lab, you will publish the form to SharePoint, open the list in the browser and create a new item using the form. Your first step is to publish the form.
To publish your form
- Click the File tab on the ribbon.
- Click Quick Publish.
- Click OK on the confirmation dialog box.
After you have published the form, you can fill out the form on SharePoint.
To fill out the form on SharePoint
- Navigate to http://<site collection>/InfoPath%20List%20Lab/ in Internet explorer.
- Select Interview Candidates from the list of lists.
- Click Add new item.
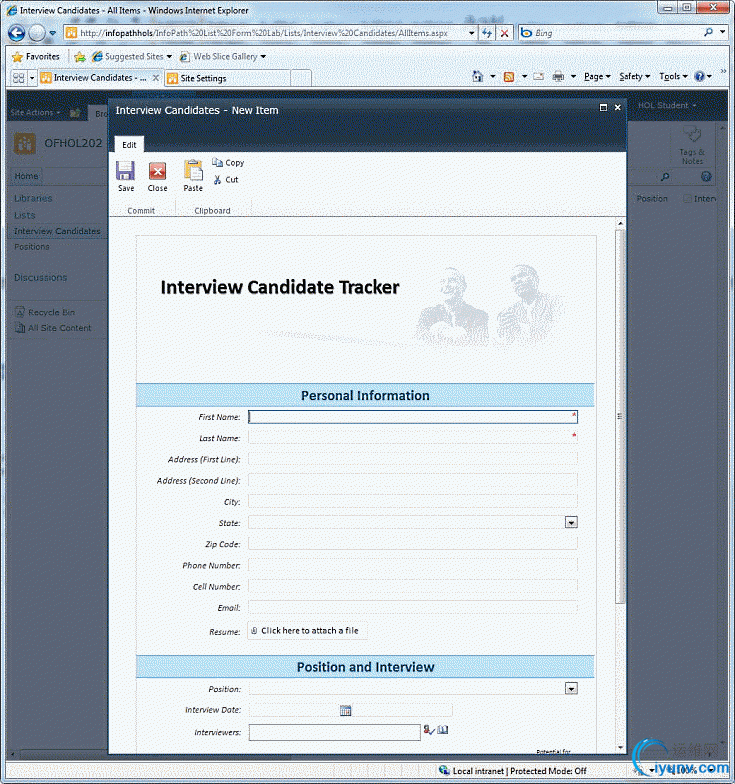
- The form will appear as shown in Figure 15.
Figure 15. Interview Candidate Tracker form
 Try out the functionality that you added:
- Try entering invalid values into the Zip Code, Phone, and Email fields to see your validation errors.
- Add scores to see the conditional formatting you added.
- Notice how the total score updates automatically based on the individual score values.
- Fill out and save the form. The columns in SharePoint will show the values that you just added using the form.
Part 5 ─ Syncing the list to SharePoint Workspace (Optional)
In this part of the lab, you will sync the list to SharePoint Workspace and use the InfoPath form offline.
To sync the list to SharePoint Workspace
- Navigate to http://<site collection>/InfoPath%20List%20Lab/ in Internet explorer.
- Select Interview Candidates from the list of lists.
- On the List tab in the ribbon, in the Connect & Export group click Sync to SharePoint Workspace.
- In the Sync to SharePoint Workspace dialog box, click OK to indicate that you trust the server.
- Close the dialog box after the sync process is completed.
- Open the SharePoint Workspace 2010 Launchbar, and then double-click the name of the list "InfoPath List Lab" as shown in Figure 16.
Figure 16. Opening the list from the SharePoint Workspace Launchbar
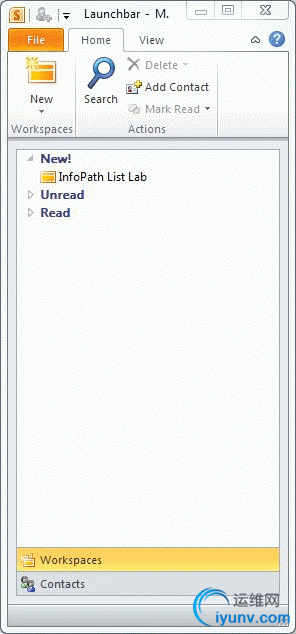 An offline view of the list will open up in SharePoint Workspace.
- On the Home tab, click New, and then click Item as shown in Figure 17.
Figure 17. Creating a new list item
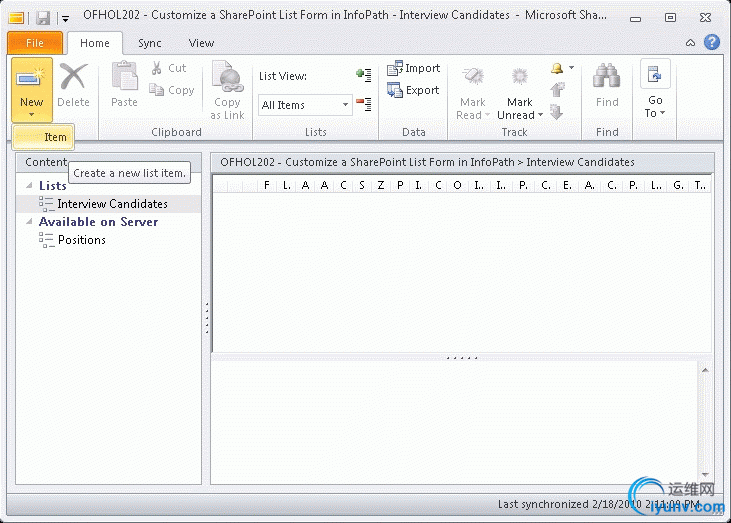
The form that you previously created will open up in SharePoint Workspace. You can use this form to create, view, and edit list items offline. Notice that the data connection to the Positions list still works even though you chose only to sync the Interview Candidates list.
Conclusion
In this lab, you learned how to customize the form for an existing SharePoint list. You customized the form by using InfoPath Designer to add controls, data validation rules, and conditional formatting rules. You also learned how take the list and its form offline by using SharePoint Workspace. |
|