|
|
By Rohit T|July 23rd, 2012
http://resources.infosecinstitute.com/ibm-rational-appscan/
IBM Rational Appscan is one of the most widely used tools in the arena of web application penetration testing. It is a desktop application which aids security professionals to automate the process of vulnerability assessments. This article focuses on configuring and starting a scan using Appscan. Analysing the scan results will be covered in my next article.
Main features in Appscan:
The Rational Appscan 8.5 Standard edition has many new features, most of which I cover in the brief outline below:
- Flash support: Appscan 8.0 has increased flash support compared to its earlier versions. It can now explore and test applications based on an Adobe Flex framework. AMF protocol is also supported.
- Glass box testing: Glass box scanning is a new feature introduced in Appscan. This process installs an agent on the server which helps find hidden URLs and additional issues.
- Web services scanning: Web service scanning is one area which organizations are looking for a more effective automated support, and Appscan has scored well in this area.
- Java script security analyzer : Appscan has introduced JavaScript security analyser which analyses the crawled html pages for vulnerabilities and allows users to focus on different client-side issues and DOM (document object model) based XSS problems.
- Reporting: Based on your requirements, you can generate reports in desired formats and include desired fields in it.
- Remediation support: For the identified vulnerabilities, the program provides a description of the issue along with the remediation notes.
- Customizable scanning policies: Appscan comes with a set of defined scanning policies. You can customize the policies to suit your needs.
- Tools support: It has tools like Authentication Tester, Token Analyzer, and HTTP Request Editor which comes in handy when testing for vulnerabilities manually.
- Support for Ajax and dojo frameworks.
Let us now proceed to learn more about installation and the process of scanning web applications using Rational Appscan.
Installation:
To run Rational Appscan the system needs to have a minimum of 2 GB RAM. Also make sure to install .NET Framework and Adobe Flash player to execute flash content during scanning. Before we proceed further, it is worth noting that this automated scanner sends loads of data to the server while the scan is in progress. So it might delete files on the server, add new records or even bring the server down unintentionally. Thus, it is advisable to properly backup of all the data before you proceed with the scan.
Before you click the setup file, close any applications that are open. After clicking on the setup file, the installation wizard appears. If you have not installed .NET Framework version earlier, Appscan will now install the feature and asks for a restart. By following the wizard instructions the installation process can be completed pretty easily. If you are using a default license, you will be allowed to scan only the Appscan testing website. To scan your own site, you need to purchase one.
Explore & Test Stages:
Before we start a scan, let us try to have an overview of how Appscan works. Any automated scanner has two goals: Find out all the available links and attack the application to find vulnerabilities.
Explore: In the explore stage Appscan tries to traverse through all the available links in the website and build a hierarchical structure. It sends requests and depending on the responses, it identifies the locations where there is a scope for vulnerability. For example, upon seeing a login page it would identify that there is a scope for authentication bypass through an sql injection. Note that it would only “identify” the test case but it would not perform any attack in this stage. In this way it sends several requests in this stage and builds the structure of the site while noting down the test cases.
Test: In the test stage, Appscan attacks the application to test for the vulnerabilities. The actual attack payloads are now unleashed to identify the security holes in the test cases that were built in the explore stage. It would also rank the severity of the risk.
The test stage might reveal new links present in the site. So Appscan begins another round of scans after completing the explore and test stages and continues to do the same until there are no more links to be tested. Please note that the number of rounds of scanning is also configurable by the user in settings.
Start a scan in Appscan :
A trial version of Appscan can be downloaded and installed from the below link:
http://www.ibm.com/developerworks/downloads/r/appscan/
To begin a scan, start Appscan and you’ll see the Welcome screen as shown in Figure 1 .

Figure 1
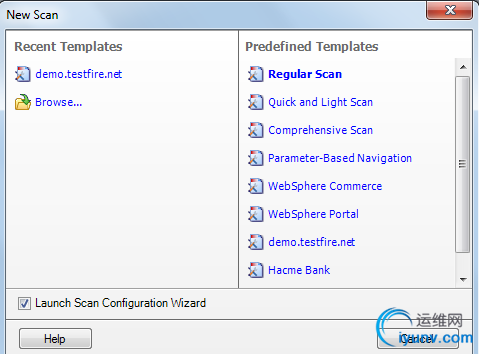
Click on “Create New Scan” to start scanning a new web application.

Figure 2
Select a scan template that suits your requirements. Templates consist of a scan configuration that is already defined. After selecting a template, the configuration wizard appears. It will ask you to select the type of scan. Select “Web Application Scan” and click on next.
The scan configuration wizard is the core part of this tool. Using this we can let Appscan know what we are expecting from it. There are plenty of options available, and they have many choices among them.
URL and Servers
Starting URL: Under this feature specify the Starting URL of the scan. In most of the cases this would be the login page of the website. I have chosen http://demo.testfire.net/ which is a demo site to test for web application vulnerabilities. If you want to limit the scan only to the links under this directory, select the check box.
Case Sensitive Path:
If your server is case sensitive to URL’s, then select this option. Case-sensitivity of a server depends upon the underlying operating system. Linux/UNIX is case-sensitive, whereas Windows is not.

Figure3
Additional Servers and Domains:
During the scan Appscan tries to crawl through all the links present in the site. When it discovers a link which is pointing to a different domain it will not attack the link unless it is specified under “Additional Servers and Domains” part. So by specifying a link under this tab, you are basically telling the Appscan that it’s OK to scan this link even though it’s not under the scan URL domain. Click on next button to proceed.
Login Management:
During the scan process, Appscan might accidentally hit a logout button or might hit a function that could logout the Appscan. So, to log in to the application we need to specify the process under this section.
Recorded:
Upon selecting this option a new browser appears and tries to connect to the site specified as the start URL of this scan. You need to enter the credentials and log into the application. Once done, just close the browser. DO NOT click on the logout button as it defeats the whole purpose of going through this process. Also notice that new browser opened is not IE or Mozilla, but Appscan browser. You can change this browser option in Appscan under Tools à Options à Advanced, set the value of OpenIEBrowser to 0 -for the AppScan browser, 1 – for Internet Explorer, 2 – for Firefox, 3 – for Chrome. This is extremely useful in situations where the site behaves differently in each browser.

Figure 4
Prompt: Appscan prompts you to log into the application every time it logs out. Select this option only if you are planning to sit through the entire scan of your system. If your application implements CAPTCHA then this is one way to go ahead with the scan.
Automatic: Under this you can directly specify the user name and password that needs to be used to log into the application.

Figure 5
Click on next to continue.
Test Policy:
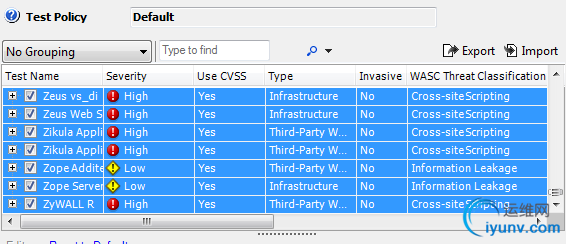
Under test policy you need to select the policy that most suits your requirements. The available policies are Default, Application-only, infrastructure-only, Invasive, Complete, the vital few, etc. out of which default policy is mostly used. If you do not want to send tests on login and logout pages, you can select that option here.

Figure 6
Click on next to continue.
Complete:
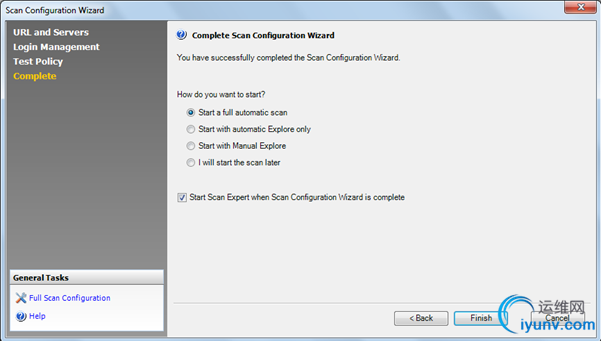
This is the final step in starting the scan. IBM Rational Appscan allows choosing the way you want to start the scan i.e. a full scan, explore only scan, etc.
Start a full automatic scan: With the configuration created earlier, Appscan would explore and then proceed to test stage as described earlier in this article.
Start with automatic explore only: Appscan will only explore the application (i.e. crawl the application) but does not send any attacks.
Start with manual explore: A browser will be opened, and you can manually browse through the application.
You can select the last option (i.e. I will start scan later) when you would like to make more changes to the scan configuration.
We are almost ready to fly but before we do that there is something very important to deal with, which is the heart and soul of the Appscan – “Full scan Configuration” window. Let’s understand why it is so important for scanning any application.

Figure 7
Full Scan Configuration:
For any successful communication it is very important that both parties are involved in the process and both individuals acqnowledge the requirements and expectations of each other. Only then can each person meet set goals. The same thing applies here. The more explicit you are when you specify your requirements, the better results you get. This full scan configuration window offers a way for Appscan to narrow down on your requirements. The options which you have already selected will be reflected here automatically (scan URL, test policy, etc.)
As seen in the figure below, there are four main sections – Explore, Connection, Test, and General. Let us see about them in detail.
Explore:
The following are the options available under this:
URL and Servers: As explained above, details about scan URL and additional servers come under this.
Login Management:
In addition to the Login method, you can specify if you want Appscan to login concurrently. This will decrease the total scan time. You can also specify the regular expressions to detect the logout pages.

Figure 8
Environment Definition:
Under this setting, you can specify the details of operating system, Web server, database server, and other third-party components, which can all help significantly improve the performance and accuracy of the scan.

Exclude Paths and Files:
If you want to exclude a particular path in your site from the scan, or even exclude particular files say .mp3 or 7z, you can specify them under this tab by using a regular expression.
Explore Options:
The redundant path option helps Appscan limit the number of times identical paths may be scanned. This is important because sometimes Appscan might enter into an endless loop hitting the same URLs again and again. With the redundant path option engaged, once the limit is reached, Appscan exits the loop. The main option in this section defines the the depth first and breadth first. In breadth first, Appscan will explore all links on a page before proceeding to the next page. In depth first, Appscan will proceed as it finds each new link.
Parameters and Cookies:
Includes details about the parameters and the cookies present in the application.
Automatic Form Fill:
During the scan, Appscan comes across forms which need some input. For instance, a registration page might need input values like username, address, etc. If you want Appscan to automatically fill them for you, then select this option.
Error pages:
Your input under this will help Appscan figure out the error pages.
Multi-Step Operations:
There are certain parts of the application that are reached only when you request data in certain order (for instance ecommerce sites). You can record their sequence here by clicking on the start recording button.
Glass box Scanning:
Glass box scanning is a new feature introduced in Appscan where in an agent will be installed on the server which helps the scanner to find hidden URLs and additional issues.
Communication and Proxy:
You can specify whether the scanner can use IE proxy settings (or cannot use any proxy) under this.
HTTP Authentication:
To use client side certificates, upload the certificate file and key file under the “client-side certificate” section and password.
Test Policy:
All the test names are listed under this option, and you can uncheck any of them if you do not want Appscan to scan for that particular vulnerability.

Test Options:
Here Appscan presents you with the option of selecting adaptive testing . Appscan sends lot of tests and usually takes a lot of time. But by selecting adaptive testing, Appscan will try to determine the appropriate tests to send. For instance, it might detect that the underlying server is IIS and send only those test cases which IIS is vulnerable to. It would not check for issues related to other servers.
Privilege Escalation:
You can upload the scan files which are scanned with a different privileged user or an unauthenticated user.
Scan Expert:
Scan expert explores the application and presents you with recommendations to scan the application better.
Click on OK and this will take you back to the initial scan wizard window. Select “start a full automatic scan” and click on finish. This completes the configuring process and start of a scan in Appscan. In my next article we will explore more about analysing the scan results in Appscan. |
|