|
|
一,被监控端-Linux
1、安装snmp
2、配置snmp
1
2
3
4
5
6
7
8
9
10
11
12
13
| [iyunv@node1 ~]#grep -v "^#" /etc/snmp/snmpd.conf |grep -v "^$"
com2sec notConfigUser default public
com2sec notConfigUser 192.168.80.132 public
group notConfigGroup v1 notConfigUser
group notConfigGroup v2c notConfigUser
view systemview included .1.3.6.1.2.1.1
view systemview included .1.3.6.1.2.1.25.1.1
access notConfigGroup "" any noauth exact all none none
view all included .1 80
view mib2 included .iso.org.dod.internet.mgmt.mib-2 fc
syslocation Unknown (edit /etc/snmp/snmpd.conf)
syscontact Root <root@localhost> (configure /etc/snmp/snmp.local.conf)
dontLogTCPWrappersConnects yes
|
3、确认snmp正常运行,并保证不被selinux,防火墙阻拦
1
2
3
| netstat -anpt |grep snmp
service iptables status
setenforce 0
|
二、被监控端-windows
测试机是windows7,可以在控制面板-->程序-->添加功能中安装snmp服务
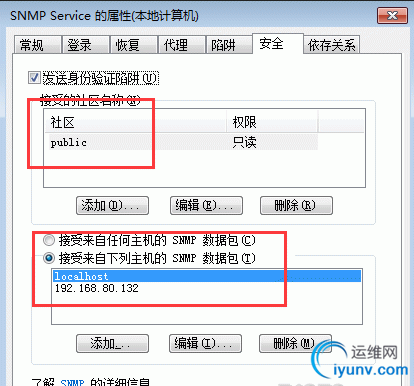
通过services.msc打开服务管理器。找到SNMP service,右击属性--安全。添加社区名和监控机IP

三、监控端-nagios
1、安装snmp
2、下载check_traffic.sh脚本,并移动到nagios插件的目录
1
2
3
| [iyunv@node2 ~]# grep -v "^$" /etc/nagios/resource.cfg |grep -v "^#"
$USER1$=/usr/lib64/nagios/plugins ##nagios插件存放目录
[iyunv@node2 ~]# cp check_traffic.sh /usr/lib64/nagios/plugins/
|
3、定义命令
1
2
3
4
5
| [iyunv@node2 ~]# vim /etc/nagios/objects/commands.cfg
define command{
command_name check_traffic
command_line $USER1/check_traffic.sh -V 2c -C public -H $HOSTADDRESS$ -I $ARG1$
}
|
介绍下几个参数的含义
check_traffic脚本主要是通过调用snmpwalk来检测被监控机的信息
-V 指定SNMP协议版本
-C 指定社区(community)名称。
-I index值,这个一会可以看到
-w warnning值,ARG2和ARG3分别时网卡的in和out流量
-c critial值
3、定义服务
1
2
3
4
5
| define service{
use local-service
host_name 192.168.80.131
check_command check_traffic!11 -w 400,400 -c 600,600
}
|
|
|