|
|
安装oracle 11gR2单实例+ASM ,让新手走向数据库管理员
一、介绍
因业务需要,最近在主系统的基础上搭建一套mini系统,本文只讲ORACLE数据库的安装;
1.服务器系统版本:RHEL 5.5 x64Bit ,kernel 2.6.18-194.el5
2.磁盘分区格式: LVM (也可是裸设备)
3.ORACLE软件包: p10404530_112030_Linux-x86-64
4.ASM 组件版本:oracleasm-2.6.18-194.el5-2.0.5-1.el5.x86_64.rpm
oracleasmlib-2.0.4-1.el5.x86_64.rpm
oracleasm-support-2.1.7-1.el5.x86_64.rpm
二、安装实施准备
1.创建ORACLE用户和组成员
groupadd oinstall
groupadd dba
groupadd oper
groupadd asmadmin
groupadd asmdba
groupadd asmoper
useradd -g oinstall -G dba,asmdba,oper -d /home/oracle oracle
useradd -g oinstall -G dba,asmadmin,asmdba,asmoper -d /home/grid grid
2.分别创建oracle、grid用户的密码
passwd oracle
new unix password: oracle
passwd grid
new unix password: grid
3.磁盘分区
//介绍:本文为项目简化,实际项目磁盘分区为:8块300G 15K SAS磁盘(HP2U服务器最多支持8块);
//前2块做raid1,安装系统包括:/、sawp、boot分区等, 可冗余磁盘为:1块;
//后6块做raid5, /u01 40G LVM管理 安装oracle软件,/u02 450G LVM管理,存放arch和RMAN 备份等,可冗余磁盘为:1块;
//ASM磁盘组为300G*3,DATA1、DATA2、DATA3 存放oracle数据;
//本文分区如下: /u01 10G,/u02 20G, ASM 10G*3 DATA1、DATA2、DATA3等;
[iyunv@ctp-dbserver ~]# fdisk -l
Disk /dev/sda: 80.0 GB, 80026361856 bytes
255 heads, 63 sectors/track, 9729 cylinders
Units = cylinders of 16065 * 512 = 8225280 bytes
Device Boot Start End Blocks Id System
/dev/sda1 * 1 13 104391 83 Linux
/dev/sda2 14 1318 10482412 83 Linux
/dev/sda3 1319 2623 10482412 83 Linux
/dev/sda4 2624 9729 57078945 5 Extended
/dev/sda5 2624 3928 10482381 83 Linux
/dev/sda6 3929 5233 10482381 83 Linux
/dev/sda7 5234 5755 4192933 82 Linux swap / Solaris
/dev/sda8 5756 9729 31921123 8e Linux LVM
说明:/dev/sda2 3 5 分配为ASM,sda8划分出u01 u02
[iyunv@ctp-dbserver ~]# pvcreate /dev/sda
sda sda1 sda2 sda3 sda4 sda5 sda6 sda7 sda8
[iyunv@ctp-dbserver ~]# pvcreate /dev/sda8
Physical volume "/dev/sda8" successfully created
[iyunv@ctp-dbserver ~]# vgcreate vg00 /dev/sda8
Volume group "vg00" successfully created
[iyunv@ctp-dbserver ~]#
[iyunv@ctp-dbserver ~]# vgs
/dev/hdb: open failed: No medium found
VG #PV #LV #SN Attr VSize VFree
vg00 1 0 0 wz--n- 30.44G 30.44G
[iyunv@ctp-dbserver ~]# lvcreate -L 10G -n lv_u01 /dev/vg00
Logical volume "lv_u01" created
[iyunv@ctp-dbserver ~]# lvcreate -l 100%FREE -n lv_u02 /dev/vg00 //使用剩余空间创建lv_u02
Logical volume "lv_u02" created
[iyunv@ctp-dbserver ~]#
[iyunv@ctp-dbserver ~]# lvs
LV VG Attr LSize Origin Snap% Move Log Copy% Convert
lv_u01 vg00 -wi-a- 10.00G
lv_u02 vg00 -wi-a- 20.44G
[iyunv@ctp-dbserver ~]#
//格式化 lv_u01 lv_u02 并分别指定(LABEL)要建立的卷标名名称 u01 和u02
[iyunv@ctp-dbserver ~]# mkfs.ext3 -L u01 /dev/vg00/lv_u01
mke2fs 1.39 (29-May-2006)
Filesystem label=u01
OS type: Linux
Block size=4096 (log=2)
Fragment size=4096 (log=2)
1310720 inodes, 2621440 blocks
131072 blocks (5.00%) reserved for the super user
First data block=0
Maximum filesystem blocks=2684354560
80 block groups
32768 blocks per group, 32768 fragments per group
16384 inodes per group
Superblock backups stored on blocks:
32768, 98304, 163840, 229376, 294912, 819200, 884736, 1605632
Writing inode tables: done
Creating journal (32768 blocks): done
Writing superblocks and filesystem accounting information: done
This filesystem will be automatically checked every 28 mounts or
180 days, whichever comes first. Use tune2fs -c or -i to override.
[iyunv@ctp-dbserver ~]#
[iyunv@ctp-dbserver ~]# mkfs.ext3 -L u02 /dev/vg00/lv_u02
mke2fs 1.39 (29-May-2006)
Filesystem label=u02
OS type: Linux
Block size=4096 (log=2)
Fragment size=4096 (log=2)
2681728 inodes, 5358592 blocks
267929 blocks (5.00%) reserved for the super user
First data block=0
Maximum filesystem blocks=4294967296
164 block groups
32768 blocks per group, 32768 fragments per group
16352 inodes per group
Superblock backups stored on blocks:
32768, 98304, 163840, 229376, 294912, 819200, 884736, 1605632, 2654208,
4096000
Writing inode tables: done
Creating journal (32768 blocks): done
Writing superblocks and filesystem accounting information: done
This filesystem will be automatically checked every 34 mounts or
180 days, whichever comes first. Use tune2fs -c or -i to override.
[iyunv@ctp-dbserver ~]#
//vim 编辑磁盘分区挂载文件fstab,添加以下2行;
[iyunv@ctp-dbserver ~]# vim /etc/fstab
LABEL=u01 /u01 ext3 defaults 1 1
LABEL=u02 /u02 ext3 defaults 1 1
//创建目录和更改目录属性
mkdir /u0{1,2}
执行 mount -a 挂载 lv_u01和lv_u02
[iyunv@ctp-dbserver ~]# df -h
Filesystem Size Used Avail Use% Mounted on
/dev/sda6 9.7G 3.0G 6.3G 32% /
/dev/sda1 99M 12M 83M 13% /boot
tmpfs 1.9G 0 1.9G 0% /dev/shm
/dev/mapper/vg00-lv_u01
9.9G 151M 9.2G 2% /u01
/dev/mapper/vg00-lv_u02
21G 173M 19G 1% /u02
[iyunv@ctp-dbserver ~]#
//创建以下目录
mkdir -p /u01/app/11.2.0/grid
mkdir -p /u01/app/grid
mkdir -p /u01/app/oracle/product/11.2.0/db_1
mkdir -p /u02/arch
chown -R grid:oinstall /u01
chown -R oracle:oinstall /u01/app/oracle
chown -R oracle:oinstall /u02
chmod -R 775 /u01
chmod -R 775 /u02
4.使用oracle域名登陆,设置oracle用户的环境变量
//增加以下几行
[oracle@ctp-dbserver ~]$ vim .bash_profile
export ORACLE_SID=zxxj
export ORACLE_BASE=/u01/app/oracle
export ORACLE_HOME=/u01/app/oracle/product/11.2.0/db_1
export LD_LIBRARY_PATH=$ORACLE_HOME/lib:.
export NLS_LANG=American_america.ZHS16GBK
export PATH=$PATH:$ORACLE_HOME/bin:.
5.使用grid域名登陆,设置grid用户的环境变量
//增加以下几行
[grid@ctp-dbserver ~]$ vim .bash_profile
export ORACLE_BASE=/u01/app/grid
export ORACLE_HOME=/u01/app/11.2.0/grid
export LD_LIBRARY_PATH=$ORACLE_HOME/lib:.
export NLS_LANG=American_america.ZHS16GBK
export PATH=$PATH:$ORACLE_HOME/bin:.
export ORACLE_SID=+ASM
6.使用root更改以下几项参数
//具体值要根据实际硬件设置,本参数则先按照原服务器配置,如有错误后面再更正;
[iyunv@ctp-dbserver ~]# vim /etc/sysctl.conf
fs.aio-max-nr = 1048576
fs.file-max = 6815744
kernel.shmall = 2097152
kernel.shmmax = 4294967295
kernel.shmmni = 4096
kernel.sem = 250 32000 100 128
net.ipv4.ip_local_port_range = 9000 65500
net.core.rmem_default = 262144
net.core.rmem_max = 4194304
net.core.wmem_default = 262144
net.core.wmem_max = 1048586
执行/sbin/sysctl -p使设置立即生效
# sysctl -p
7.修改文件数和安全设置
#vim /etc/security/limits.conf
//增加以下内容
oracle soft nproc 2047
oracle hard nproc 16384
oracle soft nofile 1024
oracle hard nofile 65536
oracle soft stack 10240
grid soft nproc 2047
grid hard nproc 16384
grid soft nofile 1024
grid hard nofile 65536
grid soft stack 1024
8.增加session连接限制库
#vim /etc/pam.d/login
//增加以下内容
session required /lib/security/pam_limits.so
9.修改hosts文件和主机名
#vim /etc/hosts
192.168.1.10 ctp-dbserver
# vim /etc/sysconfig/network
//修改HOSTNAME,使其永久生效
NETWORKING=yes
NETWORKING_IPV6=no
HOSTNAME=ctp-dbserver
GATEWAY=192.168.1.1
10.将必要的安装文件上传至服务器
如:
//oracle安装软件 ,/u02下
p10404530_112030_Linux-x86-64_1of7.zip
p10404530_112030_Linux-x86-64_2of7.zip
p10404530_112030_Linux-x86-64_3of7.zip
//ASM使用的3个rpm包 /root下
oracleasm-2.6.18-194.el5-2.0.5-1.el5.x86_64.rpm
oracleasmlib-2.0.4-1.el5.x86_64.rpm
oracleasm-support-2.1.7-1.el5.x86_64.rpm
//依赖的rpm包 /root下
binutils-2.17.50.0.6
compat-libstdc++-33-3.2.3
compat-libstdc++-33-3.2.3 (32 bit)
elfutils-libelf-0.125
elfutils-libelf-devel-0.125
gcc-4.1.2
gcc-c++-4.1.2
glibc-2.5-24
glibc-2.5-24 (32 bit)
glibc-common-2.5
glibc-devel-2.5
glibc-devel-2.5 (32 bit)
glibc-headers-2.5
ksh-20060214
libaio-0.3.106
libaio-0.3.106 (32 bit)
libaio-devel-0.3.106
libaio-devel-0.3.106 (32 bit)
libgcc-4.1.2
libgcc-4.1.2 (32 bit)
libstdc++-4.1.2
libstdc++-4.1.2 (32 bit)
libstdc++-devel 4.1.2
make-3.81
numactl-devel-0.9.8.x86_64
sysstat-7.0.2
//可先 rpm -qa |grep 查找是否有缺失未安装的rpm包
#rpm -ivh *.rpm
三、安装oralce和ASM组件
1.安装ASM
//说明:asm组件的安装需要3个asm rpm包的支持,oracleasm rpm需要和linux 系统的内核对应
#uname -ar
2.6.18-194.el5
//oracleasm 包要求:
oracleasm-2.6.18-194.el5-2.0.5-1.el5.x86_64.rpm //此包必须和linux kernel 一致
oracleasmlib-2.0.4-1.el5.x86_64.rpm //此包根据要官网说明
oracleasm-support-2.1.7-1.el5.x86_64.rpm //此包根据要官网说明
//参考:下载地址
http://www.oracle.com/technetwork/server-storage/linux/downloads/rhel5-084877.html#oracleasm_rhel5_amd64
[iyunv@ctp-dbserver ~]# rpm -ivh *.rpm
warning: oracleasm-2.6.18-194.el5-2.0.5-1.el5.x86_64.rpm: Header V3 DSA signature: NOKEY, key ID 1e5e0159
Preparing... ########################################### [100%]
1:oracleasm-support ########################################### [ 33%]
2:oracleasm-2.6.18-194.el########################################### [ 67%]
3:oracleasmlib ########################################### [100%]
[iyunv@ctp-dbserver ~]#
2.配置ASM
root用户登录,(本次安装为单实例),执行:
[iyunv@ctp-dbserver ~]# /etc/init.d/oracleasm configure
Configuring the Oracle ASM library driver.
This will configure the on-boot properties of the Oracle ASM library
driver. The following questions will determine whether the driver is
loaded on boot and what permissions it will have. The current values
will be shown in brackets ('[]'). Hitting <ENTER> without typing an
answer will keep that current value. Ctrl-C will abort.
Default user to own the driver interface []: grid
Default group to own the driver interface []: asmadmin
Start Oracle ASM library driver on boot (y/n) [n]: y
Scan for Oracle ASM disks on boot (y/n) [y]: y
Writing Oracle ASM library driver configuration: done
Initializing the Oracle ASMLib driver: [ OK ]
Scanning the system for Oracle ASMLib disks: [ OK ]
[iyunv@ctp-dbserver ~]#
3.创建ASM磁盘
[iyunv@ctp-dbserver ~]# oracleasm createdisk DATA1 /dev/sda2
Writing disk header: done
Instantiating disk: done
[iyunv@ctp-dbserver ~]# oracleasm createdisk DATA2 /dev/sda3
Writing disk header: done
Instantiating disk: done
[iyunv@ctp-dbserver ~]#
[iyunv@ctp-dbserver ~]# oracleasm createdisk DATA3 /dev/sda5
Writing disk header: done
Instantiating disk: done
[iyunv@ctp-dbserver ~]#
[iyunv@ctp-dbserver ~]# oracleasm listdisks
DATA1
DATA2
DATA3
[iyunv@ctp-dbserver ~]#
4.配置xmanager 远程连接 RHEL 5.5
//修改配置defaults.conf文件
//如果只有oralce和grid图形登录只改以下2项即可
#vim /usr/share/gdm/defaults.conf
Enable=true
Port=177
//root登录,还需要
AllowRoot=true
AllowRemoteRoot=root
//修改inittab必须为5级别
#vim /etc/inittab
id:5:initdefault:
//重启gdm
#gdm-restart
//一切OK
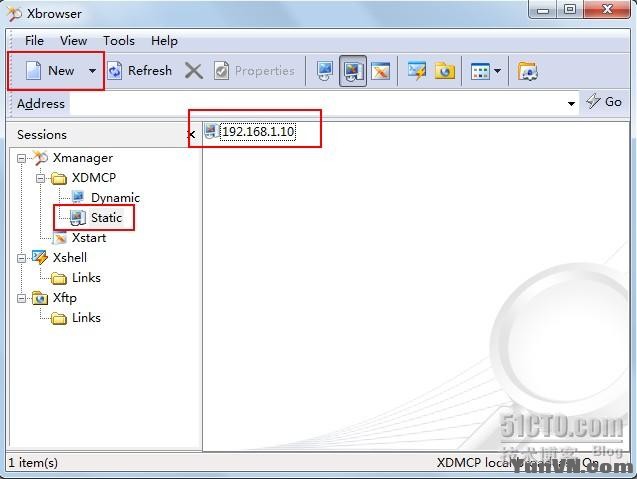
5.安装grid组件
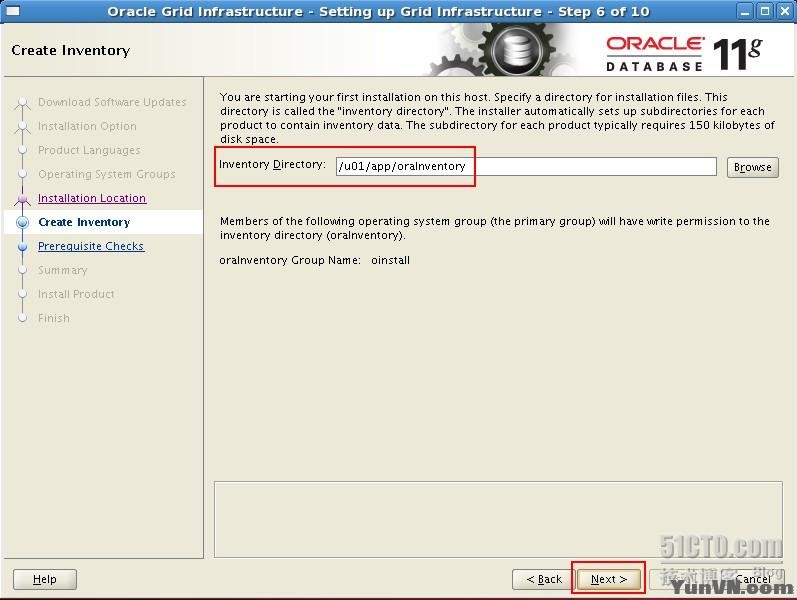
//使用Xmanager Enterprise 3 的Xbrowser图形连接服务器
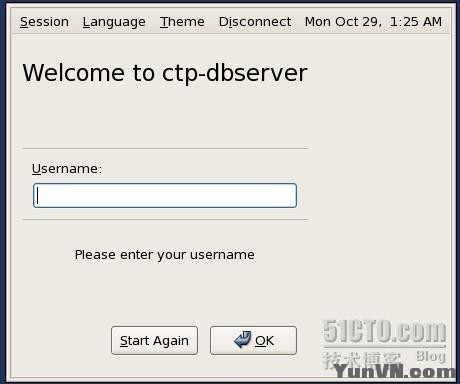
//图形界面grid用户登录,进入/u02/
#unzip p10404530_112030_Linux-x86-64_3of7.zip
#cd grid
#./runinstall


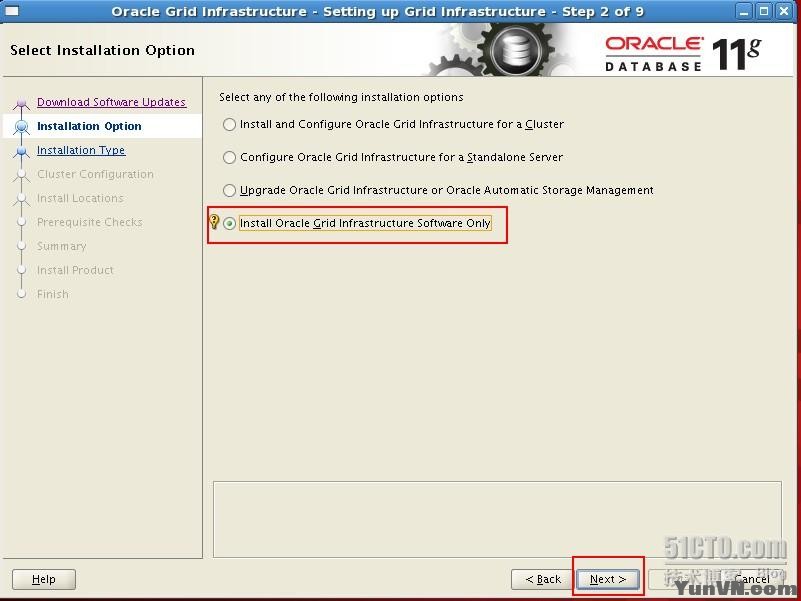
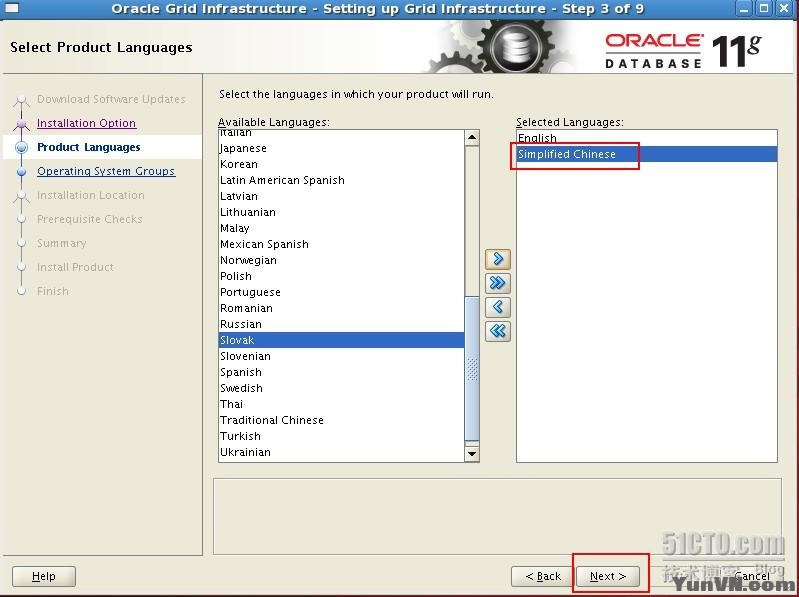




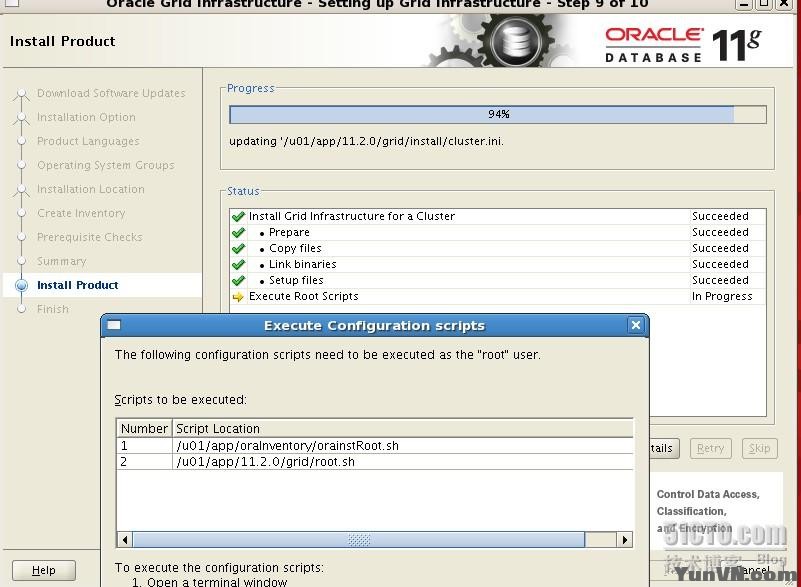


[iyunv@ctp-dbserver ~]# cd /u01/app/oraInventory/
[iyunv@ctp-dbserver oraInventory]# ls
ContentsXML logs oraInst.loc orainstRoot.sh oui
[iyunv@ctp-dbserver oraInventory]# ./orainstRoot.sh
Changing permissions of /u01/app/oraInventory.
Adding read,write permissions for group.
Removing read,write,execute permissions for world.
Changing groupname of /u01/app/oraInventory to oinstall.
The execution of the script is complete.
[iyunv@ctp-dbserver oraInventory]# cd /u01/app/11.2.0/grid/
//注意:在ORACLE单实例中执行./root.sh 后,显示说明:
##################################################
To configure Grid Infrastructure for a Stand-Alone Server run the following command as the root user:
/u01/app/11.2.0/grid/perl/bin/perl -I/u01/app/11.2.0/grid/perl/lib -I/u01/app/11.2.0/grid/crs/install /u01/app/11.2.0/grid/crs/install/roothas.pl
##################################################
//提示:在执行root.sh后,再执行/u01/app/11.2.0/grid/crs/install/roothas.pl
//否则后面的creade asm将会出错
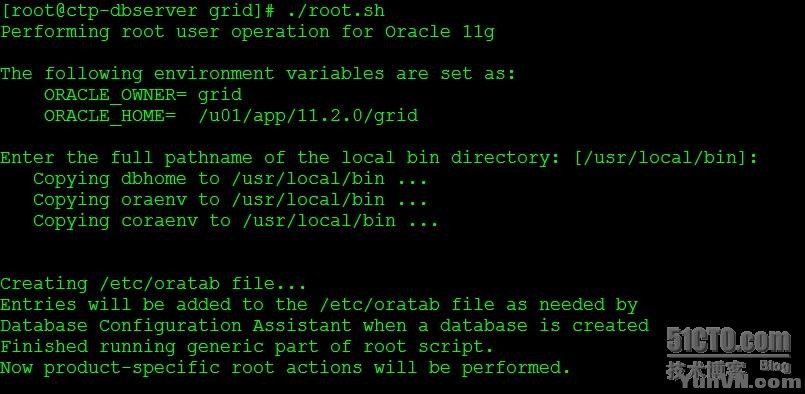
[iyunv@ctp-dbserver grid]# ./root.sh
Performing root user operation for Oracle 11g
The following environment variables are set as:
ORACLE_OWNER= grid
ORACLE_HOME= /u01/app/11.2.0/grid
Enter the full pathname of the local bin directory: [/usr/local/bin]:
Copying dbhome to /usr/local/bin ...
Copying oraenv to /usr/local/bin ...
Copying coraenv to /usr/local/bin ...
Creating /etc/oratab file...
Entries will be added to the /etc/oratab file as needed by
Database Configuration Assistant when a database is created
Finished running generic part of root script.
Now product-specific root actions will be performed.
To configure Grid Infrastructure for a Stand-Alone Server run the following command as the root user:
/u01/app/11.2.0/grid/perl/bin/perl -I/u01/app/11.2.0/grid/perl/lib -I/u01/app/11.2.0/grid/crs/install /u01/app/11.2.0/grid/crs/install/roothas.pl
To configure Grid Infrastructure for a Cluster execute the following command:
/u01/app/11.2.0/grid/crs/config/config.sh
This command launches the Grid Infrastructure Configuration Wizard. The wizard also supports silent operation, and the parameters can be passed through the response file that is available in the installation media.
[iyunv@ctp-dbserver grid]#
6.图形界面使用asmca创建ASM磁盘组
$asmca


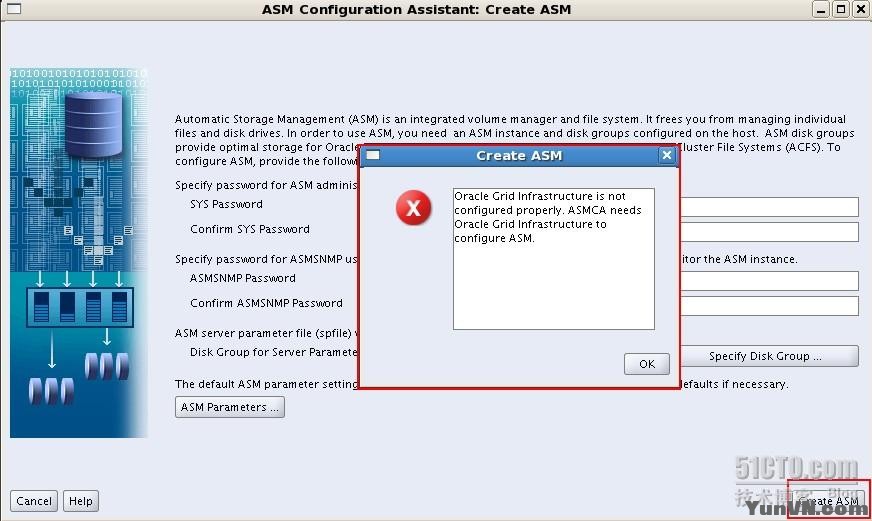

//注意:如果上述在执行./root.sh后没有执行,/u01/app/11.2.0/grid/crs/install/roothas.pl
//那么将会出现:
Oracle Grid Infrastructure is not configured properly. ASMCA needs Oracle Grid Infrastructure to configure ASM.
//如果你错过了,那么现在执行还来得及;
[iyunv@ctp-dbserver install]# ./roothas.pl
Using configuration parameter file: ./crsconfig_params
Creating trace directory
User ignored Prerequisites during installation
LOCAL ADD MODE
Creating OCR keys for user 'grid', privgrp 'oinstall'..
Operation successful.
LOCAL ONLY MODE
Successfully accumulated necessary OCR keys.
Creating OCR keys for user 'root', privgrp 'root'..
Operation successful.
CRS-4664: Node ctp-dbserver successfully pinned.
Adding Clusterware entries to inittab
ctp-dbserver 2012/10/29 02:03:01 /u01/app/11.2.0/grid/cdata/ctp-dbserver/backup_20121029_020301.olr
Successfully configured Oracle Grid Infrastructure for a Standalone Server
[iyunv@ctp-dbserver install]#
//执行roothas.pl 脚本后,再检查has进程是否启动;
#ps -ef |grep has
//确定进程已经启动后,再图形下执行Create ASM
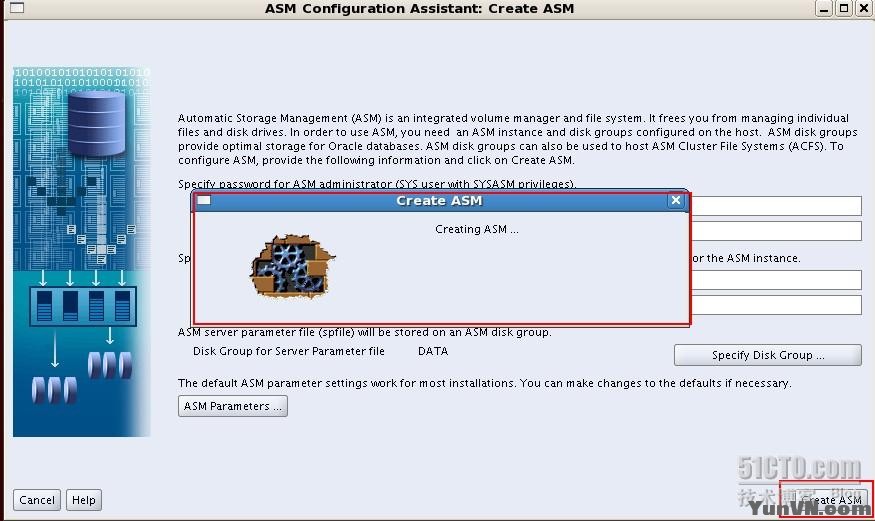
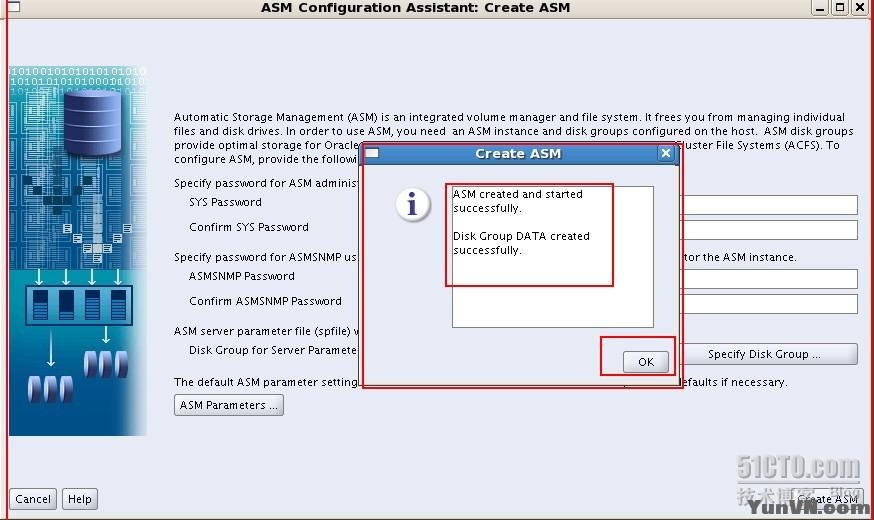
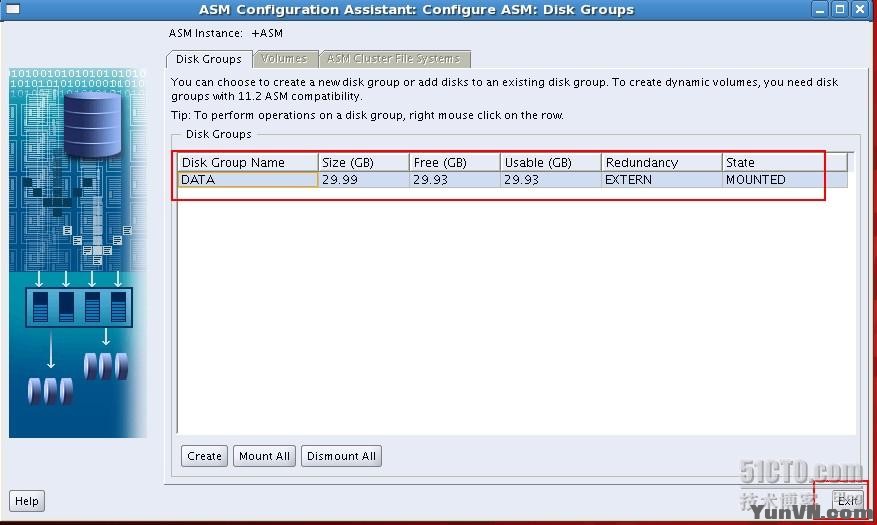
//如果grid安装顺利,那么可以泡杯红茶休息一下,后面都是很容易的了。
7.使用Oracle用户图形下安装oralce软件
[oracle@ctp-dbserver ]$ cd /u02/
[oracle@ctp-dbserver ]$unzip p10404530_112030_Linux-x86-64_1of7.zip
[oracle@ctp-dbserver ]$unzip p10404530_112030_Linux-x86-64_2of7.zip
[oracle@ctp-dbserver database]$./runInstaller


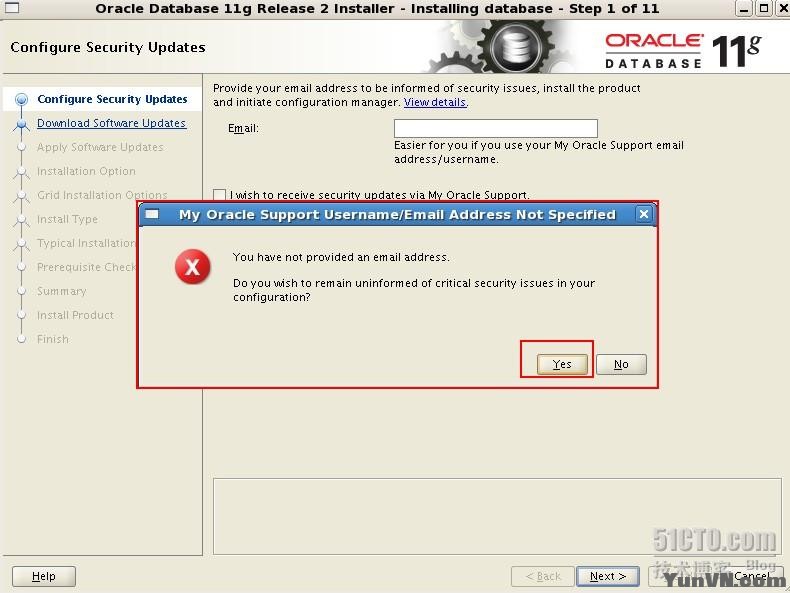



[iyunv@ctp-dbserver db_1]# ./root.sh
Performing root user operation for Oracle 11g
The following environment variables are set as:
ORACLE_OWNER= oracle
ORACLE_HOME= /u01/app/oracle/product/11.2.0/db_1
Enter the full pathname of the local bin directory: [/usr/local/bin]:
The contents of "dbhome" have not changed. No need to overwrite.
The contents of "oraenv" have not changed. No need to overwrite.
The contents of "coraenv" have not changed. No need to overwrite.
Entries will be added to the /etc/oratab file as needed by
Database Configuration Assistant when a database is created
Finished running generic part of root script.
Now product-specific root actions will be performed.
Finished product-specific root actions.
[iyunv@ctp-dbserver db_1]#
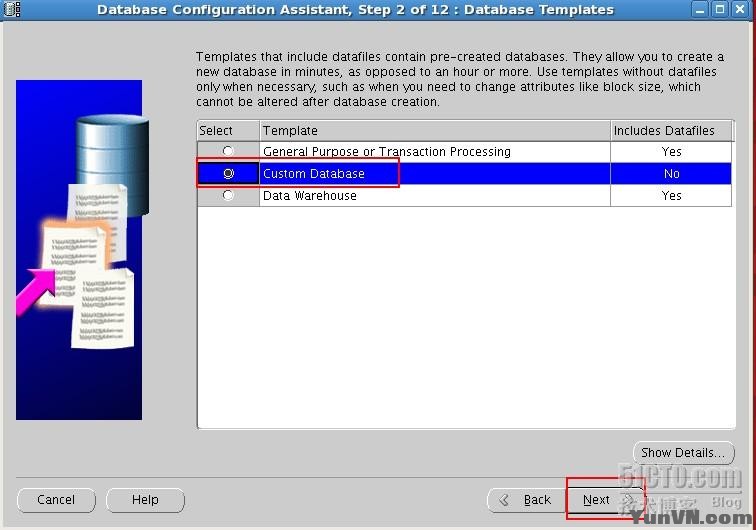
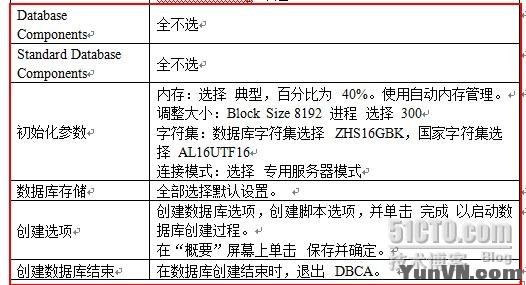
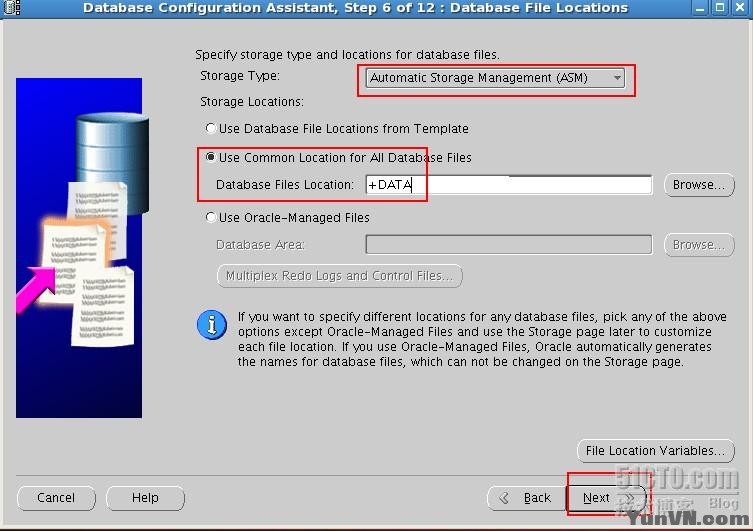
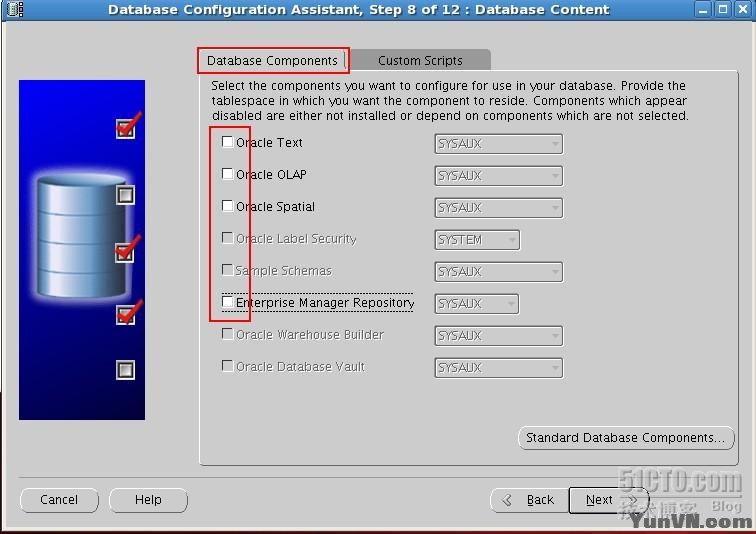
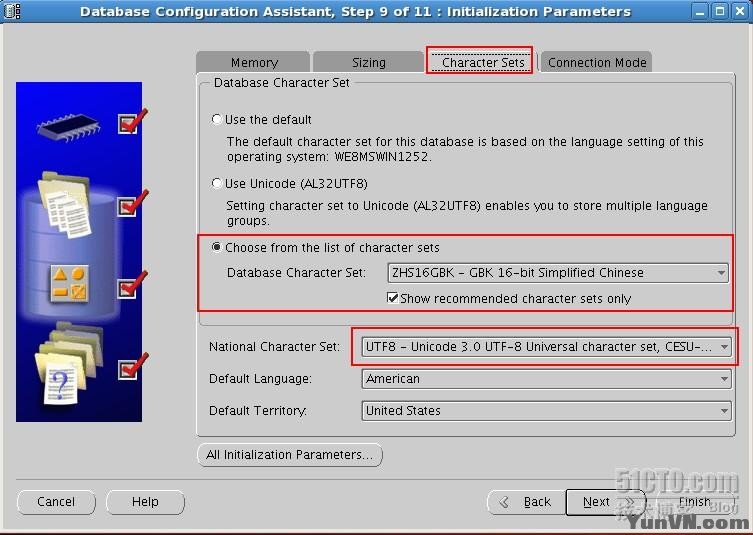
8.创建数据库
//图形界面下使用oracle用户执行dbca
$dbca
创建完成后重启服务器








9.oracle单实例+ASM 的监听
安装好grid后,无论是管理磁盘、磁盘数据、oralce启动与停止、监听等均可由grid来操作;
使用grid用户netca创建监听
不在介绍
四、使用grid用户日常管理ORACLE
[grid@ctp-dbserver ~]$ crs_stat -t
Name Type Target State Host
------------------------------------------------------------
ora.DATA.dg ora....up.type OFFLINE OFFLINE
ora....ER.lsnr ora....er.type ONLINE ONLINE ctp-...rver
ora.asm ora.asm.type OFFLINE OFFLINE
ora.cssd ora.cssd.type ONLINE OFFLINE
ora.diskmon ora....on.type OFFLINE OFFLINE
ora.evmd ora.evm.type ONLINE ONLINE ctp-...rver
ora.ons ora.ons.type OFFLINE OFFLINE
ora.zxxj.db ora....se.type OFFLINE OFFLINE
[grid@ctp-dbserver ~]$
[grid@ctp-dbserver ~]$ crs_stat //资源项目
NAME=ora.DATA.dg
TYPE=ora.diskgroup.type
TARGET=OFFLINE
STATE=OFFLINE
NAME=ora.LISTENER.lsnr
TYPE=ora.listener.type
TARGET=ONLINE
STATE=ONLINE on ctp-dbserver
NAME=ora.asm
TYPE=ora.asm.type
TARGET=OFFLINE
STATE=OFFLINE
NAME=ora.cssd
TYPE=ora.cssd.type
TARGET=ONLINE
STATE=OFFLINE
NAME=ora.diskmon
TYPE=ora.diskmon.type
TARGET=OFFLINE
STATE=OFFLINE
NAME=ora.evmd
TYPE=ora.evm.type
TARGET=ONLINE
STATE=ONLINE on ctp-dbserver
NAME=ora.ons
TYPE=ora.ons.type
TARGET=OFFLINE
STATE=OFFLINE
NAME=ora.zxxj.db
TYPE=ora.database.type
TARGET=OFFLINE
STATE=OFFLINE
[grid@ctp-dbserver ~]$
[grid@ctp-dbserver ~]$ srvctl //管理命令介绍
Usage: srvctl <command> <object> [<options>]
commands: enable|disable|start|stop|status|add|remove|modify|getenv|setenv|unsetenv|config|upgrade
objects: database|service|asm|diskgroup|listener|home|ons
For detailed help on each command and object and its options use:
srvctl <command> -h or
srvctl <command> <object> -h
[grid@ctp-dbserver ~]$
2.oracle +asm单实例数据库重启流程
2.1启动
[grid@ctp-dbserver ~]$ crs_stat -t
Name Type Target State Host
------------------------------------------------------------
ora.DATA.dg ora....up.type OFFLINE OFFLINE
ora....ER.lsnr ora....er.type ONLINE ONLINE ctp-...rver
ora.asm ora.asm.type OFFLINE OFFLINE
ora.cssd ora.cssd.type ONLINE OFFLINE
ora.diskmon ora....on.type OFFLINE OFFLINE
ora.evmd ora.evm.type ONLINE ONLINE ctp-...rver
ora.ons ora.ons.type OFFLINE OFFLINE
ora.zxxj.db ora....se.type OFFLINE OFFLINE
[grid@ctp-dbserver ~]$ srvctl start asm
[grid@ctp-dbserver ~]$ crs_stat -t
Name Type Target State Host
------------------------------------------------------------
ora.DATA.dg ora....up.type ONLINE ONLINE ctp-...rver
ora....ER.lsnr ora....er.type ONLINE ONLINE ctp-...rver
ora.asm ora.asm.type ONLINE ONLINE ctp-...rver
ora.cssd ora.cssd.type ONLINE ONLINE ctp-...rver
ora.diskmon ora....on.type OFFLINE OFFLINE
ora.evmd ora.evm.type ONLINE ONLINE ctp-...rver
ora.ons ora.ons.type OFFLINE OFFLINE
ora.zxxj.db ora....se.type OFFLINE OFFLINE
//如果asm磁盘启动以后,asm磁盘组DATA也成功启动,则不用执行
[grid@ctp-dbserver ~]$ srvctl start diskgroup -g DATA
//这是如果执行了上述命令,则会显示:
PRCC-1014 : DATA was already running
PRCR-1004 : Resource ora.DATA.dg is already running
PRCR-1079 : Failed to start resource ora.DATA.dg
CRS-5702: Resource 'ora.DATA.dg' is already running on 'ctp-dbserver'
//启动数据库
[grid@ctp-dbserver ~]$ srvctl start database -d zxxj
[grid@ctp-dbserver ~]$ crs_stat -t
Name Type Target State Host
------------------------------------------------------------
ora.DATA.dg ora....up.type ONLINE ONLINE ctp-...rver
ora....ER.lsnr ora....er.type ONLINE ONLINE ctp-...rver
ora.asm ora.asm.type ONLINE ONLINE ctp-...rver
ora.cssd ora.cssd.type ONLINE ONLINE ctp-...rver
ora.diskmon ora....on.type OFFLINE OFFLINE
ora.evmd ora.evm.type ONLINE ONLINE ctp-...rver
ora.ons ora.ons.type OFFLINE OFFLINE
ora.zxxj.db ora....se.type ONLINE ONLINE ctp-...rver
[grid@ctp-dbserver ~]$
//以上说明启动成功
2.2关闭,操作顺序相反
[grid@ctp-dbserver ~]$ srvctl stop database -d zxxj
[grid@ctp-dbserver ~]$ srvctl stop diskgroup -g DATA
[grid@ctp-dbserver ~]$ srvctl stop asm
[grid@ctp-dbserver ~]$ crs_stat -t
Name Type Target State Host
------------------------------------------------------------
ora.DATA.dg ora....up.type OFFLINE OFFLINE
ora....ER.lsnr ora....er.type ONLINE ONLINE ctp-...rver
ora.asm ora.asm.type OFFLINE OFFLINE
ora.cssd ora.cssd.type ONLINE OFFLINE
ora.diskmon ora....on.type OFFLINE OFFLINE
ora.evmd ora.evm.type ONLINE ONLINE ctp-...rver
ora.ons ora.ons.type OFFLINE OFFLINE
ora.zxxj.db ora....se.type OFFLINE OFFLINE
五、数据库备份
因为ASM管理的数据直接存储在磁盘上,日常备份一般采用RMAN备份,寒枫后续会介绍oracle11gR2数据库之RMAN备份。
参考文献:交易系统数据库搭建资料
近期忙于项目,博客已经近半年没有更新了,最近几个月由项目选型到方案设计,由招标文件到服务器选型,由服务器进场到系统部署,一步步妥而稳的进行,一天天忙而不乏的学习。终于项目定于11月5日上线,我们执着,我们坚信,我们务实,我们谨慎,预祝项目成功上线。
寒枫最近太忙了,OCP已经完成,接下来就是实际经验的数据管理工作,务必保证数据的安全是每个数据库管理员的职责。
业余时间,寒枫继续学习oracle这个神圣的机器,让我们学习的思想像oracleDBMS一样前行,渐行渐远。
|
|