前言:本文主要讲解keepalived+haproxy,等试验完成,后面会附上keepalived+nginx的思路,原理几乎相同,相信能看懂keepalived+haproxy的朋友,亦能很简单的看懂keepalived+nginx
拓扑:
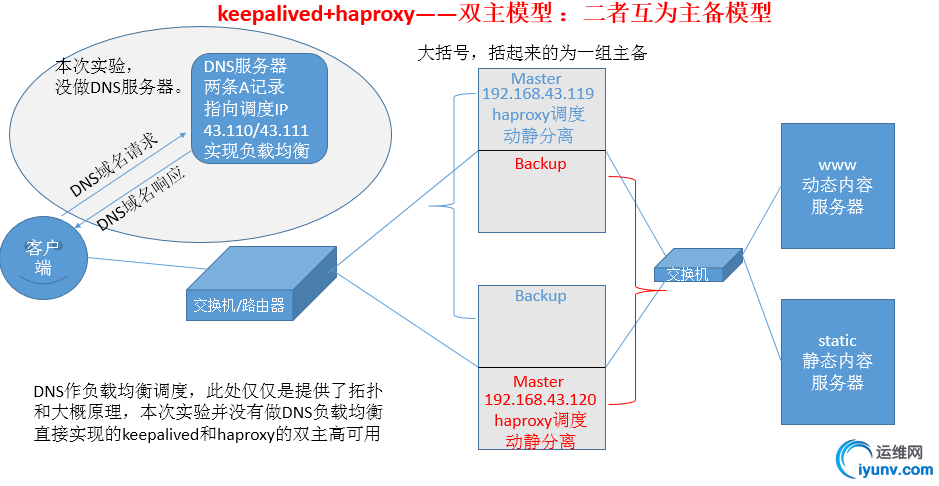
准备工作: 1).高可用集群节点基于名称互相访问(两节点都需配置,略) # vim /etc/sysconfig/network # vim /etc/hosts 2).高可用集群节点ssh互信(两节点都需配置) a.com: # ssh-keygen -t rsa -P '' b.com: # ssh-keygen -t rsa -P '' 3).高可用集群节点时间同步,推荐使用ntpdate向时间服务器同步 为了简单实验,所以采用date命令同步时间
安装软件: # yum install -y keepalived haproxy
配置: 1).修改haproxy配置文件:(a.com节点上操作)
# vim/etc/haproxy/haproxy.cfg #--------------------------------------------------------------------- # Global settings #--------------------------------------------------------------------- global # to have thesemessages end up in /var/log/haproxy.log you will # need to: # # 1) configure syslogto accept network log events. This isdone # by adding the '-r' option to theSYSLOGD_OPTIONS in # /etc/sysconfig/syslog # # 2) configure local2events to go to the /var/log/haproxy.log # file. A line like the following can be addedto # /etc/sysconfig/syslog # # local2.* /var/log/haproxy.log # log 127.0.0.1 local2 #日志通过rsyslog保存
chroot /var/lib/haproxy pidfile /var/run/haproxy.pid maxconn 3000 #最大连接 user haproxy group haproxy daemon
# turn on stats unixsocket stats socket/var/lib/haproxy/stats
#--------------------------------------------------------------------- # common defaults that all the 'listen' and 'backend' sectionswill # use if not designated in their block #--------------------------------------------------------------------- defaults mode http #工作模式为http,有tcp等选择,自行查看man文档 log global #记录日志 option httplog #详细记录http日志 option dontlognull #不记录健康检查的日志信息 option http-server-close #启用服务器端主动关闭 option forwardfor except 127.0.0.0/8 #传递客户端IP retries 3 #请求重试次数 timeout http-request 10s #http请求超时时间 timeout queue 1m #一个请求在队列里的超时时间 timeout connect 10s #连接服务器超时时间 timeout client 1m #客户端超时时间 timeout server 1m #服务器超时时间 timeout http-keep-alive 10s #持久连接超时时间 timeout check 10s #心跳检测超时时间 maxconn 3000 #最大连接
#--------------------------------------------------------------------- # main frontend which proxys to the backends #--------------------------------------------------------------------- frontend main *:80 #acl url_static path_beg -i /static /images/javascript /stylesheets #acl url_static path_end -i .jpg .gif .png.css .js acl url_www path_end -i .php use_backend www if url_www #如果上方启用的acl中匹配任意,即使用www的后端服务器 default_backend static #默认请求连接发往static的后端服务器
#--------------------------------------------------------------------- # round robin balancing between the various backends #--------------------------------------------------------------------- backend static #static后端服务器组定义 balance roundrobin #对static中定义的后端服务器,采用的调度算法为roundrobin轮询 server static1 192.168.43.112:80 check #后端服务器static1的IP,以及做健康状态监测 server static1192.168.43.254:80 check backend www #www后端服务器组定义 balance roundrobin server app2 192.168.43.113:80 check listen stats bind *:8888 #状态页的访问端口 stats enable #haproxy状态页定义 stats uri /stats #状态页的访问路径 stats realm please\ input\ passwd #提示消息,请输入密码,空格需要用\转义才可显示 stats auth admin:liao #验证用户名:admin |密码:liao stats admin if TRUE #如果用户名验证成功,则显示管理功能
2).修改keepalived配置文件
# vim /etc/keepalived/keepalived.conf ! Configuration File for keepalived
global_defs { notification_email { } smtp_server192.168.200.1 smtp_connect_timeout 30 router_id LVS_DEVEL }
vrrp_script chk_down { #定义脚本chk_down script "[ -f /etc/keepalived/down ] && exit 1 || exit0" #若目录存在down文件则返回1,不存在返回0 interval 1 weight -5 #若存在down文件则减去权重5 } vrrp_script chk_haproxy { #定义脚本 chk_haproxy script "killall -0 haproxy &>/dev/null" #检测haproxy是否正常运行,若正常运行则会返回0,否则返回1, interval 1 #1秒检测一次 weight -5 #若检测haproxy不是正常运行,那么返回值为1,减去权重5 }
vrrp_instance VI_1 { #第一个虚拟路由 state MASTER #运行为主节点 interface eth0 virtual_router_id 51 #虚拟路由ID为51 priority 100 #主节点权重为100 advert_int 1 authentication { auth_type PASS auth_pass 1111 } virtual_ipaddress { 192.168.43.119/32 brd 192.168.43.119 dev eth0label eth0:0 #在eth0:0端口配置192.168.43.119为虚拟地址 } track_script { #调用上方定义的检测脚本 chk_down chk_haproxy }
notify_master "/etc/keepalived/haproxy.sh master" #若状态变为主节点,则运行haproxy.sh脚本且附带参数master(脚本在下方) notify_backup "/etc/keepalived/haproxy.sh backup" #若状态变为备节点,则运行haproxy.sh脚本且附带参数backup notify_fault"/etc/keepalived/haproxy.sh fault" }
vrrp_instance VI_2 { #虚拟路由器2 state BACKUP #运行为备用节点 interface eth0 virtual_router_id 52 #虚拟路由器ID为52 priority 99 #权重99 advert_int 1 authentication { auth_type PASS auth_pass 1111 } virtual_ipaddress { 192.168.43.120/32 brd 192.168.43.120 dev eth0label eth0:1 #在eth0:1上配置虚拟ip192.168.43.120 } track_script { #一样需要检测上方定义的脚本 chk_down chk_haproxy } notify_master"/etc/keepalived/haproxy.sh master" notify_backup"/etc/keepalived/haproxy.sh backup" notify_fault"/etc/keepalived/haproxy.sh fault" }
3).创建上方调用的haproxy.sh脚本 # vim /etc/keepalived/haproxy.sh #!/bin/bash
case "$1" in master) /etc/rc.d/init.d/haproxy start #若传递过来的参数为master,则启动haproxy ;; backup) /etc/rc.d/init.d/haproxy restart #若传递过来的参数为backup,则重启haproxy ;; fault) /etc/rc.d/init.d/haproxy stop #若传递过来的参数为fault,则关闭haproxy esac
4).将配置和脚本文件复制到b.com # scp/etc/keepalived/keepalived.conf /etc/keepalived/haproxy.sh b.com:/etc/keepalived/ # scp/etc/haproxy/haproxy.cnf b.com:/etc/haproxy
5).切换到b.com操作,适当修改复制到b.com上的keepalived配置文件(只需修改红色字体内容即可) # vim/etc/keepalived/keepalived.conf ! Configuration File for keepalived
global_defs { notification_email { } smtp_server192.168.200.1 smtp_connect_timeout 30 router_id LVS_DEVEL }
vrrp_script chk_down { #定义脚本chk_down script "[ -f /etc/keepalived/down ] && exit 1 || exit0" #若目录存在down文件则返回1,不存在返回0 interval 1 weight -5 #若存在down文件则减去权重5 } vrrp_script chk_haproxy { #定义脚本 chk_haproxy script "killall -0 haproxy &>/dev/null" #检测haproxy是否正常运行,若正常运行则会返回0,否则返回1, interval 1 #1秒检测一次 weight -5 #若检测haproxy不是正常运行,那么返回值为1,减去权重5 }
vrrp_instance VI_1 { #第一个虚拟路由 state BACKUP #运行为主节点 interface eth0 virtual_router_id 51 #虚拟路由ID为51 priority 99 #主节点权重为100 advert_int 1 authentication { auth_type PASS auth_pass 1111 } virtual_ipaddress { 192.168.43.119/32 brd 192.168.43.119 dev eth0label eth0:0 #在eth0:0端口配置192.168.43.119为虚拟地址 } track_script { #调用上方定义的检测脚本 chk_down chk_haproxy }
notify_master "/etc/keepalived/haproxy.sh master" #若状态变为主节点,则运行haproxy.sh脚本且附带参数master(脚本在下方) notify_backup "/etc/keepalived/haproxy.sh backup" #若状态变为备节点,则运行haproxy.sh脚本且附带参数backup notify_fault"/etc/keepalived/haproxy.sh fault" }
vrrp_instance VI_2 { #虚拟路由器2 state MASTER #运行为备用节点 interface eth0 virtual_router_id 52 #虚拟路由器ID为52 priority 100 #权重99 advert_int 1 authentication { auth_type PASS auth_pass 1111 } virtual_ipaddress { 192.168.43.120/32 brd 192.168.43.120 dev eth0label eth0:1 #在eth0:1上配置虚拟ip192.168.43.120 } track_script { #一样需要检测上方定义的脚本 chk_down chk_haproxy } notify_master"/etc/keepalived/haproxy.sh master" notify_backup"/etc/keepalived/haproxy.sh backup" notify_fault"/etc/keepalived/haproxy.sh fault" } 6).分别在两台节点上给予haproxy.sh脚本执行权限 # chmod +x/etc/keepalived/haproxy.sh ; ssh a.com 'chmod +x /etc/keepalived/haproxy.sh'
启动服务,测试。两节点都正常运行时: 1).启动服务 # service haproxy start ;ssh a.com 'service haproxy start' # service keepalived start; ssh a.com 'service keepalived start'
2).分别查看两个节点日志 a.com

b.com

3).查看两个节点IP a.com
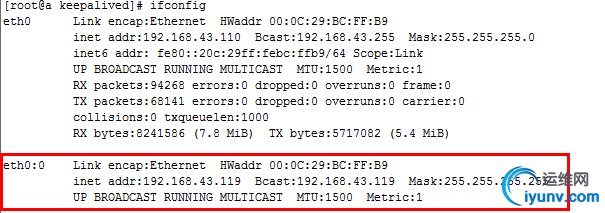
b.com
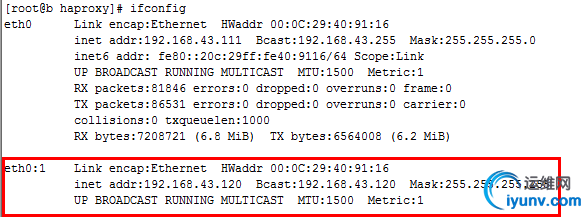
4).测试调度 测试192.168.43.119,a.com节点 动态资源调度到了192.168.43.113
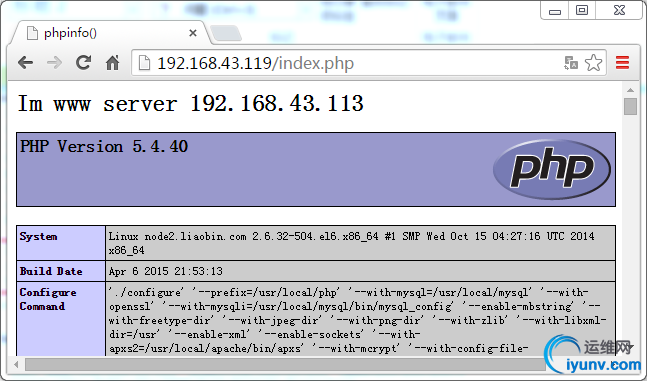
静态资源轮询调度


测试192.168.43.120,b.com节点 动态资源调度到了192.168.43.113
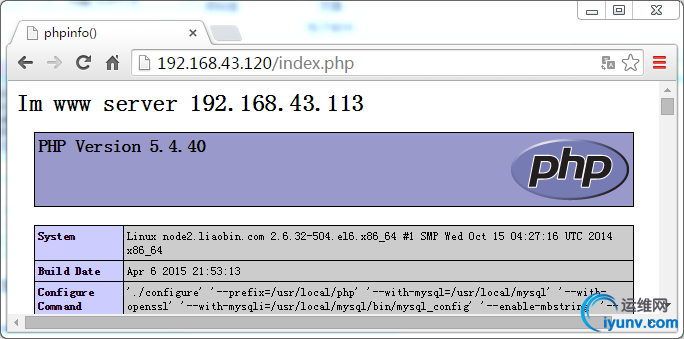
静态资源轮询调度


测试b.com节点down掉时候,b.com的资源是否迁移到a.com: 1).停掉b.com的keepalived # servicekeepalived stop
2).观察a.com的日志

3).查看a.com上的IP

4).访问测试119和120查看是否能正常调度 访问192.168.43.119 静态资源,轮询


访问动态资源,调度到113
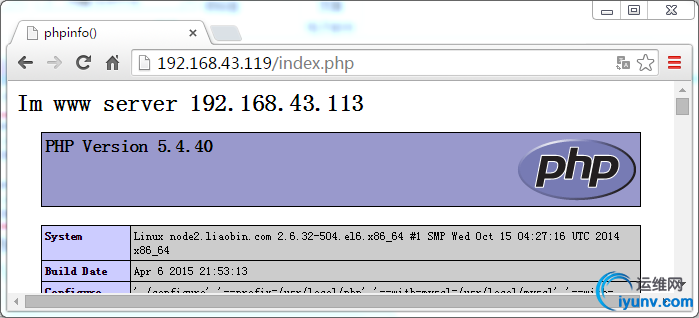
访问测试192.168.43.120 静态资源,轮询


访问动态资源,调度到113

测试b.com上线,能否将资源抢夺回来: 1).启动b.com的keepalived服务 # servicekeepalived start
2).查看两节点的日志(a.com变为备节点,移除IP。b.com变为主节点,添加IP) a.com

b.com

3).访问测试(省略)
至此,keepalived双主模型的高可用haproxy完成。 -----------------------------------------------------------------------------------------------
下面为keepalived+nginx的简单过程
1).nginx作为主流的web服务器,同样也可以作为反向代理服务器,用于负载均衡调度,代替haproxy,而且性能和haproxy相差无几;
2).所有配置文件仅仅只需修改几处,即可用作keepalived高可用nignx;
1.修改"/etc/keepalived/keepalived.conf"配置文件。(a.com节点,红色字体即为修改的部分) # vim/etc/keepalived/keepalived.conf ! Configuration File for keepalived
global_defs { notification_email { } smtp_server192.168.200.1 smtp_connect_timeout 30 router_id LVS_DEVEL }
vrrp_script chk_down { #定义脚本chk_down script "[ -f /etc/keepalived/down ] && exit 1 || exit0" #若目录存在down文件则返回1,不存在返回0 interval 1 weight -5 #若存在down文件则减去权重5 } vrrp_script chk_nginx { #定义脚本 chk_nginx script "killall -0 nginx&>/dev/null" #检测nginx是否正常运行,若正常运行则会返回0,否则返回1, interval 1 #1秒检测一次 weight -5 #若检测nginx不是正常运行,那么返回值为1,减去权重5 }
vrrp_instance VI_1 { #第一个虚拟路由 state MASTER #运行为主节点 interface eth0 virtual_router_id 51 #虚拟路由ID为51 priority 100 #主节点权重为100 advert_int 1 authentication { auth_type PASS auth_pass 1111 } virtual_ipaddress { 192.168.43.119/32 brd 192.168.43.119 dev eth0label eth0:0 #在eth0:0端口配置192.168.43.119为虚拟地址 } track_script { #调用上方定义的检测脚本 chk_down chk_nginx }
notify_master"/etc/keepalived/nginx.shmaster" #若状态变为主节点,则运行haproxy.sh脚本且附带参数master(脚本在下方) notify_backup "/etc/keepalived/nginx.shbackup" #若状态变为备节点,则运行haproxy.sh脚本且附带参数backup notify_fault "/etc/keepalived/nginx.sh fault" }
vrrp_instance VI_2 { #虚拟路由器2 state BACKUP #运行为备用节点 interface eth0 virtual_router_id 52 #虚拟路由器ID为52 priority 99 #权重99 advert_int 1 authentication { auth_type PASS auth_pass 1111 } virtual_ipaddress { 192.168.43.120/32 brd 192.168.43.120 dev eth0label eth0:1 #在eth0:1上配置虚拟ip192.168.43.120 } track_script { #一样需要检测上方定义的脚本 chk_down chk_nginx } notify_master "/etc/keepalived/nginx.sh master" notify_backup "/etc/keepalived/nginx.sh backup" notify_fault "/etc/keepalived/nginx.sh fault" } 2.创建/etc/keepalived/nginx.sh脚本(记得给予nginx.sh执行权限chmod +x nginx.sh)
脚本1 # vim /etc/keepalived/nginx.sh #!/bin/bash #nginx script #我的nginx为编译安装,/etc/rc.d/目录下无服务脚本,使用此脚本。
case "$1" in master) /usr/local/nginx/sbin/nginx #启动nginx ;; backup) /usr/local/nginx/sbin/nginx -s stop #先停止nginx /usr/local/nginx/sbin/nginx #再启动nginx,保证nginx无论主备节点都处在运行态,让killall -0 nginx检测成功 ;; fault) /usr/local/nginx/sbin/nginx -s stop ;; esac 脚本2 # vim /etc/keepalived/nginx.sh #!/bin/bash #nginx script #rpm包安装的nginx脚本
case "$1" in master) /etc/rc.d/init.d/nginx start ;; backup) /etc/rc.d/init.d/nginx restart ;; fault) /etc/rc.d/init.d/nginx stop ;; esac
3.配置nginx # vim/etc/nginx/nginx.conf http { include mime.types; default_type application/octet-stream;
#log_format main '$remote_addr - $remote_user [$time_local] "$request" ' # '$status $body_bytes_sent"$http_referer" ' # '"$http_user_agent""$http_x_forwarded_for"';
#access_log logs/access.log main;
sendfile on; #tcp_nopush on;
#keepalive_timeout 0; keepalive_timeout 65;
#gzip on; upstream staticserver { #设置一个服务器组,不加权重为rr调度算法,加权重为wrr调度算法 server 192.168.43.112 weight 1; server 192.168.43.254 weight 1; #ip_hash; #加上ip_hash即为源地址hash算法,在此处没使用用,所以注释了 } server { listen 80;
#charset koi8-r;
#access_log logs/host.access.log main; #location~* \.php$ { #注释掉的动态内容调度,若想做动静分离的可以使用 #} location / { # root /var/www/html; index index.php index.html index.htm; proxy_pass http://staticserver; # 使用反向代理,将用户请求调度到staticserver中定义的后端服务器 } }
4.将所有上方配置的文件复制到b.com # scp/etc/keepalived/keepalived.conf b.com:/etc/keepalived/ # scp/etc/nginx/nginx.conf b.com:/etc/nginx/ # scp/etc/keepalived/nginx.sh b.com:/etc/keepalived/ 5.切换到b.com操作,修改一下复制过来的keepalived.conf配置文件(红色字体为修改部分) # vim /etc/keepalived/keepalived.conf ! Configuration File for keepalived
global_defs { notification_email { } smtp_server192.168.200.1 smtp_connect_timeout 30 router_id LVS_DEVEL }
vrrp_script chk_down { #定义脚本chk_down script "[ -f /etc/keepalived/down ] && exit 1 || exit0" #若目录存在down文件则返回1,不存在返回0 interval 1 weight -5 #若存在down文件则减去权重5 } vrrp_script chk_nginx { #定义脚本 chk_nginx script "killall -0 nginx&>/dev/null" #检测nginx是否正常运行,若正常运行则会返回0,否则返回1, interval 1 #1秒检测一次 weight -5 #若检测nginx不是正常运行,那么返回值为1,减去权重5 }
vrrp_instance VI_1 { #第一个虚拟路由 state BACKUP #运行为备用节点 interface eth0 virtual_router_id 51 #虚拟路由ID为51 priority 99 #主节点权重为99 advert_int 1 authentication { auth_type PASS auth_pass 1111 } virtual_ipaddress { 192.168.43.119/32 brd 192.168.43.119 dev eth0label eth0:0 #在eth0:0端口配置192.168.43.119为虚拟地址 } track_script { #调用上方定义的检测脚本 chk_down chk_nginx }
notify_master "/etc/keepalived/nginx.shmaster" #若状态变为主节点,则运行haproxy.sh脚本且附带参数master(脚本在下方) notify_backup "/etc/keepalived/nginx.shbackup" #若状态变为备节点,则运行haproxy.sh脚本且附带参数backup notify_fault "/etc/keepalived/nginx.sh fault" }
vrrp_instance VI_2 { #虚拟路由器2 state MASTER #运行为主节点 interface eth0 virtual_router_id 52 #虚拟路由器ID为52 priority 100 #权重100 advert_int 1 authentication { auth_type PASS auth_pass 1111 } virtual_ipaddress { 192.168.43.120/32 brd 192.168.43.120 dev eth0label eth0:1 #在eth0:1上配置虚拟ip192.168.43.120 } track_script { #一样需要检测上方定义的脚本 chk_down chk_nginx } notify_master "/etc/keepalived/nginx.sh master" notify_backup "/etc/keepalived/nginx.sh backup" notify_fault "/etc/keepalived/nginx.sh fault" }
3).此时配置应该完成,在此就不做测试了
|