|
|
1、导入29个JAR包
JAR包名称
|
作用
|
Struts2.1.6(7个)
|
|
struts2-core-2.1.6.jar
|
struts2开发的核心类库
|
freemarker-2.3.13.jar
|
struts2的UI标签的模板使用freemarker编写
|
commons-logging-1.0.4.jar
|
ASF出的日志包,支持Log4J和JDK的日志记录
|
ognl-2.6.11.jar
|
对象图导航语言,通过它来读写对象属性
|
xwork-2.1.2.jar
|
xwork类库,struts2在其上进行构建
|
commons-fileupload-1.2.1.jar
|
文件上传组件,2.1.6版本后必须加入此jar包
|
commons-io-1.3.2.jar
|
以后文件上传下载需要
|
|
|
Hibernate3.3.2(13个)
|
|
hibernate3.jar
|
hibernate3开发的核心类库
|
antlr-2.7.6.jar
|
解析HQL
|
commons-collections-3.1.jar
|
集合框架
|
dom4j-1.6.1.jar
|
解析xml
|
javassist-3.9.0.GA.jar
|
|
jta-1.1.jar
|
|
junit-4.8.1.jar
|
Junit test 包
|
ejb3-persistence.jar
|
@Entity
|
Hibernate-annotations.jar
|
|
Hibernate-commons-annotations.jar
|
|
log4j-1.2.15.jar
|
是log4j实现类
|
slf4j-api-1.5.8.jar
|
标准接口
|
slf4j-log4j12-1.5.8.jar
|
是slf4j转换log4j的中间接口
|
|
|
Spring 2.5.6(8个)
|
|
spring.jar
|
Spring核心文件
|
common-annotations.jar
|
IOC支持, 例如@resource
|
aspectjrt.jar
|
AOP支持:aspectj运行时候需要的
|
aspectjweaver.jar
|
AOP支持:织入
|
cglib-nodep-2.1_3.jar
|
动态生成字节码
|
Commons-dbcp.jar
|
数据源
|
commons-po ol.jar
|
数据源
|
struts2-spring-plugin-2.1.6.jar
|
Struts2和Spring结合所需包
|
|
|
commons-logging-1.0.4.jar
|
Struts2加入了就不需要导入
|
log4j-1.2.15.jar
|
Hibernate加入了就不需要导入
|
|
|
数据库包(1个)
|
|
mysql-connector-java-3.1.10-bin.jar
|
MySql的驱动程序
|
2、导入框架的配置文件
SRC目录下的配置文件
|
|
log4j.properties
|
log4j的配置文件,放到SRC根目录下
|
hibernate.cfg.xml
|
Hibernate的配置文件
|
beans.xml
|
Spring的配置文件
|
struts.xml
|
Struts的配置文件
|
|
|
WEB-INF下配置文件
|
|
web.xml
|
Struts2和Spring的结合配置
|
PS:如果需要使用JSTL标签需要导入2个包
jstl.jar
standard.jar
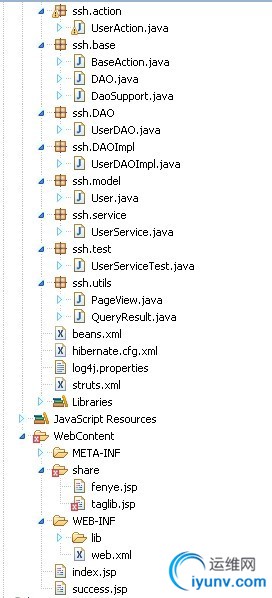
3、建立对应的package和对应的接口与类框架

hibernate.cfg.xml
<?xml version='1.0' encoding='GBK'?>
<!DOCTYPE hibernate-configuration PUBLIC
"-//Hibernate/Hibernate Configuration DTD 3.0//EN"
"http://hibernate.sourceforge.net/hibernate-configuration-3.0.dtd">
<hibernate-configuration>
<session-factory>
<!-- MySQL数据库连接设置.端口号不用改。只需修改XXXX-->
<property name="connection.driver_class">com.mysql.jdbc.Driver</property>
<property name="connection.url">jdbc:mysql://localhost:3306/ssh</property>
<property name="connection.username">root</property>
<property name="connection.password">lee</property>
<!-- 一般不用HIBERNATE的连接池
<property name="connection.pool_size">1</property>
-->
<!-- 指定用哪种数据库语言,查文档搜索dialect -->
<property name="dialect">org.hibernate.dialect.MySQLDialect</property>
<!--<property name="dialect">org.hibernate.dialect.SQLServerDialect</property> -->
<!-- 当前SESSION运行环境的上下文getCurrentSession对应的配置-thread线程。JTA是分布式管理,例如多个数据库-->
<property name="current_session_context_class">thread</property>
<!-- Disable the second-level cache -->
<property name="cache.provider_class">org.hibernate.cache.NoCacheProvider</property>
<!-- 打印自动生成的SQL语句-->
<property name="show_sql">true</property>
<!-- 格式化SQL语句
<property name="format_sql">true</property>-->
<!-- 如果不存在表,自动在数据库里生成,常用的是create,update-->
<property name="hbm2ddl.auto">update</property>
<!-- 定义需要映射的路径
<mapping class="ssh.model.User"/>
-->
</session-factory>
</hibernate-configuration>
beans:xml
<?xml version="1.0" encoding="GBK"?>
<beans xmlns="http://www.springframework.org/schema/beans"
xmlns:xsi="http://www.w3.org/2001/XMLSchema-instance"
xmlns:context="http://www.springframework.org/schema/context"
xmlns:aop="http://www.springframework.org/schema/aop"
xmlns:tx="http://www.springframework.org/schema/tx"
xsi:schemaLocation="http://www.springframework.org/schema/beans
http://www.springframework.org/schema/beans/spring-beans-2.5.xsd
http://www.springframework.org/schema/context
http://www.springframework.org/schema/context/spring-context-2.5.xsd
http://www.springframework.org/schema/aop
http://www.springframework.org/schema/aop/spring-aop-2.5.xsd
http://www.springframework.org/schema/tx
http://www.springframework.org/schema/tx/spring-tx-2.5.xsd">
<!--使用Annotation-->
<context:annotation-config />
<!--自动扫描com.bjsxt包下所有写了@Component的类注入进来-->
<context:component-scan base-package="ssh" />
<!--AOP:扫描上面定义自动扫描的路径com.bjsxt目录下的文件,就可以用@Aspect定义切入类-->
<aop:aspectj-autoproxy />
<!--==========================定义数据源==========================-->
<bean id="dataSource" class="org.apache.commons.dbcp.BasicDataSource" destroy-method="close">
<property name="driverClassName" value="com.mysql.jdbc.Driver" />
<property name="url" value="jdbc:mysql://localhost:3306/ssh" />
<property name="username" value="root" />
<property name="password" value="lee" />
</bean>
<!--=======================定义sessionFactory====================-->
<bean id="sessionFactory" class="org.springframework.orm.hibernate3.annotation.AnnotationSessionFactoryBean">
<property name="dataSource" ref="dataSource" />
<!-- 将参数名称设为packagesToScan 可定义扫描目标包下所有实体类,告诉sessionFactory哪些类被Entity和注解了 -->
<property name="packagesToScan">
<list>
<value>ssh.model</value>
</list>
</property>
<!--直接导入Hibernate的配置文件。这样才能自动建立数据库表和显示DDL语句。如果上面的配置只能先手动建立数据表然后更新。不能自动创建表-->
<property name="configLocation" value="classpath:hibernate.cfg.xml"/>
</bean>
<!--====================定义Hibernate事务管理器===================-->
<bean id="txManager" class="org.springframework.orm.hibernate3.HibernateTransactionManager">
<property name="sessionFactory" ref="sessionFactory" />
</bean>
<!--<aop:advisor 是定义事务的建议,pointcut-ref是上面pointcut的ID,advice-ref是单独的advice,是下面定义的 <tx:advice id="txAdvice" -->
<aop:config>
<aop:pointcut id="myServiceMethod" expression="execution(public * ssh.service..*.*(..))" />
<aop:advisor pointcut-ref="myServiceMethod" advice-ref="txAdvice"/>
</aop:config>
<!--定义建议(事务),供<aop:advisor的advice-ref引用,transaction-manager=" txManager "引用的是上面定义的事务管理器<bean id="txManager"。 propagation="REQUIRED"可以省略,默认是这个-->
<tx:advice id="txAdvice" transaction-manager="txManager">
<tx:attributes>
<tx:method name="add*" propagation="REQUIRED"/>
<!--
<tx:method name="exists" read-only="true" />
-->
</tx:attributes>
</tx:advice>
<!--=========================定义HibernateTemplate===================-->
<!--定义后在DAO里注入HibernateTemplate(private HibernateTemplate hibernateTemplate;在其Set方法上加@Resource注入),hibernateTemplate里面直接由save、update、delete、load等方法,可以直接hibernateTemplate.save(testUser);-->
<bean id="hibernateTemplate" class="org.springframework.orm.hibernate3.HibernateTemplate">
<property name="sessionFactory" ref="sessionFactory"></property>
</bean>
</beans>
struts.xml
<?xml version="1.0" encoding="GBK" ?>
<!DOCTYPE struts PUBLIC
"-//Apache Software Foundation//DTD Struts Configuration 2.0//EN"
"http://struts.apache.org/dtds/struts-2.0.dtd">
<struts>
<constant name="struts.devMode" value="true" />
<package name="default" namespace="/" extends="struts-default">
<action name="index" class="mstx.action.UserAction">
<result name="success">/index.jsp</result>
</action>
<action name="user" class="mstx.action.UserAction" method="save">
<result name="success">/success.jsp</result>
</action>
</package>
</struts>
web.xml
<?xml version="1.0" encoding="UTF-8"?>
<web-app version="2.5" xmlns="http://java.sun.com/xml/ns/javaee"
xmlns:xsi="http://www.w3.org/2001/XMLSchema-instance"
xsi:schemaLocation="http://java.sun.com/xml/ns/javaee
http://java.sun.com/xml/ns/javaee/web-app_2_5.xsd">
<welcome-file-list>
<welcome-file>index.jsp</welcome-file>
</welcome-file-list>
<listener>
<listener-class>org.springframework.web.context.ContextLoaderListener</listener-class>
<!-- default: /WEB-INF/applicationContext.xml -->
</listener>
<context-param>
<param-name>contextConfigLocation</param-name>
<!-- <param-value>/WEB-INF/applicationContext-*.xml,classpath*:applicationContext-*.xml</param-value> -->
<param-value>classpath:beans.xml</param-value>
</context-param>
<!--中文问题
1. Struts2.1.8已经修正,只需要改Struts.xml的i18n.encoding = gbk
2. 使用spring的characterencoding
-->
<filter>
<filter-name>encodingFilter</filter-name>
<filter-class>org.springframework.web.filter.CharacterEncodingFilter</filter-class>
<init-param>
<param-name>encoding</param-name>
<param-value>GBK</param-value>
</init-param>
</filter>
<filter-mapping>
<filter-name>encodingFilter</filter-name>
<url-pattern>/*</url-pattern>
</filter-mapping>
<!--openSessionInView
此时,session(应该说的是Hibernate的session)在事物结束(通常是service调用完)后自动关闭。由于使用的是load获取数据,在jsp页面申请取得数据时才真正的执行sql,而此时session已经关闭,故报错。
Session关闭解决方法:
在web.xml中增加filter—openSessionInView,用于延长session在jsp调用完后再关闭
-->
<filter>
<filter-name>openSessionInView</filter-name>
<filter-class>org.springframework.orm.hibernate3.support.OpenSessionInViewFilter</filter-class>
</filter>
<filter-mapping>
<filter-name>openSessionInView</filter-name>
<url-pattern>/*</url-pattern>
</filter-mapping>
<filter>
<filter-name>struts2</filter-name>
<filter-class>org.apache.struts2.dispatcher.ng.filter.StrutsPrepareAndExecuteFilter</filter-class>
</filter>
<filter-mapping>
<filter-name>struts2</filter-name>
<url-pattern>/*</url-pattern>
</filter-mapping>
</web-app>
4、建立实体类,并加入Hibernate的注解
1)在实体类上加相应注解@Entity @Id等
2)在字段属性的get方法上加--@Column(name = "表字段名")
User.java
5、定义工具类
1)定义查询返回结果
QueryResult.java
package ssh.utils;
import java.util.List;
/*
* 定义查询返回的结果,泛型定义在类上
*/
public class QueryResult<T> {
private List<T> resultlist;//记录查询的结果
private long totalrecord;//记录查询得到的总条数
public List<T> getResultlist() {
return resultlist;
}
public void setResultlist(List<T> resultlist) {
this.resultlist = resultlist;
}
public long getTotalrecord() {
return totalrecord;
}
public void setTotalrecord(long totalrecord) {
this.totalrecord = totalrecord;
}
}
2)定义分页工具类
PageView.java
package ssh.utils;
import java.util.List;
/**
* 在Action里的调用方法
//这里必须要构造新对象,不然刚打开没有currentPage参数传递过来,如果不新建也行,第一次打开必须传递currentPage参数过来
private PageView<T>pageView=new PageView<T>();
public PageView<T> getPageView() {
return pageView;
}
public void setPageView(PageView<T> pageView) {
this.pageView = pageView;
}
int maxresult=1;
int firstindex=(pageView.getCurrentPage()-1)*maxresult;
QueryResult<T> Service.getScrollData(firstindex,maxresult, null, null, null);
pageView.setQueryResult(maxresult,qr);
request.put("pageView", pageView);
*/
public class PageView<T> {
/** 分页数据 **/
private List<T> records;
/** 页码开始索引 ,例如显示第1 2 3 4 5 6 7 8 9 ,开始索引为1 **/
private long startIndex;
/** 页码结束索引 ,例如显示第1 2 3 4 5 6 7 8 9 ,结束索引为9 **/
private long endIndex;
/** 总页数 ,没有0页,所以设置默认值为1 **/
private long totalPage = 1;
/** 每页显示记录数 **/
private int maxResult = 10;
/** 当前页 **/
private int currentPage = 1;
/** 总记录数 **/
private long totalRecord;
/** 工具条上显示的页码数量 **/
private int pageBarSize = 8;
// 这只方法触发记录查询结果和总条数
public void setQueryResult(int maxResult,QueryResult<T> qr) {
this.maxResult = maxResult;
this.records = qr.getResultlist();
this.totalRecord = qr.getTotalrecord();
this.totalPage = this.totalRecord % this.maxResult == 0 ? this.totalRecord/ this.maxResult : this.totalRecord / this.maxResult + 1;
/*****************************************************/
this.startIndex = currentPage - (pageBarSize % 2 == 0 ? pageBarSize / 2 - 1 : pageBarSize / 2);
this.endIndex = currentPage + pageBarSize / 2;
if (startIndex < 1) {
startIndex = 1;
if (totalPage >= pageBarSize)
endIndex = pageBarSize;
else
endIndex = totalPage;
}
if (endIndex > totalPage) {
endIndex = totalPage;
if ((endIndex - pageBarSize) > 0)
startIndex = endIndex - pageBarSize +1;//最后一页显示多小条页
else
startIndex = 1;
}
}
public List<T> getRecords() {
return records;
}
public void setRecords(List<T> records) {
this.records = records;
}
public long getStartIndex() {
return startIndex;
}
public void setStartIndex(long startIndex) {
this.startIndex = startIndex;
}
public long getEndIndex() {
return endIndex;
}
public void setEndIndex(long endIndex) {
this.endIndex = endIndex;
}
public long getTotalPage() {
return totalPage;
}
public void setTotalPage(long totalPage) {
this.totalPage = totalPage;
}
public int getMaxResult() {
return maxResult;
}
public void setMaxResult(int maxResult) {
this.maxResult = maxResult;
}
public int getCurrentPage() {
return currentPage;
}
public void setCurrentPage(int currentPage) {
this.currentPage = currentPage<1?1:currentPage;//如果当前页为0,则显示第一页
}
public long getTotalRecord() {
return totalRecord;
}
public void setTotalRecord(long totalRecord) {
this.totalRecord = totalRecord;
}
public int getPageBarSize() {
return pageBarSize;
}
public void setPageBarSize(int pageBarSize) {
this.pageBarSize = pageBarSize;
}
}
|
|
|