|
|
本帖最后由 231312111 于 2016-12-12 08:33 编辑
自学总结redis第一部分(简介、虚拟机配置、安装、配置、连接方式、密码设置)
Redis学习部分一、NoSql简介NoSql泛指非关系型数据库。
更多简介请见
“http://baike.baidu.com/link?url= ... mZE5eLvyYzd34k5T2xa”
1、1NoSql数据库的四大分类 键值(key-value)存储数据库:这一类数据库主要会使用一个哈希表,这个表中有一个特定的键和一个指针执行特定的数据。Key/value模型对于IT系统来说的优势在于简单、易部署。但是如果DBA只对部分值进行查询或更新的时候,key/value就显得低下了。举例如:oracle BDB,Redis。
列存储数据库:这部分数据库通常是用来迎来分布式存储的海量数据。键仍然存在,但是它们的特点是指向了多个列。这些列是由列家族来安排的。如:Cassandra,HBase,Riak。
文档型数据库:文档型数据库的灵感是来自于Lotus Notes办公软件的,而且它同第一种键值存储相类似。该类型的数据模型是版本化的文档,半结构化的文档以特定的格式存储,比如JSON。文档型数据库可以看作是键值数据库的升级版,允许之间嵌套值。而且文档型数据库比键值数据库的查询效率更高。如:CouchDB,Monodb。国内也有文档型数据库SequoiaDB,已经开源。
图形(Graph)数据库:图形结构的数据库同其他队列以及刚性结构的SQL数据库不同,它是使用灵活的图形模型,并且能够扩展到多个服务器上。NoSql数据库没有标准的查询语言(SQL),因此进行数据库查询需要制定数据模型。许多NoSql数据库都有REST式的数据接口或者查询API。如Neo4J。
1、2 NoSQL数据库的四大分类表格分析
分类
| Examples举例
| 典型应用场景
| 数据模型
| 优点
| 缺点
| 键值(key-value)[3]
| Tokyo Cabinet/Tyrant, Redis, Voldemort, Oracle BDB
| 内容缓存,主要用于处理大量数据的高访问负载,也用于一些日志系统等等。[3]
| Key 指向 Value 的键值对,通常用hash table来实现[3]
| 查找速度快
| 数据无结构化,通常只被当作字符串或者二进制数据[3]
| 列存储数据库[3]
| Cassandra, HBase, Riak
| 分布式的文件系统
| 以列簇式存储,将同一列数据存在一起
| 查找速度快,可扩展性强,更容易进行分布式扩展
| 功能相对局限
| 文档型数据库[3]
| CouchDB, MongoDb
| Web应用(与Key-Value类似,Value是结构化的,不同的是数据库能够了解Value的内容)
| Key-Value对应的键值对,Value为结构化数据
| 数据结构要求不严格,表结构可变,不需要像关系型数据库一样需要预先定义表结构
| 查询性能不高,而且缺乏统一的查询语法。
| 图形(Graph)数据库[3]
| Neo4J, InfoGrid, Infinite Graph
| 社交网络,推荐系统等。专注于构建关系图谱
| 图结构
| 利用图结构相关算法。比如最短路径寻址,N度关系查找等
| 很多时候需要对整个图做计算才能得出需要的信息,而且这种结构不太好做分布式的集群方案。[3]
|
1、3共同特征1、不需要预定义模式:不需要事先定义数据模式,预定义表结构。数据库中的每条记录都可能有不同的属性和格式。当插入数据时,并不需要预先定义它们的模式。
2、无共享架构:相对于将所有数据存储的存储区域网络中的全共享架构来说,NoSql往往将数据划分后存储在各个本地服务器上。因为从本地磁盘读取数据的性能往往好于通过网络传输读取数据的性能,从而提高了系统的性能。
3、弹性可扩展:可以在系统运行的时候,动态增加或删除节点。不需要停机维护,数据可以自动迁移。
4、分区:相对于将数据存放于同一个节点,NoSql数据库需要将数据进行分区,将记录分散在多个节点上面。并且通常分区的同时还要做复制。这样既提高了并行性能,又能保证没有单点失效的问题。
5、异步复制:和RAID存储系统不同的是,NoSql中的复制,往往是基于日志的异步复制。这样,数据就可以尽快地写入一个节点,而不是被网络传输引起延迟。缺点是并不总是能保证一致性,这样的方式在出现故障的时候,可能会丢失少量的数据。
6、BASE:相对于事物严格的ACID特性,Nosql数据库保证的是BASE特性。BASE是最终一致性和软事物。
1、4适用场景1、数据模型比较简单。
2、需要灵活性强的IT系统。
3、对数据库性能要求较高。
4、不需要高度的数据一致性。
5、对于给定的KEY,比较容易映射复杂值的环境。
二、redis简介更多简介内容参考
“http://baike.baidu.com/link?url= ... sPV8FYaYJzXO-_Mu7bq”
需要关注的redis大牛网站:http://blog.nosqlfan.com/
2、1redis简介 Remote Dictionary Server(Redis)是一个基于key-value键值对的持久化数据库存储系统。Redis和大名鼎鼎的memcached缓存服务很像,但是redis支持的数据库存储类型更丰富,包括String(字符串),list(链表),set(集合),zset(有序集合)等。
这些数据类型都支持push/pop、add/remove及取交集、并集和差集及更丰富的操作,而且这些操作都是原子性的,在此基础上,redis支持各种不同方式的排序。与memcached缓存服务一样,为了保证效率,数据都是缓存在内存中提供服务。和memcached不同的是,redis持久化缓存服务还会周期性的把更新的数据写入到磁盘以及把修改的操作记录追加到文件里记录下来。
比memcached更有优势的是,redis还支持master-slave(主从同步),这点很类似于关系型数据库mysql。数据可以从主服务器向任意数量的从服务器上同步,从服务器可以是关联其他从服务器的主服务器。这使得redis可执行单层树复制。存盘可以有意无意的对数据进行写操作。由于完全实现了发布/订阅机制,使得从数据库在任何地方同步树时,可订阅一个频道并接收主服务器完整的消息发布记录。同步对数据读取操作的可扩展性和数据冗余很有帮助。
Redis的出现,在一定程度上弥补了memcached这里key-value内存缓存服务的不足,在部分场合可以对关系型数据库启动很好的补充作用。Redis提供了java、Python,ruby,erlang,PHP客户端,使用很方便。Redis官方文档如下:
http://www.redis.io/
http://www.redis.cn/
2、2redis特点 与memcached不同,可以持久化存储数据。性能很高:redis能支持超过100K+(10W+)每秒的读写频率。(网站的瓶颈是数据库)
丰富的数据类型:redis支持二进制的string,list,hashset,set及ordered set等数据类型操作。
原子:redis所有操作都是原子性的,同时redis还支持对几个操作全并后的原子性执行。
丰富的特性:redis还支持publish/subscribe,通知,key过期等特性。
Redis支持异机主从复制。
其他总结:
优点:对数据高并发读写;对海量数据的高效率存储和访问;对数据的可扩展性和高可用性。
缺点:redis(ACID处理非常简单);无法做到太复杂的关系数据库模型。
扩展性:水平扩展(比如加同等级节点机器),垂直扩展(比如加硬件)
可靠性:数据不会丢失(刷盘不丢失)
可靠性持久化:RDB(把内存中的数据周期性的同步到硬盘中);AOF(相当于oracle的undo概念。只要进行DML语句,那么就会把操作写到日志里,实时的去记录。)
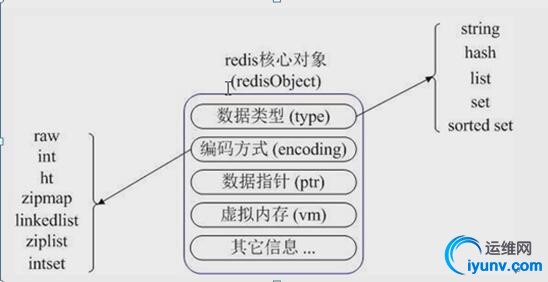
2、3redis数据类型 Redis最为常用的数据类型主要有五种:string,hash,list,set,sorted set

2、4redis应用场景说明2、4、1传统的mysql+memcached的网站架构遇到的问题 Mysql数据库实际上是适合进行海量数据存储的,加上通过memcached将热点数据存放到内存cache里,达到加速数据访问的目的,绝大部分公司都曾经使用过这样的架构,但随着业务数据量的不断增加,和访问量的不断增长,很多问题就会暴露出来。
1、需要不断的对mysql进行拆库拆表,memcached也需不断跟着扩容,扩容和维护工作占据大量开发运维时间。
2、memcached与mysql数据库数据一致性问题是个大难题。
3、memcached数据命中率低或down机,会导致大量访问直接穿透到数据库,导致mysql无法支撑访问。
4、跨机房cache同步一致性问题。
2、4、2redis的最佳应用场景1、redis的最佳应用场景是全部数据in-memory。
2、redis更多场景是作为memcached的替代品来使用。
3、支持持久化。
4、当需要除key-value之外的更多数据类型支持时,使用redis更合适。
5、需要负载均衡的场景(redis主从同步)
6、可用于:标签、统计、投票、排行榜等简单无多表查询的业务。
2、4、3memcached和redis对比举例 Memcached(单纯做缓存即可)(并行的,比方说:一个幼儿园的老师管多个孩子吃饭。)
Redis(不是靠单点的性能去实现,一般用于大业务数据处理)(串行的,比方说:一个幼儿园老师管一个孩子吃饭,一个孩子吃完再管下一个孩子吃饭,强调多实例。)
2、4、4使用redis中的经验教训1、要进行master-slave配置,出现服务故障可以支持切换。
2、在master侧禁用数据持久化,只需在slave上配置数据持久化。
3、物理内存+虚拟内存不足,这个时候dump一直死着,时间久了机器挂掉,这个情况就是灾难。,
4、当redis物理内存使用超过内存总容量的3/5时就会开始比较危险了,就开始做swap,内存碎片大。
5、当达到最大内存时,会清空带有过期时间的key,即使key未到过期时间。
6、redis与DB同步写的问题,先写DB,后写redis,因为写内存基本上没有问题。
7、redis某些情况下存储数据库比较慢是什么造成的?(redis写的性能降低,读的性能还是很高的,因为在写的时候会记录日志,所以降低了写的性能。第一种解决方案:多加机器去分担压力;第二种解决方案:可以加SSDB数据库即redis+SSDB,技术要结合具体的业务去实现。)(系统的瓶颈一般在后台,也就是数据库瓶颈,当然了后台前面的系统部署也很重要。)
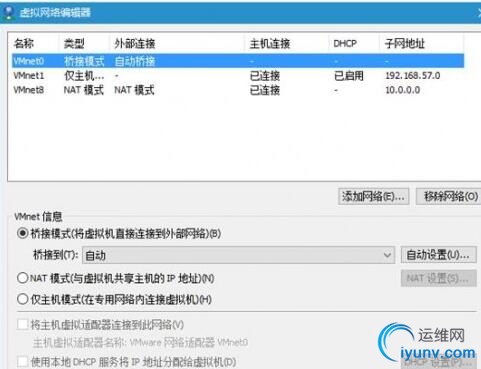
三、学习redis的软硬件配置1、1虚拟机配置在windows10-64bit下安装Vmvare12-64bit


1、2系统配置
1
2
3
4
5
6
7
8
9
10
11
12
| [iyunv@redis ~]# cat /etc/redhat-release
CentOS release 6.7 (Final)
[iyunv@redis ~]# uname -r
2.6.32-573.el6.x86_64
[iyunv@redis ~]# cat /etc/sysconfig/i18n
LANG="en_US.UTF-8"
#访问外网IP
[iyunv@redis ~]# ifconfig eth0|awk -F '[ :]+' 'NR==2{print$4}'
10.0.0.11
#内网IP
[iyunv@redis ~]# ifconfig eth1|awk -F '[ :]+' 'NR==2{print$4}'
172.16.1.11
|
四、redis安装与常用配置4、1安装与配置
1
2
3
4
5
6
7
8
9
10
| [iyunv@redis ~]# mkdir -p /home/lly/tools
[iyunv@redis ~]# cd /home/lly/tools/
[iyunv@redis tools]# wgethttp://download.redis.io/releases/redis-3.2.5.tar.gz
[iyunv@redis tools]# ls redis-3.2.5.tar.gz -sh
1.5M redis-3.2.5.tar.gz
[iyunv@redis tools]# tar xf redis-3.2.5.tar.gz
[iyunv@redis tools]# cd redis-3.2.5
[iyunv@redis redis-3.2.5]# ls
00-RELEASENOTES CONTRIBUTING INSTALL Makefile deps runtest runtest-sentinel src utils
BUGS COPYING MANIFESTO README.md redis.conf runtest-cluster sentinel.conf tests
|
#可通过less README命令查看redis的基本信息及相关操作(安装软件首先要看README和INSTALL了解此软件的相关信息)
1
2
3
4
5
6
7
8
9
10
11
12
13
14
15
16
17
| [iyunv@redis redis-3.2.5]# less README.md
[iyunv@redis redis-3.2.5]# make MALLOC=jemalloc
[iyunv@redis redis-3.2.5]# mkdir /application
[iyunv@redis redis-3.2.5]# make PREFIX=/application/redis-3.2.5install
[iyunv@redis redis-3.2.5]# ln -s /application/redis-3.2.5//application/redis
[iyunv@redis redis-3.2.5]# cd ~
[iyunv@redis ~]# tree /application/redis
/application/redis
`-- bin
|--redis-benchmark
|--redis-check-aof
|--redis-check-rdb
|-- redis-cli
|--redis-sentinel -> redis-server
`--redis-server
1 directory, 6 files
|
#注意下述的bin目录千万不要有多余的斜杠
#永久生效(推荐)
1
2
3
4
| [iyunv@redis ~]# echo "exportPATH=/application/redis/bin:$PATH">>/etc/profile
[iyunv@redis ~]# source /etc/profile
[iyunv@redis ~]# which redis-server
/application/redis/bin/redis-server
|
#临时生效,重启系统失效(不推荐)
1
2
3
4
5
| [iyunv@redis ~]# export PATH=/application/redis/bin:$PATH
[iyunv@redis ~]# which redis-server
/application/redis/bin/redis-server
[iyunv@redis ~]# mkdir -p /application/redis/conf
[iyunv@redis ~]# cp /home/lly/tools/redis-3.2.5/redis.conf/application/redis/conf/
|
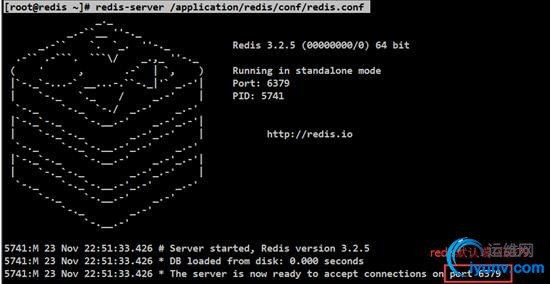
4、2redis测试#启动redis服务
1
| [iyunv@redis ~]# redis-server/application/redis/conf/redis.conf
|

#执行上述红色圈中的内容,此时按ctrl+c退出即可,因为此时不是后台执行的命令
#报错是因为内存小,所以加大内存。此处设置内核参数
1
2
3
4
5
6
7
8
9
10
| [iyunv@redis ~]# echo "vm.overcommit_memory =1">> /etc/sysctl.conf
[iyunv@redis ~]# sysctl -p
[iyunv@redis ~]# cat/sys/kernel/mm/transparent_hugepage/enabled
[always] madvise never
[iyunv@redis ~]# echo never > /sys/kernel/mm/transparent_hugepage/enabled
[iyunv@redis ~]# cat/sys/kernel/mm/transparent_hugepage/enabled
always madvise [never]
#再次启动redis服务
[iyunv@redis ~]# redis-server/application/redis/conf/redis.conf
|

1
2
3
4
5
6
7
8
9
10
11
12
13
14
15
16
17
| [iyunv@redis ~]# lsof -i:6379
COMMAND PIDUSER FD TYPE DEVICE SIZE/OFF NODE NAME
redis-ser 5741 root 4u IPv4 16039 0t0 TCP localhost:6379 (LISTEN)
#进入redis环境
[iyunv@redis ~]# redis-cli
127.0.0.1:6379> keys *
(empty list or set)
127.0.0.1:6379> set name nameval
OK
127.0.0.1:6379> keys *
1) "name"
127.0.0.1:6379> get name
"nameval"
127.0.0.1:6379> quit
[iyunv@redis ~]# redis-cli shutdown
[iyunv@redis ~]# lsof -i:6379
|
4、3redis.conf文件4、3、1设置RDB文件生成目录以及redis后台启动(重启redis生效)1
2
3
4
5
6
7
8
9
10
11
12
13
14
15
| [iyunv@redis ~]# cp /application/redis/conf/redis.conf/application/redis/conf/redis.conf.ori
#设置RDB文件生成目录
[iyunv@redis ~]# grep "dir ./"/application/redis/conf/redis.conf
dir ./
[iyunv@redis ~]# sed -i.ori1 "s#dir ./#dir/application/redis/conf/#g" /application/redis/conf/redis.conf
[iyunv@redis ~]# grep "dir/application/redis/conf/" /application/redis/conf/redis.conf
dir /application/redis/conf/
#设置redis后台启动
[iyunv@redis ~]# grep "daemonize yes"/application/redis/conf/redis.conf
daemonize yes
#可发现在redis重启之后执行启动命令不会再打印出启动日志
[iyunv@redis application]# redis-server/application/redis/conf/redis.conf
|
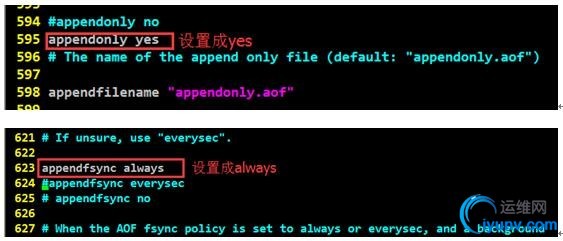
4、3、2设置AOF(重启redis生效)

1
2
3
4
5
6
7
| #具体查看4、3、4
#可查看生成AOF文件位置
[iyunv@redis conf]# pwd
/application/redis/conf
[iyunv@redis conf]# ls appendonly.aof -lsh
0 -rw-r--r-- 1 root root 0 Nov 25 00:17 appendonly.aof
|
4、3、3设置输出日志(重启redis生效)

1
2
3
4
5
6
| #具体查看4、3、4
#log文件的生成位置为
[iyunv@redis logs]# pwd
/application/redis/logs
[iyunv@redis logs]# ls redis.log -lsh
8.0K -rw-r--r-- 1 root root 4.3K Nov 25 00:20 redis.log
|
4、3、4redis.conf配置文件说明(不要用下述内容直接覆盖原redis.conf)1
2
3
4
5
6
7
8
9
10
11
12
13
14
15
16
17
18
19
20
21
22
23
24
25
26
27
28
29
30
31
32
33
34
35
36
37
38
39
40
41
42
43
44
45
46
47
48
49
50
51
52
53
54
55
56
57
58
59
60
61
62
63
64
65
66
67
68
69
70
71
72
73
74
75
76
77
78
79
80
81
82
83
84
85
86
87
88
89
90
91
92
93
94
95
96
97
98
99
100
101
102
103
104
105
106
107
108
109
110
111
112
113
114
115
116
117
118
119
120
121
122
123
124
125
126
127
128
129
130
131
132
133
134
135
136
137
138
139
140
141
142
143
144
145
146
147
148
149
150
151
152
153
154
155
156
157
158
159
160
161
162
163
164
165
166
167
168
169
170
171
172
173
174
175
176
177
178
179
180
181
182
183
184
185
186
187
188
189
190
191
192
193
194
195
196
197
198
199
200
201
202
203
204
205
206
207
208
209
210
211
212
213
214
215
216
217
218
219
220
221
222
223
224
225
226
227
228
229
230
231
232
233
234
235
236
237
238
239
240
241
242
243
244
245
246
247
248
249
250
251
252
253
254
255
256
257
258
259
260
261
262
263
264
265
266
267
268
269
270
271
272
273
274
275
276
277
278
279
280
281
282
283
284
285
286
287
288
289
290
291
292
293
294
295
296
297
298
299
300
301
302
303
304
305
306
307
308
309
310
311
312
313
314
315
316
317
318
319
320
321
322
323
324
325
326
327
328
329
330
331
332
333
334
335
336
337
338
339
340
341
342
343
344
345
346
347
348
349
350
351
352
353
354
355
356
357
358
359
360
361
362
363
364
365
366
367
368
369
370
371
372
373
374
375
376
377
378
379
380
381
382
383
384
385
386
387
388
389
390
391
392
393
394
395
396
397
398
399
400
401
402
403
404
405
406
407
408
409
410
411
412
413
414
415
416
417
418
419
420
421
422
423
424
425
426
427
428
429
430
431
432
433
434
435
436
437
438
439
440
441
442
443
444
445
446
447
448
449
450
451
452
453
454
455
456
457
458
459
460
461
462
463
464
465
466
467
468
469
470
471
472
473
474
475
476
477
478
479
480
481
482
483
484
485
486
487
488
489
490
491
492
493
494
495
496
497
498
499
500
501
502
503
504
505
506
507
508
509
| # 当配置中需要配置内存大小时,可以使用 1k, 5GB, 4M 等类似的格式,其转换方式如下(不区分大小写)
#
# 1k =>
1000 bytes
# 1kb => 1024 bytes
# 1m => 1000000 bytes
# 1mb =>
1024*1024 bytes
# 1g => 1000000000 bytes
# 1gb => 1024*1024*1024
bytes
#
# 内存配置大小写是一样的.比如 1gb 1Gb 1GB 1gB
# daemonize no 默认情况下,redis不是在后台运行的,如果需要在后台运行,把该项的值更改为yes
daemonize
yes
# 当redis在后台运行的时候,Redis默认会把pid文件放在/var/run/redis.pid,你可以配置到其他地址。
#
当运行多个redis服务时,需要指定不同的pid文件和端口
pidfile /var/run/redis.pid
# 指定redis运行的端口,默认是6379
port 6379
# 指定redis只接收来自于该IP地址的请求,如果不进行设置,那么将处理所有请求,
# 在生产环境中最好设置该项
# bind
127.0.0.1
# Specify the path for the unix socket that will be usedto listen for
#
incoming connections. There is no default, so Redis willnot listen
# on a
unix socket when not specified.
#
# unixsocket /tmp/redis.sock
#
unixsocketperm 755
# 设置客户端连接时的超时时间,单位为秒。当客户端在这段时间内没有发出任何指令,那么关闭该连接
# 0是关闭此设置
timeout
0
# 指定日志记录级别
# Redis总共支持四个级别:debug、verbose、notice、warning,默认为verbose
#
debug 记录很多信息,用于开发和测试
# varbose 有用的信息,不像debug会记录那么多
#
notice 普通的verbose,常用于生产环境
# warning 只有非常重要或者严重的信息会记录到日志
loglevel
debug
# 配置log文件地址
# 默认值为stdout,标准输出,若后台模式会输出到/dev/null
#logfile
stdout
logfile /var/log/redis/redis.log
# To enable logging to the system logger, just set'syslog-enabled' to
yes,
# and optionally update the other syslog parameters tosuit your
needs.
# syslog-enabled no
# Specify the syslog identity.
# syslog-ident redis
# Specify the syslog facility. Must be USER or between LOCAL0-LOCAL7.
#
syslog-facility local0
# 可用数据库数
# 默认值为16,默认数据库为0,数据库范围在0-(database-1)之间
databases 16
################################ 快照
#################################
#
# 保存数据到磁盘,格式如下:
#
# save#
#
指出在多长时间内,有多少次更新操作,就将数据同步到数据文件rdb。
# 相当于条件触发抓取快照,这个可以多个条件配合
#
#
比如默认配置文件中的设置,就设置了三个条件
#
# save 900 1 900秒内至少有1个key被改变
# save 300
10 300秒内至少有300个key被改变
# save 6010000 60秒内至少有10000个key被改变
save 900 1
save 300 10
save 60 10000
# 存储至本地数据库时(持久化到rdb文件)是否压缩数据,默认为yes
rdbcompression yes
# 本地持久化数据库文件名,默认值为dump.rdb。一定要注意:如果删除,那么redis库中的数据就没有了。
dbfilename dump.rdb
# 工作目录
#
# 数据库镜像备份的文件放置的路径。
#
这里的路径跟文件名要分开配置是因为redis在进行备份时,先会将当前数据库的状态写入到一个临时文件中,等备份完成时,
#
再把该该临时文件替换为上面所指定的文件,而这里的临时文件和上面所配置的备份文件都会放在这个指定的路径当中。
#
#
AOF文件也会存放在这个目录下面
#
# 注意这里必须制定一个目录而不是文件
dir ./
################################# 复制
#################################
# 主从复制. 设置该数据库为其他数据库的从数据库.
#
设置当本机为slav服务时,设置master服务的IP地址及端口,在Redis启动时,它会自动从master进行数据同步
#
# slaveof
# 当master服务设置了密码保护时(用requirepass制定的密码)
# slav服务连接master的密码
#
#
masterauth
# 当从库同主机失去连接或者复制正在进行,从机库有两种运行方式:
#
# 1)
如果slave-serve-stale-data设置为yes(默认设置),从库会继续相应客户端的请求
#
# 2)
如果slave-serve-stale-data是指为no,出去INFO和SLAVOF命令之外的任何请求都会返回一个
# 错误"SYNC with
master in progress"
#
slave-serve-stale-data yes
# 从库会按照一个时间间隔向主库发送PINGs.可以通过repl-ping-slave-period设置这个时间间隔,默认是10秒
#
#
repl-ping-slave-period 10
# repl-timeout 设置主库批量数据传输时间或者ping回复时间间隔,默认值是60秒
#
一定要确保repl-timeout大于repl-ping-slave-period
# repl-timeout 60
################################## 安全
###################################
# 设置客户端连接后进行任何其他指定前需要使用的密码。
#
警告:因为redis速度相当快,所以在一台比较好的服务器下,一个外部的用户可以在一秒钟进行150K次的密码尝试,这意味着你需要指定非常非常强大的密码来防止暴力破解
#
#
requirepass foobared
# 命令重命名.
#
# 在一个共享环境下可以重命名相对危险的命令。比如把CONFIG重名为一个不容易猜测的字符。
#
#
举例:
#
# rename-command CONFIG
b840fc02d524045429941cc15f59e41cb7be6c52
#
#
如果想删除一个命令,直接把它重命名为一个空字符""即可,如下:
#
# rename-command CONFIG ""
################################### 约束
####################################
# 设置同一时间最大客户端连接数,默认无限制,Redis可以同时打开的客户端连接数为Redis进程可以打开的最大文件描述符数,
# 如果设置
maxclients 0,表示不作限制。
# 当客户端连接数到达限制时,Redis会关闭新的连接并向客户端返回max number of clients
reached错误信息
#
# maxclients 128
# 指定Redis最大内存限制,Redis在启动时会把数据加载到内存中,达到最大内存后,Redis会先尝试清除已到期或即将到期的Key
#
Redis同时也会移除空的list对象
#
#
当此方法处理后,仍然到达最大内存设置,将无法再进行写入操作,但仍然可以进行读取操作
#
#
注意:Redis新的vm机制,会把Key存放内存,Value会存放在swap区
#
#
maxmemory的设置比较适合于把redis当作于类似memcached的缓存来使用,而不适合当做一个真实的DB。
#
当把Redis当做一个真实的数据库使用的时候,内存使用将是一个很大的开销
# maxmemory
# 当内存达到最大值的时候Redis会选择删除哪些数据?有五种方式可供选择
#
# volatile-lru ->
利用LRU算法移除设置过过期时间的key (LRU:最近使用 Least Recently Used )
# allkeys-lru ->
利用LRU算法移除任何key
# volatile-random -> 移除设置过过期时间的随机key
#
allkeys->random -> remove a random key, any key
# volatile-ttl ->
移除即将过期的key(minor TTL)
# noeviction -> 不移除任何可以,只是返回一个写错误
#
#
注意:对于上面的策略,如果没有合适的key可以移除,当写的时候Redis会返回一个错误
#
# 写命令包括: set setnx
setex append
# incr decrrpush lpush rpushx lpushx linsert lset
rpoplpush sadd
# sintersinterstore sunion sunionstore sdiff sdiffstore
zadd zincrby
# zunionstorezinterstore hset hsetnx hmset hincrby incrby
decrby
# getset msetmsetnx exec sort
#
# 默认是:
#
#
maxmemory-policy volatile-lru
# LRU 和minimal TTL 算法都不是精准的算法,但是相对精确的算法(为了节省内存),随意你可以选择样本大小进行检测。
#
Redis默认的灰选择3个样本进行检测,你可以通过maxmemory-samples进行设置
#
# maxmemory-samples
3
############################## AOF###############################
#
默认情况下,redis会在后台异步的把数据库镜像备份到磁盘,但是该备份是非常耗时的,而且备份也不能很频繁,如果发生诸如拉闸限电、拔插头等状况,那么将造成比较大范围的数据丢失。
#
所以redis提供了另外一种更加高效的数据库备份及灾难恢复方式。
# 开启append
only模式之后,redis会把所接收到的每一次写操作请求都追加到appendonly.aof文件中,当redis重新启动时,会从该文件恢复出之前的状态。
#
但是这样会造成appendonly.aof文件过大,所以redis还支持了BGREWRITEAOF指令,对appendonly.aof 进行重新整理。
#你可以同时开启asynchronous dumps 和 AOF
appendonly no
# AOF文件名称 (默认: "appendonly.aof")
# appendfilename appendonly.aof
# Redis支持三种同步AOF文件的策略:
#
# no: 不进行同步,系统去操作 . Faster.
# always:
always表示每次有写操作都进行同步. Slow, Safest.
# everysec: 表示对写操作进行累积,每秒同步一次.
Compromise.
#
# 默认是"everysec",按照速度和安全折中这是最好的。
#如果想让Redis能更高效的运行,你也可以设置为"no",让操作系统决定什么时候去执行
#或者相反想让数据更安全你也可以设置为"always"
#
# 如果不确定就用 "everysec".
# appendfsync always
appendfsync everysec
# appendfsync no
# AOF策略设置为always或者everysec时,后台处理进程(后台保存或者AOF日志重写)会执行大量的I/O操作
#在某些Linux配置中会阻止过长的fsync()请求。注意现在没有任何修复,即使fsync在另外一个线程进行处理
#
#为了减缓这个问题,可以设置下面这个参数no-appendfsync-on-rewrite
#
# This means that while
another child is saving the durability of Redis is
# the same as "appendfsync
none", that in pratical terms means that it is
# possible to lost up to 30
seconds of log in the worst scenario (with the
# default Linux
settings).
#
# If you have latency problems turn this to"yes". Otherwise
leave it as
# "no" that is the safest pick from the pointof view of
durability.
no-appendfsync-on-rewrite no
# Automatic rewrite of the append only file.
# AOF 自动重写
#
当AOF文件增长到一定大小的时候Redis能够调用 BGREWRITEAOF 对日志文件进行重写
#
#
它是这样工作的:Redis会记住上次进行些日志后文件的大小(如果从开机以来还没进行过重写,那日子大小在开机的时候确定)
#
#
基础大小会同现在的大小进行比较。如果现在的大小比基础大小大制定的百分比,重写功能将启动
#
同时需要指定一个最小大小用于AOF重写,这个用于阻止即使文件很小但是增长幅度很大也去重写AOF文件的情况
# 设置 percentage
为0就关闭这个特性
auto-aof-rewrite-percentage 100
auto-aof-rewrite-min-size 64mb
################################## SLOW LOG
###################################
# Redis Slow Log 记录超过特定执行时间的命令。执行时间不包括I/O计算比如连接客户端,返回结果等,只是命令执行时间
#
#
可以通过两个参数设置slow log:一个是告诉Redis执行超过多少时间被记录的参数slowlog-log-slower-than(微妙),
#
另一个是slow log 的长度。当一个新命令被记录的时候最早的命令将被从队列中移除
# 下面的时间以微妙微单位,因此1000000代表一分钟。
#
注意制定一个负数将关闭慢日志,而设置为0将强制每个命令都会记录
slowlog-log-slower-than 10000
# 对日志长度没有限制,只是要注意它会消耗内存
# 可以通过 SLOWLOG RESET
回收被慢日志消耗的内存
slowlog-max-len 1024
################################ VM###############################
### WARNING! Virtual Memory is deprecated in Redis 2.4
### The use of
Virtual Memory is strongly discouraged.
# Virtual Memory allows Redis to work with datasetsbigger than the
actual
# amount of RAM needed to hold the whole dataset inmemory.
# In
order to do so very used keys are taken in memory whilethe other keys
# are
swapped into a swap file, similarly to what operatingsystems do
# with
memory pages.
#
# To enable VM just set 'vm-enabled' to yes, and set the
following three
# VM parameters accordingly to your needs.
vm-enabled no
# vm-enabled yes
# This is the path of the Redis swap file. As you canguess, swap
files
# can't be shared by different Redis instances, so makesure to use a
swap
# file for every redis process you are running. Rediswill complain if
the
# swap file is already in use.
#
# The best kind of storage for the
Redis swap file (that's accessed at random)
# is a Solid State Disk
(SSD).
#
# *** WARNING *** if you are using a shared hosting thedefault
of putting
# the swap file under /tmp is not secure. Create a dirwith access
granted
# only to Redis user and configure Redis to create theswap file
there.
vm-swap-file /tmp/redis.swap
# vm-max-memory configures the VM to use at max thespecified amount
of
# RAM. Everything that deos not fit will be swapped ondisk *if* possible,
that
# is, if there is still enough contiguous space in theswap
file.
#
# With vm-max-memory 0 the system will swap everything itcan. Not
a good
# default, just specify the max amount of RAM you can inbytes, but
it's
# better to leave some margin. For instance specify anamount of
RAM
# that's more or less between 60 and 80% of your free
RAM.
vm-max-memory 0
# Redis swap files is split into pages. An object can besaved using
multiple
# contiguous pages, but pages can't be shared between different
objects.
# So if your page is too big, small objects swapped outon disk will
waste
# a lot of space. If you page is too small, there is lessspace in the
swap
# file (assuming you configured the same number of totalswap file
pages).
#
# If you use a lot of small objects, use a page size of64 or 32
bytes.
# If you use a lot of big objects, use a bigger pagesize.
# If
unsure, use the default :)
vm-page-size 32
# Number of total memory pages in the swap file.
# Given that the page
table (a bitmap of free/used pages) is taken in memory,
# every 8 pages on
disk will consume 1 byte of RAM.
#
# The total swap size is vm-page-size *
vm-pages
#
# With the default of 32-bytes memory pages and 134217728pages
Redis will
# use a 4 GB swap file, that will use 16 MB of RAM forthe page
table.
#
# It's better to use the smallest acceptable value foryour
application,
# but the default is large in order to work in most
conditions.
vm-pages 134217728
# Max number of VM I/O threads running at the same time.
# This threads
are used to read/write data from/to swap file, since they
# also encode and
decode objects from disk to memory or the reverse, abigger
# number of
threads can help with big objects even if they can't helpwith
# I/O itself
as the physical device may not be able to couple withmany
# reads/writes
operations at the same time.
#
# The special value of 0 turn off threaded
I/O and enables the blocking
# Virtual Memory
implementation.
vm-max-threads 4
############################### ADVANCED CONFIG
###############################
# 当hash中包含超过指定元素个数并且最大的元素没有超过临界时,
#
hash将以一种特殊的编码方式(大大减少内存使用)来存储,这里可以设置这两个临界值
# Redis
Hash对应Value内部实际就是一个HashMap,实际这里会有2种不同实现,
#
这个Hash的成员比较少时Redis为了节省内存会采用类似一维数组的方式来紧凑存储,而不会采用真正的HashMap结构,对应的value
redisObject的encoding为zipmap,
#
当成员数量增大时会自动转成真正的HashMap,此时encoding为ht。
hash-max-zipmap-entries
512
hash-max-zipmap-value 64
# list数据类型多少节点以下会采用去指针的紧凑存储格式。
#
list数据类型节点值大小小于多少字节会采用紧凑存储格式。
list-max-ziplist-entries
512
list-max-ziplist-value 64
# set数据类型内部数据如果全部是数值型,且包含多少节点以下会采用紧凑格式存储。
set-max-intset-entries
512
# zsort数据类型多少节点以下会采用去指针的紧凑存储格式。
#
zsort数据类型节点值大小小于多少字节会采用紧凑存储格式。
zset-max-ziplist-entries
128
zset-max-ziplist-value 64
# Redis将在每100毫秒时使用1毫秒的CPU时间来对redis的hash表进行重新hash,可以降低内存的使用
#
#
当你的使用场景中,有非常严格的实时性需要,不能够接受Redis时不时的对请求有2毫秒的延迟的话,把这项配置为no。
#
#
如果没有这么严格的实时性要求,可以设置为yes,以便能够尽可能快的释放内存
activerehashing yes
################################## INCLUDES
###################################
# 指定包含其它的配置文件,可以在同一主机上多个Redis实例之间使用同一份配置文件,而同时各个实例又拥有自己的特定配置文件
#
include /path/to/local.conf
# include /path/to/other.conf
|
4、4安装目录对应/application/redis/bin子目录的说明
1
2
3
4
5
6
7
8
9
10
| [iyunv@redis bin]# pwd
/application/redis/bin
[iyunv@redis bin]# ll
total 26340
-rwxr-xr-x 1 root root 5580319 Nov 23 21:32redis-benchmark
# redis-benchmark是Redis性能测试工具,测试redis在系统及配置下的读写性能。
-rwxr-xr-x 1 root root 22185 Nov 23 21:32 redis-check-aof
# redis-check-aof更新日志检查
-rwxr-xr-x 1 root root 7826966 Nov 23 21:32redis-check-rdb
# redis-check-rdb用户本地数据检查
|
-rwxr-xr-x 1 root root5709036 Nov 23 21:32 redis-cli
# redis-cli是Redis命令行操作工具,也可以使用Telnet根据纯文本协议来操作。
1
2
| lrwxrwxrwx 1 root root 12 Nov 23 21:32 redis-sentinel ->redis-server
# redis-sentinel同redis-serve,只是建立了软链接而已
|
-rwxr-xr-x 1 root root7826966 Nov 23 21:32 redis-server
#redis-server是Redis服务器的daemon(守护进程)启动程序。
1
2
3
4
5
6
7
8
9
10
11
12
13
14
15
16
17
| #查看使用方法
比如(其他命令同理):
[iyunv@redis bin]# redis-server --help
Usage: ./redis-server [/path/to/redis.conf] [options]
./redis-server - (read config from stdin)
./redis-server -v or --version
./redis-server -h or --help
./redis-server --test-memory
Examples:
./redis-server (run the server with default conf)
./redis-server /etc/redis/6379.conf
./redis-server --port 7777
./redis-server --port 7777 --slaveof 127.0.0.1 8888
./redis-server /etc/myredis.conf --loglevel verbose
Sentinel mode:
./redis-server /etc/sentinel.conf --sentinel
|
4、5连接redis的两种方式4、5、1第一种redis-cli1
2
3
4
5
6
7
8
9
10
| [iyunv@redis bin]# redis-cli -a redis
#如果没设置redis密码,那么-a redis是不需要的
127.0.0.1:6379> keys *
1) "name"
127.0.0.1:6379> quit
[iyunv@redis bin]# redis-cli
#如果没设置redis密码,那么auth redis是不需要的
127.0.0.1:6379> auth redis
OK
127.0.0.1:6379> quit
|
4、5、2第二种telnet4、5、2、1当前linux系统下1
2
3
4
5
6
7
8
9
10
11
12
13
14
15
16
17
18
19
20
21
22
23
24
25
26
| #检查是否安装Telnet
[iyunv@redis bin]# rpm -qa telnet
#如果没安装,那么安装Telnet
[iyunv@redis bin]# yum install telnet -y
[iyunv@redis bin]# rpm -qa telnet
telnet-0.17-48.el6.x86_64
[iyunv@redis bin]# telnet 127.0.0.1 6379
Trying 127.0.0.1...
Connected to 127.0.0.1.
Escape character is '^]'.
keys *
-NOAUTH Authentication required.
#如果没有设置redis密码,那么auth redis是不需要的
auth redis
+OK
keys *
*1
$4
name
get name
$7
nameval
quit
+OK
Connection closed by foreign host.
|
4、5、2、2windows连接

五、密码设置5、1修改redis.conf文件,需重启redis在

加入红圈中的内容,密码对应redis
1
2
3
4
5
6
7
8
9
10
11
12
13
14
15
16
17
18
19
20
21
22
23
24
25
26
27
28
29
30
31
32
33
| 可以发现此时进入redis,是不需要密码的,
[iyunv@redis ~]# redis-cli
127.0.0.1:6379> keys *
(empty list or set)
重启redis重新测试:
[iyunv@redis ~]# redis-cli shutdown
[iyunv@redis ~]# redis-server/application/redis/conf/redis.conf
[iyunv@redis ~]# lsof -i:6379
COMMAND PIDUSER FD TYPE DEVICE SIZE/OFF NODE NAME
redis-ser 6067 root 4u IPv4 18272 0t0 TCP localhost:6379 (LISTEN)
#第一种进入redis方式
[iyunv@redis ~]# redis-cli -h 127.0.0.1 -p 6379
#上述相当于redis-cli,原因参考“4、3、2”中的port和bind说明
127.0.0.1:6379> keys *
(error) NOAUTH Authentication required.
127.0.0.1:6379> auth redis
OK
127.0.0.1:6379> keys *
(empty list or set)
#第二种进入redis方式
[iyunv@redis ~]# redis-cli -h 127.0.0.1 -p 6379 -a redis
127.0.0.1:6379> keys *
(empty list or set)
#相当于
[iyunv@redis ~]# redis-cli -a redis
127.0.0.1:6379> keys *
(empty list or set)
#在退出redis服务时,同理也需要设置密码
[iyunv@redis ~]# redis-cli -a redis shutdown
[iyunv@redis ~]# lsof -i:6379
|
5、2通过命令行设置,不用重启redis1
2
3
4
5
6
7
8
9
10
11
12
13
14
15
16
17
18
19
20
21
22
23
24
25
26
27
28
29
30
31
32
33
34
35
36
37
38
39
| #前提注释掉5、1的密码设置
[iyunv@redis ~]# redis-server/application/redis/conf/redis.conf
[iyunv@redis ~]# netstat -lntup|grep 6379
tcp 0 0 127.0.0.1:6379 0.0.0.0:* LISTEN 6092/redis-server 1
[iyunv@redis ~]# redis-cli
127.0.0.1:6379> keys *
(empty list or set)
127.0.0.1:6379> config set requirepass redis
OK
127.0.0.1:6379> keys *
(error) NOAUTH Authentication required.
127.0.0.1:6379> auth redis
OK
127.0.0.1:6379> keys *
(empty list or set)
#查看设置密码情况
127.0.0.1:6379> config get requirepass
1) "requirepass"
2) "redis"
127.0.0.1:6379> quit
[iyunv@redis ~]# redis-cli
127.0.0.1:6379> keys *
(error) NOAUTH Authentication required.
127.0.0.1:6379> quit
[iyunv@redis ~]# redis-cli -a redis
127.0.0.1:6379> keys *
(empty list or set)
#取消命令行设置的密码
127.0.0.1:6379> config set requirepass ""
OK
127.0.0.1:6379> keys *
1) "name"
127.0.0.1:6379> get name
"nameval"
127.0.0.1:6379> quit
[iyunv@redis ~]# redis-cli
#可以发现不再使用密码
127.0.0.1:6379> get name
"nameval"
|
|
|