|
|
Apache已经将Pivot升级为顶级项目,虽然从前不知道这个项目,但是看来还是有发展前途的。我看好它,因为我对FLEX语法实在不感冒,还是Java写着舒服。似乎也很少有人用AWT/Swing做商业产品,但Applet的应用还是常见的。就研究研究Pivot吧。
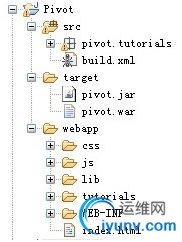
既然Apache将其定位为RIA in Java,做J2EE的还是关注下吧。这是纯Java血统的东西(相比于FLEX),下了开发包,看例子,语法类似Swing,还是比较容易接受的。但是官方例子中没有完整的目录结构,构建开发环境还是留下了一些障碍。可能是之前没有接触过。我自己摸索了一个适应web开发的目录结构,可能不是最好的,但是是可行的。如下:

这里用了ANT进行jar打包,之前用Eclipse的导出打包不好用,就自己写了个ANT构建脚本运行,还真好用了。
目录结构还是传统的web项目,不同的是webapp下也放置了lib,当然就是运行项目所需的lib库,如果放到WEB-INF/lib下,那页面是不能直接访问到的,而pivot程序是直接在页面显示调用类库的,就需要放到可见的位置。不过我是在WEB-INF/lib下也放置了一份,那里的在编译路径里的,这样不冲突,也为ANT构建省去来回设置类路径的麻烦。jar包也不大,基本的才1.29M,没有办法,谁让人家是RIA呢。
先从Java Application开始吧,我是参照官方示例学习的。但是如果你刚下载开发包,估计得看上一阵子呢。其实很简单,就是一个类,一个XML配置文件(Pivot中是以wtkx作为扩展名的)。下面用代码来说明,更为直观。
Java代码


- package pivot.tutorials.hellowtkx;
-
import org.apache.pivot.collections.Map;
import org.apache.pivot.wtk.Application;
import org.apache.pivot.wtk.DesktopApplicationContext;
import org.apache.pivot.wtk.Display;
import org.apache.pivot.wtk.Window;
import org.apache.pivot.wtkx.WTKXSerializer;
-
public class HelloWTKX implements Application {
private Window window = null;
-
public void startup(Display display, Map<String, String> map)
throws Exception {
WTKXSerializer wtkxSerializer = new WTKXSerializer();
window = (Window) wtkxSerializer.readObject(this, "helloWTKX.wtkx.xml");
window.setTitle("Hello JavaEye");
- window.open(display);
- }
-
public boolean shutdown(boolean optional) throws Exception {
if (window != null) {
- window.close();
- }
return false;
- }
-
public void resume() throws Exception {
- }
-
public void suspend() throws Exception {
- }
-
public static void main(String[] args) {
DesktopApplicationContext.main(HelloWTKX.class, args);
- }
-
- }
package pivot.tutorials.hellowtkx;
import org.apache.pivot.collections.Map;
import org.apache.pivot.wtk.Application;
import org.apache.pivot.wtk.DesktopApplicationContext;
import org.apache.pivot.wtk.Display;
import org.apache.pivot.wtk.Window;
import org.apache.pivot.wtkx.WTKXSerializer;
public class HelloWTKX implements Application {
private Window window = null;
public void startup(Display display, Map<String, String> map)
throws Exception {
WTKXSerializer wtkxSerializer = new WTKXSerializer();
window = (Window) wtkxSerializer.readObject(this, "helloWTKX.wtkx.xml");
window.setTitle("Hello JavaEye");
window.open(display);
}
public boolean shutdown(boolean optional) throws Exception {
if (window != null) {
window.close();
}
return false;
}
public void resume() throws Exception {
}
public void suspend() throws Exception {
}
public static void main(String[] args) {
DesktopApplicationContext.main(HelloWTKX.class, args);
}
}
官方示例中配置文件都以XXX.wtkx形式存在,其实就是XML文档,我就直接以.xml来编辑,这样在Eclipse中可以高亮显示,否则就是普通文本编辑了。配置文件的编写参考官方示例就行了。我还加上了的XML声明。
Xml代码
- <?xml version="1.0" encoding="UTF-8" ?>
<Window title="Hello WTKX" maximized="true"
xmlns:wtkx="ttp://pivot.apache.org/wtkx"
xmlns="org.apache.pivot.wtk">
<content>
<Label text="Hello JavaEye! - The Pivot WTKX Application"
styles="{font:'Arial bold 24',color:'#ff0000',
horizontalAlignment:'center',verticalAlignment:'center'}" />
</content>
</Window>
<?xml version="1.0" encoding="UTF-8" ?>
<Window title="Hello WTKX" maximized="true"
xmlns:wtkx="ttp://pivot.apache.org/wtkx"
xmlns="org.apache.pivot.wtk">
<content>
<Label text="Hello JavaEye! - The Pivot WTKX Application"
styles="{font:'Arial bold 24',color:'#ff0000',
horizontalAlignment:'center',verticalAlignment:'center'}" />
</content>
</Window>
基本的Pivot应用程序都是实现了Application接口,自然也要实现其中的抽象方法。从方法名启动,关闭,唤醒和挂起不难看出这是进程的状态转化方法。负责继承状态改变时的处理。主函数就是Pivot应用程序的执行方式,这都是固定的写法了,传入本类的class和主函数的参数。
类中定义一个私有属性window,就是Pivot应用程序的窗口对象,在startup方法中进行进程加载启动时的事情。WTKXSerializer类在官方文档中解释为“从XML中加载对象层次结构”,可以看出类似于MXML,控件的定义都是写在配置文件中的。只不过这个XML编码时IDE还不能给出提示。我想是Schema还没有最后固定,编码时只能按照已有定义来编写。程序就可以解析XML了。wtkxSerializer对象读取XML配置文件,并从中获取window实例(window是根元素)。中间可以是业务流程的处理。这里是对window的title进行了设置,编码风格很像Swing。最后一步是window的open()方法,传入display参数。在shutdown()方法中别忘记关闭window就可以了。
此时程序就可以以Application方式运行了。得到效果:

第一部分介绍到此结束,第二部分中将介绍Web应用中的Pivot部署和用ANT构建自定义jar包。
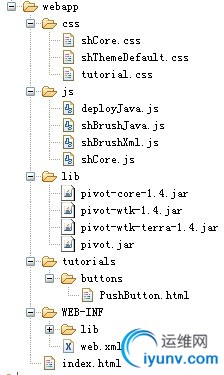
我们探究了如何构建Pivot开发框架,编写Pivot桌面应用程序。这一篇我们来说说如何在web环境中部署Pivot程序。webapp发布目录 如下所示:

css中的样式表和js下的JavaScript脚本都是根据官方示例中拷贝下来的,其中最重要的是deployJava.js,它是展示Java applet的工具包,Pivot在页面中就是以Applet的形式展现的,js文件在http://java.com/js/deployJava.js 下载。Lib下是Pivot应用所依赖的类库,可以看出pivot.jar是我自定义的jar,就是编好代码打的包,而WEB-INF/lib下的库和Pivot没有关系,那里的库正常是访问不到的。
下面展示HTML页面
Html代码


- <!DOCTYPE html PUBLIC "-//W3C//DTD XHTML 1.0 Transitional//EN" "http://www.w3.org/TR/xhtml1/DTD/xhtml1-transitional.dtd">
<html xmlns="http://www.w3.org/1999/xhtml">
<head>
<meta content="text/html; charset=UTF-8" http-equiv="Content-Type" />
<title>Push Buttons</title>
<script src="/pivot/js/deployJava.js" type="text/javascript"></script>
</head>
<body>
<script xmlns="" type="text/javascript">
var attributes = {
- code:'org.apache.pivot.wtk.BrowserApplicationContext$HostApplet',
- width:'480',
- height:'360'
- };
var libraries = [];
- libraries.push("/pivot/lib/pivot-core-1.4.jar");
- libraries.push("/pivot/lib/pivot-wtk-1.4.jar");
- libraries.push("/pivot/lib/pivot-wtk-terra-1.4.jar");
- libraries.push("/pivot/lib/pivot.jar");
attributes.archive = libraries.join(",");
var parameters = {
- codebase_lookup:false,
java_arguments:'-Dsun.awt.noerasebackground=true -Dsun.awt.erasebackgroundonresize=true',
- application_class_name:'pivot.tutorials.buttons.PushButtons'
- };
- deployJava.runApplet(attributes, parameters, "1.6");
</script>
</body>
</html>
<!DOCTYPE html PUBLIC "-//W3C//DTD XHTML 1.0 Transitional//EN" "http://www.w3.org/TR/xhtml1/DTD/xhtml1-transitional.dtd">
<html xmlns="http://www.w3.org/1999/xhtml">
<head>
<meta content="text/html; charset=UTF-8" http-equiv="Content-Type" />
<title>Push Buttons</title>
<script src="/pivot/js/deployJava.js" type="text/javascript"></script>
</head>
<body>
<script xmlns="" type="text/javascript">
var attributes = {
code:'org.apache.pivot.wtk.BrowserApplicationContext$HostApplet',
width:'480',
height:'360'
};
var libraries = [];
libraries.push("/pivot/lib/pivot-core-1.4.jar");
libraries.push("/pivot/lib/pivot-wtk-1.4.jar");
libraries.push("/pivot/lib/pivot-wtk-terra-1.4.jar");
libraries.push("/pivot/lib/pivot.jar");
attributes.archive = libraries.join(",");
var parameters = {
codebase_lookup:false,
java_arguments:'-Dsun.awt.noerasebackground=true -Dsun.awt.erasebackgroundonresize=true',
application_class_name:'pivot.tutorials.buttons.PushButtons'
};
deployJava.runApplet(attributes, parameters, "1.6");
</script>
</body>
</html>
关键是JS段代码,其实都是固定套路,只需修改自定义的jar即可,其他段根据字母意思即可理解,关键是lib库的位置一定要对。下面说说ANT打包。
Xml代码
- <?xml version="1.0" encoding="UTF-8" ?>
<project name="pivot" default="all">
<description>The Pivot Application</description>
<!-- 定义文件夹 -->
<property name="srcDir" location="." />
<property name="classDir" location="../webapp/WEB-INF/classes" />
<property name="libDir" location="../webapp/WEB-INF/lib" />
<property name="webDir" location="../webapp" />
<!--用于输出打包的文件夹-->
<property name="tempDir" location="${java.io.tmpdir}/${ant.project.name}" />
<property name="targetDir" location="../target" />
<!-- 定义classpath -->
<path id="master-classpath">
<fileset file="${libDir}/*.jar" />
<pathelement path="${classDir}" />
</path>
<!-- 执行清理 -->
<target name="clean">
<delete dir="${classDir}" />
<delete dir="${tempDir}" />
<delete file="${targetDir}/${ant.project.name}.jar" />
<delete file="${targetDir}/${ant.project.name}.war" />
<delete dir="${targetDir}" />
</target>
<!-- 初始化任务 -->
<target name="init" depends="clean">
<mkdir dir="${targetDir}" />
<mkdir dir="${tempDir}" />
<mkdir dir="${classDir}" />
</target>
<!-- 编译 -->
<target name="compile" depends="init" description="compile the source files">
<javac srcdir="${srcDir}" destdir="${classDir}" debug="true" encoding="UTF-8">
<classpath refid="master-classpath" />
</javac>
<copy todir="${classDir}" overwrite="true">
<fileset dir="${srcDir}">
<include name="**/*.xml" />
<include name="**/*.properties" />
</fileset>
</copy>
</target>
<!--打jar包-->
<target name="jar" depends="compile">
<jar jarfile="${targetDir}/${ant.project.name}.jar">
<fileset dir="${classDir}">
<include name="**/*" />
</fileset>
</jar>
</target>
<!—准备war包 -->
-
<target name="preWar" depends="jar">
<copy todir="${tempDir}/WEB-INF/lib" overwrite="true">
<fileset dir="${libDir}">
<include name="*.jar" />
</fileset>
</copy>
<copy todir="${tempDir}" overwrite="true">
<fileset dir="${webDir}">
<include name="**/*" />
</fileset>
</copy>
</target>
<!--打war包-->
<target name="war" depends="preWar">
<jar jarfile="${targetDir}/${ant.project.name}.war">
<fileset dir="${tempDir}">
<include name="**/*" />
</fileset>
</jar>
</target>
-
<!-- 清理临时目录 -->
<target name="all" depends="war">
<delete dir="${tempDir}" />
</target>
</project>
<?xml version="1.0" encoding="UTF-8" ?>
<project name="pivot" default="all">
<description>The Pivot Application</description>
<!-- 定义文件夹 -->
<property name="srcDir" location="." />
<property name="classDir" location="../webapp/WEB-INF/classes" />
<property name="libDir" location="../webapp/WEB-INF/lib" />
<property name="webDir" location="../webapp" />
<!--用于输出打包的文件夹-->
<property name="tempDir" location="${java.io.tmpdir}/${ant.project.name}" />
<property name="targetDir" location="../target" />
<!-- 定义classpath -->
<path id="master-classpath">
<fileset file="${libDir}/*.jar" />
<pathelement path="${classDir}" />
</path>
<!-- 执行清理 -->
<target name="clean">
<delete dir="${classDir}" />
<delete dir="${tempDir}" />
<delete file="${targetDir}/${ant.project.name}.jar" />
<delete file="${targetDir}/${ant.project.name}.war" />
<delete dir="${targetDir}" />
</target>
<!-- 初始化任务 -->
<target name="init" depends="clean">
<mkdir dir="${targetDir}" />
<mkdir dir="${tempDir}" />
<mkdir dir="${classDir}" />
</target>
<!-- 编译 -->
<target name="compile" depends="init" description="compile the source files">
<javac srcdir="${srcDir}" destdir="${classDir}" debug="true" encoding="UTF-8">
<classpath refid="master-classpath" />
</javac>
<copy todir="${classDir}" overwrite="true">
<fileset dir="${srcDir}">
<include name="**/*.xml" />
<include name="**/*.properties" />
</fileset>
</copy>
</target>
<!--打jar包-->
<target name="jar" depends="compile">
<jar jarfile="${targetDir}/${ant.project.name}.jar">
<fileset dir="${classDir}">
<include name="**/*" />
</fileset>
</jar>
</target>
<!—准备war包 -->
<target name="preWar" depends="jar">
<copy todir="${tempDir}/WEB-INF/lib" overwrite="true">
<fileset dir="${libDir}">
<include name="*.jar" />
</fileset>
</copy>
<copy todir="${tempDir}" overwrite="true">
<fileset dir="${webDir}">
<include name="**/*" />
</fileset>
</copy>
</target>
<!--打war包-->
<target name="war" depends="preWar">
<jar jarfile="${targetDir}/${ant.project.name}.war">
<fileset dir="${tempDir}">
<include name="**/*" />
</fileset>
</jar>
</target>
<!-- 清理临时目录 -->
<target name="all" depends="war">
<delete dir="${tempDir}" />
</target>
</project>
Eclipse中已经集成了ANT,只要新建build.xml的文件并且编写,右键就能直接运行,非常方便,ANT构建脚本的编写也很简单,关键是目录迭代不能遗漏,还有目录的定位,不过在IDE中都有提示,也很方便。
将打包好的jar放到webapp/lib下并且修改页面的js段代码即可看到效果了。

欢迎大家交流。
(全篇完) |
|
|