一. 目录
- 关于集群的介绍.
- 什么是负载均衡以及为什么需要负载均衡.
- 负载均衡技术的特点.
- 负载均衡集群的常见解决方案.
- lvs介绍及管理工具.
- 实现lvs集群服务的三种类型方法介绍.
- LVS调度算法介绍.
- ipvsadm管理工具的用法.
- FWM.
- LVS持久连接
- 实验部分(包括lvs-nat和lvs-dr类型的实现、基于lvs集群的http和https,及FWM的实现).
二. 正文
1. 关于集群的介绍
当网站后端服务器承受不住访问的压力,提高服务器性能的解决方案会极大的增加成本时,于是就出现了横向扩展的解决方案。即增加一台或几台服务器,提供相同的服务,通过前端调度器将访问请求均匀的分配到后台服务器上。这种多台服务器组成的数组集合就叫做集群。
集群按功能划分有三种模型:
- 负载均衡集群(LB, loadBalance)
- 高可用性集群(HA, High Availability)
- 高性能集群(HP, High Performance)
2. 什么是负载均衡以及为什么需要负载均衡:
由于网站中业务量的提高,访问量和数据流量的快速增长,其处理能力和计算强度也相应地增大,使得单一的服务器设备根本无法承担。负载均衡解决方案,让网站服务器轻松应对流量高峰,有效保证网站的稳定性。针对此情况而衍生出来的一种廉价有效透明的方法以扩展现有网络设备和服务器的带宽、增加吞吐量、加强网络数据处理能力、提高网络的灵活性和可用性。这种技术就是负载均衡(Load Balance)。
3. 负载均衡技术的特点:
- 大量的并发访问或数据流量分担到多台节点设备上分别处理,有效保证每个请求都能最快处理;
- 网络接入均衡,有效解决我国电信、网通“南北互通”问题;
- 多种负载均衡方式,有针对性的解决不同网站的压力分配问题;
- 科学的数据同步及内容分发系统;
- 完整的数据备份系统。
- ...
4. 负载均衡集群的常见解决方案:
1) F5: F5公司是应用交付网络(ADN)领域的全球领先厂商,全球市场份额第一。其致力于帮助全球大型的企业和服务提供商实现虚拟化、云计算和“随需应变”的IT的业务价值。F5公司总部设在华盛顿州的西雅图,并在全球各地设有分部。其产品性能好但价格昂贵。
2) A10: A10 公司是应用交付网络(ADN)领域的全球领先厂商,全球市场份额第三。其总部位于美国硅谷,连续多年被INC.500评为全球发展最快的企业之一。
3) 深信服: 深信服应用交付AD产品具备服务器负载均衡、链路负载均衡、单边加速、智能优化技术、SSL加速、商业智能分析等优势功能,将用户访问请求智能匹配到最优的链路,并为用户选择响应最快的服务器,提升用户使用体验,并为企业提供科学管理的决策。
4)Citrix NetScaler:中文名为负载均衡,指的是对于一个三层架构web应用来说,客户端的请求将通过NetScaler与后台服务器建立链接。思杰系统公司(Citrix System)是全球领先的以及最值得信赖的应用交付基础架构解决方案提供商。全球有超过21万5千家机构依靠思杰产品向身处任何地点的用户交付任何应用,其方案性能好、安全性高、成本低。
lvs,haproxy,nginx,httpd,varnish,...
5. lvs介绍及管理工具:
(1) LVS全称为Linux Virtual Server,是由国内章文嵩教授牵头开发的开源项目,现在已经被收到linux2.6以上的内核版本中,不需要对系统打补丁就可以轻松实现。
(2) LVS工作于IOS七层模型的第四层-传输层,通过对TCP, UDP, AH, EST, AH_EST, SCTP等工作在四层的协议的支持,根据目标地址和端口做出转发与否的决策,根据调度算法做出转发至哪一个端口的解决方案。
(3) LVS将其控制程序ipvs嵌套至传输层数据流的Input钩子函数上,ipvs将发送至本调度器主机(director)上的数据流在input链上进行截流,通过对数据报文的分析根据自身的算法将数据流转发至后台真正提供服务的主机(Real Server)上,达到根据后端服务器负载能力均衡分配处理任务的效果。许多商业的集群产品,如RedHat的Piranha,Turbolinux公司的Turbo Cluster等都是基于LVS的核心代码实现的。
(4) LVS集群采用IP负载均衡技术和基于内容请求分发技术。调度器(Director)具有很好的吞吐率,将请求均衡地转移到不同的服务器上执行,且调度器自动屏蔽掉服务器的故障,从而将一组服务器构成一个高性能的、高可用的虚拟服务器。整个服务器集群的结构对客户是透明的,而且无需修改客户端和服务器端的程序。为此,在设计时需要考虑系统的透明性、可伸缩性、高可用性和易管理性。
(5) IPVS: 称之为IP虚拟服务器(IP Virtual Server,简写为IPVS),是运行在LVS下的提供负载均衡功能的一种技术。 当一个TCP连接的初始SYN报文到达时,IPVS就选择一台服务器,将报文转发给这台服务器。此后通过检查发报文的IP和TCP报文头地址,保证此连接的后继报文被转发到相同的服务器。这样,当IPVS无法检查到请求的内容而需要再选择服务器时,这就要求后端的服务器组提供相同的服务,不管请求被送到哪一台服务器,返回结果都应该是一样的。但是在有一些应用中后端的服务器可能功能不一,有的是提供HTML文档的Web服务器,有的是提供图片的Web服务器,有的是提供CGI的Web服务器。这时,就需要基于内容进行请求分发 (Content-Based Request Distribution),同时基于内容请求分发可以提高后端服务器上访问的局部性。
(6) ipvsadm: 用户空间的命令行工具, 用于管理集群服务;
(7) 查看系统内核中的lvs支持的协议:
1
2
3
4
5
6
7
8
9
10
11
12
13
14
15
16
17
18
19
20
21
22
23
24
25
26
27
28
29
30
31
32
33
34
35
36
37
38
39
40
41
42
43
44
45
46
47
48
49
50
51
52
53
54
55
| [iyunv@CentOS7 ~]# cat /etc/redhat-release
CentOS Linux release 7.3.1611 (Core)
[iyunv@CentOS7 ~]#
[iyunv@CentOS7 ~]# grep -i -A 10 "IPVS" /boot/config-3.10.0-514.el7.x86_64
CONFIG_NETFILTER_XT_MATCH_IPVS=m
CONFIG_NETFILTER_XT_MATCH_LENGTH=m
CONFIG_NETFILTER_XT_MATCH_LIMIT=m
CONFIG_NETFILTER_XT_MATCH_MAC=m
CONFIG_NETFILTER_XT_MATCH_MARK=m
CONFIG_NETFILTER_XT_MATCH_MULTIPORT=m
CONFIG_NETFILTER_XT_MATCH_NFACCT=m
CONFIG_NETFILTER_XT_MATCH_OSF=m
CONFIG_NETFILTER_XT_MATCH_OWNER=m
CONFIG_NETFILTER_XT_MATCH_POLICY=m
CONFIG_NETFILTER_XT_MATCH_PHYSDEV=m
--
# IPVS transport protocol load balancing support
#
CONFIG_IP_VS_PROTO_TCP=y
CONFIG_IP_VS_PROTO_UDP=y
CONFIG_IP_VS_PROTO_AH_ESP=y
CONFIG_IP_VS_PROTO_ESP=y
CONFIG_IP_VS_PROTO_AH=y
CONFIG_IP_VS_PROTO_SCTP=y
#
# IPVS scheduler
#
CONFIG_IP_VS_RR=m
CONFIG_IP_VS_WRR=m
CONFIG_IP_VS_LC=m
CONFIG_IP_VS_WLC=m
CONFIG_IP_VS_LBLC=m
CONFIG_IP_VS_LBLCR=m
CONFIG_IP_VS_DH=m
CONFIG_IP_VS_SH=m
CONFIG_IP_VS_SED=m
--
# IPVS SH scheduler
#
CONFIG_IP_VS_SH_TAB_BITS=8
#
# IPVS application helper
#
CONFIG_IP_VS_FTP=m
CONFIG_IP_VS_NFCT=y
CONFIG_IP_VS_PE_SIP=m
#
# IP: Netfilter Configuration
#
CONFIG_NF_DEFRAG_IPV4=m
CONFIG_NF_CONNTRACK_IPV4=m
[iyunv@CentOS7 ~]#
|
(8) lvs中常用的的术语:
DIP(Director IP): 调度器连接后台服务器的IP
CIP(Client IP): 客户端IP
VIP(Director Virtual IP): 调度器对外开放的IP
RIP(Real Server IP): 后台服务器IP
RS(Real Server): 后台提供服务的主机
Director: 调度器或控制器
6. 实现lvs集群服务的四种类型方法介绍.
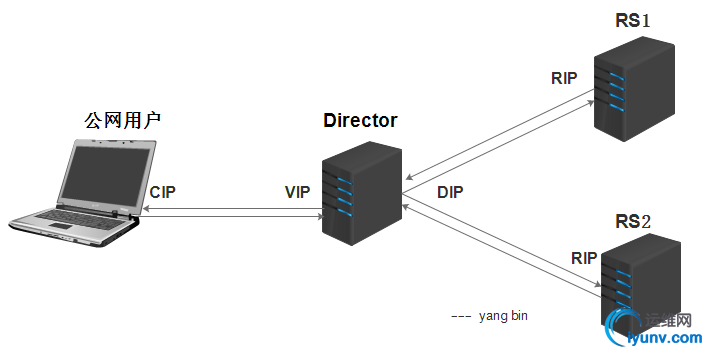
(1) lvs-nat
多目标的DNAT(iptables),它通过修改请求报文的目标IP地址(同时可能会修改目标端口)至挑选出某RS的RIP地址实现转发;
图示:

注:
1) LVS(Director)上面需要双网卡:DIP(内网)和VIP(外网).
2) RS应该和DIP使用私网地址, 且RS的网关要指向DIP;RIP仅用于各个节点之间的通信
3) 请求和响应报文都要经由director转发, 极高负载的场景中, director可能会成为系统瓶颈;
4) 支持端口映射;
5) RS可以使用任意OS;
6) RS的RIP和Director的DIP必须在同一IP网络;
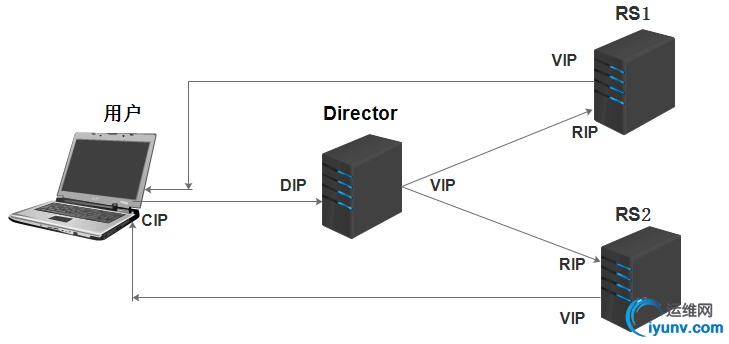
(2) lvs-dr
通过修改请求报文的目标MAC地址进行转发。
图示:

注:
1) 保证前端路由器将目标IP为VIP的请求报文发送给director;
解决方案:
静态绑定.
arp tables.
修改RS主机内核的参数.
2) RS的RIP可以使用私有地址, 但也可以使用公网地址;
3) RS跟Director必须在同一物理网络中;
4) 请求报文经由Director调度, 但响应报文一定不能经由Director;
5) Director仅仅负责处理入站请求,响应报文则由Real Server直接发往客户端;
6) 不支持端口映射;
7) RS可以是大多数OS;
8) RS的网关不能指向DIP,而是指向外部路由;
9) Director能够支持比NAT多很多的Real Server;
在DR模型中,由于每个节点均要配置VIP,因此存在VIP的MAC广播问题,在现在的linux内核中,都提供了相应kernel 参数对MAC广播进行管理,具体如下:
两个内核参数:
1) arp_ignore:定义接收到ARP请求时的响应级别;
0:只要本地配置的有相应地址,就给予响应;
1:仅在请求的目标地址配置在到达的接口上的时候,才给予响应;DR模型使用
2) arp_announce:定义将自己地址向外通告时的通告级别;
0:将本地任何接口上的任何地址向外通告;
1:试图仅向目标网络通告与其网络匹配的地址;
2:仅向与本地接口上地址匹配的网络进行通告;DR模型使用
两内核参数所在位置:/proc/sys/net/ipv4/conf/
(3) lvs-tun
tun模型的数据转发原理和上面的dr模式是一样的,不过这个的应用场景主要是不同位置(不同机房);LB是通过隧道进行了信息传输,虽然增加了负载,可是因为地理位置不同的优势,还是可以参考的一种方案;
优点:负载均衡器只负责将请求包分发给物理服务器,而物理服务器将应答包直接发给用户。所以,负载均衡器能处理很大的请求量,这种方式,一台负载均衡能为超过100台的物理服务器提供服务,负载均衡器不再是系统的瓶颈。使用LVS-TUN方式,如果你的负载均衡器拥有100M的全双工网卡的话,就能使得整个Virtual Server能达到1G的吞吐量。
不足:这种方式需要所有的服务器支持”IP Tunneling”(IP Encapsulation)协议;
注:
1) RIP,DIP,VIP都是公网地址;
2) RS的网关不能,也不可能指向DIP;
3) 请求报文由Director分发,但响应报文直接由RS响应给Client;
4) 不支持端口映射;
5) RS的OS必须得支持IP隧道,目前只有linux系统支持,windows,bsfdb等不支持;
(4) lvs-fullnat(双向转换)
通过请求报文的源地址为DIP,目标为RIP来实现转发:对于响应报文而言,修改源地址为VIP,目标地址为CIP来实现转发:
注:
1) fullnat是对nat模型的改进,是一个扩展,使得RS与Director可以处于不同网络中。
2) VIP是公网地址,RIP和DIP是私网地址,二者无需在同一网络中;
3) RIP和DIP可以不再同一个网络中,且RIP的网关未必需要指向DIP;
4) 支持端口映射;
5) RS可以使用任意OS;
6) 请求报文经由Director,响应报文也经由Director;
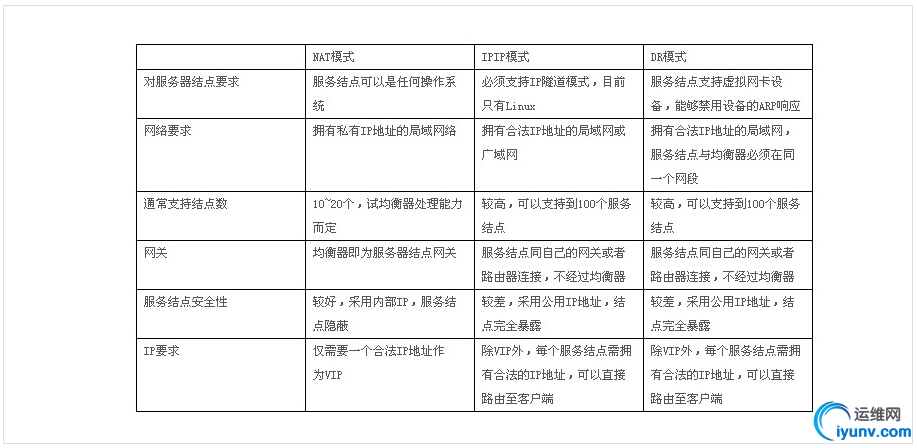
对DR/TUN/NAT模型的优缺点总结如下:

7. LVS调度算法介绍.
四种静态算法,不考虑后端服务器实际负载情况:
1) RR
根据规则依次论调,不考虑RS的性能。轮到谁就转发给谁。
2) WRR
加权轮询,加入了weight(权重),可以根据RS的性能为其设置权重值,权重越大功能越强,但是无法发现当前的服务器的运行情况如何。
3) DH
目标地址hash,适用于前端是一个director后端是几个缓存服务器的情况,当客户端第一次访问到的是RS1的时候,DH这种算法能保证在客户端刷新后还是访问的RS1。
4) SH
源地址hash,用于保证响应的报文和请求的报文是同一个路径。
六种动态算法,考虑后端服务器当前负载后再进行分配:
1) LC
least connection,当一个用户请求过来的时候,Director会计算一下哪台RS的连接数最小,那么这台RS就获得了下次响应客户端请求的机会,计算的方法Overhead=active*256+inactive,如果两者的结果是相同的则从LVS中的规则依次往下选择RS。这种算法也是不考虑服务器的性能的。
2) WLC
这个就是加了权重的LC,考虑了RS的性能,即性能好的就给的权重值大一些,性能差的给的权重值小一些。缺点就是如果Overhead相同,则会按规则表中的顺序,由上而下选择RS,Overhead=(active*256+inactive)/weight
3) SED
就是对WLC的情况的补充,Overhead=(active+1)*256/weight,加1,就是为了让其能够比较出大小。
4) NQ
即never queue,基本和SED相同,避免了SED当中的性能差的服务器长时间被空闲的弊端,它是将第一个请求给性能好的服务器,第二个请求一定是给空闲的服务器不论它的性能的好与坏。之后还是会把请求给性能好的服务器。
5) LBLC
它就是动态DH和LC的组合,适用于cache集群,对于从来没有来过的那些新的请求会分给当前连接数较少的那台服务器。
6) LBLCR
带有复制功能的LBLC,它的适用场景这里举例说明一下,比如说现在有RS1和RS2,第一次访问RS1的5个请求第二次又来了,理所应到Director将会将其交给RS1,而此时在RS2是非常闲的,所以此时最好的处理方法就是可以将后来的这5个请求分别交给RS1和RS2,所以此时就需要把客户端第一次请求的资源复制下来。(特殊情况)
8. ipvsadm管理工具的用法:
管理集群服务:
# ipvsadm -A|E -t|u|f service-address [-s scheduler]
# ipvsadm -D -t|u|f service-address
service-address:
tcp: -t ip:port
udp: -u ip:port
fwm: -f MARK
-s scheduler:
默认为wlc.
管理集群服务中的RS:
# ipvsadm -a|e -t|u|f service-address -r server-address [-g|i|m] [-w weight] [-x upper] [-y lower]
# ipvsadm -d -t|u|f service-address -r server-address
server-address:
ip[:port]
lvs-type:
-g: gateway, dr
-i: ipip, tun
-m: masquerade, nat
权重:
-w NUM , -w表示权重,为0时就不会调度,数字越小,能力越小,性能越差;
清空和查看:
# ipvsadm -C
# ipvsadm -L|l [options]
-n: numeric,基于数字格式显示地址和端口;
-c: connection, 显示ipvs连接;
--stats: 统计数据
--rate: 速率
--exact: 精确值
保存和重载:
# ipvsadm -R
# ipvsadm -S [-n]
置零计数器:
# ipvsadm -Z [-t|u|f service-address]
9. FWM
复习netfilter知识:
netfilter:
PREROUTING --> INPUT
PREROUTING --> FORWARD --> POSTROUTING
OUTPUT --> POSTROUTING
FWM(FireWall MARK): 防火墙标记语言
为什么使用防火墙标记?
将来自于同一个客户端的所有请求都定义到同一个RS上;如使用防火墙标记将443和80定义为同一个集群服务,这样就可以实现统一调度到后端的RS。
比如在电商站点中,往购物车中添加商品之后需要付款,这个时候就需要访问director,发起的连接就不是http,而是https;但director会认为这是一个新的连接,很可能会被分配到其他RS服务器,这个时候购物车中就没有了商品。为了解决这种问题,就需要把用户的http请求和https请求,都调度到同一台服务器。
防火墙标记在什么时候打?
当用户请求报文到防火墙(PREROUTING链),防火墙就将特定报文(如:443和80),打上标记,假设标记为“10”;LVS调度的时候,就可以根据标记进行,只要请求带有标记10,就会将请求调度到同一个RS服务器。
定义方法:
(1)打标:在director上的mangle表的PREROUTING链上实现:
语法:
# iptables -t mangle -A PREROUTING -d $vip -p $protocol --dport $port -j MARK --set-mark n
$vip: vip地址
$protocol: 协议
$port: 协议端口
n: [1-99]
(2)基于FWM定义集群服务:
# ipvsadm -A -f FWM -s SCHEDULER
# ipvsadm -a -f FWM -rserver-address -g|-i|-m -w #
PREROUTING:
-j MARK --set-mark 10
ipvs:
-A -f 10
10. LVS持久连接
lvs persistence: lvs的持久连接;
功能:无论ipvs使用何种调度方法,其都能实现将来自于同一个Client的请求始终定向至第一次调度时挑选出的RS;
和sh调度算法比较优点:
sh:会一直将一个用户请求定义到一个后端server,不会考虑后端服务器状态;对多个共享的同一组RS的服务器,需要统一进行绑定,sh算法无法实现; 持久连接:第一次会根据设置的调度算法(rr,wlc……)调度到后端,在指定的会话存活时间使用持久连接,会话存活时间到期之后,还是根据调度算法进行调度。 persistence template(持久连接模板):将多个集群服务归并到一起统一调度;
持久连接的实现方式:
PPC:每端口持久;持久连接生效范围仅为单个集群服务;如果有多个集群服务,每服务被单独持久调度;
PFWM:每FWM持久:持久连接生效范围为定义为同一个FWM下的所有服务;
PCC:每客户端持久;持久连接生效范围为所有服务;定义集群服务时,其TCP或UDP协议的目标端口要使用0;
director会将用户的任何请求都识别为集群服务,并向RS进行调度;
TCP: 1-65535; UDP: 1-65535
lvs persistence语法:
ipvsadm-A -t|-u|-f service-address -s $schedular -p [n]
无-p选项:不启用持久连接
-p n:指定持久时长,省略时长,默认为360秒
其他注意事项:
关于时间同步:各节点间的时间偏差不大于1s,建议使用统一的ntp服务器进行更新时间;
DR模型中的VIP的MAC广播问题:
11. 实验部分:
实验一:部署lvs-nat集群
实验环境:
实验软件:vmware workstation
系统:
Director:CentOS7.3
Real Server(2台):CentOS6.7
网络拓扑图:

IP地址分配
CIP=10.68.7.14 VIP=10.68.7.222 DIP=192.168.7.1
RS1_RIP=192.168.7.200 RS2_RIP=192.168.7.201
主机名:
调度器服务器:director
RS1服务器:RS1
RS2服务器:RS2
网卡:
Director:两块,一块桥接,与CIP在同一网段;另一块设置为vmnat2.
RS1&RS2:各一块,都设置为vmnat2,与DIP都在同一网段
实验过程如下:
1. 首先配置Director服务器:
确认Director与两RS服务器之间的网络没有问题.
1
2
3
4
5
6
7
8
9
10
11
12
13
14
15
16
17
| [iyunv@director ~]# ping 192.168.7.200
PING 192.168.7.200 (192.168.7.200) 56(84) bytes of data.
64 bytes from 192.168.7.200: icmp_seq=1 ttl=64 time=1.20 ms
64 bytes from 192.168.7.200: icmp_seq=2 ttl=64 time=2.32 ms
^C
--- 192.168.7.200 ping statistics ---
2 packets transmitted, 2 received, 0% packet loss, time 1005ms
rtt min/avg/max/mdev = 1.206/1.767/2.328/0.561 ms
[iyunv@director ~]# ping 192.168.7.201
PING 192.168.7.201 (192.168.7.201) 56(84) bytes of data.
64 bytes from 192.168.7.201: icmp_seq=1 ttl=64 time=1.58 ms
64 bytes from 192.168.7.201: icmp_seq=2 ttl=64 time=3.45 ms
^C
--- 192.168.7.201 ping statistics ---
2 packets transmitted, 2 received, 0% packet loss, time 1005ms
rtt min/avg/max/mdev = 1.586/2.518/3.450/0.932 ms
[iyunv@director ~]#
|
1
2
3
4
5
6
7
8
9
| [iyunv@RS1 ~]# ping 192.168.7.1
PING 192.168.7.1 (192.168.7.1) 56(84) bytes of data.
64 bytes from 192.168.7.1: icmp_seq=1 ttl=64 time=0.663 ms
64 bytes from 192.168.7.1: icmp_seq=2 ttl=64 time=1.44 ms
^C
--- 192.168.7.1 ping statistics ---
2 packets transmitted, 2 received, 0% packet loss, time 1155ms
rtt min/avg/max/mdev = 0.663/1.051/1.440/0.389 ms
[iyunv@RS1 ~]#
|
1
2
3
4
5
6
7
8
9
| [iyunv@RS2 ~]# ping 192.168.7.1
PING 192.168.7.1 (192.168.7.1) 56(84) bytes of data.
64 bytes from 192.168.7.1: icmp_seq=1 ttl=64 time=1.26 ms
64 bytes from 192.168.7.1: icmp_seq=2 ttl=64 time=1.78 ms
^C
--- 192.168.7.1 ping statistics ---
2 packets transmitted, 2 received, 0% packet loss, time 1640ms
rtt min/avg/max/mdev = 1.267/1.525/1.783/0.258 ms
[iyunv@RS2 ~]#
|
开启Director服务器的路由转发功能:
1
2
3
4
5
6
| [iyunv@director ~]# vim /etc/sysctl.conf
//添加如下行
net.ipv4.ip_forward = 1
[iyunv@director ~]# sysctl -p //查看并刷新配置.
net.ipv4.ip_forward = 1
[iyunv@director ~]#
|
2. 配置RS服务器,安装apache http服务
1
2
3
| [iyunv@RS1 ~]# yum -y install httpd
[iyunv@RS1 ~]# echo "<h1>RS1.yangbin.com</h1>" > /var/www/html/index.html
[iyunv@RS1 ~]# service httpd start
|
1
2
3
| [iyunv@RS2 ~]# yum -y install httpd
[iyunv@RS2 ~]# echo "<h1>RS2.yangbin.com</h1>" > /var/www/html/index.html
[iyunv@RS2 ~]# service httpd start
|
3. 在Director服务器端通过curl命令查看RS端服务是否正常运行:
3. 在Director服务器端安装ipvsadm配置工具:
可通过yum安装,也可通过编译源码的方式安装
源码包下载地址:http://www.linuxvirtualserver.org/software/ipvs.html
此处通过yum快速安装:
1
2
3
| [iyunv@director ~]# yum -y install ipvsadm
[iyunv@director ~]# ipvsadm -v
ipvsadm v1.27 2008/5/15 (compiled with popt and IPVS v1.2.1)
|
4. 编写ipvs规则:
1
2
3
4
5
6
7
8
9
10
11
12
13
14
15
| [iyunv@director ~]# ipvsadm -ln //查看规则
IP Virtual Server version 1.2.1 (size=4096)
Prot LocalAddress:Port Scheduler Flags
-> RemoteAddress:Port Forward Weight ActiveConn InActConn
[iyunv@director ~]# ipvsadm -A -t 10.68.7.222:80 -s rr
[iyunv@director ~]# ipvsadm -a -t 10.68.7.222:80 -r 192.168.7.200 -m
[iyunv@director ~]# ipvsadm -a -t 10.68.7.222:80 -r 192.168.7.201 -m
[iyunv@director ~]# ipvsadm -ln
IP Virtual Server version 1.2.1 (size=4096)
Prot LocalAddress:Port Scheduler Flags
-> RemoteAddress:Port Forward Weight ActiveConn InActConn
TCP 10.68.7.222:80 rr
-> 192.168.7.200:80 Masq 1 0 6
-> 192.168.7.201:80 Masq 1 0 7
[iyunv@director ~]#
|
5. 通过浏览器访问,如果刷新出现轮循的结果,则验证成功:


结果如上图所示,通过"F5"刷新页面,就会出现RS1和RS2分别响应的情况.
实验二:部署lvs-dr集群
实验环境:
实验软件:vmware workstation
系统:
Director:CentOS7.3
Real Server(2台):CentOS6.7
网络拓扑图:

IP地址分配
CIP=10.68.7.14 DIP=10.68.7.222 VIP=10.68.7.13
RS1_RIP=10.68.7.200 RS2_RIP=10.68.7.201
RS1_VIP=10.68.7.13 RS2_VIP=10.68.7.13
RS1_VIP即lo:0 RS2_VIP即lo:0
主机名:
调度器服务器:director
RS1服务器:RS1
RS2服务器:RS2
网卡:
Director:两块,其中第二块(ens33:0)是第一块(ens33)的别名,即虚拟网卡接口.
RS1&RS2:各两块,其中第二块(lo:0)是本地回环网卡(lo)的别名,即虚拟网卡接口.
实验过程如下:
1. 首先配置Director服务器:
1
2
3
4
5
6
7
8
9
10
11
12
13
14
15
16
17
18
19
20
21
22
23
24
25
26
27
28
29
30
31
32
33
34
35
36
37
38
39
40
41
42
43
44
45
46
47
| [iyunv@director ~]# ifconfig
ens33: flags=4163<UP,BROADCAST,RUNNING,MULTICAST> mtu 1500
inet 10.68.7.222 netmask 255.255.255.0 broadcast 10.255.255.255
inet6 fe80::42c7:3094:c773:558f prefixlen 64 scopeid 0x20<link>
ether 00:0c:29:b0:42:49 txqueuelen 1000 (Ethernet)
RX packets 8183 bytes 632803 (617.9 KiB)
RX errors 0 dropped 387 overruns 0 frame 0
TX packets 799 bytes 90668 (88.5 KiB)
TX errors 0 dropped 0 overruns 0 carrier 0 collisions 0
lo: flags=73<UP,LOOPBACK,RUNNING> mtu 65536
inet 127.0.0.1 netmask 255.0.0.0
inet6 ::1 prefixlen 128 scopeid 0x10<host>
loop txqueuelen 1 (Local Loopback)
RX packets 54 bytes 4944 (4.8 KiB)
RX errors 0 dropped 0 overruns 0 frame 0
TX packets 54 bytes 4944 (4.8 KiB)
TX errors 0 dropped 0 overruns 0 carrier 0 collisions 0
[iyunv@director ~]# ifconfig ens33:0 10.68.7.13/32 broadcast 10.68.7.13
//增加虚拟网络接口,广播地址指向自己.
[iyunv@director ~]# route add -host 10.68.7.13 dev ens33:0
//添加一条从ens33:0接口进来,并且目标主机是10.68.7.13的路由条目.
[iyunv@director ~]# ifconfig
ens33: flags=4163<UP,BROADCAST,RUNNING,MULTICAST> mtu 1500
inet 10.68.7.222 netmask 255.255.255.0 broadcast 10.255.255.255
inet6 fe80::42c7:3094:c773:558f prefixlen 64 scopeid 0x20<link>
ether 00:0c:29:b0:42:49 txqueuelen 1000 (Ethernet)
RX packets 8442 bytes 653900 (638.5 KiB)
RX errors 0 dropped 391 overruns 0 frame 0
TX packets 912 bytes 103470 (101.0 KiB)
TX errors 0 dropped 0 overruns 0 carrier 0 collisions 0
ens33:0: flags=4163<UP,BROADCAST,RUNNING,MULTICAST> mtu 1500
inet 10.68.7.13 netmask 0.0.0.0 broadcast 10.68.7.13
ether 00:0c:29:b0:42:49 txqueuelen 1000 (Ethernet)
lo: flags=73<UP,LOOPBACK,RUNNING> mtu 65536
inet 127.0.0.1 netmask 255.0.0.0
inet6 ::1 prefixlen 128 scopeid 0x10<host>
loop txqueuelen 1 (Local Loopback)
RX packets 54 bytes 4944 (4.8 KiB)
RX errors 0 dropped 0 overruns 0 frame 0
TX packets 54 bytes 4944 (4.8 KiB)
TX errors 0 dropped 0 overruns 0 carrier 0 collisions 0
[iyunv@director ~]#
|
开启Director服务器的路由转发功能:
1
2
3
| [iyunv@director ~]# sysctl -p
net.ipv4.ip_forward = 1
[iyunv@director ~]#
|
2. 配置RS服务器,增加一个lo的虚拟网络接口并添加路由条目:
1
2
3
4
5
6
7
8
9
10
11
12
13
14
15
16
17
18
19
20
21
22
| [iyunv@RS1 ~]# ifconfig
eth0 Link encap:Ethernet HWaddr 00:0C:29:EC:C4:A8
inet addr:10.68.7.200 Bcast:10.255.255.255 Mask:255.0.0.0
inet6 addr: fe80::20c:29ff:feec:c4a8/64 Scope:Link
UP BROADCAST RUNNING MULTICAST MTU:1500 Metric:1
RX packets:937 errors:0 dropped:0 overruns:0 frame:0
TX packets:205 errors:0 dropped:0 overruns:0 carrier:0
collisions:0 txqueuelen:1000
RX bytes:78549 (76.7 KiB) TX bytes:21933 (21.4 KiB)
lo Link encap:Local Loopback
inet addr:127.0.0.1 Mask:255.0.0.0
inet6 addr: ::1/128 Scope:Host
UP LOOPBACK RUNNING MTU:65536 Metric:1
RX packets:16 errors:0 dropped:0 overruns:0 frame:0
TX packets:16 errors:0 dropped:0 overruns:0 carrier:0
collisions:0 txqueuelen:0
RX bytes:1088 (1.0 KiB) TX bytes:1088 (1.0 KiB)
[iyunv@RS1 ~]# ifconfig lo:0 10.68.7.13/32 broadcast 10.68.7.13
[iyunv@RS1 ~]# route add -host 10.68.7.13 dev lo:0
[iyunv@RS1 ~]#
|
1
2
3
4
5
6
7
8
9
10
11
12
13
14
15
16
17
18
19
20
21
22
23
24
25
26
27
28
29
30
31
32
33
34
35
36
37
38
39
40
41
42
43
44
45
| [iyunv@RS2 ~]# ifconfig
eth0 Link encap:Ethernet HWaddr 00:0C:29:EA:29:E2
inet addr:10.68.7.201 Bcast:10.255.255.255 Mask:255.0.0.0
inet6 addr: fe80::20c:29ff:feea:29e2/64 Scope:Link
UP BROADCAST RUNNING MULTICAST MTU:1500 Metric:1
RX packets:4399 errors:0 dropped:0 overruns:0 frame:0
TX packets:348 errors:0 dropped:0 overruns:0 carrier:0
collisions:0 txqueuelen:1000
RX bytes:337508 (329.5 KiB) TX bytes:34582 (33.7 KiB)
lo Link encap:Local Loopback
inet addr:127.0.0.1 Mask:255.0.0.0
inet6 addr: ::1/128 Scope:Host
UP LOOPBACK RUNNING MTU:65536 Metric:1
RX packets:18 errors:0 dropped:0 overruns:0 frame:0
TX packets:18 errors:0 dropped:0 overruns:0 carrier:0
collisions:0 txqueuelen:0
RX bytes:1312 (1.2 KiB) TX bytes:1312 (1.2 KiB)
[iyunv@RS2 ~]# ifconfig lo:0 10.68.7.13/32 broadcast 10.68.7.13
[iyunv@RS2 ~]# route add -host 10.68.7.13 dev lo:0
[iyunv@RS2 ~]# ifconfig
eth0 Link encap:Ethernet HWaddr 00:0C:29:EA:29:E2
inet addr:10.68.7.201 Bcast:10.255.255.255 Mask:255.0.0.0
inet6 addr: fe80::20c:29ff:feea:29e2/64 Scope:Link
UP BROADCAST RUNNING MULTICAST MTU:1500 Metric:1
RX packets:4644 errors:0 dropped:0 overruns:0 frame:0
TX packets:455 errors:0 dropped:0 overruns:0 carrier:0
collisions:0 txqueuelen:1000
RX bytes:358710 (350.3 KiB) TX bytes:47762 (46.6 KiB)
lo Link encap:Local Loopback
inet addr:127.0.0.1 Mask:255.0.0.0
inet6 addr: ::1/128 Scope:Host
UP LOOPBACK RUNNING MTU:65536 Metric:1
RX packets:18 errors:0 dropped:0 overruns:0 frame:0
TX packets:18 errors:0 dropped:0 overruns:0 carrier:0
collisions:0 txqueuelen:0
RX bytes:1312 (1.2 KiB) TX bytes:1312 (1.2 KiB)
lo:0 Link encap:Local Loopback
inet addr:10.68.7.13 Mask:0.0.0.0
UP LOOPBACK RUNNING MTU:65536 Metric:1
[iyunv@RS2 ~]#
|
3. 在CIP对应的windows客户机检测虚拟网络接口是否设置正常,使用"ping"命令:
1
2
3
4
5
6
7
8
9
10
11
12
13
14
| C:\Users\20160819>ping 10.68.7.13
正在 Ping 10.68.7.13 具有 32 字节的数据:
来自 10.68.7.100 的回复: 无法访问目标主机。
来自 10.68.7.13 的回复: 字节=32 时间=2ms TTL=64
来自 10.68.7.13 的回复: 字节=32 时间=1ms TTL=64
来自 10.68.7.13 的回复: 字节=32 时间=1ms TTL=64
10.68.7.13 的 Ping 统计信息:
数据包: 已发送 = 4,已接收 = 4,丢失 = 0 (0% 丢失),
往返行程的估计时间(以毫秒为单位):
最短 = 1ms,最长 = 2ms,平均 = 1ms
C:\Users\20160819>
|
4. 因为lvs-dr类型集群服务通过修改请求报文的目标MAC地址进行转发。
所以此处继续在windows客户机查看各主机的MAC情况,使用"arp -a"命令:
1
2
3
4
5
6
7
8
9
10
11
12
13
14
15
16
17
18
19
20
21
22
23
24
25
26
| C:\Users\20160819>arp -a
接口: 192.168.225.1 --- 0x4
Internet 地址 物理地址 类型
192.168.225.254 00-50-56-ea-0b-ef 动态
224.0.0.2 01-00-5e-00-00-02 静态
224.0.0.22 01-00-5e-00-00-16 静态
224.0.0.252 01-00-5e-00-00-fc 静态
224.0.1.60 01-00-5e-00-01-3c 静态
239.192.152.143 01-00-5e-40-98-8f 静态
239.255.255.250 01-00-5e-7f-ff-fa 静态
255.255.255.255 ff-ff-ff-ff-ff-ff 静态
接口: 10.68.7.14 --- 0x7
Internet 地址 物理地址 类型
10.68.7.1 00-23-ea-63-b0-c3 动态
10.68.7.13 00-0c-29-b0-42-49 动态 //此为虚拟网卡接口IP及MAC
10.68.7.85 00-25-11-85-73-2d 动态
10.68.7.124 1c-39-47-ae-89-ae 动态
10.68.7.189 1c-39-47-19-33-55 动态
10.68.7.193 90-fb-a6-07-1f-a8 动态
10.68.7.200 00-0c-29-ec-c4-a8 动态 //此为RS1服务器IP及MAC
10.68.7.201 00-0c-29-ea-29-e2 动态 //此为RS2服务器IP及MAC
10.68.7.222 00-0c-29-b0-42-49 动态 //此为Director服务器IP及MAC
10.68.7.255 ff-ff-ff-ff-ff-ff 静态
10.90.90.90 6c-19-8f-a0-21-62 动态
|
从上面MAC条目可以观察到,Director服务器MAC地址与虚拟网卡接口的MAC地址一致.
5. 同样,配置RS服务器,安装apache http服务
1
2
3
| [iyunv@RS1 ~]# yum -y install httpd
[iyunv@RS1 ~]# echo "<h1>RS1.yangbin.com</h1>" > /var/www/html/index.html
[iyunv@RS1 ~]# service httpd start
|
1
2
3
| [iyunv@RS2 ~]# yum -y install httpd
[iyunv@RS2 ~]# echo "<h1>RS2.yangbin.com</h1>" > /var/www/html/index.html
[iyunv@RS2 ~]# service httpd start
|
6. 在Director服务器端通过curl命令查看RS端服务是否正常运行:
7. 编写ipvs规则:
1
2
3
4
5
6
7
8
9
10
11
12
13
14
15
16
| [iyunv@director ~]# ipvsadm -C //清空规则.
[iyunv@director ~]# ipvsadm -ln
IP Virtual Server version 1.2.1 (size=4096)
Prot LocalAddress:Port Scheduler Flags
-> RemoteAddress:Port Forward Weight ActiveConn InActConn
[iyunv@director ~]# ipvsadm -A -t 10.68.7.13:80 -s rr
[iyunv@director ~]# ipvsadm -a -t 10.68.7.13:80 -r 10.68.7.200 -g
[iyunv@director ~]# ipvsadm -a -t 10.68.7.13:80 -r 10.68.7.201 -g
[iyunv@director ~]# ipvsadm -ln
IP Virtual Server version 1.2.1 (size=4096)
Prot LocalAddress:Port Scheduler Flags
-> RemoteAddress:Port Forward Weight ActiveConn InActConn
TCP 10.68.7.13:80 rr
-> 10.68.7.200:80 Route 1 0 0
-> 10.68.7.201:80 Route 1 0 0
[iyunv@director ~]#
|
8. 通过浏览器访问,如果刷新出现轮循的结果,则验证成功:


结果如图所示,刷新页面即出现轮询的结果.
实验三:配置基于lvs集群的http和https:(此实验在实验二的基础上进行)
此处将Director服务器作为CA服务器,自建CA,然后跟两RS服务器颁发证书.
证书申请及签署步骤:
1). 生成申请请求;
2). RA核验;
3). CA签署;
4). 获取证书;
(1) 创建所需要的文件, 指定证书编号初始值,即初始化环境
1
2
3
4
5
6
7
8
| [iyunv@director ~]# cd /etc/pki/CA
[iyunv@director CA]# ls
certs crl newcerts private
[iyunv@director CA]# touch index.txt
[iyunv@director CA]# echo 01 > serial
[iyunv@director CA]# ls
certs crl index.txt newcerts private serial
[iyunv@director CA]#
|
(2) CA自签证书
1
2
3
4
5
6
7
8
9
| [iyunv@director CA]# (umask 077; openssl genrsa -out private/cakey.pem 2048)
Generating RSA private key, 2048 bit long modulus
...............................+++
.....................................................................+++
e is 65537 (0x10001)
[iyunv@director CA]# ll private/
总用量 4
-rw-------. 1 root root 1679 1月 3 00:42 cakey.pem
[iyunv@director CA]#
|
(3) 创建证书请求
1
2
3
4
5
6
7
8
9
10
11
12
13
14
15
16
17
18
| [iyunv@director CA]# openssl req -new -x509 -key private/cakey.pem -days 7300 -out cacert.pem
You are about to be asked to enter information that will be incorporated
into your certificate request.
What you are about to enter is what is called a Distinguished Name or a DN.
There are quite a few fields but you can leave some blank
For some fields there will be a default value,
If you enter '.', the field will be left blank.
-----
Country Name (2 letter code) [XX]:CN
State or Province Name (full name) []:BJ
Locality Name (eg, city) [Default City]:BJ
Organization Name (eg, company) [Default Company Ltd]:Linux
Organizational Unit Name (eg, section) []:Os
Common Name (eg, your name or your server's hostname) []:yangbin
Email Address []:319485318@qq.com
[iyunv@director CA]# ls
cacert.pem certs crl index.txt newcerts private serial
[iyunv@director CA]#
|
此时,CA证书已创建完毕,拥有CA意味着可以给别人签发证书.
2. 在RS服务器上配置
(1) 首先生成key.
1
2
3
4
5
6
7
8
9
10
11
| [iyunv@RS1 ~]# mkdir /etc/httpd/ssl
[iyunv@RS1 ~]# cd /etc/httpd/ssl/
[iyunv@RS1 ssl]# (umask 077; openssl genrsa -out /etc/httpd/ssl/httpd.key 2048)
Generating RSA private key, 2048 bit long modulus
..........................................+++
......................+++
e is 65537 (0x10001)
[iyunv@RS1 ssl]# ll
total 4
-rw-------. 1 root root 1675 Sep 25 10:21 httpd.key
[iyunv@RS1 ssl]#
|
(2) 通过加载httpd.key生成一个新请求,保存为httpd.csr.
1
2
3
4
5
6
7
8
9
10
11
12
13
14
15
16
17
18
19
20
21
22
23
24
25
| [iyunv@RS1 ssl]# openssl req -new -key httpd.key -days 365 -out httpd.csr
You are about to be asked to enter information that will be incorporated
into your certificate request.
What you are about to enter is what is called a Distinguished Name or a DN.
There are quite a few fields but you can leave some blank
For some fields there will be a default value,
If you enter '.', the field will be left blank.
-----
Country Name (2 letter code) [XX]:CN
State or Province Name (full name) []:BJ
Locality Name (eg, city) [Default City]:BJ
Organization Name (eg, company) [Default Company Ltd]:Linux
Organizational Unit Name (eg, section) []:Os
Common Name (eg, your name or your server's hostname) []:yangbin
Email Address []:319485318@qq.com
Please enter the following 'extra' attributes
to be sent with your certificate request
A challenge password []:
An optional company name []:
[iyunv@RS1 ssl]# ll
total 8
-rw-r--r--. 1 root root 1025 Sep 25 10:23 httpd.csr
-rw-------. 1 root root 1675 Sep 25 10:21 httpd.key
[iyunv@RS1 ssl]#
|
(3) 把请求文件httpd.csr传输给CA服务器端:
1
2
3
4
5
6
7
8
| [iyunv@RS1 ssl]# scp httpd.csr root@10.68.7.222:/tmp
The authenticity of host '10.68.7.222 (10.68.7.222)' can't be established.
RSA key fingerprint is 2d:5e:56:b7:c4:89:72:ad:b4:1a:70:c7:ee:8a:6d:7c.
Are you sure you want to continue connecting (yes/no)? yes
Warning: Permanently added '10.68.7.222' (RSA) to the list of known hosts.
root@10.68.7.222's password:
httpd.csr 100% 1025 1.0KB/s 00:00
[iyunv@RS1 ssl]#
|
3. 在CA服务器端签署证书,并将证书发还给请求者
1
2
3
4
5
6
7
8
9
10
11
12
13
14
15
16
17
18
19
20
21
22
23
24
25
26
27
28
29
30
31
32
33
34
35
36
37
38
39
40
41
42
43
44
45
| [iyunv@director CA]# openssl ca -in /tmp/httpd.csr -out /etc/pki/CA/certs/httpd.crt -days 356
Using configuration from /etc/pki/tls/openssl.cnf
Check that the request matches the signature
Signature ok
Certificate Details:
Serial Number: 1 (0x1)
Validity
Not Before: Jan 2 16:54:31 2017 GMT
Not After : Dec 24 16:54:31 2017 GMT
Subject:
countryName = CN
stateOrProvinceName = BJ
organizationName = Linux
organizationalUnitName = Os
commonName = yangbin
emailAddress = 319485318@qq.com
X509v3 extensions:
X509v3 Basic Constraints:
CA:FALSE
Netscape Comment:
OpenSSL Generated Certificate
X509v3 Subject Key Identifier:
AC:8F:68:12:95:29:25:7B:4A:6B:70:5A:D9:27:D2:6C:66:D7:22:B0
X509v3 Authority Key Identifier:
keyid:42:CD:E6:5B:58:6D:D5:C5:AF:7F:FE:A6:E2:62:F2:76:CD:D2:93:DA
Certificate is to be certified until Dec 24 16:54:31 2017 GMT (356 days)
Sign the certificate? [y/n]:y
1 out of 1 certificate requests certified, commit? [y/n]y
Write out database with 1 new entries
Data Base Updated
[iyunv@director CA]# ll certs/
总用量 8
-rw-r--r--. 1 root root 4531 1月 3 00:54 httpd.crt
[iyunv@director CA]#
[iyunv@director CA]# scp certs/httpd.crt root@10.68.7.200:/etc/httpd/ssl
The authenticity of host '10.68.7.200 (10.68.7.200)' can't be established.
RSA key fingerprint is e5:ae:b7:a2:5c:98:37:13:72:23:25:6b:47:0c:fc:dd.
Are you sure you want to continue connecting (yes/no)? yes
Warning: Permanently added '10.68.7.200' (RSA) to the list of known hosts.
root@10.68.7.200's password:
httpd.crt 100% 4531 4.4KB/s 00:00
[iyunv@director CA]#
|
4. 以上是将RS1服务器作为客户端向CA服务器请求证书,因为两RS服务器环境一致,所以也将CA签署给RS1服务器的证书发给RS2服务器一份,通过RS1服务器拷贝:
1
2
3
4
5
6
7
8
9
10
11
12
13
14
15
| [iyunv@RS1 ssl]# ll
total 16
-rw-r--r--. 1 root root 4531 Sep 25 10:29 httpd.crt
-rw-r--r--. 1 root root 1025 Sep 25 10:23 httpd.csr
-rw-------. 1 root root 1675 Sep 25 10:21 httpd.key
[iyunv@RS1 ssl]# scp -rp /etc/httpd/ssl root@10.68.7.201:/etc/httpd/
The authenticity of host '10.68.7.201 (10.68.7.201)' can't be established.
RSA key fingerprint is e5:ae:b7:a2:5c:98:37:13:72:23:25:6b:47:0c:fc:dd.
Are you sure you want to continue connecting (yes/no)? yes
Warning: Permanently added '10.68.7.201' (RSA) to the list of known hosts.
root@10.68.7.201's password:
httpd.crt 100% 4531 4.4KB/s 00:00
httpd.csr 100% 1025 1.0KB/s 00:00
httpd.key 100% 1675 1.6KB/s 00:00
[iyunv@RS1 ssl]#
|
5. 因为两RS服务器上配置的是Apache Web服务,因此添加ssl模块,使其支持https功能:
1
| [iyunv@RS1 ~]# yum -y install mod_ssl
|
1
| [iyunv@RS2 ~]# yum -y install mod_ssl
|
6. 修改https服务的配置文件:
1
2
3
4
5
6
7
| [iyunv@RS1 ~]# vim /etc/httpd/conf.d/ssl.conf
...
77 DocumentRoot "/var/www/html" //开启此项.
...
105 SSLCertificateFile /etc/httpd/ssl/httpd.crt //修改crt文件路径.
...
112 SSLCertificateKeyFile /etc/httpd/ssl/httpd.key //修改key文件路径.
|
7. 将步骤6修改好的ssl配置文件给RS2服务器拷贝一份:
1
2
3
4
5
| [iyunv@RS1 ~]# scp /etc/httpd/conf.d/ssl.conf root@10.68.7.201:/etc/httpd/conf.d/
root@10.68.7.201's password:
ssl.conf 100% 9447 9.2KB/s 00:00
[iyunv@RS1 ~]#
//用scp命令进行远程复制时,如果目标目录底下有同样文件存在,它默认会直接覆盖.
|
8. 重启httpd服务并查看监听端口:
1
2
3
4
5
6
7
8
9
| [iyunv@RS1 ~]# service httpd restart
Stopping httpd: [ OK ]
Starting httpd: httpd: apr_sockaddr_info_get() failed for RS1
httpd: Could not reliably determine the server's fully qualified domain name, using 127.0.0.1 for ServerName
[ OK ]
[iyunv@RS1 ~]# ss -tunlp |egrep "80|443"
tcp LISTEN 0 128 :::80 :::* users:(("httpd",3934,4),("httpd",3935,4),("httpd",3936,4),("httpd",3937,4),("httpd",3938,4),("httpd",3939,4),("httpd",3940,4),("httpd",3941,4),("httpd",3942,4))
tcp LISTEN 0 128 :::443 :::* users:(("httpd",3934,6),("httpd",3935,6),("httpd",3936,6),("httpd",3937,6),("httpd",3938,6),("httpd",3939,6),("httpd",3940,6),("httpd",3941,6),("httpd",3942,6))
[iyunv@RS1 ~]#
|
1
2
3
4
5
6
7
8
9
| [iyunv@RS2 ~]# service httpd restart
Stopping httpd: [ OK ]
Starting httpd: httpd: apr_sockaddr_info_get() failed for RS2
httpd: Could not reliably determine the server's fully qualified domain name, using 127.0.0.1 for ServerName
[ OK ]
[iyunv@RS2 ~]# ss -tunlp |egrep "80|443"
tcp LISTEN 0 128 :::80 :::* users:(("httpd",4250,4),("httpd",4252,4),("httpd",4253,4),("httpd",4254,4),("httpd",4255,4),("httpd",4256,4),("httpd",4257,4),("httpd",4258,4),("httpd",4259,4))
tcp LISTEN 0 128 :::443 :::* users:(("httpd",4250,6),("httpd",4252,6),("httpd",4253,6),("httpd",4254,6),("httpd",4255,6),("httpd",4256,6),("httpd",4257,6),("httpd",4258,6),("httpd",4259,6))
[iyunv@RS2 ~]#
|
9. 编写ipvs规则:
1
2
3
4
5
6
7
8
9
10
11
12
13
14
15
16
17
18
19
20
21
| [iyunv@director ~]# ipvsadm -ln
IP Virtual Server version 1.2.1 (size=4096)
Prot LocalAddress:Port Scheduler Flags
-> RemoteAddress:Port Forward Weight ActiveConn InActConn
TCP 10.68.7.13:80 rr
-> 10.68.7.200:80 Route 1 0 0
-> 10.68.7.201:80 Route 1 0 0
[iyunv@director ~]# ipvsadm -A -t 10.68.7.13:443 -s rr
[iyunv@director ~]# ipvsadm -a -t 10.68.7.13:443 -r 10.68.7.200 -g
[iyunv@director ~]# ipvsadm -a -t 10.68.7.13:443 -r 10.68.7.201 -g
[iyunv@director ~]# ipvsadm -ln
IP Virtual Server version 1.2.1 (size=4096)
Prot LocalAddress:Port Scheduler Flags
-> RemoteAddress:Port Forward Weight ActiveConn InActConn
TCP 10.68.7.13:80 rr
-> 10.68.7.200:80 Route 1 0 0
-> 10.68.7.201:80 Route 1 0 0
TCP 10.68.7.13:443 rr
-> 10.68.7.200:443 Route 1 0 0
-> 10.68.7.201:443 Route 1 0 0
[iyunv@director ~]#
|
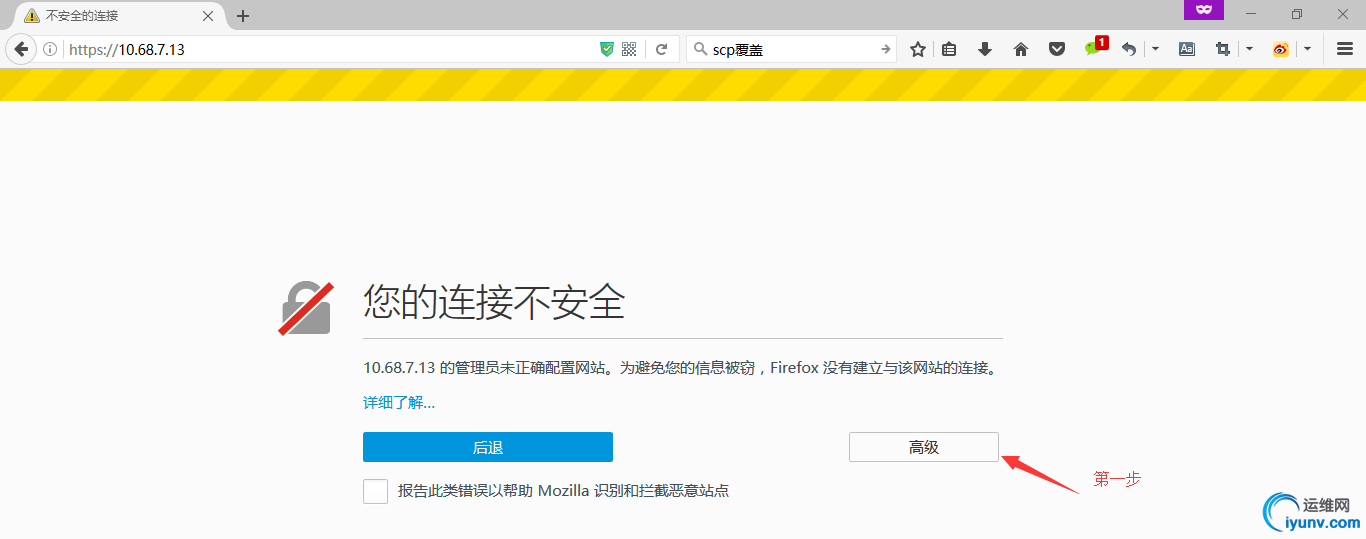
10. 通过浏览器访问


验证成功!
实验四:FWM的实现
此实验依然沿用实验三和实验四的环境不变.
实现步骤如下:
1
2
3
4
5
6
7
8
9
10
11
12
13
14
15
16
17
18
19
20
21
22
23
24
25
26
27
28
29
30
31
32
33
34
35
| [iyunv@director ~]# systemctl disable firewalld.service
Removed symlink /etc/systemd/system/basic.target.wants/firewalld.service.
Removed symlink /etc/systemd/system/dbus-org.fedoraproject.FirewallD1.service.
//禁用firewalld服务.
[iyunv@director ~]# iptables -X
[iyunv@director ~]# iptables -X -t nat
[iyunv@director ~]# iptables -X -t mangle
[iyunv@director ~]# iptables -t mangle -A PREROUTING -d 10.68.7.13 -p tcp --dport 80 -j MARK --set-mark 10
[iyunv@director ~]# iptables -t mangle -A PREROUTING -d 10.68.7.13 -p tcp --dport 443 -j MARK --set-mark 10
[iyunv@director ~]# ipvsadm -ln
IP Virtual Server version 1.2.1 (size=4096)
Prot LocalAddress:Port Scheduler Flags
-> RemoteAddress:Port Forward Weight ActiveConn InActConn
TCP 10.68.7.13:80 rr
-> 10.68.7.200:80 Route 1 0 0
-> 10.68.7.201:80 Route 1 0 0
TCP 10.68.7.13:443 rr
-> 10.68.7.200:443 Route 1 0 0
-> 10.68.7.201:443 Route 1 0 0
[iyunv@director ~]# ipvsadm -C
[iyunv@director ~]# ipvsadm -ln
IP Virtual Server version 1.2.1 (size=4096)
Prot LocalAddress:Port Scheduler Flags
-> RemoteAddress:Port Forward Weight ActiveConn InActConn
[iyunv@director ~]# ipvsadm -A -f 10 -s rr
[iyunv@director ~]# ipvsadm -a -f 10 -r 10.68.7.200 -g
[iyunv@director ~]# ipvsadm -a -f 10 -r 10.68.7.201 -g
[iyunv@director ~]# ipvsadm -ln
IP Virtual Server version 1.2.1 (size=4096)
Prot LocalAddress:Port Scheduler Flags
-> RemoteAddress:Port Forward Weight ActiveConn InActConn
FWM 10 rr
-> 10.68.7.200:0 Route 1 0 0
-> 10.68.7.201:0 Route 1 0 0
[iyunv@director ~]#
|
浏览器访问验证:


|