Introduction
In this article, you build and develop an order-processing Web service using CXF and Spring. This Web service processes or validates the order placed by a customer and returns the unique order ID. After reading this article, you can apply the concepts and features of CXF to build and develop a Web service.
System requirements
To run the examples in this article, make sure the following software is installed and set up on your machine:
- Java 5 or higher
- Tomcat 5 or higher
- Ant build tool
- CXF binary distribution 2.1
After the above distribution is installed, set up the following environment variables:
- JAVA_HOME (for Java)
- CATALINA_HOME (for Tomcat)
- ANT_HOME (for Ant)
- CXF_HOME (for CXF)
By way of example, set CXF_HOME=C:\apache-cxf-2.1 and add the following to the PATH env variable:
- JAVA_HOME\bin
- CATALINA_HOME\bin
- ANT_HOME\bin
Back to top
Why CXF?
Apache CXF is an open source framework that provides a robust infrastructure for conveniently building and developing Web services. It lets you create high-performance and extensible services, which you can deploy in the Tomcat and Spring-based lightweight containers as well as on a more advanced server infrastructure, such as JBoss, IBM® WebSphere®, or BEA WebLogic.
Features
The framework provides the following features:
Web services standards support: CXF supports the following Web services standards:
- Java API for XML Web Services (JAX-WS)
- SOAP
- Web Services Description Language (WSDL)
- Message Transmission Optimization Mechanism (MTOM)
- WS-Basic Profile
- WS-Addressing
- WS-Policy
- WS-ReliableMessaging
- WS-Security
Front-end modeling: CXF provides the concept of front-end modeling, which lets you create Web services using different front-end APIs. The APIs lets you create a Web service using simple factory beans and through a JAX-WAS implementation. It also lets you create dynamic Web service clients.
Tools support: CXF provides different tools for conversion between Java beans, Web services, and WSDL. It provides support for Maven and Ant integration, and seamlessly supports Spring integration.
Support of RESTful services: CXF supports the concept of RESTful (Representational State Transfer) services and supports a JAX-RS implementation for the Java platform. (Part 2 in this series provides more information about RESTful services.)
Support for different transport and bindings: CXF supports different kinds of transports, from XML to Comma Separated Values (CSVs). It also supports Java Architecture for XML Binding (JAXB) and AEGIS data binding apart from SOAP and HTTP protocol binding.
Support for non-XML binding: CXF supports non-XML bindings, such as JavaScript Object Notation (JSON) and Common Object Request Broker Architecture (CORBA). It also supports the Java Business Integration (JBI) architectures and Service Component Architectures (SCAs).
Back to top
Develop a Web service
Let's look specifically at how to create an order-processing Web service and then register it as a Spring bean using a JAX-WS front end. You use the code-first approach, which means you first develop a Java class and annotate it as a Web service. To do this, you typically perform the following steps:
- Create a service endpoint interface (SEI) and define a method to be exposed as a Web service.
- Create the implementation class and annotate it as a Web service.
- Create beans.xml and define the service class as a Spring bean using a JAX-WS front end.
- Create web.xml to integrate Spring and CXF.
First let's create the order-processing Web service SEI.
Create the order-processing Web service SEI
Create an SEI named OrderProcess, which will have a method, processOrder, that takes an order bean and returns a string. The goal of the processOrder method is to process the order placed by the customer and return the unique order ID.
Listing 1. OrderProcess SEI
package demo.order;
import javax.jws.WebService;
@WebService
public interface OrderProcess {
String processOrder(Order order);
}
|
As you can see in Listing 1, the OrderProcess SEI is simply a standard Java interface that's annotated as a Web service. The @WebService annotation simply makes the interface a Web service interface. This interface is used by the client or the consumer to invoke the service method. The OrderProcess SEI has one service method, processOrder, which takes Order as a parameter and returns the order ID as a string.
Listing 2. OrderProcess service implementation
package demo.order;
import javax.jws.WebService;
@WebService(endpointInterface = "demo.order.OrderProcess")
public class OrderProcessImpl implements OrderProcess {
public String processOrder(Order order) {
return order.validate();
}
}
|
Write the implementation of the SEI
To write the implementation of the SEI in the previous section, you again annotate your implementation class, OrderProcessImpl, as a Web service and provide an attribute, endpointInterface, with a value as a fully qualified name of the SEI you created in the previous step. This tells the class to implement the OrderProcess SEI. Because it's an implementation of an SEI, you have to provide implementation of the processOrder method that returns the order ID.
You've created an SEI and its implementation. Using CXF, now you can make this an actual service component using a JAX-WS front end.
Listing 3. beans.xml configuration file
<beans xmlns="http://www.springframework.org/schema/beans"
xmlns:xsi="http://www.w3.org/2001/XMLSchema-instance"
xmlns:jaxws="http://cxf.apache.org/jaxws"
xsi:schemaLocation="
http://www.springframework.org/schema/beans
http://www.springframework.org/schema/beans/spring-beans.xsd
http://cxf.apache.org/jaxws http://cxf.apache.org/schemas/jaxws.xsd">
<import resource="classpath:META-INF/cxf/cxf.xml" />
<import resource="classpath:META-INF/cxf/cxf-extension-soap.xml" />
<import resource="classpath:META-INF/cxf/cxf-servlet.xml" />
<jaxws:endpoint
id="orderProcess"
implementor="demo.order.OrderProcessImpl"
address="/OrderProcess" />
</beans>
|
Create a configuration file for CXF
A CXF configuration file is actually a Spring configuration file that contains bean definitions. You create a bean definition for the OrderProcess Web service using JAX-WS front-end configuration. The <jaxws:endpoint> tag in the beans.xml file specifies the OrderProcess Web service as a JAX-WS endpoint. It effectively means that CXF internally uses JAX-WS to publish this Web service. You have to provide the implementation class name, which is OrderProcessImpl, and the address to the <jaxws:endpoint> tag. The address that you provide is relative to the Web context.
Listing 4. web.xml Web configuration file
<web-app>
<context-param>
<param-name>contextConfigLocation</param-name>
<param-value>WEB-INF/beans.xml</param-value>
</context-param>
<listener>
<listener-class>
org.springframework.web.context.ContextLoaderListener
</listener-class>
</listener>
<servlet>
<servlet-name>CXFServlet</servlet-name>
<display-name>CXF Servlet</display-name>
<servlet-class>
org.apache.cxf.transport.servlet.CXFServlet
</servlet-class>
<load-on-startup>1</load-on-startup>
</servlet>
<servlet-mapping>
<servlet-name>CXFServlet</servlet-name>
<url-pattern>/*</url-pattern>
</servlet-mapping>
</web-app>
|
Finally you need to:
- Create the web.xml file, which loads the CXF configuration file.
- Use the Spring context loader to load the configuration file.
- Register a CXFServlet to handle all the requests coming from the client program.
You've just finished developing the necessary server-side components. Now you can develop a client component that makes a request to the OrderProcess service.
Back to top
Develop a client
As you can see from Listing 5, it's very easy to create the client bean, just as it was easy to create the service endpoint. JaxWsProxyFactory is used to create the client bean for the OrderProcess Web service. The factory bean expects the service class (OrderProcess) and the URL of your service. The client bean stub, OrderProcess, is then created by using the factory bean reference.
Listing 5. client-bean.xml client Web configuration file
<beans xmlns="http://www.springframework.org/schema/beans"
xmlns:xsi="http://www.w3.org/2001/XMLSchema-instance"
xmlns:jaxws="http://cxf.apache.org/jaxws"
xsi:schemaLocation="
http://www.springframework.org/schema/beans
http://www.springframework.org/schema/beans/spring-beans-2.0.xsd
http://cxf.apache.org/jaxws
http://cxf.apache.org/schema/jaxws.xsd">
<bean id="client" class="demo.order.OrderProcess"
factory-bean="clientFactory" factory-method="create"/>
<bean id="clientFactory" class="org.apache.cxf.jaxws.JaxWsProxyFactoryBean">
<property name="serviceClass" value="demo.order.OrderProcess"/>
<property name="address" value="http://localhost:8080/orderapp/OrderProcess"/>
</bean>
</beans>
|
You create a Java main program that uses the Spring context to get the client bean defined, then invoke the processOrder method.
Listing 6. The client code
public final class Client {
public Client() {
}
public static void main(String args[]) throws Exception {
ClassPathXmlApplicationContext context
= new ClassPathXmlApplicationContext(new String[]
{"demo/order/client/client-beans.xml"});
OrderProcess client = (OrderProcess)context.getBean("client");
Order order = new Order();
String orderID = client.processOrder(order);
System.out.println("Order ID: " + orderID);
System.exit(0);
}
}
|
Back to top
Run the program
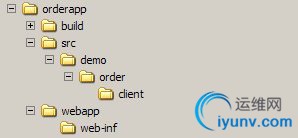
Before running the program, create the directory structure shown in Figure 1 under your root C:\ folder and put the components covered previously in this article into it:
- The Java code goes into the package folders.
- beans.xml and web.xml go into the web\web-inf folder.
- client-beans.xml will go into demo\order\client folder.
Figure 1. Code directory structure

For building, deploying, and running the OrderProcess Web service and client, you use the Ant tool. The code is deployed on the Tomcat server. Deploy the code using the ant deploy command under the c:\orderapp folder.
The application folder (c:\orderapp) has the Ant build files. After running the above command, your orderapp code is deployed in the Tomcat server environment as the orderapp.war file. Now start the Tomcat Web server by providing the catalina start command under the CATALINA_HOME\bin folder.
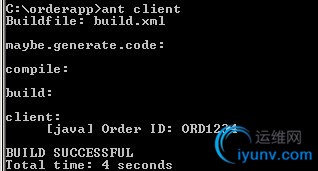
The orderapp folder is created under the webapps folder of Tomcat. After the server is started, run the application by entering the ant client command. The output displays the order ID (see Figure 2).
Figure 2. Program output
 Conclusion
This article briefly described the features of the CXF framework and demonstrated how it lets you create a Web service without much coding effort. You learned about Spring integration with CXF using a bean context file. You also looked at how the framework abstracts the actual semantics of creating a Web service infrastructure component and provides you with a shell of a simpler API that simply focuses on Web service creation.
Now that you've seen the basics of Web service creation using CXF, check out
Part 2 of this
series, which shows you how to expose POJOs as RESTful services using CXF and Spring.