|
|
Summary of installation
Step 0: Prerequisites
Step 1: Create Openstack hostsystem
Step 2: Config
Openstack host
system
Step 3: Install Openstackplatform
Step 4: Login Openstack
Step 5: Config to access external network
Step 0: Prerequisites
Software
·Red Hat Enterprise Linux (RHEL) 7is preferred. (e.g.CentOS-7-x86_64-Minimal-1611.iso, or the equivalent version of one of theRHEL-based Linux distributions such as CentOS, Scientific Linux, and so on. )
·x86_64 is currently the only supported architecture.
·VirtualBox 5.0.30
Hardware
·Machine: PC / Mac
·RAM: 6+GB
·Processors: 2 ~4(with hardware virtualization extensions)
·Network Adapter: 1+ (Cable MUST be connected to yourcomputer if usingMac system.)
Step 1: Create Openstack host system
Make sure RAM size is bigger than 6GB
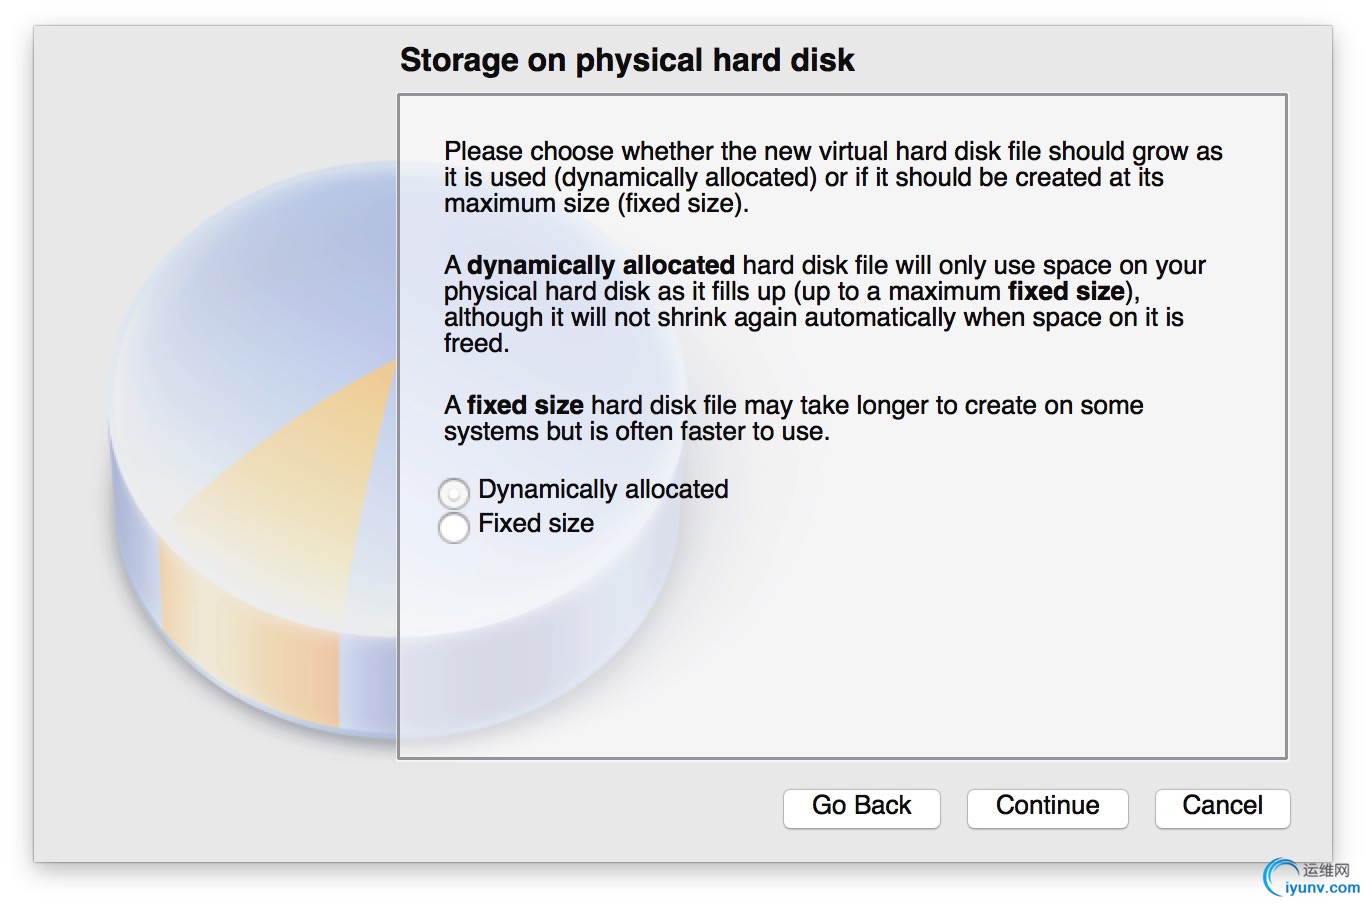
VDI is preferred.
Dynamically Allocation ispreferred.
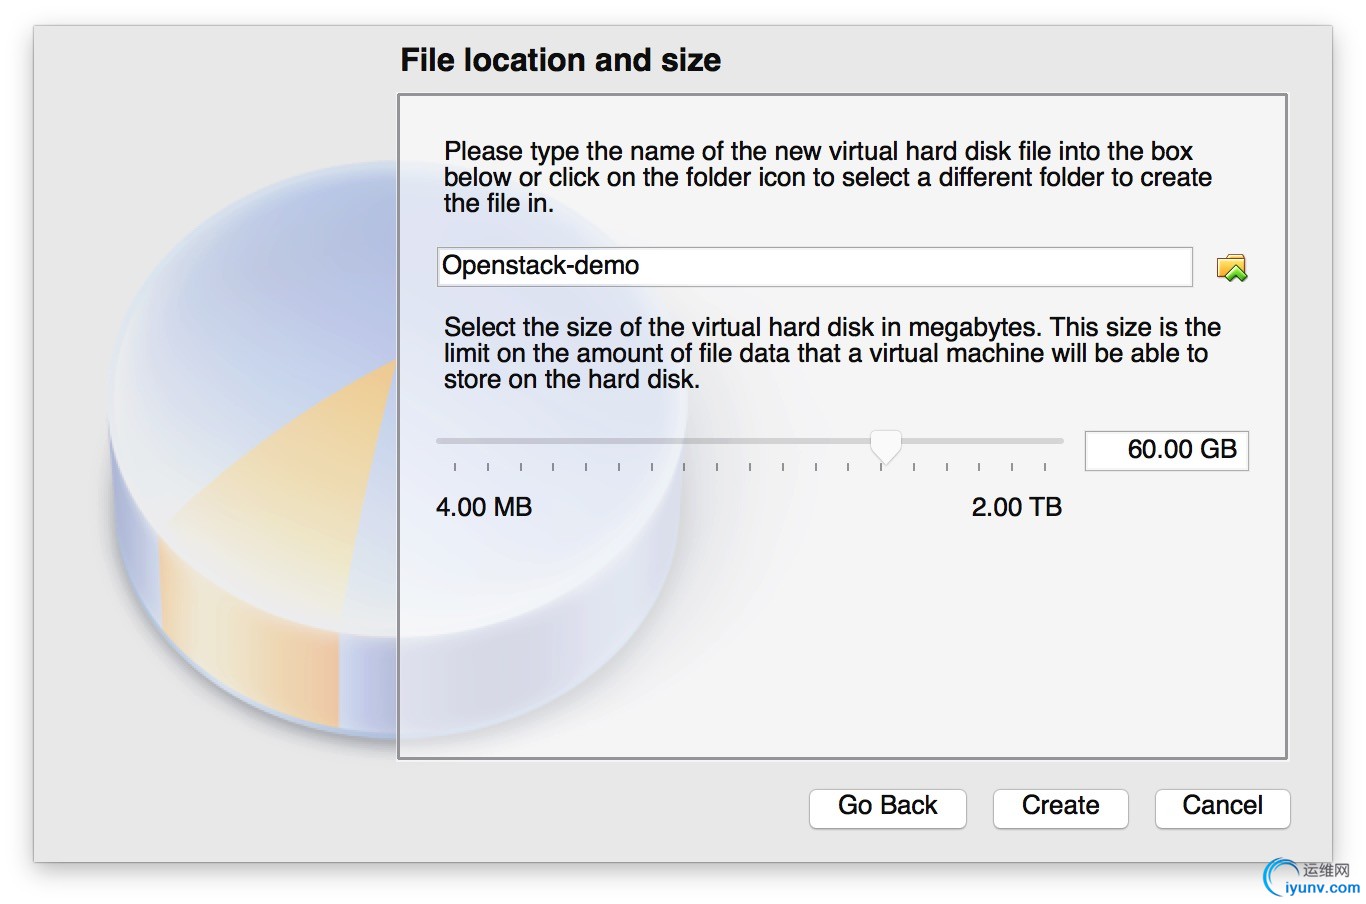
 Make sure Disk Size is greater than60GB.
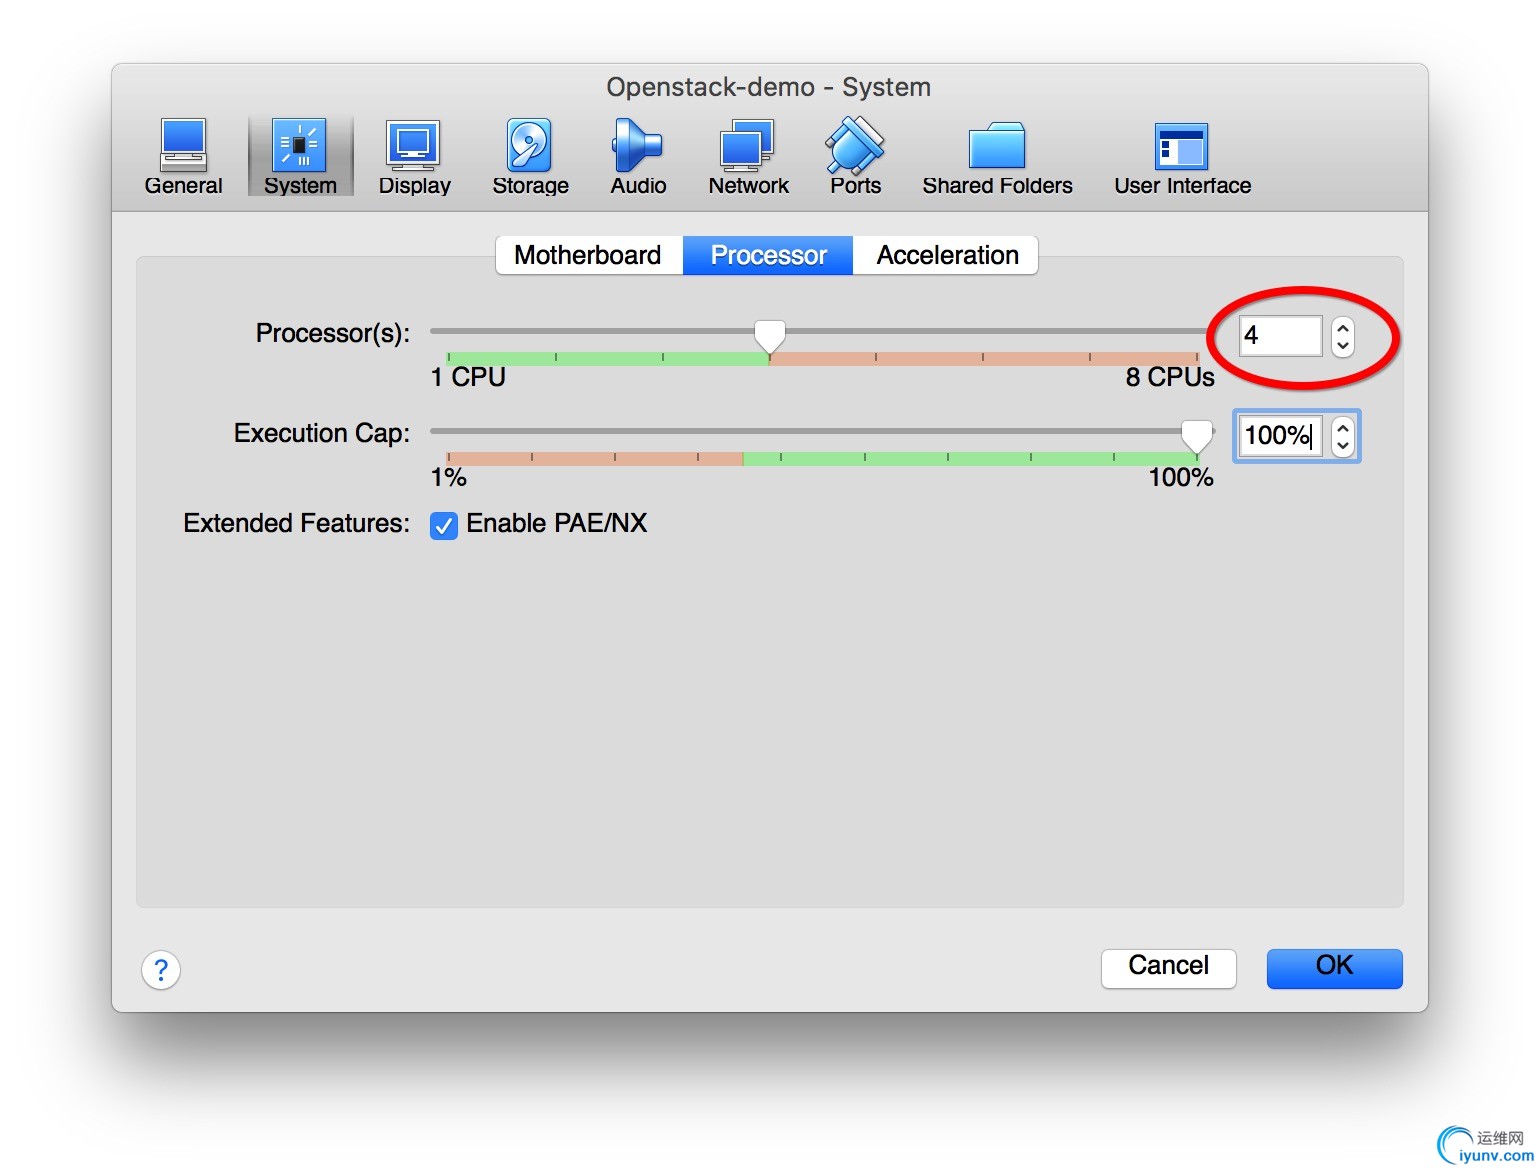
2 ~ 4 processor is preferred.
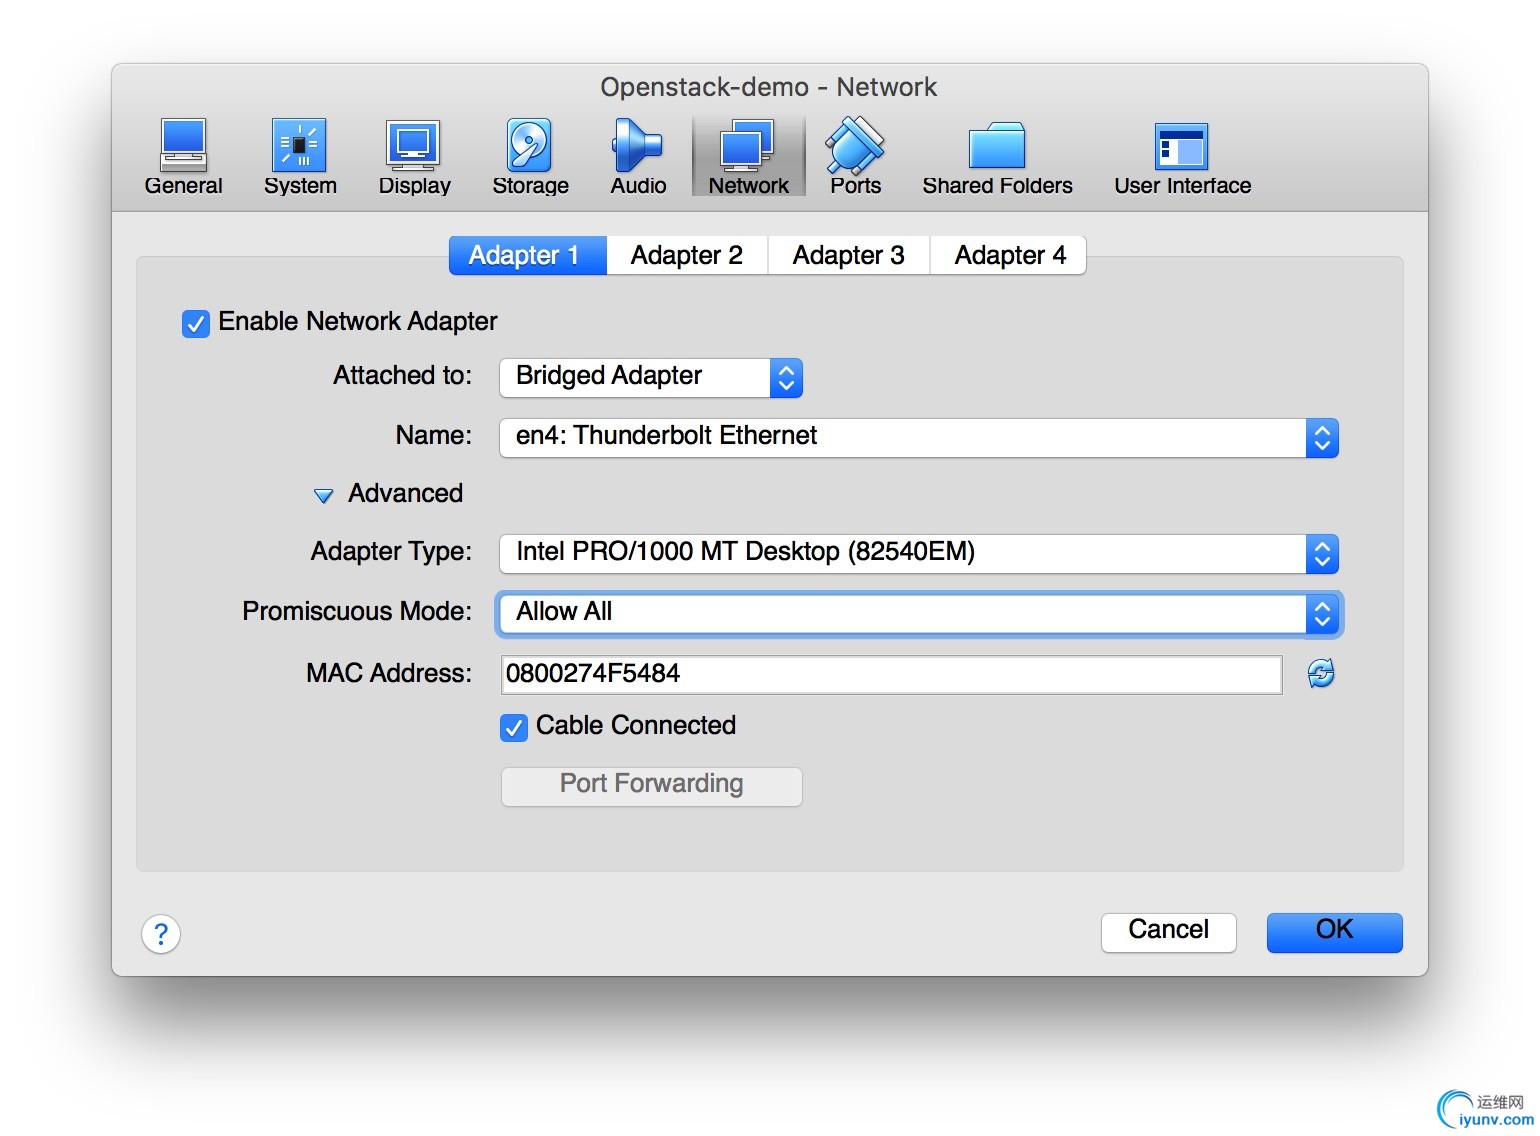
Make sure following:
- Only one Adapter is needed.
- Adapter Type is “Bridge”.
- Promiscuous Mode is “Allow All”.
- Cable Connected is checked.
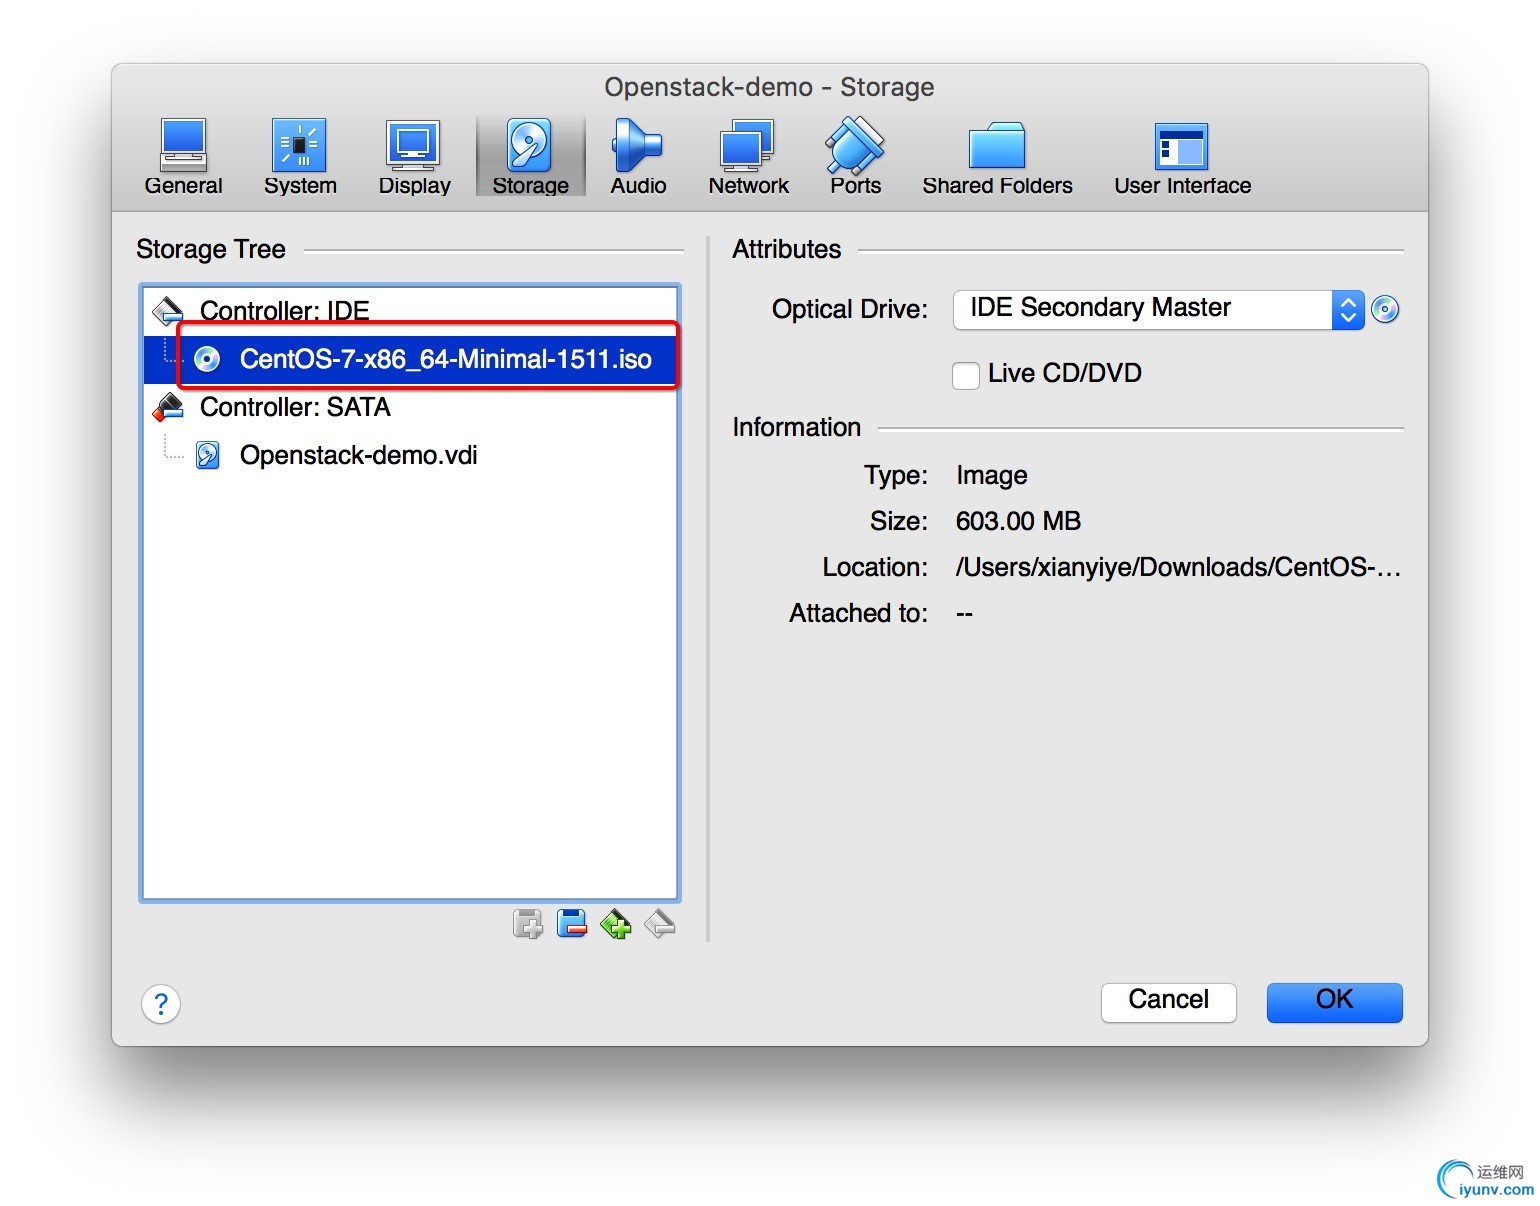
 Make sure following:
- Load CentOS installation image to the driver.
- Launch virtual instance we created just now.
- Install CentOS to the instance.
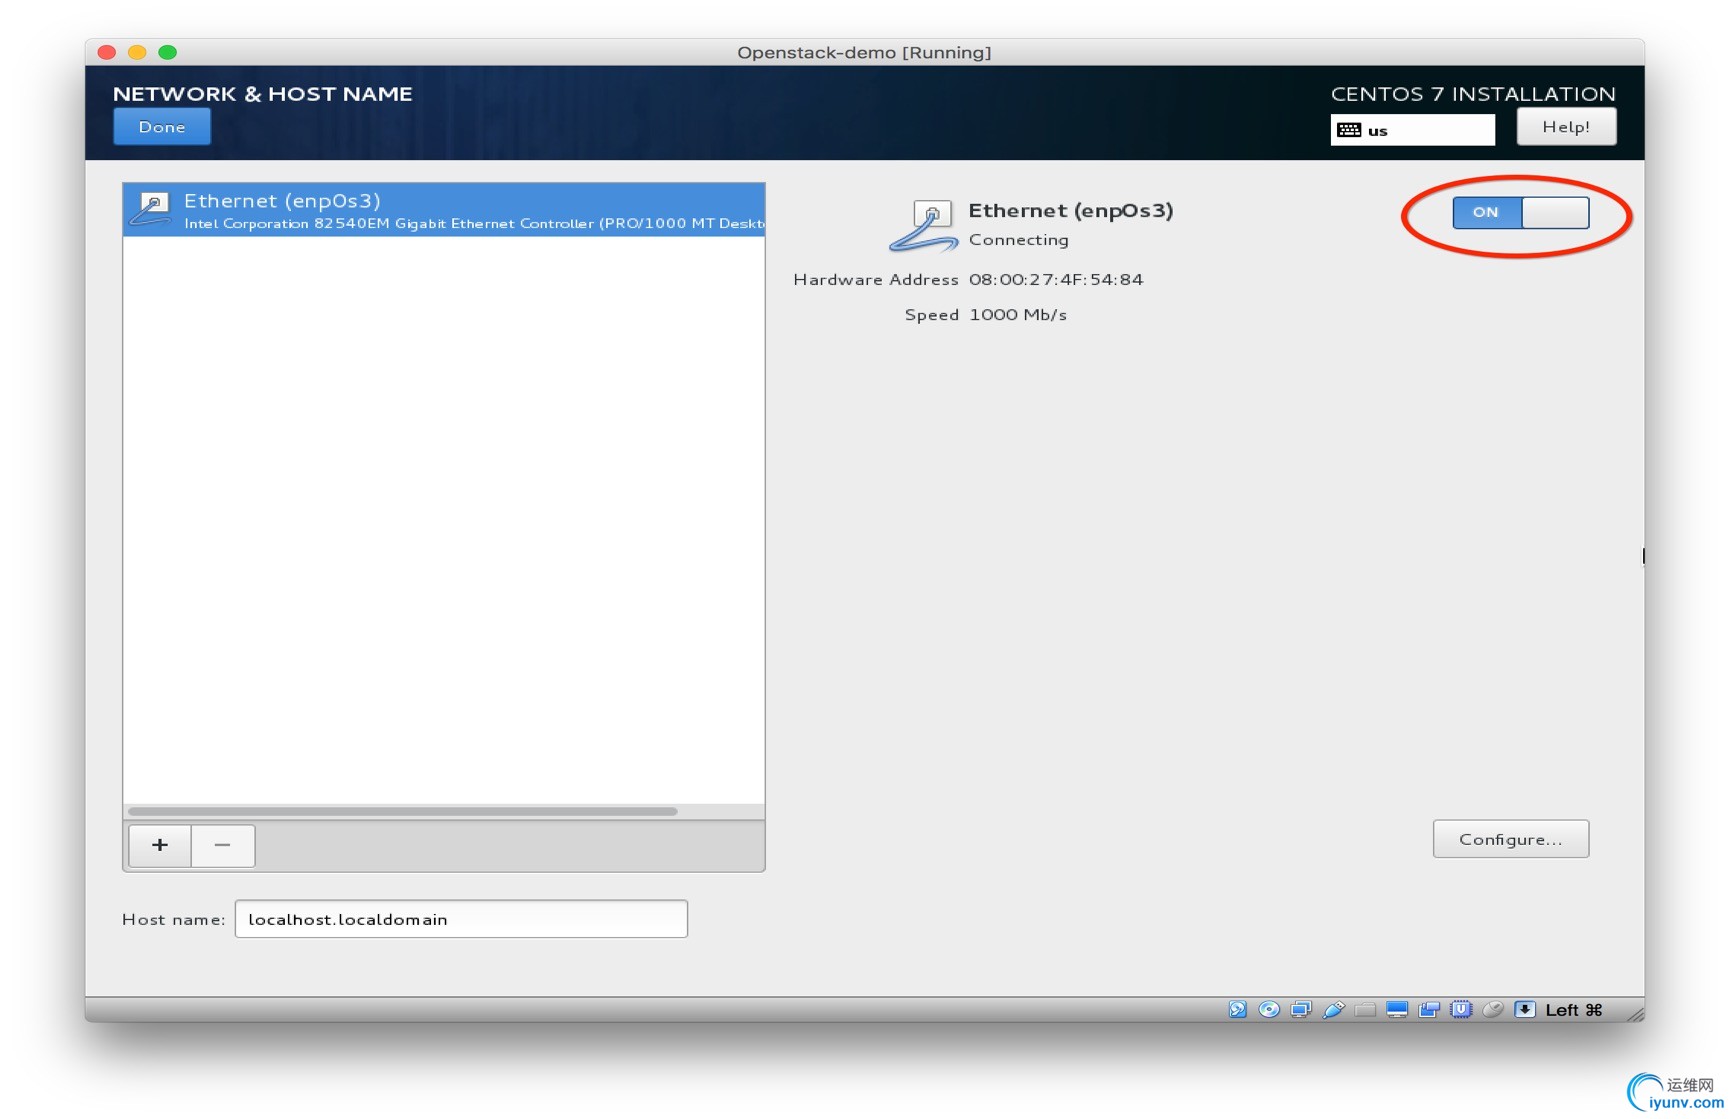
- Most of configuration could be proceed by clicking “Next” button with one exception that Ethernet Card Connection needs to be turn on in manually.
Step 2: Config OpenStack host system
- Reboot virtual instance after installation
- Log into instance with the correct credential info, such as root/root
- vi /etc/environment
LANG=en_US.utf-8
LC_ALL=en_US.utf-8
- source /etc/environment
- Turn off firewall:
systemctl disable firewalld
systemctl stop firewalld
(Note: Ignore the error message, such as “Failed to execute operation: Access denied”)
Step 3: Install Openstack platform
- yum install -y centos-release-openstack-newton
- yum update–y
- yum install -y openstack-packstack
- vi ~/.bash_profile
export LANG="en_US.UTF-8”
export LC_COLLATE="en_US.UTF-8”
export LC_CTYPE="en_US.UTF-8”
export LC_MESSAGES="en_US.UTF-8”
export LC_MONETARY="en_US.UTF-8”
export LC_NUMERIC="en_US.UTF-8”
export LC_TIME="en_US.UTF-8”
export LC_ALL="en_US.UTF-8”
- packstack --allinone--provision-demo=n --os-neutron-ovs-bridge-mappings=extnet:br-ex--os-neutron-ovs-bridge-interfaces=br-ex:eth0--os-neutron-ml2-type-drivers=vxlan,flat,vlan
Note:
- Ensure “flat” and “vlan” have been added into ml2-type-drivers list.
- Ensure eth0 is not your current network card which is using for yourssh connection.
Step 4: Login Openstack
- cat keystonerc_admin
unset OS_SERVICE_TOKEN
export OS_USERNAME=admin
export OS_PASSWORD=98a76dc776654792
exportOS_AUTH_URL=http://10.140.253.44:5000/v2.0
export PS1='[\u@\h \W(keystone_admin)]\$'
exportOS_TENANT_NAME=admin
exportOS_REGION_NAME=RegionOne
- Log into openstack dashboard viahttp://10.140.253.XXX/dashboard (admin/98a76dc776654792)
- Start your openstackjourney.
Step 5: Config to access external network
5.1 Create Bridge
- vi /etc/sysconfig/network-scripts/ifcfg-br-exDEVICE=br-ex
DEVICETYPE=ovs
TYPE=OVSBridge
BOOTPROTO=static
IPADDR=10.140.253.XXX# Old eth0 IP since we want the network restart to not
# kill the connection, otherwise pick something outside your dhcprange
NETMASK=255.255.255.0 # your netmask
GATEWAY=10.140.253.1 #yourgateway
DNS1=123.123.123.XXX #yournameserver
ONBOOT=yes
- vi /etc/sysconfig/network-scripts/ifcfg-ethXXXDEVICE=ethXXX
TYPE=OVSPort
DEVICETYPE=ovs
OVS_BRIDGE=br-ex
ONBOOT=yes
- service network restart
5.2 Create External Network
- Log into dashboard via http://10.140.253.XXX/dashboard withyour credential.
- Go to Admin->System->Networks
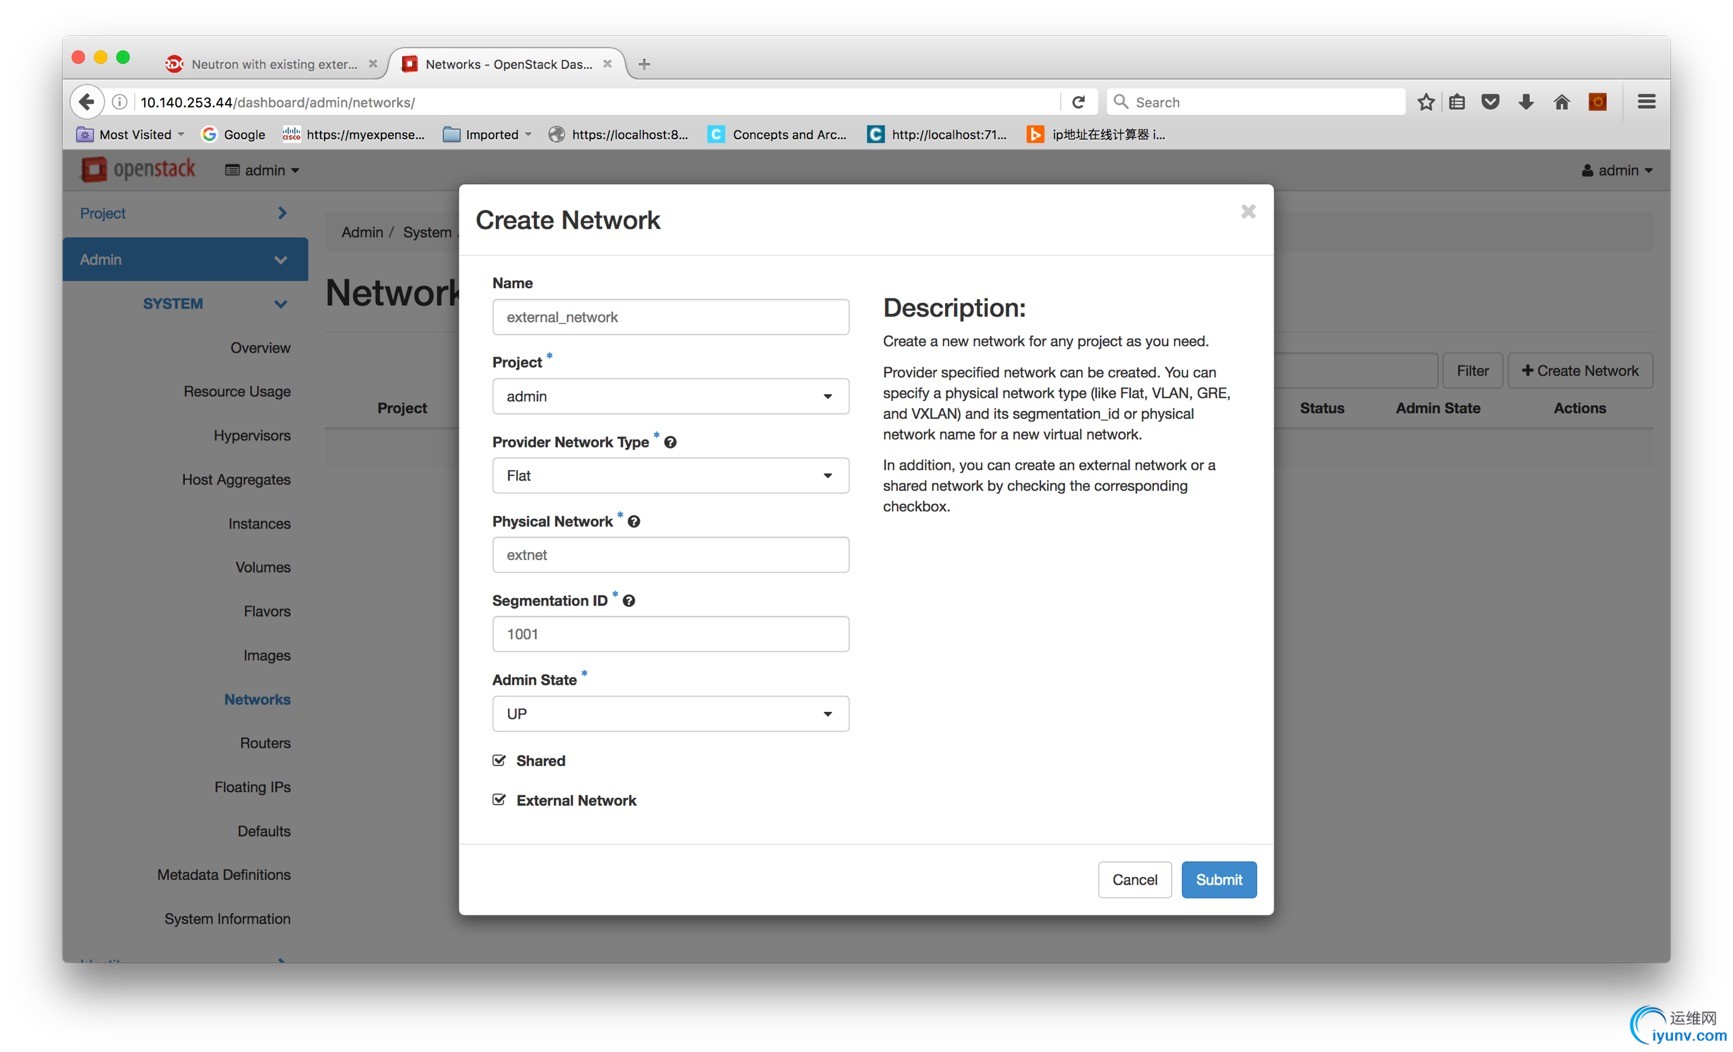
- Create a network with following info:
- Name:external_network
- Project:admin
- Provider Network Type: Flat
- Physical Network: extnet
- Segment ID: <any number>
- Admin State: UP
- Shared:checked
- External Network: checked
5.3 Create Subnet of External Network
- Subnet Name: <any string>
- Network Address: <any available range> e.g.10.140.253.100/28
- IP Version: IPv4
- Gateway IP: <same with your host gateway> e.g.
10.140.253.1
- Uncheck DHCP
- Allocation Pools: <any avaliable range within your Network(10.140.253.100/28>
- DNS Name Servers: <your host DNS servers> e.g.123.123.123.123 , 8.8.8.8
5.4 Create Internal Network
- Name: private_network
- Project: admin
- Provider Network Type: VXLAN
- Physical Network: extnet
- Segment ID: <any number>.
- Admin State: UP
- Shared: checked
- External Network: unchecked
5.5 Create Subnet of Internal Network
- Subnet Name: <any string>
- Network Address: <any available range> e.g.192.168.100.0/24
- IP Version: IPv4
- Uncheck DHCP
- Allocation Pools: <any available range within your Network(192.168.100.0/24>
- DNS Name Servers: <your host DNS servers> e.g.123.123.123.123, 8.8.8.8
5.6 Create Router
- Router Name: <Any string>
- Admin State: UP
- External Network: external_network
5.7 Associate Networks
- Go back to Network Topology
- Click “Add Interface”
- IP Address: <gateway server ip of the internal network> e.g.192.168.100.1
5.8 Config Security Policy
- Go to Project -> Compute -> Access & Security
- Click“Manage Rules” button on “default” item.
- Remove all default rules.
- Recreate rules for protocals“ICMP”, “TCP” and “UDP” with both Ingress and Egress directions.
5.9 Create Instance
- Go back to Network Topology, you should see the external network and the private network are connected with a router
- Click“Launch Instance” button to create an vm
- Instance Name: <any string>
- Availability Zone: nova
- Count:1
- Boot Source: Image
- Volume Size: <The min size of your image>
- Create New Volume: YES
- Delete Volume on Instance Delete:YES
- Allocated:<Your image> e.g. cirros
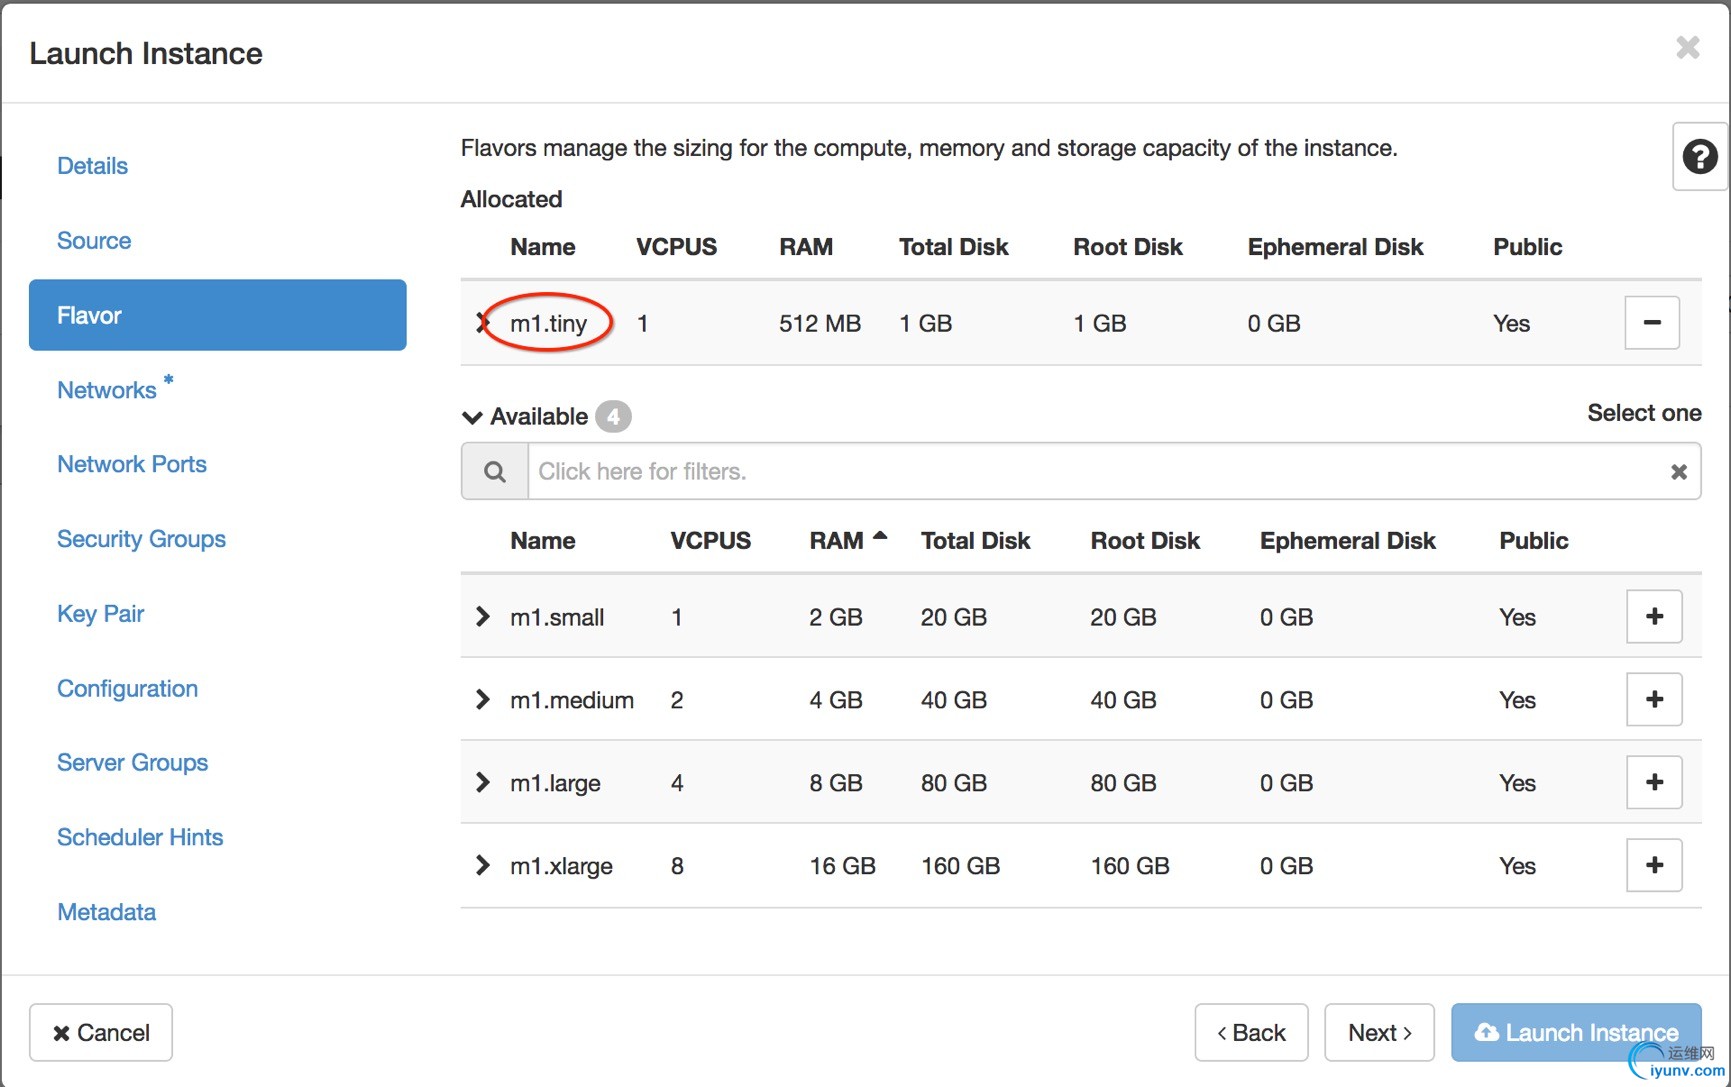
Choose appropriate flavor size.
e.g m1.tiny
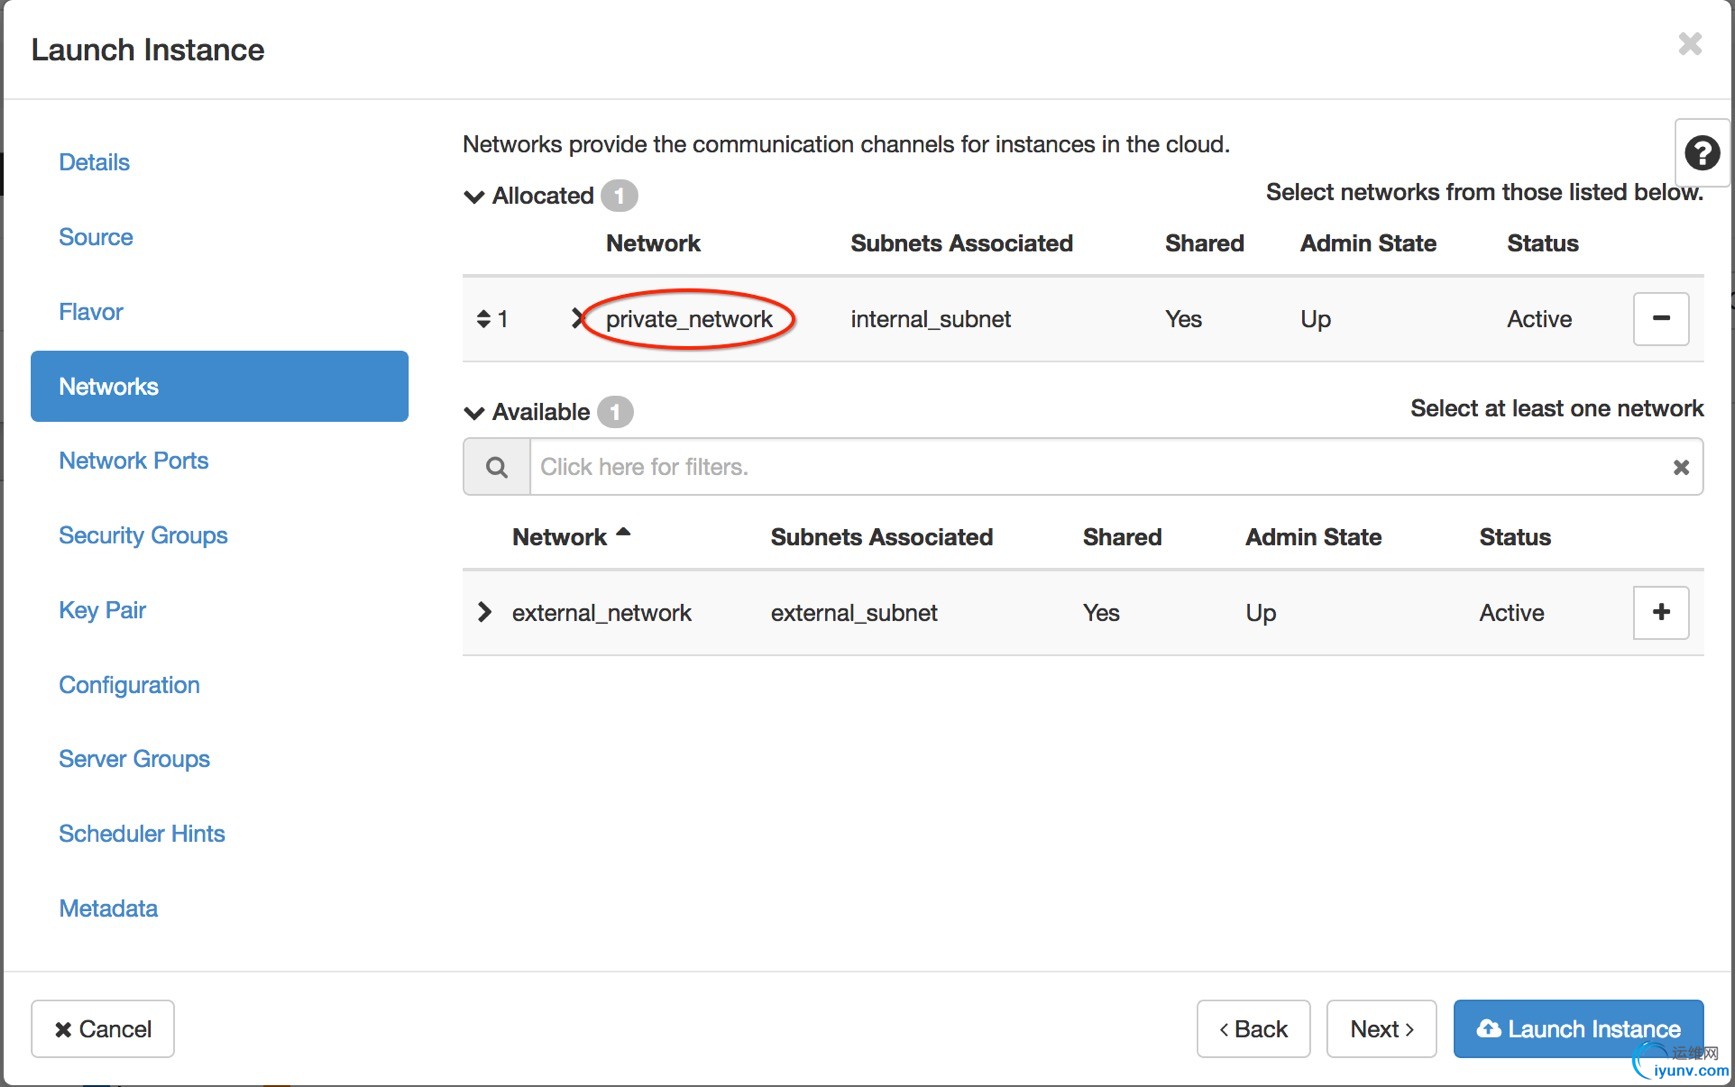
Choose the network you want to create an instance on.
e.g. “private_network”
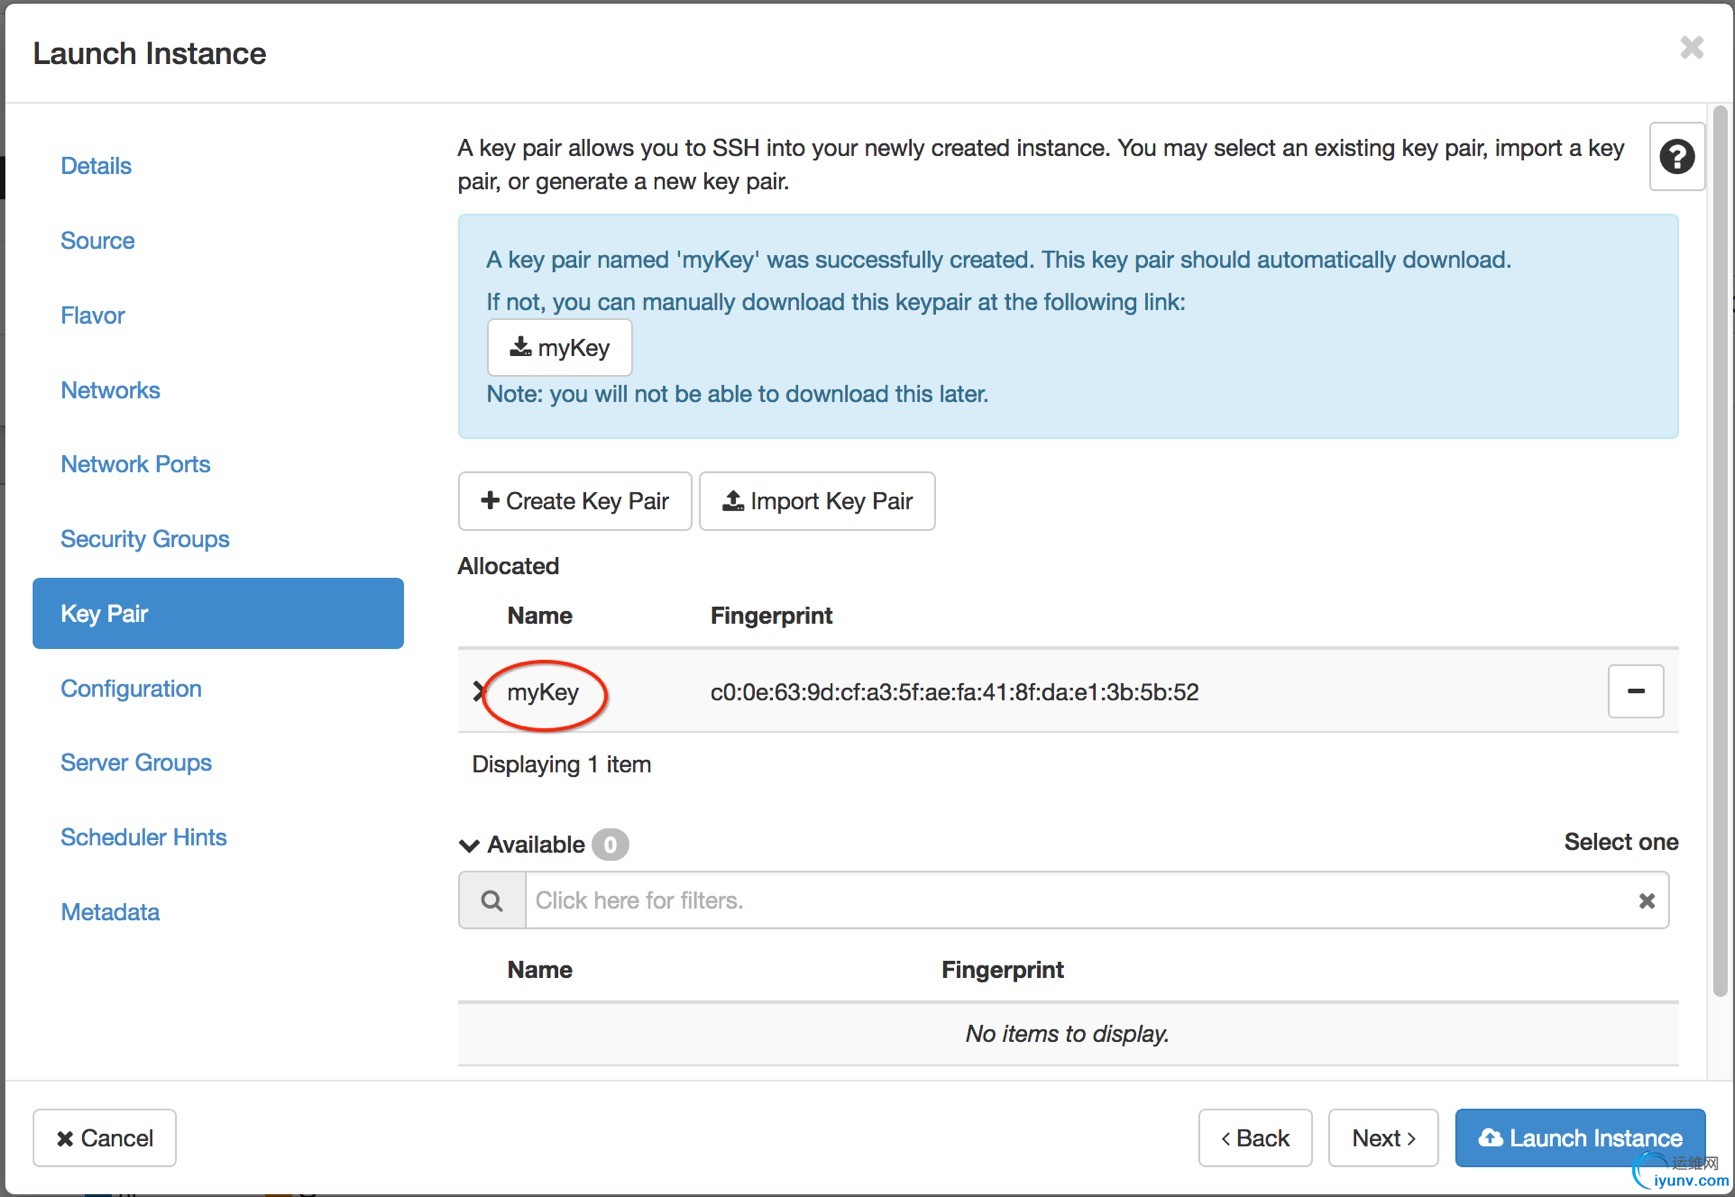
Choose the key pair which you want to used for logging into the instance later on.
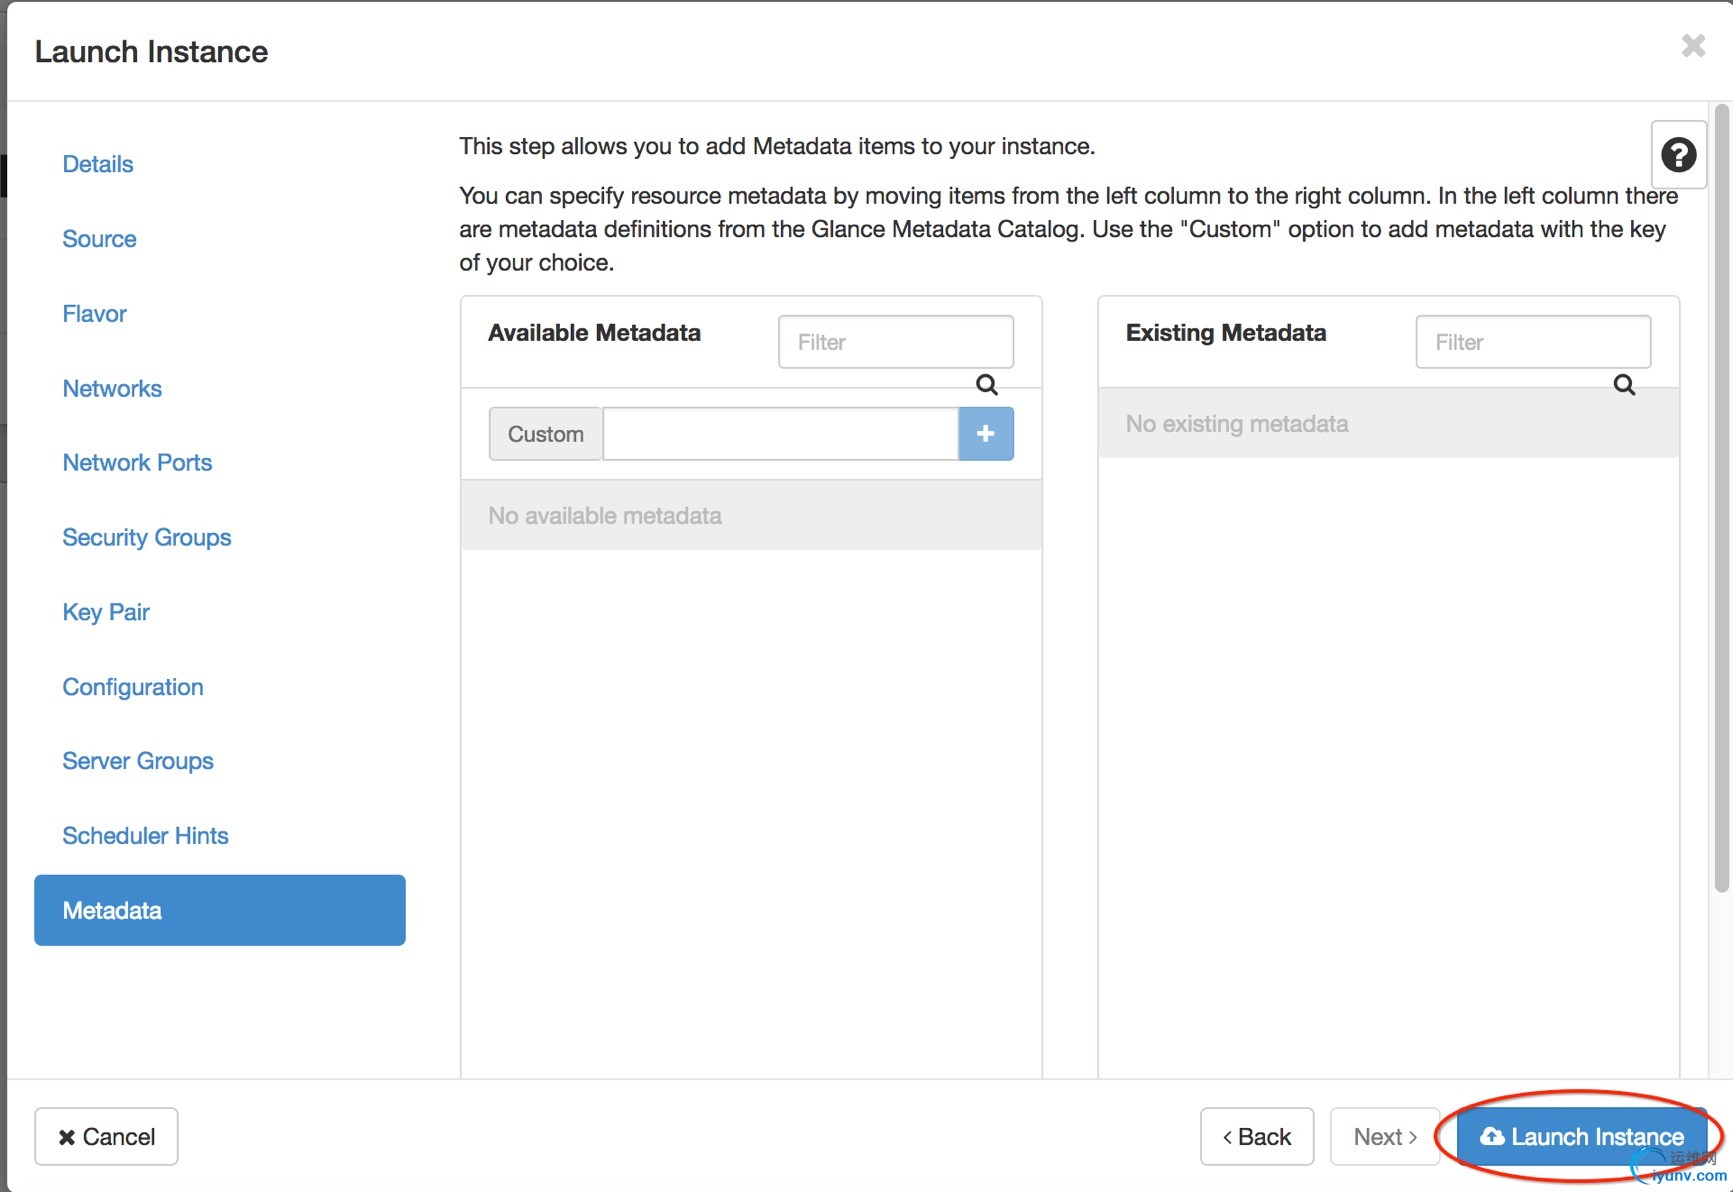
Click “Launch Instance” to start instance.
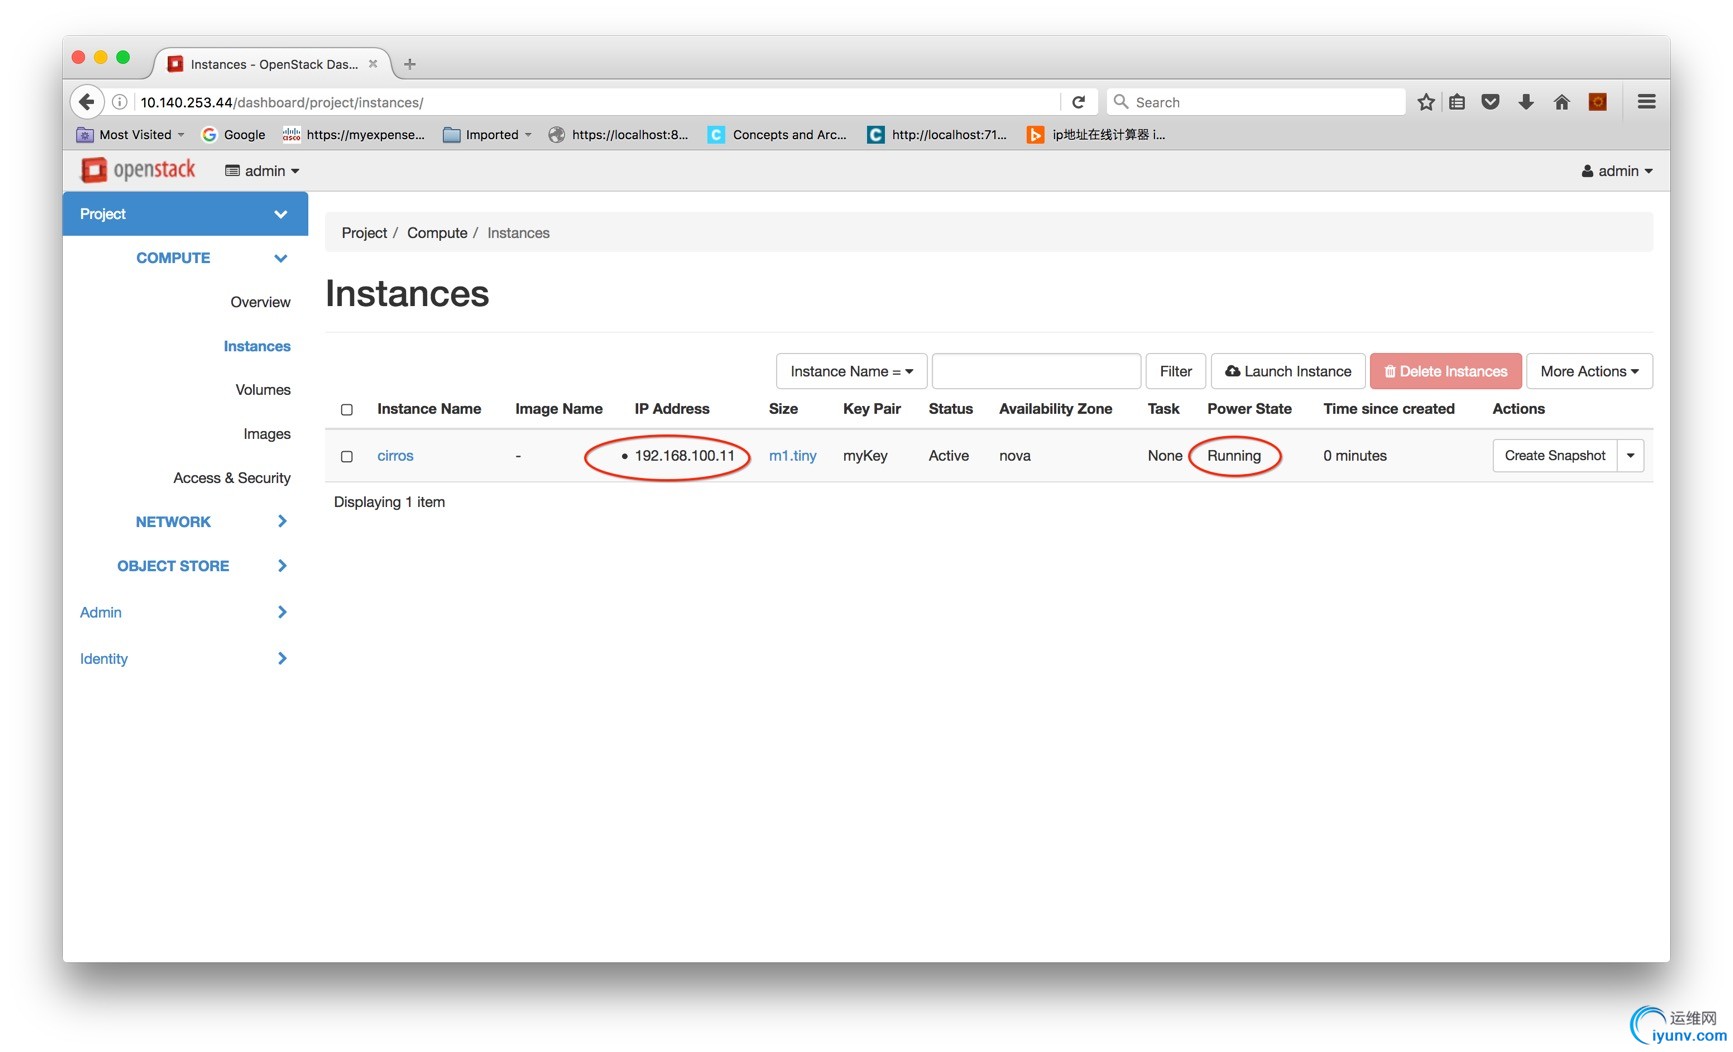
Once the instance is created successfully, you should see the Power State is changed to “Running”.
5.10 Allocate Floating IP
- Click the instance drop-down list
- Click Associate Floating IP
- Click”+” button to creating an floating IP address in a specific Network.
- If it’s already done, you can also choose an
avaliable IP address from the drop-down list.
- Choose the network you want to create an IP address on. (e.g. “External_network”)
- Click “Allocate IP”
- Choose the IP address we created just now.
- Click “Associate” button
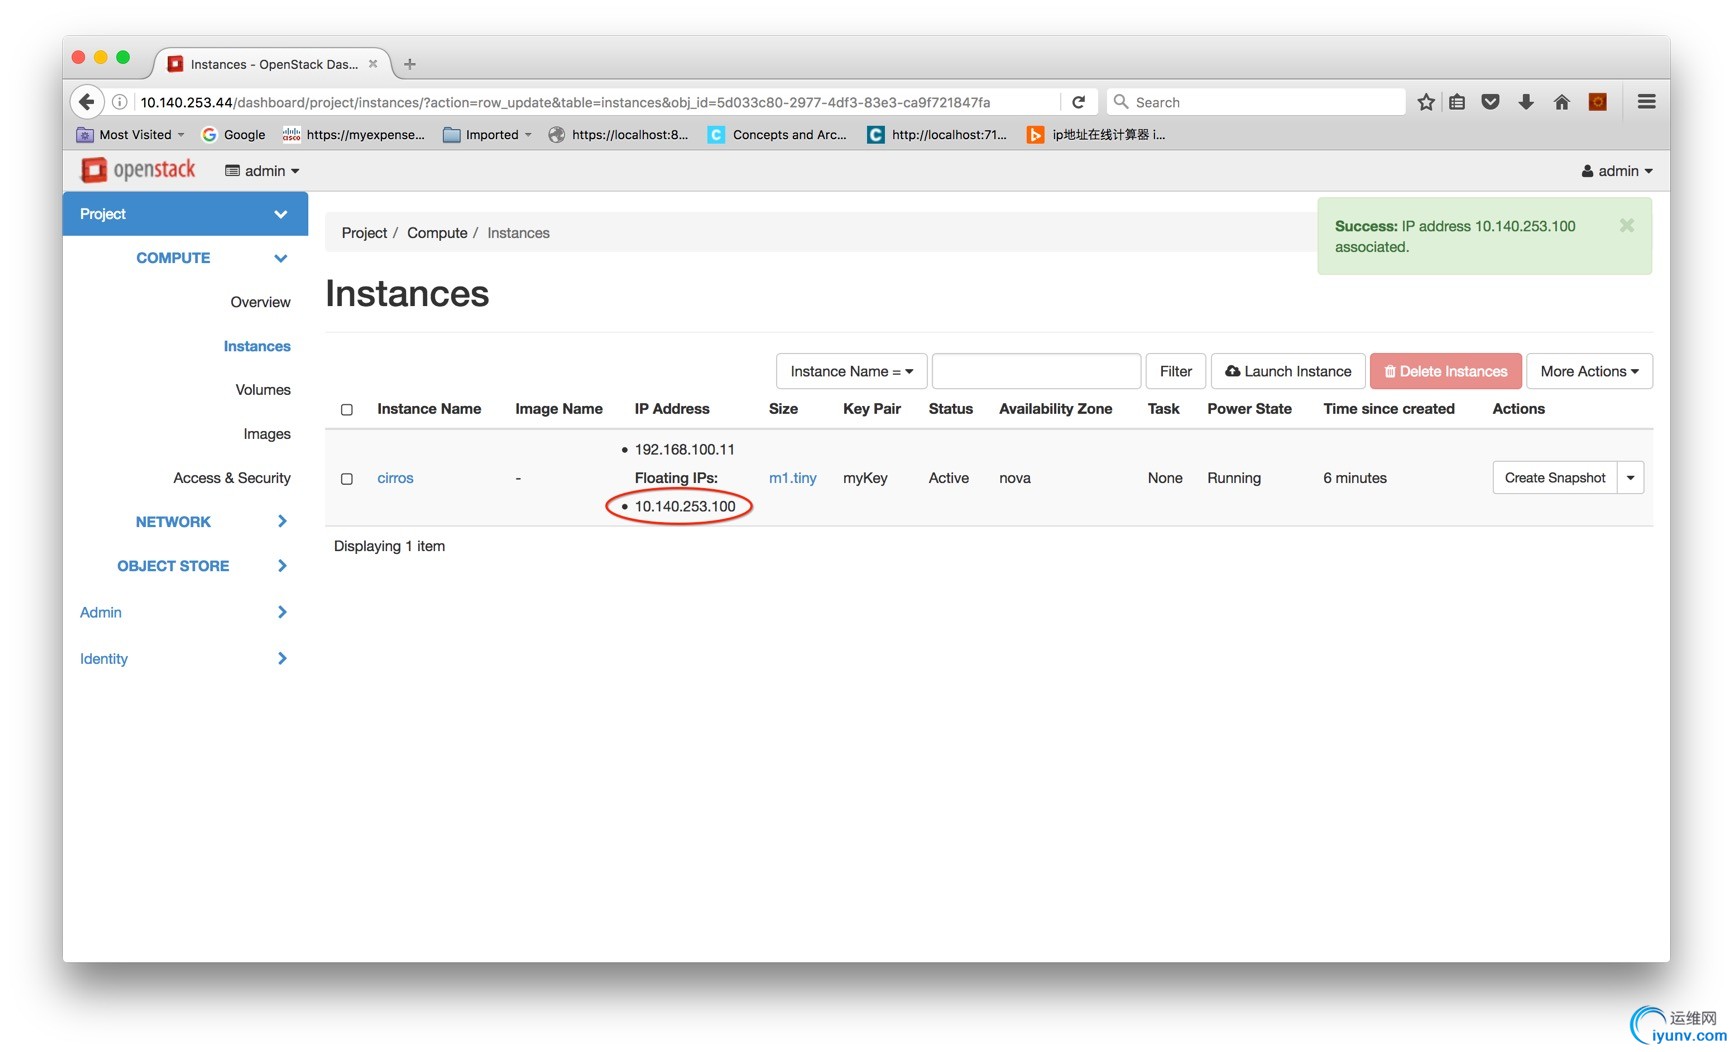
Now, you should see 2 IP address havebeen associated with the instance.
One is for
private_network;another one (Floating IP) is forexternal_network.
5.11 Instance Login
- Click the Instance name and switch to “Console” tab. You could log into the instance.
- Type your credential info to login. e.g.cirros/cubswin:)
5.12 IP Binding
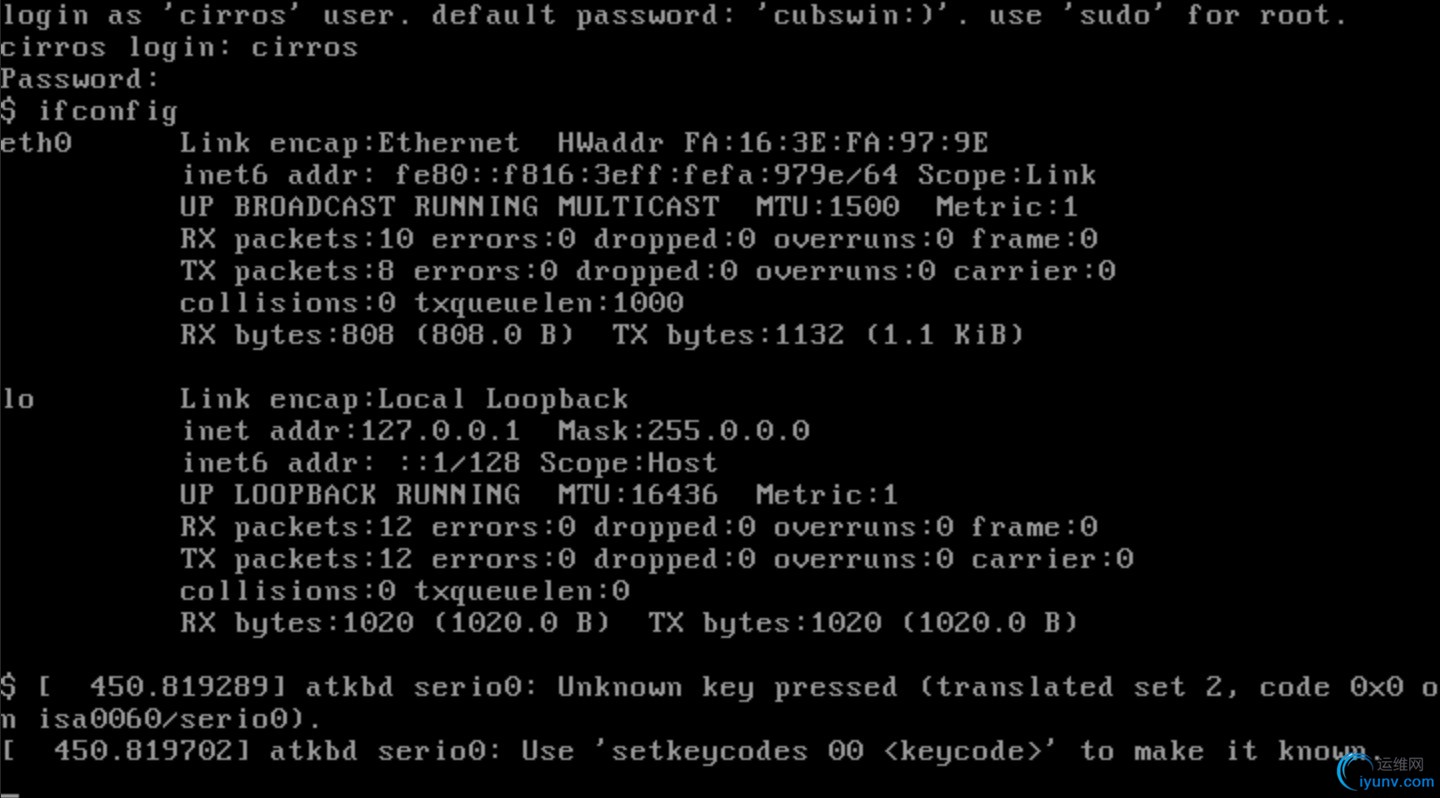
If you check the network information, you would find that there is no any IPv4 address bind to the instance.
Neither192.168.100.11, nor 10.140.253.100
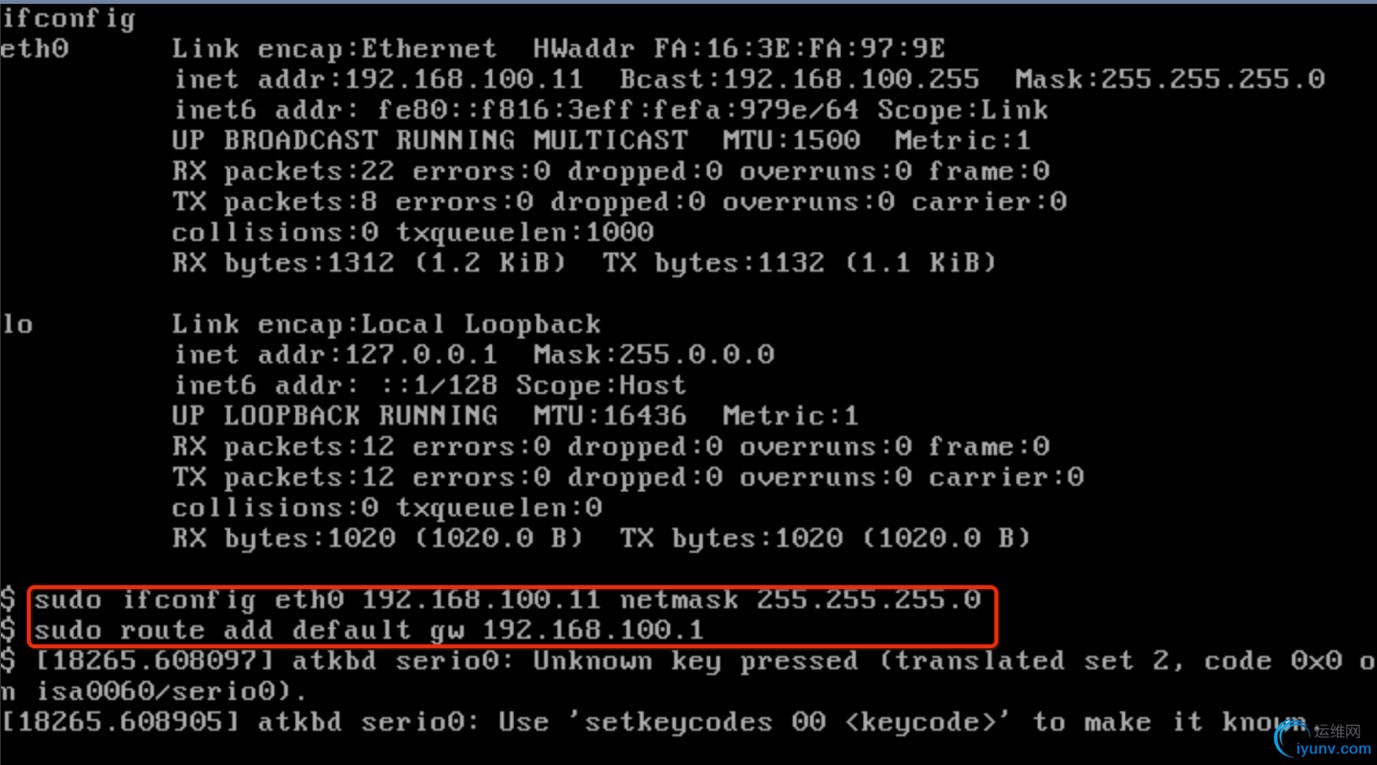
 Execute following 2 commands:
sudo ifconfig eth0 192.168.100.11 netmask 255.255.255.0
sudo route add default gw 192.168.100.1
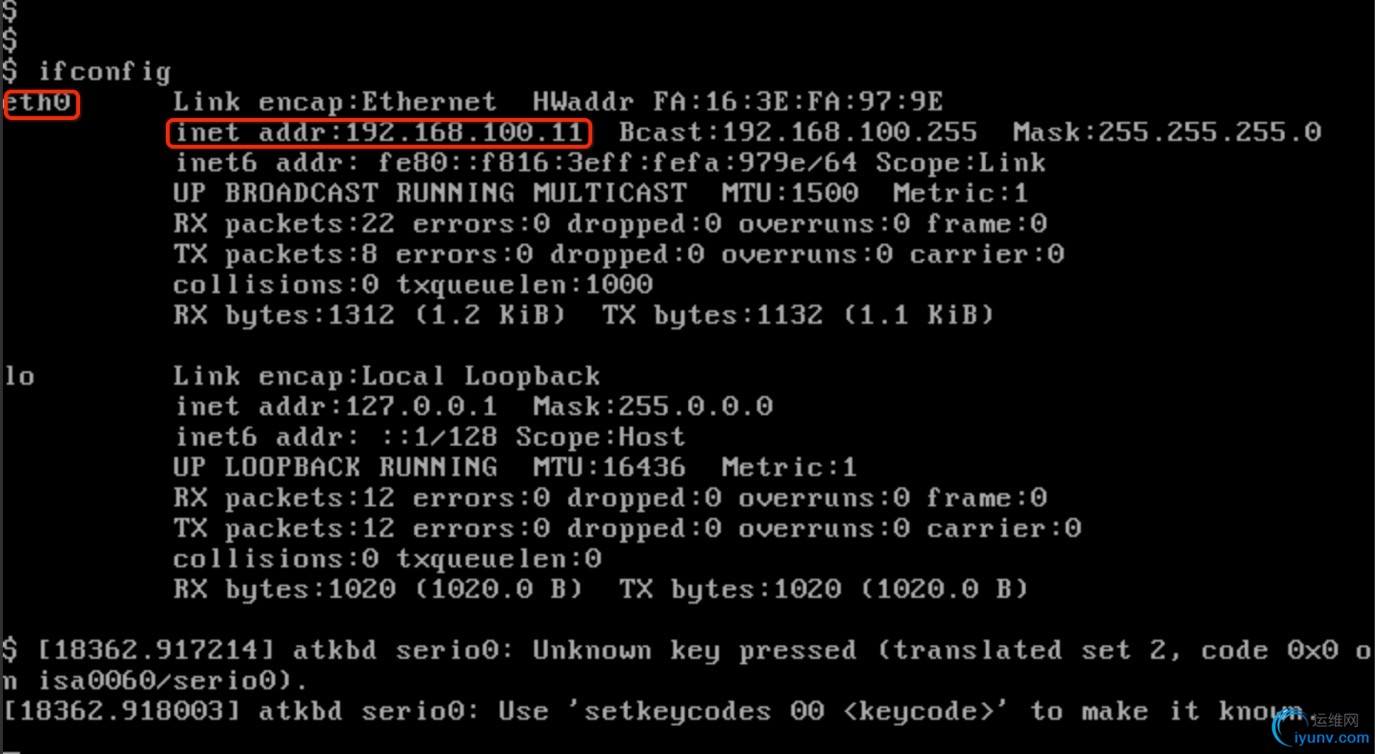
Now, the private IP address has been associated with the instance.
(We do not need to bind the public IP 10.140.253.100 here, because the HTTP requests will be transferred to the outside world by the router which is connected “private_network”and “external_network”.
More importantly, that is why10.140.253.100 is an floating IP, and how does it work.)
Ping 8.8.8.8 is OK.
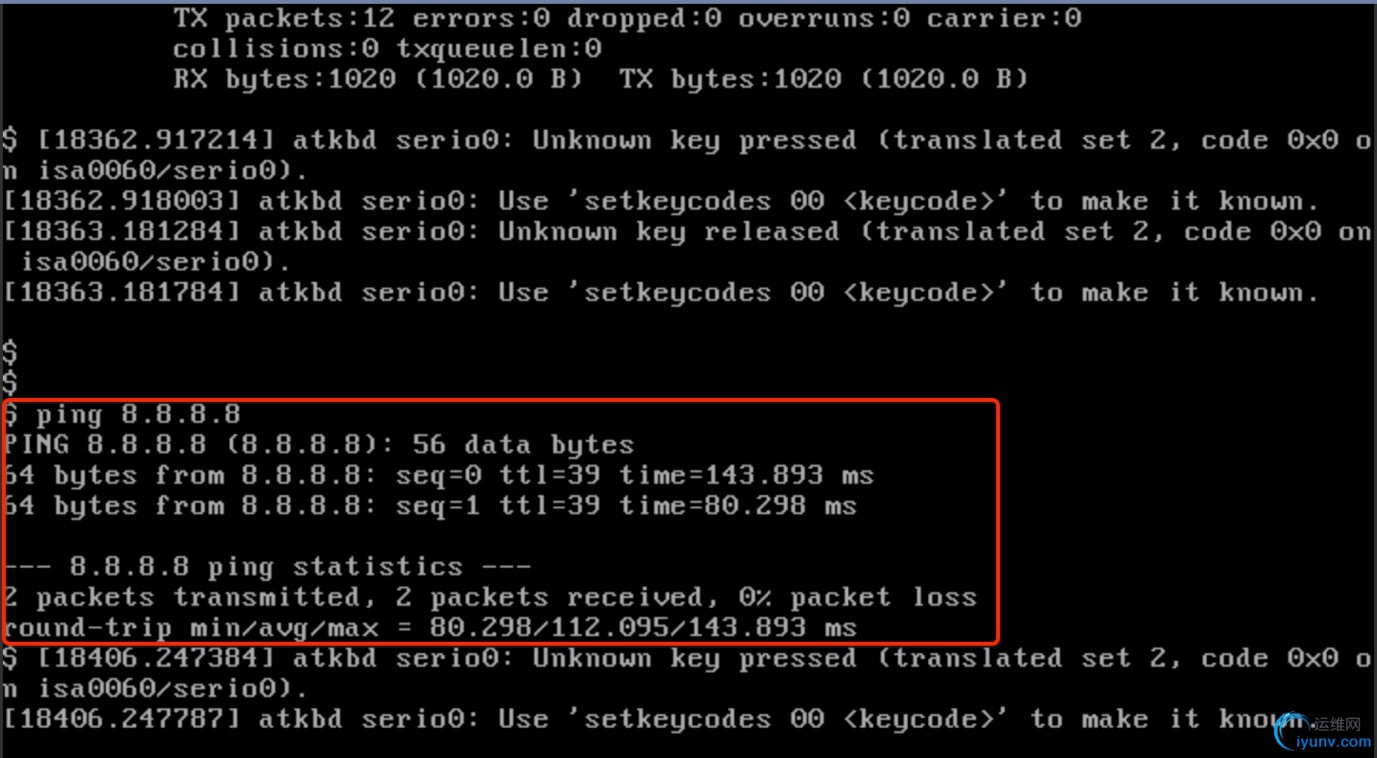 However, Ping by domain name is not working.
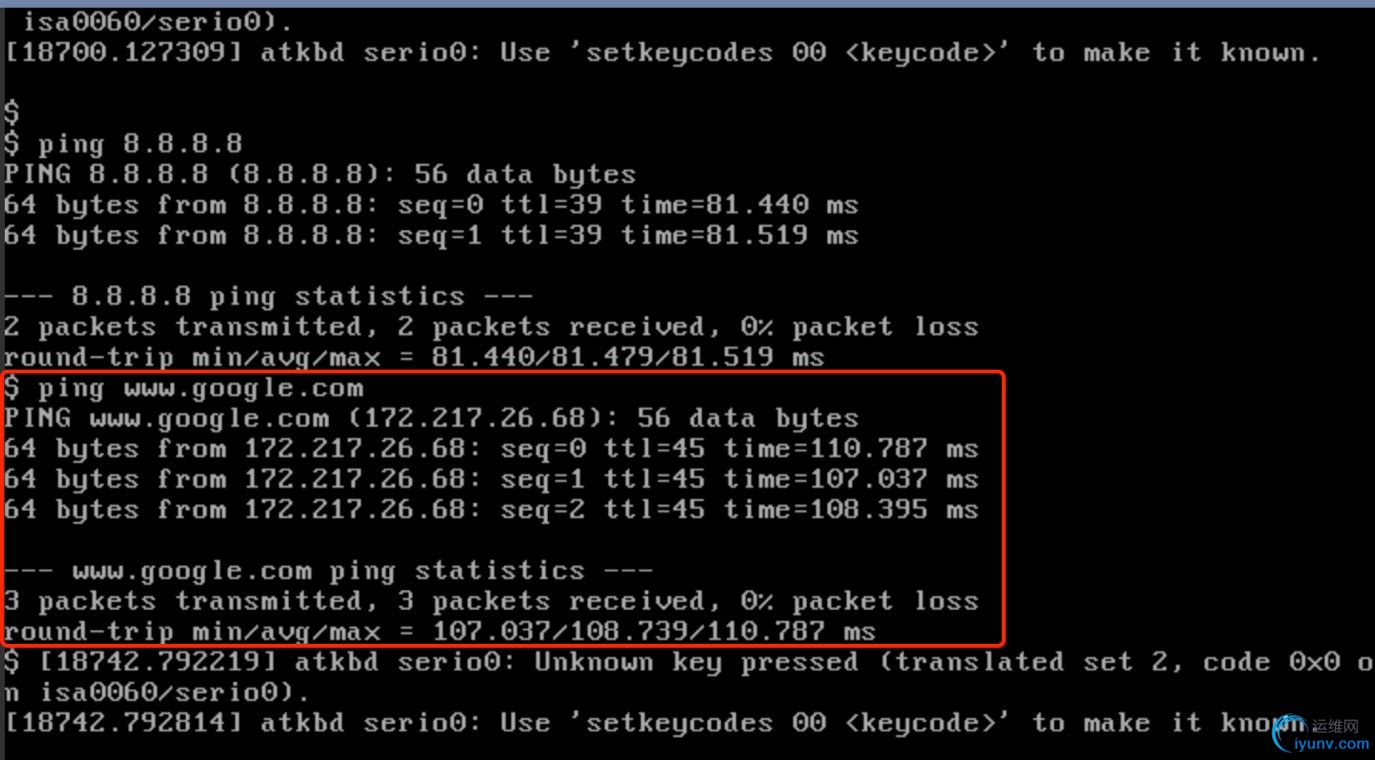
e.g. ping www.google.com
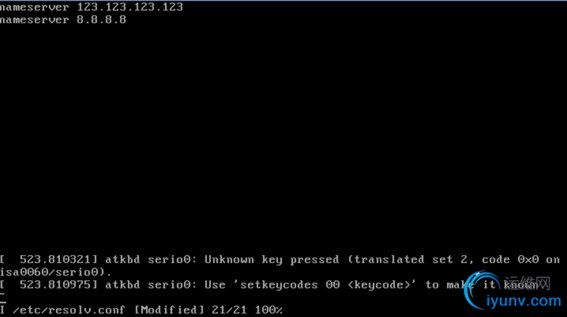
sudo vi /etc/resolv.conf
nameserver 123.123.123.123
nameserver 8.8.8.8
Ping www.google.comis OK.
Ping the instance from ”external_network” is pass as well.

6 Useful Tools
# show current network info
ip a
# show current gateway info
route
netstat -rn
# show current network namespace
ipnet ns list
e.g. qrouter-bc826659-8f64-4f82-8f20-8fb76e3c5d9d
#execute command via specific network
ipnet ns exec qrouter-bc826659-8f64-4f82-8f20-8fb76e3c5d9d ping www.google.com
#bind specific ip to network interface
ifconfig eth0 192.168.100.11 netmask 255.255.255.0
#add default gateway route
route add default gw 192.168.100.1
Reference:
http://www.learnlinux.org.za/courses/build/net-admin/ch01s11.html
https://www.rdoproject.org/install/quickstart/
https://www.rdoproject.org/networking/neutron-with-existing-external-networ |
|