参考官方文档:http://docs.openstack.org/juno/i ... stall/yum/content/#
三个节点ip信息
controller:192.168.100.10
network:192.168.100.20
compute1:192.168.100.30
修改各节点的/etc/hosts 文件

测试各节点到openstack.org的连通性

controller node
配置NTP服务
yum install -y ntp
vi /etc/ntp.conf 修改文件如下:
server NTP_SERVER iburst #此处未做修改,采用默认
restrict -4 default kod notrap nomodify
restrict -6 default kod notrap nomodify
systemctl enable ntpd.service #开机启动
systemctl start ntpd.service

其他节点同样安装
yum install ntp
修改/etc/ntp.conf文件如下:
server controller iburst
开机启动服务:
systemctl enable ntpd.service
systemctl start ntpd.service

OpenStack packages
Install the yum-plugin-priorities package to enable assignment of relative priorities within repositories:
# yum install -y yum-plugin-priorities
Install the epel-release package to enable the EPEL repository:
# yum install http://dl.fedoraproject.org/pub/ ... ease-7-5.noarch.rpm
Install the rdo-release-juno package to enable the RDO repository:
# yum install http://rdo.fedorapeople.org/openstack-juno/rdo-release-juno.rpm
Upgrade the packages on your system:
# yum upgrade
# reboot
RHEL and CentOS enable SELinux by default. Install the openstack-selinux package to automatically manage security policies for OpenStack services:
# yum install openstack-selinux
安装如果报错,可通过下面安装:
#yum install http://repos.fedorapeople.org/re ... 2.el7ost.noarch.rpm
To install and configure the database server
# yum install mariadb mariadb-server MySQL-python
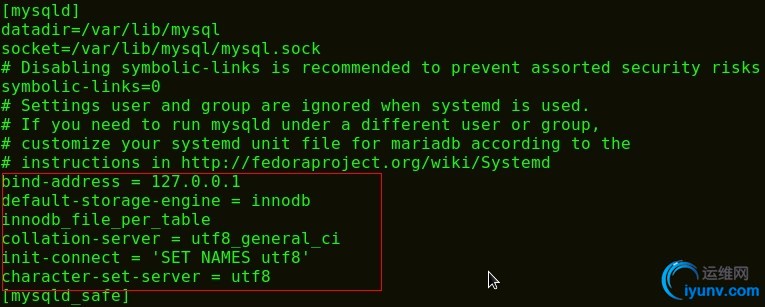
修改/etc/my.cnf
bind-address = 127.0.0.1
default-storage-engine = innodb
innodb_file_per_table
collation-server = utf8_general_ci
init-connect = 'SET NAMES utf8'
character-set-server = utf8
# systemctl enable mariadb.service
# systemctl start mariadb.service
To install the RabbitMQ message broker service
# yum install rabbitmq-server
# systemctl enable rabbitmq-server.service
# systemctl start rabbitmq-server.service
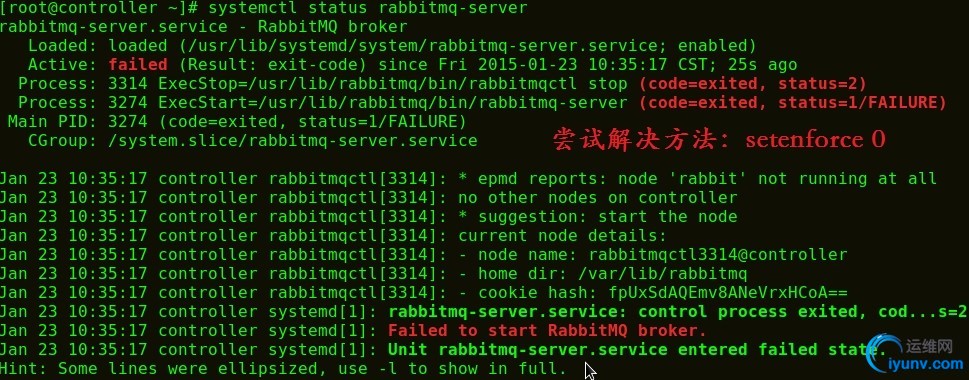
启动服务时出现如下错误:
# rabbitmqctl change_password guest 123456
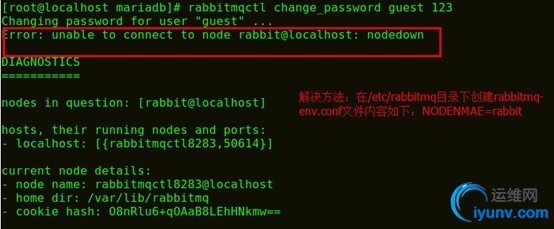
执行时如果有报错
Identity service Install and configure
# mysql
> create database keystone;
> grant all privileges on keystone.* to 'keystone'@'localhost' identified by 'test01';
> grant all privileges on keystone.* to 'keystone'@'%' identified by 'test01';
# openssl rand -hex 10
02456f17dc198d827a90 #值不一样

# yum install openstack-keystone python-keystoneclient
修改 /etc/keystone/keystone.conf
[DEFAULT] ... admin_token= 02456f17dc198d827a90
verbose = True [database] ... connection=mysql://keystone:test01@localhost/keystone [token] ... provider = keystone.token.providers.uuid.Provider driver =keystone.token.persistence.backends.sql.Token
# keystone-manage pki_setup --keystone-user keystone --keystone-group keystone
# chown -R keystone:keystone /var/log/keystone
# chown -R keystone:keystone /etc/keystone/ssl
# chmod -R o-rwx /etc/keystone/ssl
# su -s /bin/sh -c "keystone-manage db_sync" keystone 或者 keystone-manage db_sync
# systemctl enable openstack-keystone
# systemctl start openstack-keystone
Create tenants, users, and roles
# export OS_SERVICE_TIOEN=02456f17dc198d827a90
# export OS_SERVICE_ENDPOINT=http://controller:35357/v2.0
Create the admin tenant:
# keystone tenant-create --name admin --description "Admin Tenant"

Create the admin user:
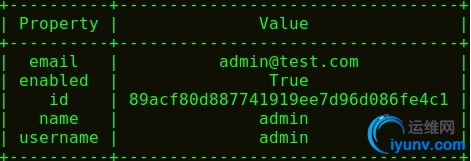
# keystone user-create --name admin --pass test01 --email admin@test.com
Create the admin role:
# keystone role-create --name admin

Add the admin role to the admin tenant and user:
# keystone user-role-add --user admin --tenant admin --role admin
Create a demo tenant and user for typical operations in your environment:
Create the demo tenant:
# keystone tenant-create --name demo --description "Demo Tenant"

Create the demo user under the demo tenant:
# keystone user-create --name demo --tenant demo --pass test01 --email admin@test.com
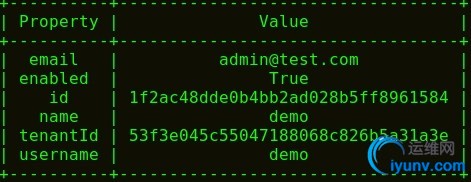
Create the service tenant:
# keystone tenant-create --name service --description "Service Tenant"

Create the service entity for the Identity service:
# keystone service-create --name keystone --type identity --description "Openstack Identity"

Create the Identity service API endpoints:
# keystone endpoint-create --service-id $(keystone service-list | awk '/ identity / {print $2}') --publicurl http://controller:5000/v2.0 --internalurl http://controller:5000/v2.0 --adminurl http://controller:35357/v2.0 --region regionOne
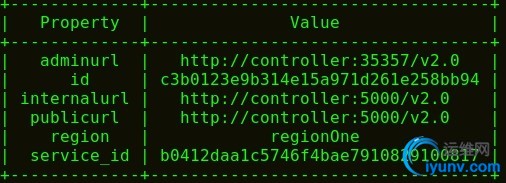
# unset OS_SERVICE_TOKEN OS_SERVICE_ENDPOINT
# keystone --os-tenant-name admin --os-username admin --os-password test01 --os-auth-url http://controller:35357/v2.0 token-get

# keystone --os-tenant-name admin --os-username admin --os-password test01 --os-auth-url http://controller:35357/v2.0 tenant-list

# keystone --os-tenant-name admin --os-username admin --os-password test01 --os-auth-url http://controller:35357/v2.0 user-list

# keystone --os-tenant-name admin --os-username admin --os-password test01 --os-auth-url http://controller:35357/v2.0 role-list

# keystone --os-tenant-name demo --os-username demo --os-password test01 --os-auth-url http://controller:35357/v2.0 token-get

# keystone --os-tenant-name demo --os-username demo --os-password test01 --os-auth-url http://controller:35357/v2.0 user-list
Add the Image Service(in controller node)
To configure prerequisites
#mysql -u root
> create database glance;
> grant all privileges on glance.* to 'glance'@'localhost' identified by 'test01';
> grant all privileges on glance.* to 'glance'@'%' identified by 'test01';
>quit
# source admin-openrc.sh
# keystone user-create --name glance --pass test01 --email admin@test.com
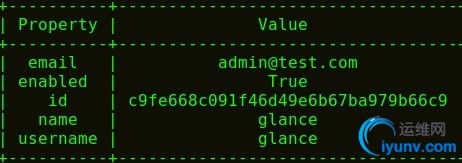
# keystone user-role-add --user glance --tenant service --role admin
# keystone service-create --name glance --type image --description "Openstack Image Service"
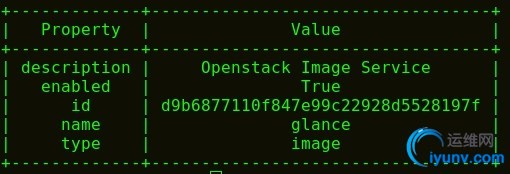
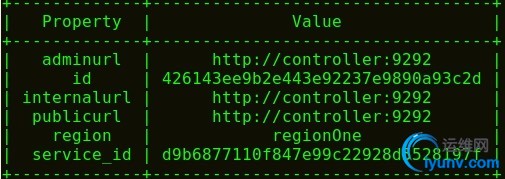
# keystone endpoint-create --service-id $(keystone service-list | awk '/ image / {print $2}') --publicurl http://controller:9292 --internalurl http://controller:9292 --adminurl http://controller:9292 --region regionOne
To install and configure the Image Service components
# yum install openstack-glance python-glanceclient
# vi /etc/glance/glance-api.conf
[DEFAULT]
verbose=True
[database]
connection=mysql://glance:test01@controller/glance
[keystone_authtoken]
auth_uri = http://controller:5000/v2.0
identity_uri=http://controller:35357
admin_tenant_name=service
admin_user=glance
admin_password=test02
[paste_deploy]
flavor=keystone
filesystem_store_datadirs=/var/lib/glance/images/
[glance_store]
default_store = file
filesystem_store_datadir = /var/lib/glance/images/
# vi /etc/glance/glance-registry.conf
[DEFAULT] verbose=True
[paste_deploy]
flavor = keystone
[database]
connection=mysql://glance:test01@controller/glance
[keystone_authtoken]
auth_uri=http://controller:5000/v2.0
identity_uri=http://controller:35357
admin_tenant_name=service
admin_user=glance
admin_password=test02
# su -s /bin/sh -c "glance-manage db_sync" glance
# systemctl enable openstack-glance-api.service openstack-glance-registry.service
# systemctl start openstack-glance-api.service openstack-glance-registry.service
#mkdir /tmp/images
#cd /tmp/images
# wget http://cdn.download.cirros-cloud ... 3.3-x86_64-disk.img
#source admin-openrc.sh (要先进入admin-openrc.sh的目录下才有效,本次默认在/root/下)
#cd /tmp/images
# glance image-create --name "cirros-0.3.3-x86_64" --file cirros-0.3.3-x86_64-disk.img --disk-format qcow2 --container-format bare --is-public True --progress
|