|
|
我们以前学过的队列,在线程中针对同一程序下的多个线程直接 可以实现消息的发送接收,对于进程来说只能在父进程与子进程中或者 父进程 下的子进程之间 进行,都无法实现连个进程的交互
RabbitMQ 实现了这一功能
需要先下载RabbitMQ 之后还需要下载erlang语言,因为RabbitMQ就是由erlang编辑而成的!
生产者:
import pika
#我们先生成一个链接的实例
connection=pika.BlockingConnection(pika.ConnectionParameters("localhost"))
#开通一个管道
channer=connection.channel()
#给管道一个队列,队列的名字叫Hello
channer.queue_declare(queue="hello")
#在管道中需要传输的数据格式
channer.basic_publish(exchange="",routing_key="hello",body="hello world!")
print(" sent the word!")
connection.close()
消费者:
import pika
#这三步骤 其实 两个里面都是一样的
connection=pika.BlockingConnection(pika.ConnectionParameters("localhost"))
channer=connection.channel()
channer.queue_declare("hello")
def callback(ch,menthod,properties,body):
print("recevied %s"%body)
channer.basic_consume(callback,queue="hello",no_ack=True)
print("waiting for message ")
channer.start_consuming()
RabbitMQ具有消息分发轮询机制,假如三个consumer一起的话,producer发送会按照,开的顺序来执行
如果中途截至的话 他会自动转到下一个 直到全结束!
RabbitMQ当你发消息的时候,消费者一般不会自动确认 生产者的消息传输完毕 ,所以我们要想保证发一次就接受一次那么 我们就在消费者的callback中加ch.basic_ack(delivery_tag=menthod.delivery_tag) 即可实现
我们上面实现的RabbitMQ不能实现消息的持久化,如果要想实现持久化 也就是当关闭RabbitMQ时 信息不会消失
在代码中channer.queue_declare(queue="hello") 改变成channer.queue_declare(queue="hello",durable=True) 这实现的是队列的持久化
我们还的实现消息的持久化 channer.basic_consume(callback,queue="hello",no_ack=True,properties=pika.BasicProperties(delivery_mode=2))
这样综合下来就实现了消息的持久化!
我们要想实现一种消息的广播模式怎么办?
1.给所有人发送消息 !!
生产者端口:
import pika
#我们先生成一个链接的实例
connection=pika.BlockingConnection(pika.ConnectionParameters("localhost"))
#开通一个管道
channer=connection.channel()
#给管道一个队列,队列的名字叫Hello
#先给exchange起一个名字,标明其类型
channer.exchange_declare(exchange="logs",type="fanout")
message="info:hello world"
#在管道中需要传输的数据格式,routing_key这里不像非fanout模式需要输入传输内容的队列,body仍然是传输的消息
channer.basic_publish(exchange="logs",routing_key="",body=message)
print("we send :",message)
connection.close()
消费者端口:
import pika
#这三步骤 其实 两个里面都是一样的
connection=pika.BlockingConnection(pika.ConnectionParameters("localhost"))
channer=connection.channel()
channer.exchange_declare("logs",'fanout')
#为了保证 每个接受能力不同的进程执行的任务在自身的能力范围内,他的原理就是当一个消息没有处理完成就不会给你穿下一个任务
result=channer.queue_declare(exclusive=True)
queue_name=result.method.queue
print("random queue_name:",queue_name)
channer.queue_bind(exchange="logs",queue=queue_name)
print("waiting for message ")
def callback(ch,method,properties,body):
print("recevied %r"%body)
channer.basic_consume(callback,queue=queue_name,no_ack=True)
channer.start_consuming()
其实上面的代码我一运行会报type的错误 我现在还没找到错误 等我找到立马更新 !!
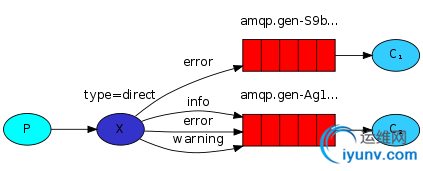
2.有选择的给部分人发消息

import pika
import sys
#我们先生成一个链接的实例
connection=pika.BlockingConnection(pika.ConnectionParameters("localhost"))
#开通一个管道
channer=connection.channel()
#给管道一个队列,队列的名字叫Hello
#先给exchange起一个名字,标明其类型
channer.exchange_declare("logs1",'direct')
servity=sys.argv[1]if len(sys.argv)>1 else "info"
#传送的消息是后面的命令或者 hello world , 也就是说 命令内容放在了 也就是把消息内容放在了指令中sys.argv[1]中 ,hello world放在了 info中
message=" ".join(sys.argv[2:]) or "hello world"
#在管道中需要传输的数据格式,routing_key这里不像非fanout模式需要输入传输内容的队列,body仍然是传输的消息
channer.basic_publish(exchange="logs1",routing_key=servity,body=message)
print(" [x] Sent %r:%r" % (servity, message))
connection.close()
#接受消息端
import pika
import sys
#这三步骤 其实 两个里面都是一样的
connection=pika.BlockingConnection(pika.ConnectionParameters("localhost"))
channer=connection.channel()
channer.exchange_declare("logs1",'direct')
#为了保证 每个接受能力不同的进程执行的任务在自身的能力范围内,他的原理就是当一个消息没有处理完成就不会给你穿下一个任务
result=channer.queue_declare(exclusive=True)
queue_name=result.method.queue
servities=sys.argv[1:]
if not servities:
sys.stderr.write("Usage: %s [info] [warning] [error]\n" % sys.argv[0])
sys.exit(1)
print(servities)
print("random queue_name:",queue_name)
for servity in servities:
channer.queue_bind(exchange="logs1",queue=queue_name,routing_key=servity)
def callback(ch,method,properties,body):
print("recevied %r"%body)
channer.basic_consume(callback,queue=queue_name,no_ack=True)
channer.start_consuming()
我们上面的选择式的分发只针对一些命令如果我们 要接受mysql 或者 其他的 要怎么办呢 那么我们就需要 topic细致过滤 一下
生产者 其实在我的想法中,这个就是在文件名字上面做了些手脚 将以前的一个改为一类
import pika
import sys
connection = pika.BlockingConnection(pika.ConnectionParameters(
host='localhost'))
channel = connection.channel()
channel.exchange_declare('topic_logs',
'topic')
routing_key = sys.argv[1] if len(sys.argv) > 1 else 'anonymous.info'
message = ' '.join(sys.argv[2:]) or 'Hello World!'
channel.basic_publish(exchange='topic_logs',
routing_key=routing_key,
body=message)
print(" [x] Sent %r:%r" % (routing_key, message))
connection.close()
消费者
import pika
import sys
connection = pika.BlockingConnection(pika.ConnectionParameters(
host='localhost'))
channel = connection.channel()
channel.exchange_declare('topic_logs',
'topic')
result = channel.queue_declare(exclusive=True)
queue_name = result.method.queue
binding_keys = sys.argv[1:]
if not binding_keys:
sys.stderr.write("Usage: %s [binding_key]...\n" % sys.argv[0])
sys.exit(1)
for binding_key in binding_keys:
channel.queue_bind(exchange='topic_logs',
queue=queue_name,
routing_key=binding_key)
print('
Waiting for logs. To exit press CTRL+C')
def callback(ch, method, properties, body):
print(" [x] %r:%r" % (method.routing_key, body))
channel.basic_consume(callback,
queue=queue_name,
no_ack=True)
channel.start_consuming()
如果我们要实现两个程序之间的缓存机制怎么办?这时候我们就用到了redis
http://www.cnblogs.com/wupeiqi/articles/5132791.html 详细参考该老师博客
以前我们用的rabbitMQ都是单向的一个过程,发送执行 但没有返回结果 ,那么我们就让他变成一个双向的过程,但此时我们需要用到的不至就是一个队列了,而是两个队列 为了防止信息紊乱
producer
import pika
import uuid
class Fibonacciclient(object):
def __init__(self):
self.connection=pika.BlockingConnection(pika.ConnectionParameters(
host="localhost"
))
self.channel=self.connection.channel()
result=self.channel.queue_declare(exclusive=True)
#随机生成一个queue
self.callback_queue=result.method.queue
#收到的返回消息的调用函数通道途径
self.channel.basic_consume(self.on_response,no_ack=True,
queue=self.callback_queue)
def on_response(self,ch,method,props,body):
if self.corr_id==props.correlation_id:
#满足条件就会将信息放在reponse中,使其变成真
self.response=body
def call(self,n):
self.response=None
#生产者产生的一个随机字符序列
self.corr_id=str(uuid.uuid4())
#其实发送的原理就是发送一个字典,propertis下对应一些东西,reply_to和Body也有各自的东西都会被消费者接受
self.channel.basic_publish(exchange="",routing_key="rpc_queue",#声明一个队列的名字
properties=pika.BasicProperties(
reply_to=self.callback_queue,#返回的队列
correlation_id=self.corr_id#核对字符序列
),
body=str(n)
)
while self.response is None:
#这个相当于一个非阻塞的IO模式 ,无论是否有信息都会返回
self.connection.process_data_events()
print("no message")
return int(self.response)
#创建一个实例,创建的同时也就初始化了管道信息
fc=Fibonacciclient()
print(" requesting fib(number)")
#传参
response=fc.call(30)
#返回结果
print("Got %r"%response)
consumer
import pika
import uuid
connection = pika.BlockingConnection(pika.ConnectionParameters(
host='localhost'))
channel = connection.channel()
#传入的队列
channel.queue_declare(queue="rpc_queue")
#就是一个处理数的算法 随便改成什么都行
def fib(n):
if n == 0:
return 0
elif n == 1:
return 1
else:
return fib(n-1) + fib(n-2)
def on_request(ch,method,props,body):
n=int(body)
print("fib(%d)"%n)
response=fib(n)
ch.basic_publish(exchange="",routing_key=props.reply_to,
#收到的又给他发回去,避免的就是多并发的时候会乱
properties=pika.BasicProperties(correlation_id=\
props.correlation_id),body=str(response) )
ch.basic_ack(delivery_tag=method.delivery_tag)#确认信息
channel.basic_qos(prefetch_count=1)
channel.basic_consume(on_request,queue="rpc_queue")
print("waiting!!!")
channel.start_consuming()
下面这段代码清晰的看出pexpect的用法
import pexpect
def login(port,user,passwd,ip,command):
#发送给服务器的一个登陆请求 等待 确认 ,当i==0是是超时的情况,我们再次发送密码 ,如果是一则表示接受
child=pexpect.spawn('ssh -p%s %s@%s "%s"' %(port,user,ip,command))
o=''
try:
i=child.expect(['[Pp]assword:','continue connecting (yes/no)?'])
if i == 0:
child.sendline(passwd)
elif i == 1:
child.sendline('yes')
else:
pass
except pexpect.EOF:
child.close()
else:
o=child.read()
child.expect(pexpect.EOF)
child.close()
return o
hosts=file('hosts.list','r')
for line in hosts.readlines():
host=line.strip("\n")
if host:
ip,port,user,passwd,commands= host.split(":")
for command in commands.split(","):
print "+++++++++++++++ %s run:%s ++++++++++++" % (ip,command),
print login(port,user,passwd,ip,command)
hosts.close()
我们可以用pxssh来执行简化的Pexpect |
|