版权声明:
本文遵循“署名非商业性使用相同方式共享 2.5 中国大陆”协议
您可以自由复制、发行、展览、表演、放映、广播或通过信息网络传播本作品
您可以根据本作品演义自己的作品
您必须按照作者或者许可人指定的方式对作品进行署名。
您不得将本作品用于商业目的。
如果您改变、转换本作品或者以本作品为基础进行创作,您只能采用与本协议相同的许可协议发布基于本作品的演绎作品。
对任何再使用或者发行,您都必须向他人清楚地展示本作品使用的许可协议条款。
如果得到著作权人的许可,您可以不受任何这些条件的限制。
LNMP是一个缩写,它指一组通常一起使用来运行动态网站或者服务器的自由软件:
Linux+Nginx+MySQL+php(php-fpm),由于Nginx有大并发的优势,现在越来越多的企业LAMP平台都在向LNMP迁移。
接着我们开始进入LNMP搭建。现实生产环境下,不同的业务需求都不相同,因此更多的企业会考虑使用源码搭建LNMP环境,这样可以更加灵活使用各个功能参数将性能调制到最佳状态。当然如果贵公司的环境比较简单,可以考虑rpm包安装。
注意:本实验环境基本上都是从各大官网下载的最新安装包。
一、系统环境:
[iyunv@rhel6u3-7 ~]# uname -r
2.6.32-279.el6.i686
[iyunv@rhel6u3-7 ~]# cat /etc/redhat-release
Red Hat Enterprise Linux Server release 6.3 (Santiago)
[iyunv@rhel6u3-7 ~]#
二、开始安装部署LNMP
1、部署环境之前先配置好yum仓库指向对应光盘所在位置即可。
yum能够自动解决依赖包问题,功能明显优越于rpm安装。
[Shell] 纯文本查看 复制代码 [iyunv@rhel6u3-7 ~]# mount /dev/cdrom /media/cdrom/ //挂载光盘
mount: block device /dev/sr0 is write-protected, mounting read-only
[iyunv@rhel6u3-7 ~]# vim /etc/yum.repos.d/rhel-source.repo //编辑并修改默认yum配置文件
[rhel-source]
name=Red Hat Enterprise Linux $releasever - $basearch - Source
baseurl=file:///media/cdrom
enabled=1
gpgcheck=0
[iyunv@rhel6u3-7 ~]# yum clean all //清空yum环境
Loaded plugins: product-id, security, subscription-manager
Updating certificate-based repositories.
Unable to read consumer identity
Cleaning repos: rhel-source
Cleaning up Everything
[iyunv@rhel6u3-7 ~]# yum makecache //清空yum缓存
Loaded plugins: product-id, security, subscription-manager
Updating certificate-based repositories.
Unable to read consumer identity
rhel-source | 4.0 kB 00:00 ...
rhel-source/filelists_db | 3.1 MB 00:00 ...
rhel-source/primary_db | 2.5 MB 00:00 ...
rhel-source/other_db | 1.2 MB 00:00 ...
rhel-source/group_gz | 204 kB 00:00 ...
Metadata Cache Created //当出现以上信息时候,说明yum环境配置OK了。
2、安装LNMP环境所需要的最基本包
[Shell] 纯文本查看 复制代码 [iyunv@rhel6u3-7 ~]#yum -y install libjpeg-devel libpng-devel libtiff-devel fontconfig-devel freetype-devel libXpm-devel gettext-devel openssl-devel libtool-ltdl-devel gcc *c++* ncurses-devel // libjpeg-devel ,libpng-devel ,libtiff-devel ,fontconfig-devel ,freetypedevel,
libXpm-devel这些都是图片与字体相关的开发包,为了使php可以对其做更好的支持。gettext是语言相关的一个函数库。openssl-devel是一套工具,用于生成X.509协议中所使用的密钥,公钥等文件。libtool是一个通用库支持脚本,在php编译过程中会需要使用到。
[iyunv@rhel6u3-7 yuanma]#tar -zxvf pcre-8.32.tar.gz //解压
[iyunv@rhel6u3-7 yuanma]#cd pcre-8.32/ 安装nginx需要的pcre包
[iyunv@rhel6u3-7 pcre-8.32]#./configure //检查配置环境
[iyunv@rhel6u3-7 pcre-8.32]#make && make install //编译安装
[iyunv@rhel6u3-7 lib]# ln -s libpcre.so.0.0.1 libpcre.so.1 //做个软连接指向libpcre.so.1,否则安装nginx会报错,找不到libpcre.so.1
3、安装nginx软件包
关于nginx详细配置可参看以下文档
Nginx实战基础篇一 源码包编译安装部署web服务器
http://dreamfire.blog./418026/1140965
Nginx实战基础篇二 Nginx主配置文件参数详解http://dreamfire.blog./418026/1140995
[Shell] 纯文本查看 复制代码 [iyunv@rhel6u3-7 yuanma]# tar -xzf nginx-1.2.7.tar.gz
[iyunv@rhel6u3-7 nginx-1.2.7]# useradd nginx
[iyunv@rhel6u3-7 nginx-1.2.7]# ./configure --user=nginx --group=nginx --prefix=/usr/local/nginx/ --with-http_stub_status_module --with-http_ssl_module --with-sha1=/usr/lib //-with-sha1指定希哈函数库位置,其他参数参看以上共享文档
[iyunv@rhel6u3-7 nginx-1.2.7]#make && make install
[iyunv@rhel6u3-7 pcre-8.32]# /usr/local/nginx/sbin/nginx -c /usr/local/nginx/conf/nginx.conf //启动nginx
[iyunv@rhel6u3-7 pcre-8.32]# links 192.168.100.107 //出现welcome to nginx! 说明nginx安装成功
4、安装mysql数据库
安装mysql包,并设置mysql开机自动启动。
[Shell] 纯文本查看 复制代码 [iyunv@rhel6u3-7 mysql-5.5.9]# autoreconf --force –install //由autoconf包提供 Autoconf可以用来分析用户的系统,判断是否符合POSIX标准,并提供相应解决方法。
autoreconf: `configure.ac' or `configure.in' is required
[iyunv@rhel6u3-7 yuanma]# tar -xzf mysql-5.1.67.tar.gz //解压mysql安装包
[iyunv@rhel6u3-7 mysql-5.1.67]# ./configure --prefix=/usr/local/mysql --localstatedir=/var/lib/mysql --enable-assembler --with-extra-charsets=all --enable-thread-safe-client --with-client-ldflags=-all-static --with-mysqld-ldflags=-all-static --with-pthread --with-big-tables --without-debug --with-ssl //编译安装mysql时我们尽量以静态化方式编译,提高mysql性能,在安装之前你应该已经停止机器上原有的mysql,甚至应该将原本的卸载。--enable-assembler参数将会使mysql使用一些字符函数的汇编版本,--with-extra-charsets设置了支持的字符集,--enable-thread-safe-client和--with-pthread这两个参数要求mysql使用线程库并以线程方式编译了客户端。
…… //出现以下信息说明安装成功
Thank you for choosing MySQL!
Remember to check the platform specific part of the reference manual
for hints about installing MySQL on your platform.
Also have a look at the files in the Docs directory.
[iyunv@rhel6u3-7 mysql-5.1.67]# make && make install
[iyunv@rhel6u3-7 mysql-5.1.67]# useradd mysql –s /sbin/nologin // 创建mysql管理用户名为mysql,并设置禁止登陆系统。
[iyunv@rhel6u3-7 mysql-5.1.67]# /usr/local/mysql/bin/mysql_install_db --user=mysql //使用本地用户mysql运行mysql数据库
[iyunv@rhel6u3-7 mysql-5.1.67]# cd /usr/local/mysql/
[iyunv@rhel6u3-7 mysql]# chown -R root:mysql . //更改mysql主目录属主和属组,增强安全性
[iyunv@rhel6u3-7 mysql]# chown mysql. /var/lib/mysql -R
[iyunv@rhel6u3-7 mysql]# cp share/mysql/my-huge.cnf /etc/my.cnf
cp: overwrite `/etc/my.cnf'? y
[iyunv@rhel6u3-7 mysql]# cp share/mysql/mysql.server /etc/init.d/mysqld //创建system V 脚本
[iyunv@rhel6u3-7 mysql]# chmod 755 /etc/init.d/mysqld
[iyunv@rhel6u3-7 mysql]# chkconfig --add mysqld //添加到开机启动项中
[iyunv@rhel6u3-7 mysql]# chkconfig mysqld on //设置开机启动
[iyunv@rhel6u3-7 mysql]# service mysqld start //用system V脚本启动开是否能够成功启动mysql
Starting MySQL. SUCCESS!
[iyunv@rhel6u3-7 mysql]# echo 'export PATH=$PATH:/usr/local/mysql/bin' >>~/.bashrc //创建搜索路径
[iyunv@rhel6u3-7 ~]# cat ./.bashrc | grep mysql
export PATH=$PATH:/usr/local/mysql/bin
[iyunv@rhel6u3-7 init.d]# mysqladmin -u root password 123.com //创建数据库管理用户及密码
5、安装php软件
安装php软件之前,需要安装以下库,方可更佳完美的支持php软件
[Shell] 纯文本查看 复制代码 [iyunv@rhel6u3-7 yuanma]# tar -xf gd-2.0.35.tar.gz //gd2是一个用以生成图形图片的库,RHEL自带gd2的开发包,但是版本比较低,生成的图片是黑白的,非常不美观,因此这边单独编译一个高版本。
[iyunv@rhel6u3-7 gd-2.0.35]# ./configure -prefix=/usr/local/gd2
[iyunv@rhel6u3-7 gd-2.0.35]# make && make install
[iyunv@rhel6u3-7 yuanma]# tar -zxvf libiconv-1.14.tar.gz //libiconv 用于实现一个字符编码到另一个字符编码的转换。
[iyunv@rhel6u3-7 yuanma]# cd libiconv-1.14
[iyunv@rhel6u3-7 libiconv-1.14]# ./configure
[iyunv@rhel6u3-7 libiconv-1.14]#make && make install
[iyunv@rhel6u3-7 yuanma]# tar xf libmcrypt-2.5.7.tar.gz //libmcrypt 可以使php支持更多加密算法。
[iyunv@rhel6u3-7 yuanma]# cd libmcrypt-2.5.7
[iyunv@rhel6u3-7 libmcrypt-2.5.7]# ./configure
[iyunv@rhel6u3-7 libmcrypt-2.5.7]# make && make install
[iyunv@rhel6u3-7 yuanma]# tar xf mhash-0.9.9.tar.gz //mhash是一个哈稀演函数库,它可以支持多种哈稀演算法,例如最出名的MD5、SHA1 或 GOST,还有其它多种的哈稀演算法。
[iyunv@rhel6u3-7 yuanma]# cd mhash-0.9.9
[iyunv@rhel6u3-7 mhash-0.9.9]# ./configure
[iyunv@rhel6u3-7 mhash-0.9.9]# make && make install
[iyunv@rhel6u3-7 yuanma]# tar -xf libevent-2.0.21-stable.tar.gz //libevent 是一个事件触发的网络库,适用于windows、linux、bsd等多种平台,内部用select、epoll、kqueue等系统调用管理事件机制。
[iyunv@rhel6u3-7 yuanma]# cd libevent-2.0.21-stable
[iyunv@rhel6u3-7 libevent-2.0.21-stable]# ./configure
[iyunv@rhel6u3-7 libevent-2.0.21-stable]# make && make install
[iyunv@rhel6u3-7 yuanma]# yum –y install libxml2-devel libcurl-devel //安装其他支持包
//以下开始安装php软件
[iyunv@rhel6u3-7 yuanma]# tar xf php-5.2.17.tar.gz
[iyunv@rhel6u3-7 yuanma]# gzip -cd php-5.2.17-fpm-0.5.14.diff.gz | patch -d php-5.2.17 -p1 //将php-fpm作为补丁加入php源码中
[iyunv@rhel6u3-7 php-5.2.17]# ./configure --prefix=/usr/local/php --enable-fastcgi --enable-fpm --enable-discard-path --enable-force-cgi-redirect --with-config-file-path=/usr/local/php/etc --with-mysql=/usr/local/mysql/ --with-mysqli=/usr/local/mysql/bin/mysql_config -with-iconv-dir --with-freetype-dir with-jpeg-dir --with-png-dir --with-gd=/usr/local/gd2/ --with-zlib --with-libxml-dir --with-curl --with-curlwrappers --with-openssl --with-mhash --with-xmlrpc --with-mcrypt --enable-xml --enable-shmop --enable-sysvsem --enable-inline-optimization --enable-mbregex --enable-mbstring --enable-gd-native-ttf --enable-ftp --enable-pcntl --enable-sockets --enable-zip --disable-debug --disable-ipv6
//--enable-fastcgi启动fast-cgi "
---enable-fpm"是激活对FastCGI模式的fpm支持,
"--enable-discard-path" 打开这个选项,用户就不能透过浏览器读取类似.htaccess 的系统安全相关的文件。
"--enable-force-cgi-redirect" 若使用 CGI VERSION 模式来执行 PHP 的设,打开本选项会增加安全性。例如用户读 [url]http://my.host/cgi-bin/php/secret/doc.html[/url] 遇到比较了解 PHP 系统的黑客级用户可能会自已输入以下网址 [url]http://my.host/secret/doc.html[/url] 来读取相关信息。若 PHP 和 Apache 编译在一起,让 PHP 变成 Apache 的一部份,则不需要加入本选项。
--with-config-file-path在指定php主配置文件的路径
--with-mysql和--with-mysqli在指定你的mysql的位置和它的相关工具
--with-iconv-dir,--with-freetype-dir,-with-jpeg-dir,--with-png-dir,--withgd,--with-zlib,--with-libxml-dir这些都是在启用对某种文件的支持
--with-curl和--with-curlwrappers是用于支持curl函数,此函数允许你用不同的协议连接和沟通不同的服务器
--with-openssl,--with-mhash,--with-mcrypt这都是和加密有关的参数,启用它们是为了让php可以更好的支持各种加密。
"--enable-bcmath" 高精度数学运算组件。
"--enable-shmop" 和 "--enable-sysvsem" 使得你的PHP系统可以处理相关的IPC函数 。IPC是一个Unix标准通讯机制,它提供了使得在同一台主机不同进程之间可以互相通讯的方法。
"--enable-inline-optimization" 栈堆指针和优化线程。
"--enable-pcntl" 多线程优化。
make ZEND_EXTRA_LIBS='-liconv' 手工指定将iconv加到php额外库中,一般来说这些库的增加php可以自动完成,只是iconv貌似不太合群,需要手工操作。
…… //出现以下内容,说明配置成功
+--------------------------------------------------------------------+
| License: |
| This software is subject to the PHP License, available in this |
| distribution in the file LICENSE. By continuing this installation |
| process, you are bound by the terms of this license agreement. |
| If you do not agree with the terms of this license, you must abort |
| the installation process at this point. |
+--------------------------------------------------------------------+
Thank you for using PHP.
[iyunv@rhel6u3-7 php-5.2.17]# make && make install //make完了之后,如果没有错误,你也可以执行一下make test看看是否有错误,不过时间会比较长。
[iyunv@rhel6u3-7 php-5.2.17]# cp php.ini-dist /usr/local/php/etc/php.ini //创建php配置文件
6、安装php扩展模块,更好的支持php
安装扩展模块是为了进一步完善我们的php,或提高性能,或提高安全性,或扩展功能,或增加稳定
性等。
[Shell] 纯文本查看 复制代码 [iyunv@rhel6u3-7 yuanma]# tar -zxf memcache-3.0.7.tgz //memcache是一个高性能的分布式的内存对象缓存系统,通过在内存里维护一个统一的巨大的hash表,它能够用来存储各种格式的数据,包括图像、视频、文件以及数据库检索的结果等。
[iyunv@rhel6u3-7 yuanma]# cd memcache-3.0.7
[iyunv@rhel6u3-7 memcache-3.0.7]# /usr/local/php/bin/phpize
[iyunv@rhel6u3-7 memcache-3.0.7]# ./configure --with-php-config=/usr/local/php/bin/php-config
[iyunv@rhel6u3-7 memcache-3.0.7]# make && make install
[iyunv@rhel6u3-7 yuanma]# cd eaccelerator-eaccelerator-42067ac //eAccelerator加速引擎是基于mmcache开发的PHP加速优化软件。通过编译和缓存来增加PHP脚本的性能,使得PHP脚本在编译的状态下降低服务器负载,对服务器的开销几乎完全消除。它还对脚本起优化作用,能加快其执行效率,提高PHP应用执行速度最高达10倍。
[iyunv@rhel6u3-7 eaccelerator-eaccelerator-42067ac]# /usr/local/php/bin/phpize
[iyunv@rhel6u3-7 eaccelerator-eaccelerator-42067ac]# ./configure --enable-eaccelerator=shared --with-php-config=/usr/local/php/bin/php-config
[iyunv@rhel6u3-7 eaccelerator-eaccelerator-42067ac]# make && make install
[iyunv@rhel6u3-7 yuanma]# tar xf PDO_MYSQL-1.0.2.tgz //PDO_MYSQL 是一个php的扩展模块,可以让php更好调用mysql。
[iyunv@rhel6u3-7 yuanma]# cd PDO_MYSQL-1.0.2
[iyunv@rhel6u3-7 PDO_MYSQL-1.0.2]# /usr/local/php/bin/phpize //ImageMagick是一个用于查看、编辑位图文件以及进行图像格式转换的开放源代码软件套装。
[iyunv@rhel6u3-7 PDO_MYSQL-1.0.2]# ./configure --prefix=/usr/local/pdo-mysql --with-php-config=/usr/local/php/bin/php-config --with-pdo-mysql=/usr/local/mysql
[iyunv@rhel6u3-7 PDO_MYSQL-1.0.2]# make && make install
[iyunv@rhel6u3-7 ImageMagick-6.5.9-10]# yum -y install perl-ExtUtils-CBuilder perl-ExtUtils-MakeMake //安装imageMangick包依赖的系统包
[iyunv@rhel6u3-7 yuanma]# tar xf ImageMagick-6.5.9-10.tar.gz // //ImageMagick是一个用于查看、编辑位图文件以及进行图像格式转换的开放源代码软件套装。
[iyunv@rhel6u3-7 yuanma]# cd ImageMagick-6.5.9-10
[iyunv@rhel6u3-7 ImageMagick-6.5.9-10]# ./configure --enable-shared --with-modules --without-x --with-gs-font-dir=default --with-perl=yes --with-zlib=yes --with-jpeg=yes
[iyunv@rhel6u3-7 ImageMagick-6.5.9-10]# make && make install
[iyunv@rhel6u3-7 yuanma]# tar xf imagick-3.0.1.tgz
[iyunv@rhel6u3-7 yuanma]# cd imagick-3.0.1
[iyunv@rhel6u3-7 imagick-3.0.1]# /usr/local/php/bin/phpize
[iyunv@rhel6u3-7 imagick-3.0.1]# ./configure --with-php-config=/usr/local/php/bin/php-config //--with-php-config在指定php的配置工具,/usr/local/php/bin/phpize 是用来扩展php的扩展模块的,通过phpize可以建立php的外挂模块。
[iyunv@rhel6u3-7 imagick-3.0.1]# make && make install
7、修改php主配置文件,以使php支持扩展模块。
[Shell] 纯文本查看 复制代码 [iyunv@rhel6u3-7 imagick-3.0.1]# cat >>/usr/local/php/etc/php.ini <<ENDF //修改php主配置文件,以使php支持扩展模块。
> [eAccelerator]
> zend_extension="/usr/local/php/lib/php/extensions/no-debug-non-zts-20060613/eaccelerator.so"
> eaccelerator.shm_size="32"
> eaccelerator.cache_dir="/usr/local/cache/ea"
> eaccelerator.enable="1"
> eaccelerator.optimizer="1"
> eaccelerator.check_mtime="1"
> eaccelerator.debug="0"
> eaccelerator.filter=""
> eaccelerator.shm_max="0"
> eaccelerator.shm_ttl="0"
> eaccelerator.shm_prune_period="0"
> eaccelerator.shm_only="0"
> eaccelerator.compress="1"
> eaccelerator.compress_level="9"
> ENDF
[iyunv@rhel6u3-7 imagick-3.0.1]#
[iyunv@rhel6u3-7 imagick-3.0.1]# mkdir -p /usr/local/cache/ea
[iyunv@rhel6u3-7 imagick-3.0.1]# vim /usr/local/php/etc/php.ini //注意:以下是更改后的内容
expose_php = Off //expose是php的一个参数,关闭它则会显示更少的php消息,以提高安全性。output_buffering是一个缓存有关的参数选项。
extension_dir = "/usr/local/php/lib/php/extensions/no-debug-non-zts-20060613/"
extension = "memcache.so"
extension = "pdo_mysql.so"
extension = "imagick.so"
output_buffering = On
更多php核心参数的配置请参考 [url]http://manual.phpv.net/zh/ini.core.php[/url]
8、优化配置PHP-FPM
PHP-FPM是第三方的FastCGI进程管理器,它是作为PHP的一个补丁来开发的,在安装的时候也需
要和PHP源码一起编译,也就是说PHP-FPM被编译到PHP内核中,因此在处理性能上更加优秀,同
时PHP-FPM在处理高并发方面也比spawn-fcgi引擎好很多,因此,推荐Nginx+php/php-fpm这个组合
对php进行解析
注意:下载软件包版本时,尽量使php和php-fpm版本一致,如果版本之间相差太大,可能会出现兼
容的问题。
[Shell] 纯文本查看 复制代码 [iyunv@rhel6u3-7 ~]# vim /usr/local/php/etc/php-fpm.conf //配置并优化php-fpm,红色部分为修改后的部分,部分注释部分需要取消掉。
<value name="listen_address">192.168.100.107:9000</value> //配置FastCGI进程监听的IP地址以及端口。
<value name="display_errors">1</value> //设置为1显示php错误信息
<value name="user">nginx</value> //设置允许FastCGI运行的用户名为nginx 注意和nginx主配置文件中的指定的用户保持一致
<value name="group">nginx</value> //设置运行FastCGI运行的组名为nginx 注意和nginx主配置文件中的指定的用户保持一致
<value name="max_children">64</value> //设置FstCGI的进程数,根据官方建议,小于2GB内存的服务器,可以只开启64个进程,4GB以上内存的服务器可以开启200个进程
<value name="request_terminate_timeout">0s</value> //设置FastCGI执行脚本的时间,默认是0秒,也就是无限制的执行下去,可以根据情况进行修改
<value name="rlimit_files">65536</value> //通过ulimit –HSn 65536 设置系统文件数打开最大值为65535,这里的设置才能生效。
<value name="max_requests">500</value> //指明了每个children最多处理多少个请求后便会被关闭。
<value name="allowed_clients">192.168.100.107</value> //设置允许访问FastCGI进程解析器的IP地址,如果不在这里指定IP地址,将无法接受Nginx转发过来的PHP解析请求。
[iyunv@rhel6u3-7 imagick-3.0.1]# /usr/local/php/sbin/php-fpm start //启动FastCGI方法1
Starting php_fpm done
[iyunv@rhel6u3-7 imagick-3.0.1]# /usr/local/php/bin/php-cgi –fpm //启动FastCGI方法2 建议采用
[iyunv@rhel6u3-7 imagick-3.0.1]# netstat -antl | grep 9000 //查看监听端口及FastCGI运行程序
tcp 0 0 192.168.100.107:9000 0.0.0.0:* LISTEN
[iyunv@rhel6u3-7 imagick-3.0.1]# ps -ef | grep php-cgi
root 9891 1 0 16:48 ? 00:00:00 /usr/local/php/bin/php-cgi --fpm --fpm-config /usr/local/php/etc/php-fpm.conf
nginx 9892 9891 0 16:48 ? 00:00:00 /usr/local/php/bin/php-cgi --fpm --fpm-config /usr/local/php/etc/php-fpm.conf
nginx 9893 9891 0 16:48 ? 00:00:00 /usr/local/php/bin/php-cgi --fpm --fpm-config /usr/local/php/etc/php-fpm.conf
………..
9、配置Nginx支持PHP-FPM
[Shell] 纯文本查看 复制代码 [iyunv@rhel6u3-7 ~]# vim /usr/local/nginx/conf/nginx.conf //配置网站基本信息,以下只显示主要信息,其他信息可参看Nginx实战基础篇二 Nginx主配置文件参数详解[url]http://dreamfire.blog./418026/1140995[/url] ,当然也可以配置虚拟主机,这里不做介绍。
………………….
server {
listen 80;
server_name 51bbs.rsyslog.org; //网址
location / {
root html;
index index.php index.html;
}
//以下php部分nginx默认配置文档中有打开注释即可
location ~ \.php$ {
root html;
fastcgi_pass 192.168.100.107:9000; //设置监听IP及端口
fastcgi_index index.php;
fastcgi_param SCRIPT_FILENAME /usr/local/nginx/html$fastcgi_script_name; //红色部分为网站绝对路径
include fastcgi_params;
}
………….
[iyunv@rhel6u3-7 ~]# cd /usr/local/nginx/html/
[iyunv@rhel6u3-7 html]# vim index.php //创建一个php主页用于测试php是否能够正常解析nginx的请求,如果出现了php安装配置以及功能列表统计系统,说明php环境安装成功。
<?php
phpinfo();
?>
[iyunv@rhel6u3-7 html]# /etc/rc.d/init.d/nginx restart
nginx: the configuration file /usr/local/nginx/conf/nginx.conf syntax is ok
nginx: configuration file /usr/local/nginx/conf/nginx.conf test is successful
Stopping nginx: [ OK ]
Starting nginx: [ OK ]
10、在DNS上设置A记录,并在客户机上解析是否成功
有关DNS搭建及配置请参看http://dreamfire.blog./418026/1091943
51bbs A 192.168.100.107
测试Nginx对PHP的解析功能


11、优化Nginx中FastCGI的参数
[Shell] 纯文本查看 复制代码 [iyunv@rhel6u3-7 bbs]# vim /usr/local/nginx/conf/nginx.conf //在nginx中添加以下FastCGI优化参数
http {
……..
fastcgi_connect_timeout 300; //指定连接到后端FastCGI的超时时间
fastcgi_send_timeout 300; //指定向FastCGI传送请求的超时时间,这个值是已经完成两次握手后向FastCGI传送请求的超时时间
fastcgi_read_timeout 300; //指定向FastCGI接收请求的超时时间,这个值是已经完成两次握手后向FastCGI传送请求的超时时间
fastcgi_buffer_size 128k; //使用1个128KB的缓冲区读取应答的第一部分
fastcgi_buffers 4 128k; //需要4个128K的缓冲区来缓冲FastCGI的应答请求
fastcgi_busy_buffers_size 256k; //默认值是Fastcig_buffers的两倍
fastcgi_temp_file_write_size 128k; //表示在写入缓存文件时使用多大的数据块,默认值是fastcig_buffers的两倍
fastcgi_intercept_errors on; //记录错误
……..}
以上LNMP环境配置基本完成,现在我们通过搭建一个Discuz论坛来测试LNMP是否能够完美的结合
运转。
12、搭建Discuz论坛
先去Discuz下载最新版的安装包
[Shell] 纯文本查看 复制代码 [iyunv@rhel6u3-7 ~]# unzip Discuz_X2.5_SC_UTF8.zip
[iyunv@rhel6u3-7 ~]# cd upload/
[iyunv@rhel6u3-7 upload]# cp -rfp * /usr/local/nginx/html/ //copy论坛网站部分到nginx网站主目录下
cp: overwrite `/usr/local/nginx/html/index.php'? y
[iyunv@rhel6u3-7 ~]# chown nginx. /usr/local/nginx/html/* -R //修改网站主目录及附属的所有文件和文件夹属主和属组都为nginx
[iyunv@rhel6u3-7 bbs]# /etc/rc.d/init.d/mysqld restart //启动mysql
Starting MySQL......................... SUCCESS!
[iyunv@rhel6u3-7 bbs]# /etc/rc.d/init.d/nginx restart //启动nginx
nginx: the configuration file /usr/local/nginx/conf/nginx.conf syntax is ok
nginx: configuration file /usr/local/nginx/conf/nginx.conf test is successful
Stopping nginx: [ OK ]
Starting nginx: [ OK ]
[iyunv@rhel6u3-7 bbs]# /usr/local/php/sbin/php-fpm restart //启动FastCGI
Shutting down php_fpm .. done
Starting php_fpm done
[iyunv@rhel6u3-7 bbs]#
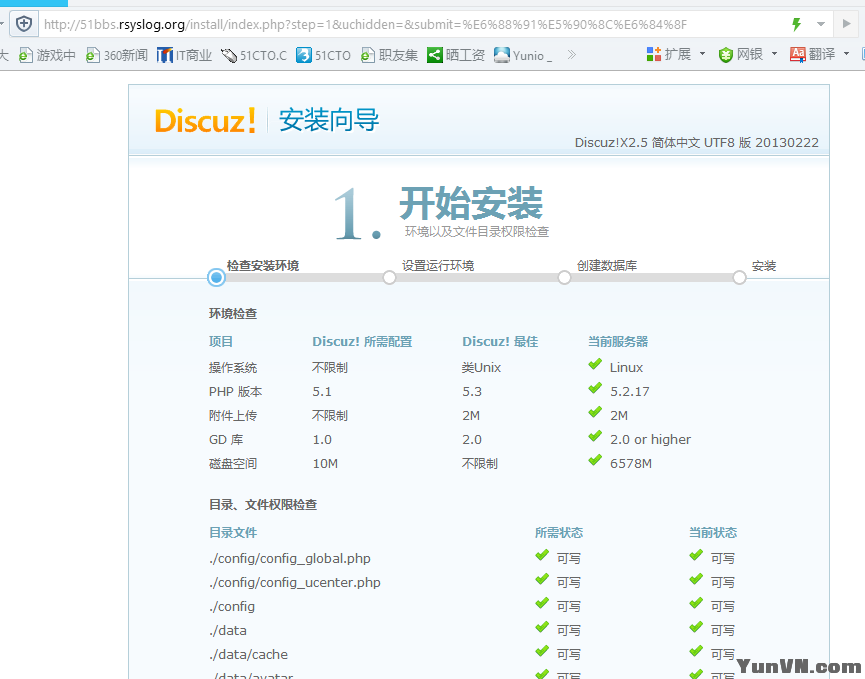
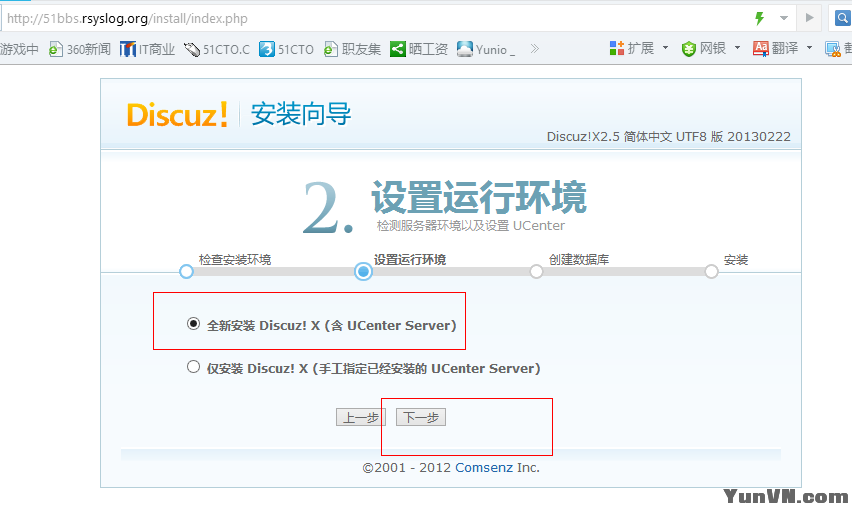
在客户机的浏览器中输入http://51bbs.rsyslog.org/install

注意以下是环境检测,主要看看权限是否满足需求。


数据库名称及密码为创建mysql时候创建的,用于管理创建的数据库51bbs,管理员账户及密码用于
管理论坛。


出现以下页面说明安装成功,由于没有联网,所以未显示出来,呵呵。

通过访问http://51bbs.rsyslog.org 可以尽情访问论坛并发布文章了。

|