在公司内网服务器上面搭建gdk环境,踩了很多坑,历时四五天(中间涉及申请开通固定外网),整理如下:
总览:
操作系统:redhat 6.3
参考文档:https://gitlab.com/gitlab-org/gitlab-development-kit
准备阶段
申请开通网络
registry.npm.taobao.org
registry.yarnpkg.com
yarnpkg.com
upyun.gems.ruby-china.org
nm.ctn.aicdn.com
yum.postgresql.org
download.fedoraproject.org
get.rvm.io
keys.gnupg.net
cache.ruby-china.org
gitlab.com
github.com
gems.ruby-china.org
配置代理/etc/profile中追加:
http_proxy=http://192.168.XX.XX:8080
https_proxy=$http_proxy
no_proxy=XX.XX.XX.XX,XX.XX.XX.XX
export http_proxy https_proxy no_proxy |
新建用户gitdev
user add gitdev
开通sudo权限,在/etc/sudoers后追加:
gitdev ALL=(ALL) ALL
注意:sodu出现环境变量问题引起的命令找不到时,设置secure_path即可。
以下安装都用gitdev用户进行
安装步骤
安装ruby
下载安装包:ruby-2.4.1.tar.gz
tar –xvzf ruby-2.4.1.tar.gz
cd ruby-2.4.1
./configure
make
sudo make install
安装/更新本地的nodejs和npm
下载最新版本的npm和node:http://nodejs.cn/download/
node-v8.2.1-linux-x64.tar.xz
解压
/opt/software/node-v8.2.1-linux-x64
设置环境变量
$ vim /etc/profile
export NODE_HOME=/opt/software/node-v8.2.1-linux-x64
export PATH=$PATH:$NODE_HOME/bin/
配置npm源到公司源(如果没有公司的npm源,可配置到淘宝源):
npm config set registry=https://XXX.XX.com
修改gem源
gem sources --add http://gems.ruby-china.org/ --remove https://rubygems.org/
注意:执行过程中openssl相关报错
安装openssl和openssl-devel
然后到ruby的安装目录执行:
ruby extconfig.rb
make
make install
过程中报错:make: *** No rule to make target `/thread_native.h', needed by `ossl.o'. Stop.
其实是ext/openssl/Makefile中忘了给路径变量top_srcdir赋值,调用的时候当然就报错了,修改 Makefile 增加 top_srcdir = ../..
安装rails
gem install rails –y
测试执行命令时报错:
rails server
rails g controller events
ERROR: Loading command: install (LoadError)
no such file to load -- zlib
进入ruby源码文件夹
安装ruby自身提供的zlib包
#cd ext/zlib
#ruby ./extconf.rb
#make
#make install
来源: <http://blog.csdn.net/kenera/article/details/6524557>
报错信息;
make: *** No rule to make target `/thread_native.h', needed by `ossl.o'. Stop.
解决这个问题,修改 Makefile 增加 top_srcdir = ../.. 即可。
Preparing your computing environment for GDK
进入页面:https://gitlab.com/gitlab-org/gitlab-development-kit/blob/master/doc/prepare.md
页面给出的提示,要仔细阅读并遵照执行,否则会走很多弯路:
Prerequisites for all platforms
If you do not have the dependencies below you will experience strange errors
during installation.
A non-root Unix user, this can be your normal user but DO NOT run the
installation as a root user
Ruby 2.3 (2.3.3 or newer) installed with a Ruby version manager
(RVM, rbenv, chruby, etc.), DO NOT use the
system Ruby
Bundler, which you can install with gem install bundler
Git version of 2.7.X or higher
Node 4.3 or newer and Yarn 0.17 or newer. If your package manage does not
have up-to-date versions of node or yarn available, visit the official
websites for node and yarn for installation instructions.
Go 1.8.3 or newer. If your package manager does not have up-to-date versions
of Go available, visit the official website for go for installation instructions.
找到对应的操作系统安装步骤,本例中是centos,所以,执行centos的安装步骤:
CentOS
页面步骤:
Please read the prerequisites for all platforms.
This is tested on CentOS 6.5:
sudo yum install http://yum.postgresql.org/9.5/redhat/rhel-7-x86_64/pgdg-redhat95-9.5-2.noarch.rpm
sudo yum install https://download.fedoraproject.org/pub/epel/6/x86_64/epel-release-6-8.noarch.rpm
sudo yum install postgresql95-server postgresql95-devel libicu-devel cmake gcc-c++ redis ed fontconfig freetype libfreetype.so.6 libfontconfig.so.1 libstdc++.so.6 nodejs npm re2
sudo npm install phantomjs-prebuilt@2.1.12 -g
bundle config build.pg --with-pg-config=/usr/pgsql-9.5/bin/pg_config
sudo rvm install 2.3
sudo rvm use 2.3
#Ensure your user is in rvm group
sudo usermod -a -G rvm <username>
#add iptables exceptions, or sudo service stop iptables
Install go manually using go official installation instructions.
Install phantomJS manually, or download it and put in your $PATH. For
instructions, follow the Debian guide on phantomJS.
Git 1.7.1-3 is the latest git binary for CentOS 6.5 and GitLab. Spinach tests
will fail due to a higher version requirement by GitLab. You can follow the
instructions found in the GitLab recipes repository to install a newer
binary version of Git.
You may need to install Redis 2.8 or newer manually.
安装实践:
由于是内网环境,有些安装包可能会出现缺失,所以第一次安装不到的后面分批次安装。
yum安装软件1:
$ sudo yum install postgresql95-server postgresql95-devel libicu-devel cmake gcc-c++ redis ed fontconfig freetype libfreetype.so.6 libfontconfig.so.1 libstdc++.so.6 nodejs npm re2
Loaded plugins: product-id, security, subscription-manager |
注意:有些软件服务器所在的yum源没有提供,则后面进行安装,如果已经安装,后面有些步骤可以跳过。
yum安装软件2:
安装postgresql相关
可参考地址:http://www.cnblogs.com/mchina/archive/2012/06/06/2539003.html
包下载地址:https://download.postgresql.org/pub/repos/yum/9.6/redhat/rhel-6.3-x86_64/
按照顺序rpm –ivh安装,也可yum安装
postgresql96-libs-9.6.4-1PGDG.rhel6.x86_64.rpm
postgresql96-9.6.4-1PGDG.rhel6.x86_64.rpm
postgresql96-server-9.6.4-1PGDG.rhel6.x86_64.rpm
postgresql96-devel-9.6.4-1PGDG.rhel6.x86_64.rpm
postgresql96-contrib-9.6.4-1PGDG.rhel6.x86_64.rpm
注意:安装postgresql96-contrib时可能会报却依赖:resource libxslt.so.1()(64bit)
下载libxslt-1.1.26-2.el6_3.1.x86_64.rpm安装,在安装postgresql96-contrib即可。
安装完成 验证即可:
验证步骤可如下:
service postgresql-9.6 initdb #初始化
service postgresql-9.6 start #启动服务
chkconfig postgresql-9.6 on #加入开机自启动
#修改密码为postgres 此步骤只是验证,不是安装gdk环境必须的
# su - postgres
$ psql
# ALTER USER postgres WITH PASSWORD 'postgres';
# select * from pg_shadow ; |
出现相关信息。
验证成功!
yum安装软件3:
安装re2
下载地址:https://mirrors.tuna.tsinghua.edu.cn/epel/6/x86_64/
$sudo yum install re2-20130115-2.el6.x86_64.rpm re2-devel-20130115-2.el6.x86_64.rpm |
安装phantomjs-prebuilt
$ npm install phantomjs-prebuilt@2.1.12 --ignore-scripts |
配置bundle
$ bundle config build.pg --with-pg-config=/usr/pgsql-9.6/bin/pg_config |
安装GO
下载:https://golang.org/doc/install?download=go1.8.3.linux-amd64.tar.gz
解压安装:
$ tar -C /usr/local -xzf go1.8.3.linux-amd64.tar.gz |
设置环境变量:
vim /etc/profile<br>export PATH=$PATH:/usr/local/go/bin |
安装:phantomJS
下载:https://bitbucket.org/ariya/phantomjs/downloads/phantomjs-2.1.1-linux-x86_64.tar.bz2
PHANTOM_JS="phantomjs-2.1.1-linux-x86_64"
cd ~
wget https://bitbucket.org/ariya/phantomjs/downloads/$PHANTOM_JS.tar.bz2
tar -xvjf $PHANTOM_JS.tar.bz2
sudo mv $PHANTOM_JS /usr/local/share
sudo ln -s /usr/local/share/$PHANTOM_JS/bin/phantomjs /usr/local/bin
phantomjs –version |
注:安装成功后,查看版本报错如下:
[iyunv@neptunesitweb12 software]# phantomjs --version
phantomjs: /lib64/libz.so.1: no version information available (required by phantomjs)
2.1.1
解决:zlib没有安装或者版本太低,本次安装是由于版本太低:
wget http://zlib.net/zlib-1.2.7.tar.gz
tar zxvf zlib-1.2.11.tar.gz
cd zlib-1.2.11
./configure
make
make install |
覆盖原来的:
cp libz.so.1 /lib/libz.so.1.2.3
cp libz.so.1 /lib64/libz.so.1.2.3
[iyunv@neptunesitweb12 zlib-1.2.11]# phantomjs --version
2.1.1
安装git
版本需要 >=1.7.1-3
本次安装版本:2.10.2,
准备软件: git-2.10.2.tar.gz
安装依赖:
$ sudo yum install curl-devel expat-devel gettext-devel openssl-devel zlib-devel gcc perl-ExtUtils-MakeMaker |
解压
$ tar –xvzf git-2.10.2.tar.gz
$ cd git-2.10.2
$ make prefix=/usr/local/git all
$ sudo make prefix=/usr/local/git install |
设置环境变量
$ vim /etc/profile
export PATH=/usr/local/git/bin:$PATH |
验证查看版本:
$ git --version<br>git version 2.10.2 |
安装redis
要求版本 >=2.8
下载地址:http://www.redis.net.cn/download/
redis-3.0.6.tar.gz
$ tar –xvzf redis-3.0.6.tar.gz
$ cd redis-3.0.6
$ make test
$ make prefix=/usr/local/redis install |
过程中报错:
Hint: It's a good idea to run 'make test' ;) 可忽略
修改环境变量
$ vim /etc/profile
export PATH=/usr/local/redis/bin:$PATH
$ source /etc/profile |
执行启动命令redis-server
测试redis 命令redis-cli
redis-cli -h 10.37.87.253 -p 6379 -a "sn123456"
10.37.87.253:6379> set mykey "chiwei"
Set up GDK
此步骤过程中不能用root执行时,要切换到非root用户,本次安装使用gitdev用户
安装gdk
$ gem install gitlab-development-kit |
初始化项目&执行安装
gdk init gdk-ee
cd gdk-ee
echo 3001 > port
echo 3809 > webpack_port
echo XX.XX.XX.XXX >host #此步骤可根据个人需要,默认是localhost
gdk install gitlab_repo=https://gitlab.com/gitlab-org/gitlab-ee.git |
解释:
gem install gitlab-development-kit 安装软件
gdk init [可以跟项目名称,也可以不跟,不跟默认为gitlab-development-kit]
gdk install #下载代码 https://gitlab.com/gitlab-org/gitlab-ce.git gitlab
过程中bundle报错如下:
由于本次安装服务器不能连外网,所以可切换到已经开了白名单的gem源gems.ruby-china.org, 修改Gemfile中的源到gems.ruby-china.org
$ vim gitlab/Gemfile
source 'https://gems.ruby-china.org'
$ vim gitlab/Gemfile.lock
source 'https://gems.ruby-china.org' |
过程中提示缺少安装的组件,一一安装即可:
本例中层提示如下:
gem install charlock_holmes -v '0.7.3'
gem install ffi -v '1.9.10'
gem install rubocop-rspec
gem install charlock_holmes -v '0.7.3'
注:安装报错,icu required (brew install icu4c or apt-get install libicu-dev)
解决办法:下载安装libicu-devel-4.2.1-14.el6.x86_64.rpm
libicu-4.2.1-14.el6.x86_64.rpm
下载地址:http://www.rpmfind.net/linux/rpm2html/search.php?query=libicu%28x86-64%29&submit=Search+...&system=centos&arch=
安装命令:
$ yum install libicu-4.2.1-14.el6.x86_64.rpm libicu-devel-4.2.1-14.el6.x86_64.rpm |
再执行下面命令即可:
$ gem install charlock_holmes -v '0.7.3' -- --with-icu-lib=/usr/lib64 |
gem install rugged -v '0.26.0'
报错,需要升级cmake版本到2.8以上
下载cmake: https://cmake.org/files/v2.8/
解压编译安装设置环境变量
$ cmake --version
cmake version 2.8.11.2 |
报错:Yarn executable was not detected in the system.
安装yarn
npm install yarn –g
切换源到淘宝源
$ yarn config set registry https://registry.npm.taobao.org |
报错:LoadError:cannot load such file --readline
解决办法:找打gems安装路径下的byebug-9.0.6/lib/byebug/history.rb
注掉require 'readline'
报错:Authentication is required for http://rubygems.org/
Please supply credentials for this source....
解决办法:修改:/opt/software/gitlab-development-kit/gitlab-shell
下的Gemfile.lock Gemfile中的rubygems到http://gems.ruby-china.org源
执行报错:
make:pg_config :Command not found
解决办法:postgresql没有安装或者没有配置环境变量
确认已经安装,即配置环境变量
解决完诸多报错之后,后面还会进行一些数据库的初始化、redis的初始化操作,都是有命令自动完成的,耐心等待即可。出现下面的setup finished,恭喜你,安装成功了。
*********************************************
************** Setup finished! **************
*********************************************
cat HELP
# GitLab Development Kit cheat sheet
gdk run # Start everything
gdk run db # Start enough to run tests
gdk run app # Start GitLab, needs 'gdk run db'
gdk install gitlab_repo=https://my-fork # Install everything
gdk update # Pull application changes from Git
gdk reconfigure # Delete and regenerate all config files created by GDK
gdk psql -d gitlabhq_development # Postgres console
gdk redis-cli # Redis console
# Development admin account: root / 5iveL!fe
For more information about GitLab development see
https://docs.gitlab.com/ce/development/README.html.
*********************************************
git clone https://gitlab.com/gitlab-org/gitaly.git gitaly/src/gitlab.com/gitlab-org/gitaly
Cloning into 'gitaly/src/gitlab.com/gitlab-org/gitaly'...
remote: Counting objects: 6183, done.
remote: Compressing objects: 100% (3453/3453), done.
remote: Total 6183 (delta 2935), reused 5057 (delta 2280)
Receiving objects: 100% (6183/6183), 6.13 MiB | 1.56 MiB/s, done.
Resolving deltas: 100% (2935/2935), done.
GO15VENDOREXPERIMENT=1 GOPATH=/opt/chenyu/gdk-geo/gitaly go install gitlab.com/gitlab-org/gitaly/cmd/...
sed \
-e "s|^socket_path.*|socket_path = \"/opt/chenyu/gdk-geo/gitaly.socket\"|" \
-e "s|# prometheus_listen_addr|prometheus_listen_addr|" \
-e "s|/home/git|/opt/chenyu/gdk-geo|" gitaly/src/gitlab.com/gitlab-org/gitaly/config.toml.example > gitaly/config.toml
ln -s /opt/chenyu/gdk-geo/gitaly/src/gitlab.com/gitlab-org/gitaly/ruby gitaly/ruby
gdk run
在项目/opt/chenyu/gdk-ee下执行:
顺利的话,出现如下log,即启动成功:
21:07:19 rails-background-jobs.1 | resque:gitlab:queue:export_csv
21:07:19 rails-background-jobs.1 | resque:gitlab:queue:git_garbage_collect
21:07:19 rails-background-jobs.1 | resque:gitlab:queue:update_user_activity
21:07:19 rails-background-jobs.1 | resque:gitlab:queue:elastic_indexer
21:07:19 rails-background-jobs.1 | resque:gitlab:queue:admin_emails
21:07:19 rails-background-jobs.1 | resque:gitlab:queue:irker
21:07:19 rails-background-jobs.1 | resque:gitlab:queue:authorized_projects
21:07:19 rails-background-jobs.1 | resque:gitlab:queue:expire_build_instance_artifacts
21:07:19 rails-background-jobs.1 | resque:gitlab:queue:use_key
21:07:19 rails-background-jobs.1 | resque:gitlab:queue:elastic_batch_project_indexer
21:07:19 rails-background-jobs.1 | resque:gitlab:queue:project_destroy
21:07:19 rails-background-jobs.1 | 2
....... |
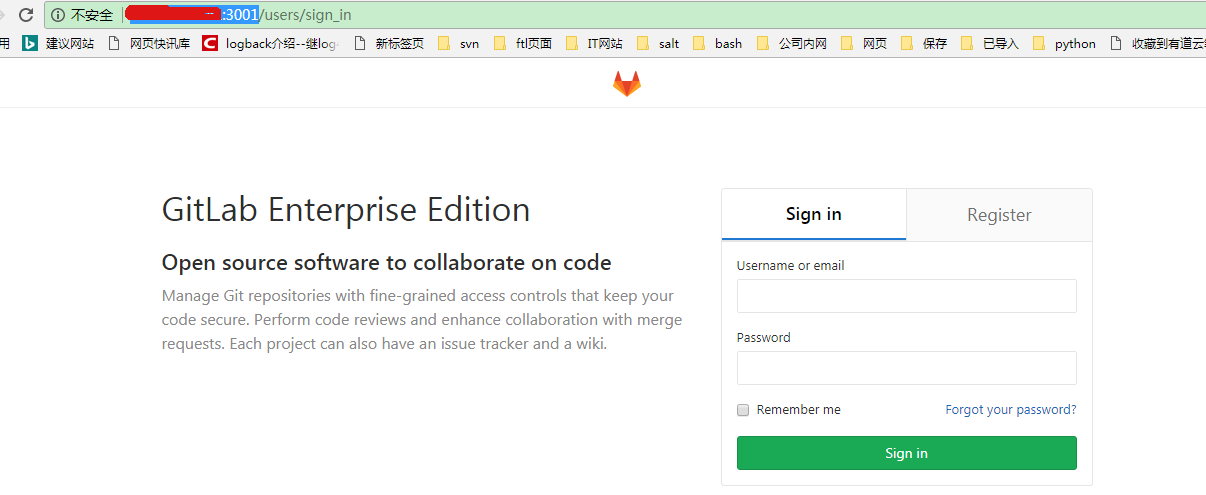
此时,访问http://ip:3001 即出现gitlab的登录页面:
恭喜你,安装成功~~
其他的报错和解决办法如下:
缺包:
exec gitaly/bin/gitaly /opt/gitDEV/gdk-ee/gitaly/config.toml执行的时候报错
# gem install grpc -v '1.4.1'
gem install gitaly -v '0.19.0'
npm install webpack-dev-server –g
npm install webpack –g
ActiveRecord::StatementInvalid: PG::UndefinedFile: ERROR: could not open extension control file "/usr/pgsql-9.5/share/extension/pg_trgm.control": No such file or directory
: CREATE EXTENSION IF NOT EXISTS "pg_trgm"
手动执行MakeFile中的第三步骤
报错:realpath:command not found
解决:
echo '/usr/bin/readlink -e "$@"' > /usr/local/bin/realpath ; chmod +x /usr/local/bin/realpath
再次执行:成功 |  QQ群⑧:
QQ群⑧:


 窥视卡
窥视卡 雷达卡
雷达卡 发表于 2018-1-12 13:06:44
 提升卡
提升卡 置顶卡
置顶卡 沉默卡
沉默卡 喧嚣卡
喧嚣卡 变色卡
变色卡 千斤顶
千斤顶 显身卡
显身卡