|
|
VMware Horizon View enables users to access virtual desktops and applications through a single pane of glass. There have been many improvements added to the release of Horizon View 7 such as Blast Extreme protocol, Instant Clone, enhanced security and policy management. VMware Horizon 7 What’s New. In this blog series I will be going through installation and configuration of Horizon View 7 in my lab environment.
vBoring Blog Series:
- VMware Horizon View 7: Deployment and Installation
- VMware Horizon View 7: Apply SSL Certificates
- VMware Horizon View 7: Create Events Database
- VMware Horizon View 7: Add Microsoft RDS Farm
- VMware Horizon View 7: Setup Remote Access through Security Server
- VMware Horizon View 7: Create Master Desktop Template
- VMware Horizon View 7: Automated Desktop Pool
- VMware Horizon View 7: Instant Clone Desktop Pool
 Horizon View Components
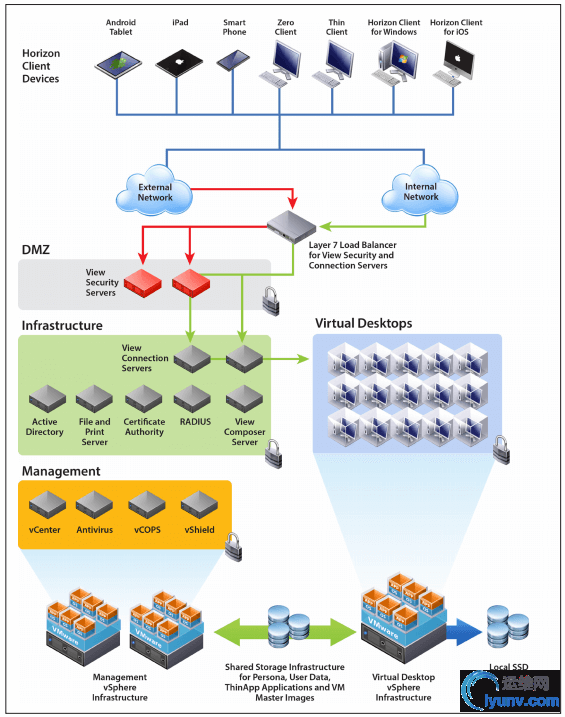
Horizon View 7 Components:
- Connection Server (AKA Standard Server): This is the core component of View. This is the first role to be installed and where the View Administrator Console is housed. The Connection Server is where you define View desktop pools, applications, permissions, etc.
- Replica Server: After the initial Connection Server additional Connection Servers are considered Replicas. Their purpose is to provide redundancy and load balancing thus providing availability.
- Security Server: The security server is placed in the DMZ allowing external users to securely access Horizon View on the internal network from the internet.
- Enrollment Server: Used to create ‘True-SSO’, not covered in this blog series, will be added at a later date.
- Composer Server: When installed it enables the use of Linked Clones, not covered in the blog series yet. Instant Clones were introduced with Horizon View 7 which is the Linked Clone successor.
- View Agent: When installed on a Server or Workstation, it enables Horizon View to use it as a resource.
Hardware Requirements:
You will need a minimum of two servers, one for Connection and the other for Security Server roles. I used Server 2012 R2 with 2 vCPU, 4 GB of memory, and a static IP address on each. You can scale the resources depending on the needs of your environment.
Installing the Connection Server:
The first View component to be installed is the Connection Server. Login to the server you have designated to be the Connection Server and launch the installer.
Note: The same executable is used to install both Connection and Security Server services which makes things easier!
Click Next:
The EULA must be accepted to continue. Click Next:
Change the installation directory if applicable. Click Next:
Select the Horizon 7 Standard Server, check the box labeled Install HTML access (HTML access uses the Blast Protocol to enable access to your View resources straight from a web browser, very cool!), select your network protocol (IPv4)then click Next:
Note: If you wish to expand past the first Standard/Connection Server you would install Replica servers.
Enter a password for the backups that View creates. Click Next:
Note: Make sure you keep this password in a safe place in case you need to do a restore from backup!
Ensure the listed firewall ports are open. Click Next:
Since my server is on a domain I created an Active Directory group for my View Admins. Click Next:
Check the box if you wish to participate in the User Experience Improvement Program. Click Next:
Click Install to kick off the installation!
Once complete click Finish:
Creating Pairing Password for Security Server Installation:
Before we can install the security server we must create a pairing password. On the desktop there is a new icon, launch it:
You can also open a browser and access the Administrator Console by going to:
https://{FQDN of Connection Server or IP Address}/admin Login using an account that has permissions given during the installation.
Welcome to the Horizon View 7 Administrator Console! You will perform all View setup and administration from here. To create the pairing password go to Servers -> Connection Servers tab -> More Commands -> Specify Security Server Pairing Password…
On the pop up window, enter a password and select a timeout period then click Ok:
Now, login to the server you designed as the Security Server instance and launch the same installer that was used for the Connection Server.
On the Installation Options screen select the Horizon 7 Security Server option, select your network protocol (IPv4) then click Next:
Enter the hostname or IP address of your Connection Server then click Next:
Enter the pairing password you created above. Click Next:
You can leave this default, we will edit this at a later step. Click Next:
Ensure the listed firewall ports are open. Click Next:
Click Install:
Once finished switch back over to the Click Next:. Under Servers -> Security Servers tab you will now see your Security Server that is paired to your Connection Server.
Add vCenter to your Horizon View Setup:
View needs a vCenter! To add vCenter go to Servers -> vCenter Servers -> Add:
On the pop up window, enter your vCenter information then click Next:
If you are still using unsigned certificates you will get the following popup. Click View Certificate:
Click Accept:
I am skipping View Composer and going to use Instant Clone. I might circle back and complete a View Composer post. For now proceed without using View Composer. Click Next:
Instant Clones requires Storage Accelerator be enabled. Click Next:
Click Finish:
Your vCenter server should now be populated:
Add License to View:
To license View click Product Licensing and Usage -> Edit License:
Enter your product key then click OK:
View is now licensed
Proceed to the next step:
VMware Horizon View 7: Apply SSL Certificates
|
|