|
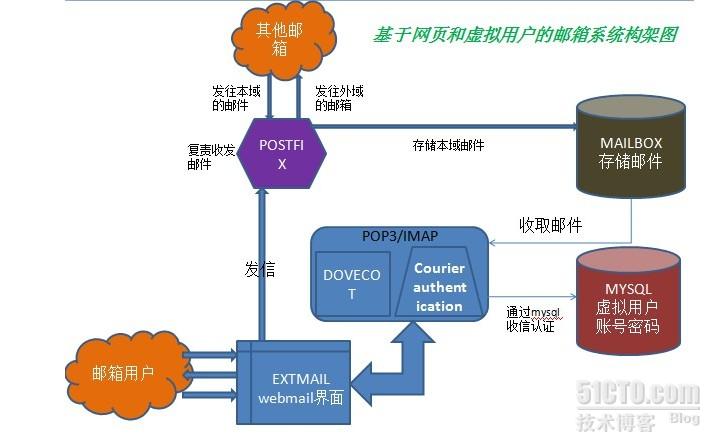
postfix系统的结构图,我们将按照这个图来部署我们的postfix的邮件服务器 每个软件包的安装都是一步。

mysql数据库的安装
我这里用的版本是mysql-5.1.69.tar.gz 在mysql的官方网站可以下载,而且用的系统是centos 5.9 (1)解压mysql-5.1.69.tar.gz [iyunv@centos ~]# tar zxvf mysql-5.1.69.tar.gz
(2) 检查创建mysql用户和组 [iyunv@centos ~]# id mysql 检查发现没有mysql用户
id: mysql: No such user
[iyunv@centos ~]# useradd -s /sbin/nologin -d /dev/null mysql
useradd: warning: the home directory already exists.
Not copying any file from skel directory into it. 一般不需要mysql登陆,所以也没有给家目录
(3)mysql的编译安装 安装之前必须要有编译安装的工具 gcc等 [iyunv@centos mysql-5.1.69]# ./configure --prefix=/usr/local/mysql --with-charset=utf8
./configure出了问题 最后几行出了错。完整错误信息如下: checking for tgetent in -lncurses... no checking for tgetent in -lcurses... no checking for tgetent in -ltermcap... no checking for tgetent in -ltinfo... no checking for termcap functions library... configure: error: No curses/termcap library found 原因: 缺少ncurses安装包 ncurses 提供字符终端处理库,包括面板和菜单。 解决办法: 下载安装相应软件包 [iyunv@centos mysql-5.1.69]# yum -y install ncurses-devel 如果出现如下提示证明configure成功了
Thank you for choosing MySQL!
Remember to check the platform specific part of the reference manual
for hints about installing MySQL on your platform.
Also have a look at the files in the Docs directory.
make && make install MYSQL安装到这里卡了很久,是不是你觉得认为死机,程序安装错误了?聪明的你可能发现了,实际MYSQL已经安装成功了,它这步过段时间就会好了,但你知道是什么原因吗?哈哈告诉你吧“这是mysql在自我编译测试造成的“。所以耐心的等 make[2]: Entering directory `/down/webinstall/mysql-5.1.57/mysql-test
make[3]: Entering directory `/down/webinstall/mysql-5.1.57/mysql-test
make[3]: Nothing to be done for `install-exec-am.
make INSTALL_TO_DIR="/usr/local/mysql/mysql-test" install_test_files
make[4]: Entering directory `/down/webinstall/mysql-5.1.57/mysql-test mysql配置文件 [iyunv@centos mysql-5.1.69]# cp support-files/my-medium.cnf /etc/my.cnf
mysql的开机启动
[iyunv@centos mysql-5.1.69]# cp support-files/mysql.server /etc/init.d/mysqld
[iyunv@centos mysql-5.1.69]# chmod 700 /etc/init.d/mysqld
[iyunv@centos mysql-5.1.69]# chkconfig --list |grep mysqld
[iyunv@centos mysql-5.1.69]# chkconfig --add mysqld
初始化数据库生成var目录
]# /usr/local/mysql/bin/mysql_install_db --user=mysql
修改/usr/local/mysql下文件属主和属组
除了var目录的属主和属组都为mysql外,其余的只需要将属组设为mysql即可
[ root@centos ~]# chown -R root:mysql /usr/local/mysql/
[iyunv@centos ~]# chown -R mysql:mysql /usr/local/mysql/var/
mysql/ mysql-bin.000002 test/
mysql-bin.000001 mysql-bin.index
[iyunv@centos ~]# chown -R mysql:mysql /usr/local/mysql/var/
启动mysql
/usr/local/mysql/bin/mysqld_safe --user=mysql &
service mysqld restart ps aux |grep mysqld netstat -anpt |grep 3306
|