|
|
典型的家庭设置可能涉及运行用户在离开家庭或办公室时想要获得的许多服务,例如监控摄像头、媒体收藏和系统监控工具。可以打开防火墙端口来远程访问所有本地服务,但暴露超过绝对必要的数量会增加未经授权的***风险。我在我的网络中提供一个安全的单个***隧道,可以访问我所有的本地服务。本指南将演示如何配置pfSense和iOS设备以实现对内部服务器的远程访问。
外部DNS
大多数家庭互联网连接通过动态IP地址提供服务而不是静态IP地址,为了使我们能够定位我们的网络,我们需要在pfSense中设置动态DNS服务,并可以使用我们的本地WAN地址在更改时实时更新。pfSense支持许多动态DNS提供商,请导航至Services > DynamicDNS,然后打开服务类型下拉菜单进行选择。
在本教程中,我将使用Amazons Route 53做为我的动态DNS提供商。我们将在Route53的DNS服务中为access.nguvu.org创建一个测试DNS条目,该条目将使用我的WAN地址进行更新。根据你选择的动态DNS服务,你的授权设置可能会不尽相同。
动态DNS
导航至 Services > Dynamic DNS
- 点击 Add
- Service Type: Route53
- Interface to monitor - WAN
- Hostname: access.nguvu.org
- MX: Blank
- Wildcards: [ ]
- Verbose logging: [ ]
- HTTP API SSL Options: [ ]
Username: Route53 Access Key>
- Password: Route53 Secret Access Key
- Password Confirm: Route53 user Secret Access Key again
Zone>
- TTL: 300
- Description: SOHO WAN
- 单击Save & Force Update
Route53动态DNS设置
如果一切正确,您的动态DNS记录应该更新为WAN接口的记录。我们将在后面的***隧道连接设置中使用此记录。
配置Route53动态DNS
从命令行执行DNS查找以验证是否正确返回了正确的地址(我已经对下面的地址响应进行了混淆处理)
$ nslookup access.nguvu.org
Server: 8.8.8.8
Address: 8.8.8.8#53
Non-authoritative answer:
Name: access.nguvu.org
Address: 1.2.3.4
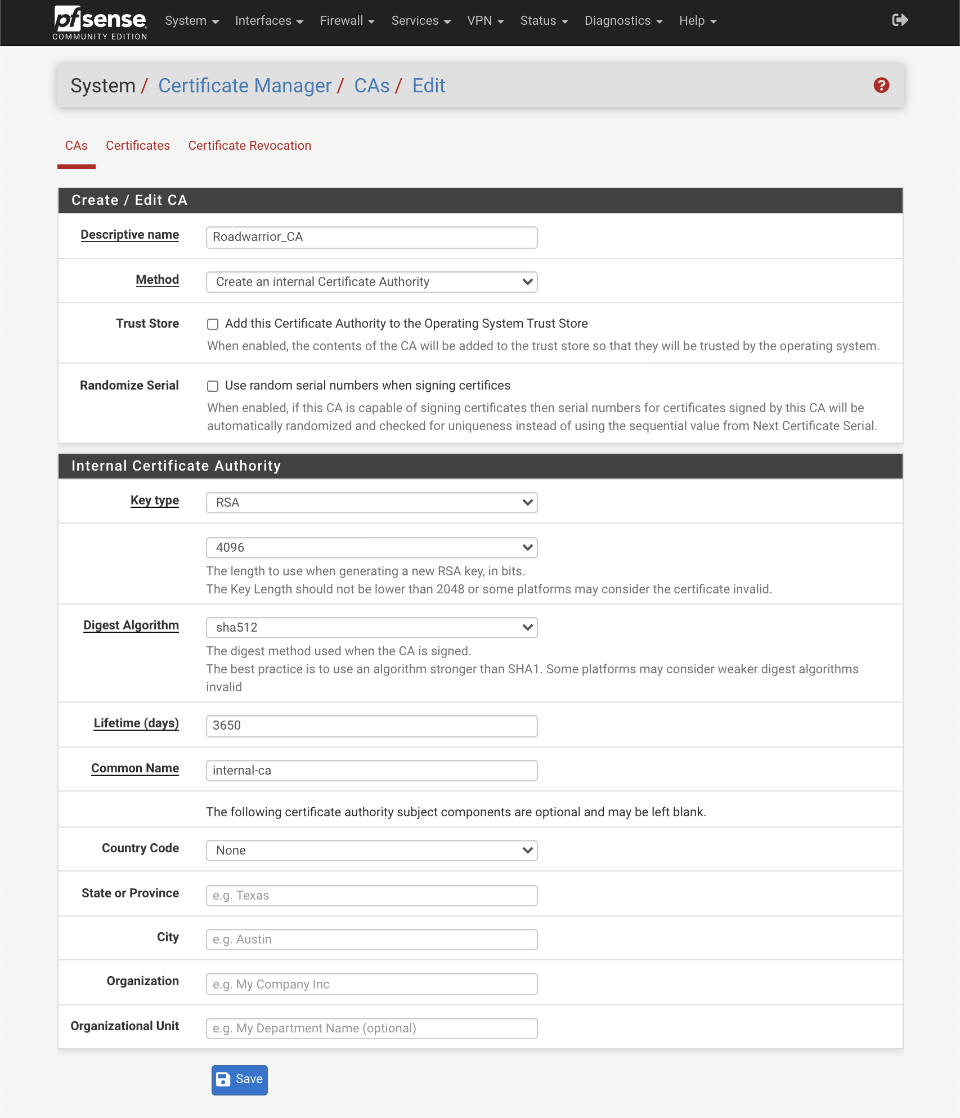
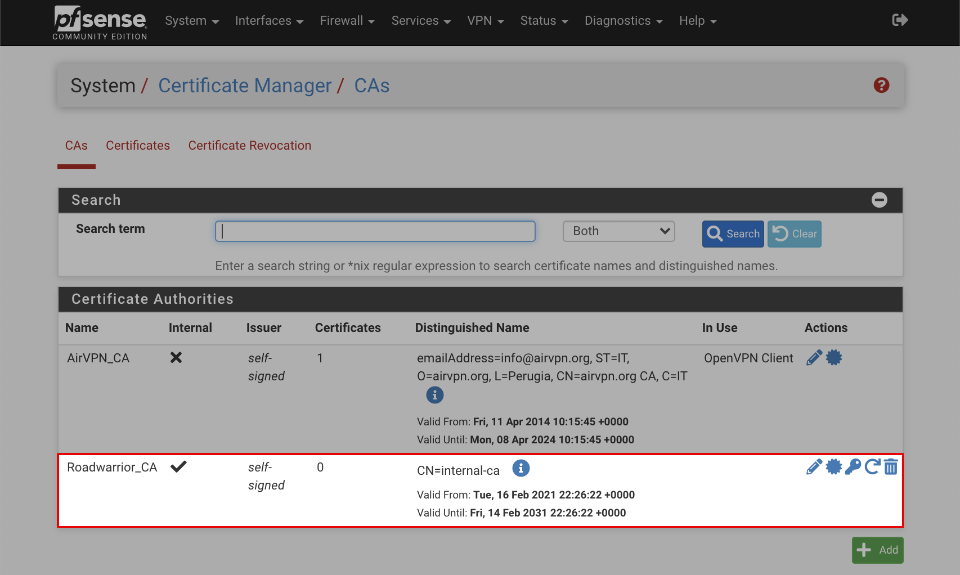
创建'roadwarrior'认证中心
为了确保能访问我们的SOHO网络,我们需要创建一个证书颁发机构来验证试图访问的设备。
导航到System > Cert Manager > CAs
创建/编辑CA
- Descriptive Name = Roadwarrior_CA
- Method = Create an Internal Certificate Authority
Internal Certificate Authority(内部认证机构)
- Key Length = 4096
- Digest Algorithm = SHA256
- Lifetime (Days) 3650
- Country Code = Your country
- State or province = Your State
- City = Your City
- Organization = Your Organisation
- e-mail Address = Your email
- Common Name = internal-ca
- 单击Save
创建内部认证机构
完成后如下图所示。
内部认证机构
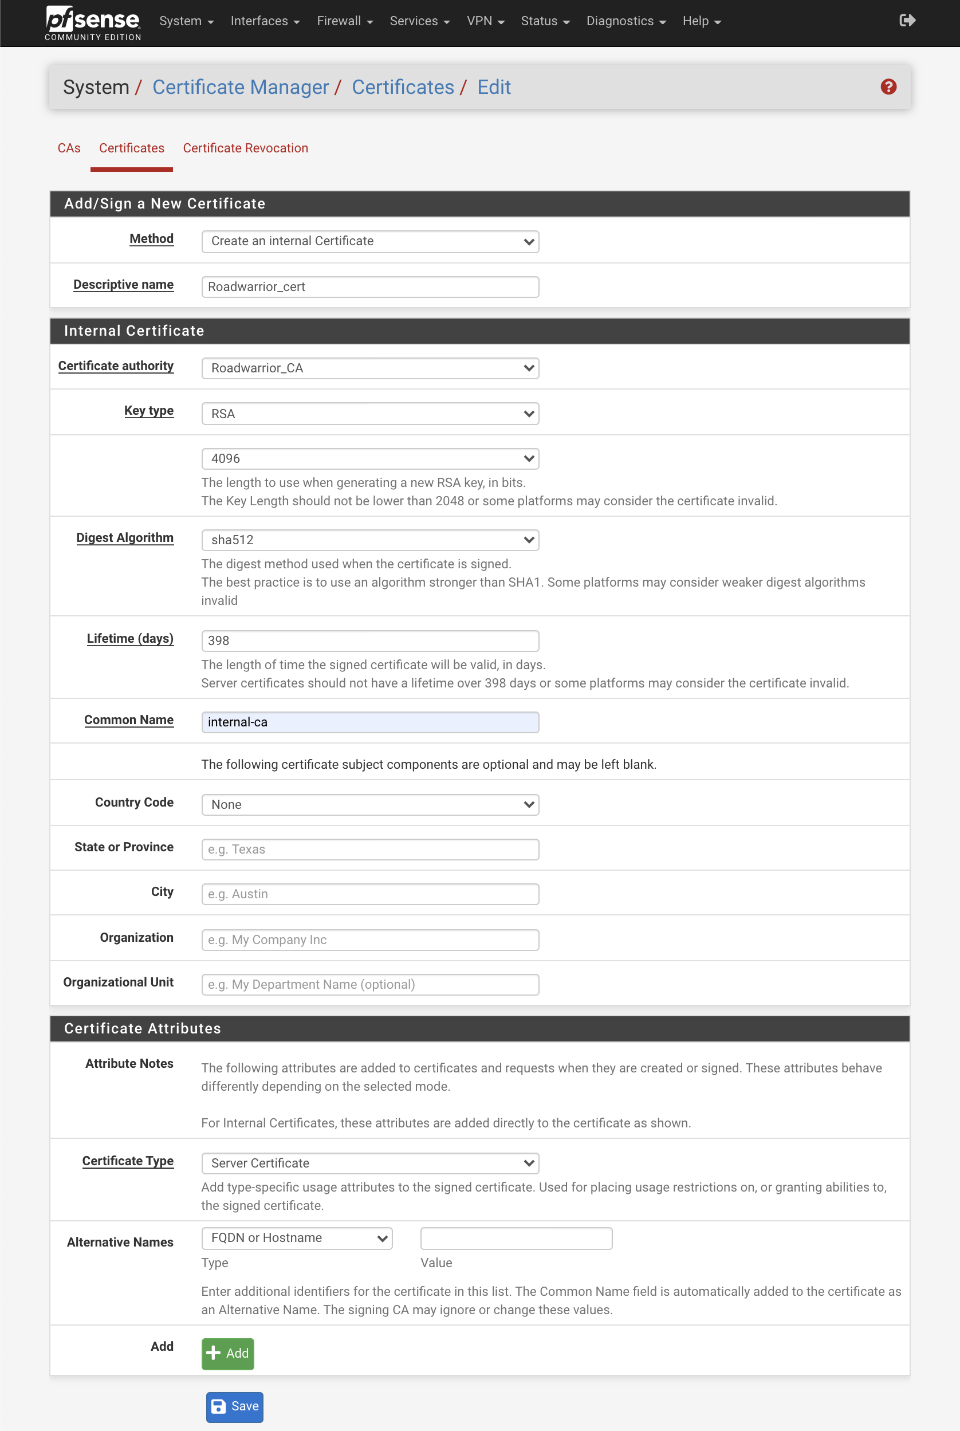
创建'roadwarrior'证书
导航到System > Cert Manager > Certificates
选择Create an internal certificate(创建一个内部证书)
Add a new certificate(添加一个新的证书)
- Descriptive name: Roadwarrior_cert
Internal Certificate(内部证书)
- Certificate authority = Roadwarrior_CA
- Key Length = 4096
- Digest Algorithm = SHA256
- Lifetime (Days) 3650
- Country Code = Your country
- State or province = Your State
- City = Your City
- Organization = Your Organisation
- e-mail Address = Your email
- Common Name = roadwarrior_cert
- Alternative names = FQDN or Hostname “pfsense.local.lan”
Certificate Attributes(证书属性)
- Certificate Type = Server certificate
- Alternative names
- Type: FQDN or Hostname
- Value: empt
- Save
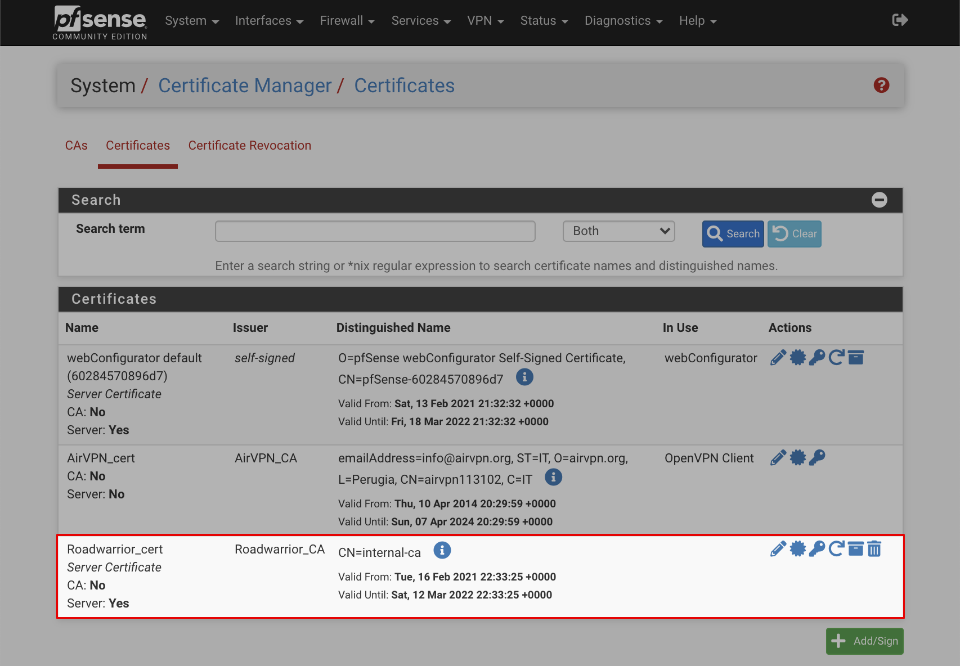
创建roadwarrior证书
完成后如下图所示。
创建roadwarrior证书
创建一个证书吊销列表
如果你需要过期任何证书,那必须要一个证书吊销清单。
导航到 System > Certificates > Certificate Revocation
- 在Roadwarrior_CA旁边,点击添加或导入CRL
- Method = Create an internal Certificate Revocation List
- Descriptive name = Roadwarrior_CRL
- Certificate Authority: Roadwarrior_CA
Internal Certificate Revocation List(内部证书吊销列表)
- Lifetime Days = 9999
- Serial 0
- 单击 Save
创建Open***服务器
现在我们将创建远程设备将连接到的Open***服务器。我们将从默认端口1194更改为443,因为此端口通常在远程网络上关闭。
导航到*** > Open*** > Server
点击+Add
General Information(常规信息)
- Disabled = [ ]
- Server Mode = Remote Access (SSL/TLS)
- Protocol = UDP on IPv4 only
- Device mode = tun Layer 3 Tunnel Mode
- Interface = WAN
- Port = 443
- Description = Roadwarrior ***
Cryptographic settings(加密设置)
- TLS Configuration = [x]
- Automatically generate a shared TLS authentication key = [x]
- Peer certificate authority = Roadwarrior_CA
- Peer certificate revocation list = Roadwarrior_CRL (CA: Roadwarrior_CA)
- Server certificate = Roadwarrior_cert (Server Yes, CA: Roadwarrior_CA)
- DH Parameter Length = 2048 bits
- ECDH curve= default
- Encryption Algorithm = AES-256-CBC (256-bit, 128 bit block)
- Enable NCP = [x]
- Allowed NCP Encryption algoriths: AES-256-GCM, AES-256-CBC Top to bottom and order is important
- Auth Digest algorithm = SHA1 (160bit)
- Hardware crypto = Intel RDRAND engine - RAND
- Certificate Depth = One (Client + Server)
Tunnel Settings(隧道设置)
- IPv4 Tunnel = 192.168.200.0/24
- IPv6 Tunnel = blank
- Redirect Gateway = [x] Force all client generated traffic through the tunnel.
- Concurrent Connections = 10
- Compression = Adaptive LZO Compressions
- Push compression = [x]
- Type-of-service = [ ]
- Inter-client communication = [ ]
- Duplicate Connection = [ ]
Client Settings(客户端设置)
- Dynamic IP = [x]
- Topology = Subnet - One IP address per client in common subnet
Advanced Client Settings(高级客户端设置)
- DNS Default Domain = [x]
- DNS Default Domain = local.lan
- DNS Server enable = [x]
- DNS Server 1 = 192.168.200.1
- DNS Server 2 = empty
- DNS Server 3 = empty
- DNS Server 4 = empty
- Block Outside DNS = [x]
- Force DNS cache update = [x]
- NTP Server Enable = [x]
- NTP Server 1 = 192.168.200.1
- NTP Server 2 = blank
- NetBIOS enable = [ ]
Advanced Configuration(高级配置)
- Custom options = mute-replay-warnings如果你在日志中看到大量重播警告,则可能需要
- UDP Fast I/O = [x]
- Send/receive buffer = 512KiB
- Verbosity level: default
- Save
创建Open***服务器
分配Open***接口
我们现在可以基于我们前面创建的Open***服务器创建一个接口。
- 导航到Interfaces > Assign
- 选择'o***s4(Roadwarrior ***)'
- 点击Add
点击Roadwarrior ***网络端口旁边的OPTx界面
- Enable = [√]
- Description = RW_***
- IPv4 Configuration Type = None
- IPv6 Configuration Type = None
- Mac controls : Blank
- MTU = blank
- MSS = blank
- Block private networks = [ ]
- Block bogon networks = [ ]
- Save & Apply changes
保存后如下图所示。
***服务器接口
分配Open***服务器路由
导航到System > Routing
点击RW_***_***V4网关旁边的“copy gateway(复制网关)”图标
- Disabled = [ ]
- Interface = RW_***
- Address Family = IPv4
- Name = RW_***
- Gateway = Dynamic
- Default Gateway = [ ]
- Gateway Monitoring = [ ]
- Gateway Action = [ ]
- Monitor IP = 8.8.8.8 或使用其他可靠的公共DNS服务器
- Description = Interface RW_*** Gateway
- Save & Apply
配置***服务器网关
设置RW_***防火墙规则
在Open***服务器接口上设置规则以允许进行以下访问
- 允许ping进行网络诊断
- 只允许在批准的端口(Allowed_OUT_ports_LAN)上访问我的本地子网(LOCAL_SUBNETS)
- 只允许通过我的***网关组在允许的端口上进行互联网访问(Allowed_OUT_ports_WAN)
导航到Firewall > Rules并选择RW_***
允许Ping进行网络诊断
- Click ‘↴+’
- Action: Pass
- Disabled = [ ]
- Interface: RW_***
- Address Family: IPv4
- Protocol: ICMP
- ICMP Type = Any
- Source: RW_*** net
- Destination: Any
- Log: [ ]
- Description: RW_***: Pass ICMP
- 单击 [Save]
只允许在批准的端口(Allowed_OUT_ports_LAN)上访问我的本地子网(LOCAL_SUBNETS)
- Click ‘↴+’
- Action: Pass
- Disabled = [ ]
- Interface: RW_***
- Address Family: IPv4
- Protocol: TCP/UDP
- Source: RW_*** net
- Destination:
- invert match: [ ]
- Single host or alias
- LOCAL_SUBNETS
- Destination Port Range:
- From: Other
- Custom: Allowed_OUT_ports_LAN
- To: Other
- Custom: Allowed_OUT_ports_LAN
- Log: [ ]
- Description: RW_***: Pass local traffic
- 单击 [Save]
只允许通过我的***网关组在允许的端口上进行互联网访问(Allowed_OUT_ports_WAN)
- Click ‘↴+’
- Action: Pass
- Disabled = [ ]
- Interface: RW_***
- Address Family: IPv4
- Protocol: TCP/UDP
- Source: RW_*** net
- Destination:
- Invert Match: [√]
- Single host or alias
- Address: LOCAL_SUBNETS
- Destination Port Range:
- From: Other
- Custom: Allowed_OUT_ports_WAN
- To: Other
- Custom: Allowed_OUT_ports_WAN
- Log = [ ]
- Description: RW_***: Pass approved internet via ***_GROUP
- Click Advanced Options
- Gateway: ***_Group
- 单击[Save]
默认阻止并记录IPv4
- Click ‘↴+’
- Action: Reject
- Disabled = [ ]
- Interface: RW_***
- Address Family: IPv4
- Protocol: any
- Source: Any
- Destination: Any
- Log: [√]
- Description: RW_***: Default reject IPv4
- 单击 [Save]
默认阻止IPv6
- Click ‘↴+’
- Action: Reject
- Disbaled = [ ]
- Interface: RW_***
- Address Family: IPv6
- Protocol: any
- Source: Any
- Destination: Any
- Log: [ ]
- Description: RW_***: Default reject IPv6
- 单击 [Save]
完成后,您的RW_***接口应该如下图所示。
配置***防火墙规则
允许WAN端口使用Open***访问
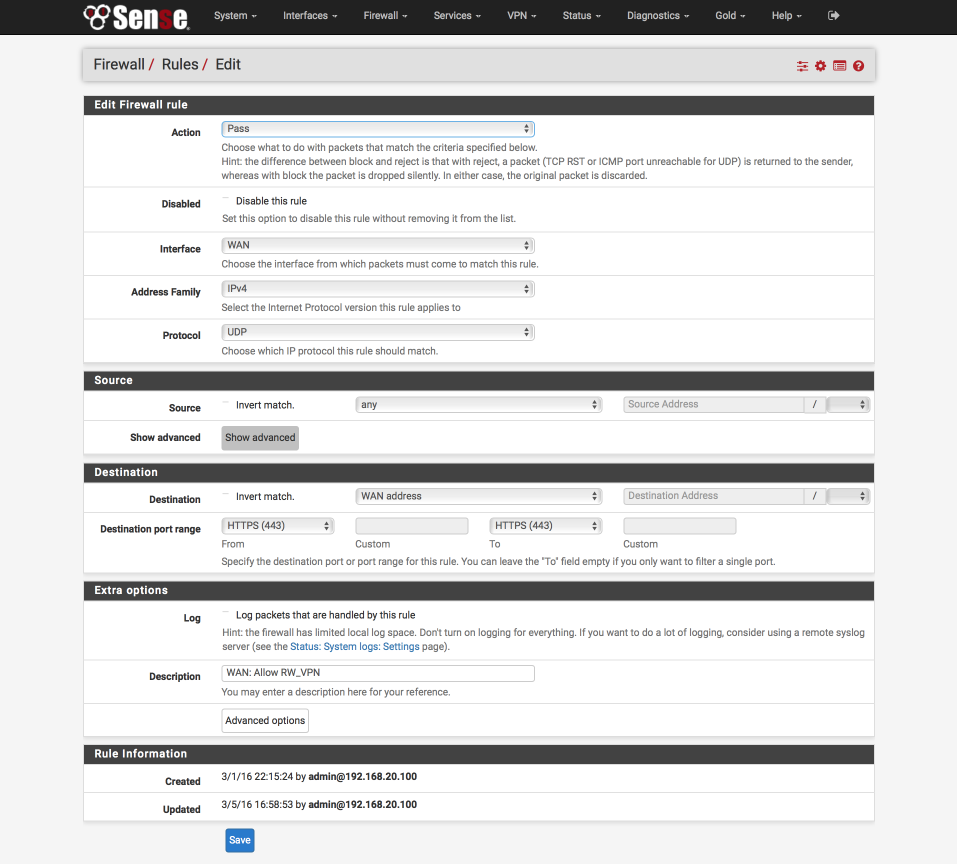
我们现在将在防火墙上打开一个端口,以允许访问端口443上运行的Open***服务器。
导航到Firewall > WAN
选择↑Add
- Action: Pass
- Disabled = [ ]
- Interface: WAN
- Address family: IPv4
- Protocol: UDP
- Source: Any
- Destination:
- Invert match = [ ]
- Address: WAN address
- Destination Port Range:
- From: HTTPS (443)
- To: HTTPS (443)
- Log: [ ]
- Description: WAN: Allow RW_***
- Save & Apply
完成后,您的WAN接口应该如下所示。
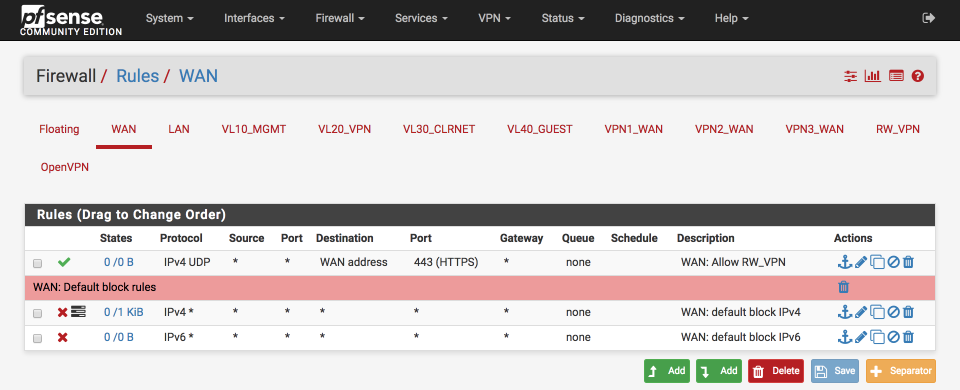
配置WAN防火墙规则
允许DNS解析
导航到Services > DNS Resolver
在“Network interfaces(网络接口)”下拉列表中,将RW_***添加到选择以启用远程设备的DNS解析。
Save & Apply(保存并应用)
为入站***连接设置传出NAT
需要NAT将入站设备专用本地IP地址(192.168.200.0/24)转换为全局注册地址空间。我们将为我们的多个***_WAN网关进行设置,如果您只使用单个***网关,则只需要这三条规则中的一条。
导航到 Firewall > NAT并选择Outbound(出站)选项卡
创建'RW_***到***_WAN'NAT
点击 ↴Add
- Disabled =
- Do not NAT =
- Interface = ***_WAN
- Protocol = any
- Source
- Type = Network
- Source Network = 192.168.200.0 / 24
- Source port: Blank
- Destination
- Type = Any
- Address = Blank
- Destination Port: Blank
- Not :
- Translation
- Address = Interface Address
- Port =
- Miscellaneous
- Description = RW_*** to ***_WAN
- 单击 Save
创建'RW_***到***2_WAN'NAT
点击↴Add
- Disabled =
- Do not NAT =
- Interface = ***2_WAN
- Protocol = any
- Source
- Type = Network
- Source Network = 192.168.200.0 / 24
- Source port: Blank
- Destination
- Type = Any
- Address = Blank
- Destination Port: Blank
- Not :
- Translation
- Address = Interface Address
- Port =
- Miscellaneous
- Description = RW_*** to ***2_WAN
- Click Save
创建'RW_***到***_WAN'NAT
点击 ↴Add
- Disabled =
- Do not NAT =
- Interface = ***3_WAN
- Protocol = any
- Source
- Type = Network
- Source Network = 192.168.200.0 / 24
- Source port: Blank
- Destination
- Type = Any
- Address = Blank
- Destination Port: Blank
- Not :
- Translation
- Address = Interface Address
- Port =
- Miscellaneous
- Description = RW_*** to ***3_WAN
- 单击Save
更新别名
我使用LOCAL_SUBNETS别名来定义内部和外部的流量。我们需要将新的RW_***地址范围添加到此地址,以确保我们能够正确匹配适当的防火墙规则。
导航到Firewall > Aliases
单击LOCAL_SUBNETS别名旁边的铅笔图标编辑列表
添加RW_***地址范围,即
- 192.168.200.0 / 24“RW_***”
点击保存并应用
完成后,您的LOCAL_SUBNETS别名应该如下所示。
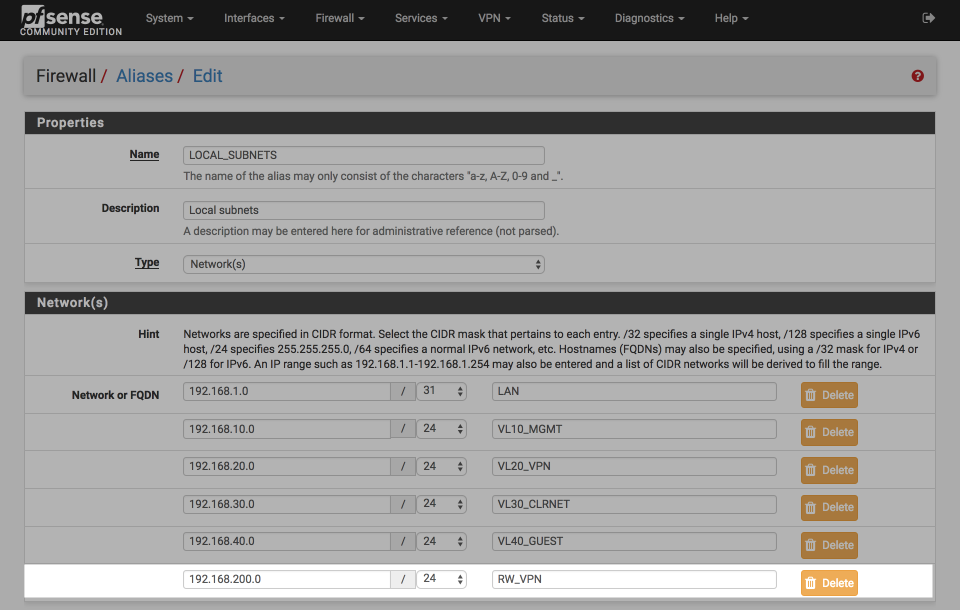 更新别名
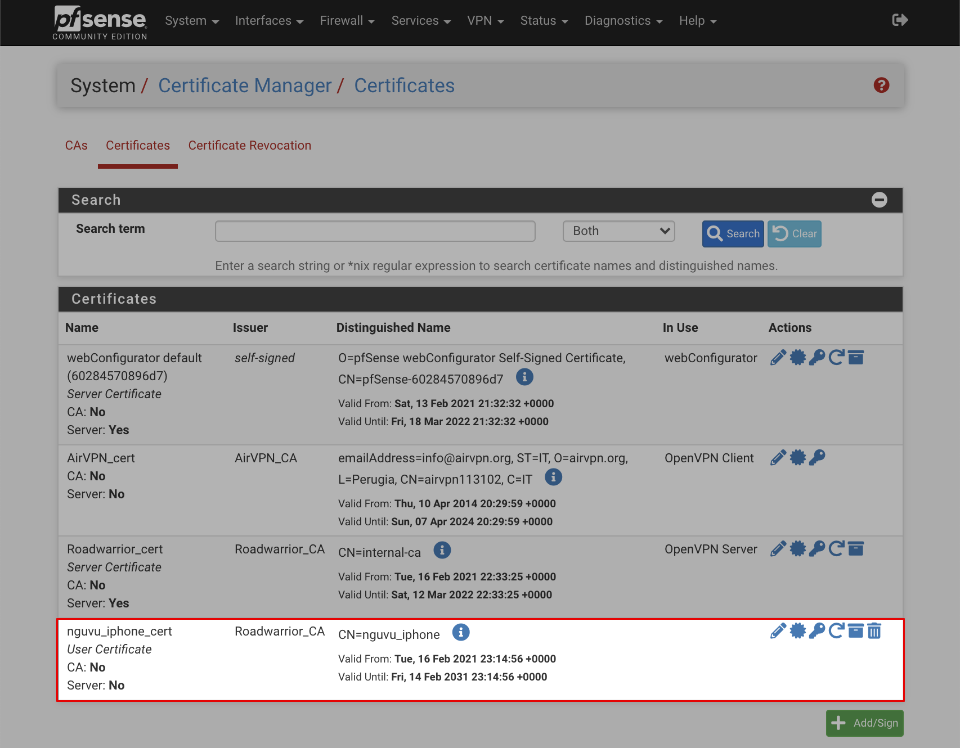
创建一个客户端证书
我们现在将为iOS设备创建一个客户端证书。虽然可以将Open***设置为接受来自多个客户端的相同证书,但这不是一种安全的选项。此选项允许您为每个用户或客户端指定一个证书,并且可以随时过期取消单个证书以撤消访问权限。
导航到System > Cert Manager > Certificates
点击Add/Sign(添加/签名)
- Method = Create an internal certificate
- Descriptive name: nguvu_iphone_cert
Internal Certificate(内部证书)
- Certificate authority = Roadwarrior_CA
- Key Length = 4096
- Digest Algorithm = SHA256
- Lifetime (Days) 3650
- Country Code = Your country
- State or province = Your State
- City = Your City
- Organization = Your Organisation
- e-mail Address = Your email
- Common Name = 这个证书令人难忘的名字,例如nguvu_iphone
Certificate Attributes(证书属性)
- Certificate Type = User certificate
- Alternative names = FQDN or Hostname blank
- Save
完成后,您的证书摘要应该如下图所示。
iPhone证书
安装Open***客户端导出向导
我们将使用客户端导出向导导出客户端证书。导航到System > Packages > Available packages,然后单击Open***-client-export旁边的安装图标。
您会在屏幕中看到显示的进度报告...
>>> Installing pfSense-pkg-open***-client-export...
Updating pfSense-core repository catalogue...
pfSense-core repository is up to date.
Updating pfSense repository catalogue...
pfSense repository is up to date.
All repositories are up to date.
The following 4 package(s) will be affected (of 0 checked):
New packages to be INSTALLED:
pfSense-pkg-open***-client-export: 1.4.13_1 [pfSense]
open***-client-export: 2.4.3_4 [pfSense]
zip: 3.0_1 [pfSense]
p7zip: 16.02 [pfSense]
Number of packages to be installed: 4
The process will require 18 MiB more space.
11 MiB to be downloaded.
[1/4] Fetching pfSense-pkg-open***-client-export-1.4.13_1.txz: ... done
[2/4] Fetching open***-client-export-2.4.3_4.txz: .......... done
[3/4] Fetching zip-3.0_1.txz: .......... done
[4/4] Fetching p7zip-16.02.txz: .......... done
Checking integrity... done (0 conflicting)
[1/4] Installing open***-client-export-2.4.3_4...
[1/4] Extracting open***-client-export-2.4.3_4: .......... done
[2/4] Installing zip-3.0_1...
[2/4] Extracting zip-3.0_1: .......... done
[3/4] Installing p7zip-16.02...
[3/4] Extracting p7zip-16.02: .......... done
[4/4] Installing pfSense-pkg-open***-client-export-1.4.13_1...
Extracting pfSense-pkg-open***-client-export-1.4.13_1: .......... done
Saving updated package information...
done.
Loading package configuration... done.
Configuring package components...
Loading package instructions...
Custom commands...
Writing configuration... done.
>>> Cleaning up cache... done.
Success
导出证书
完成安装后,导航到***> Open***选择Client Export (客户端导出)并设置选项,如下所示:
Open*** Server(服务器)
- Remote Access Server = Roadwarrior *** UDP:443
Client Connection Behavior(客户端连接行为)
- Host name Resolution = Other
- hostname = access.nguvu.org (replace with your dynamic hostname you setup earlier)
- Verify Server CN = Automatic - Use verify-x509-name (Open*** 2.3)+ where possible
- Block outside DNS = [x]
- Legacy Client = [ ]
- Use Random local port = [x]
Certificate eport options
- PKCS#11 Certificate storage = [ ]
- Microsoft certificate storage [ ]
- Password protect certificate = [ ]
Proxy Options(代理选项)
Advanced(高级设置)
- Additional configuration options = empty
另存为默认值
现在将有多个选项与每个证书一起显示,可以用各种格式导出。我们将使用Open*** Connect客户端的内联配置。
点击Open***连接(Android或iOS)
证书文件将被下载到您的桌面,我们现在可以将其传输到我们的iOS设备。
客户端软件安装
Open*** connect 应用程序可以在多个平台使用,必须先在我们的iphone上安装该程序,才能处理导入的.o***配置文件。
将.o***文件传送到iphone手机,有许多方法可以解决。可以将文件通过电子邮件发送给自己,通过Dropbox等云服务传输,但请注意,该文件包含访问您的网络所需的所有详细信息,因此其值得特别注意如何传输以防止它被泄露。我最喜欢的 Instashare ,它可以很方便的在Mac> iOS设备之间直接传输。
一旦我将.o***文件拖到我的instashare文件夹中,该文件就会出现在我的iOS设备上。
Instashare
我现在可以将文件复制到Open*** Connect应用程序中
Instashare导入
Open***将打开并提示导入证书。点击绿色+符号将其添加到iphone设备。
Open*** Connect导入
导入完成后,你就可以切换连接开关来启动连接。
Open***连接
如果一切正常,你应该可以看到下面关联的IP、端口和协议详细信息等。
Open***连接
你可以通过使用'>'箭头展开连接框来检查日志,从而诊断任何错误或验证连接是否正确。
Open***日志
这是我的连接日志仅供参考。
2017-09-09 18:56:51 ----- Open*** Start -----
Open*** core 3.1.2 ios arm64 64-bit built on Dec 5 2016 12:50:25
2017-09-09 18:56:51 Frame=512/2048/512 mssfix-ctrl=1250
2017-09-09 18:56:51 UNUSED OPTIONS
0 [persist-tun]
1 [persist-key]
4 [tls-client]
7 [lport] [0]
8 [verify-x509-name] [Roadwarrior_cert] [name]
2017-09-09 18:56:51 EVENT: RESOLVE
2017-09-09 18:56:51 Contacting [xxxx:xxxx::xx:x:x:xxxx:xxx]:443 via UDP
2017-09-09 18:56:51 EVENT: WAIT
2017-09-09 18:56:51 SetTunnelSocket returned 1
2017-09-09 18:56:51 Connecting to [access.nguvu.org]:443 (2607:7700::1a:0:1:4c5b:9d7) via UDPv6
2017-09-09 18:56:52 EVENT: CONNECTING
2017-09-09 18:56:52 Tunnel Options:V4,dev-type tun,link-mtu 1558,tun-mtu 1500,proto UDPv4,comp-lzo,keydir 1,cipher AES-256-CBC,auth SHA1,keysize 256,tls-auth,key-method 2,tls-client
2017-09-09 18:56:52 Creds: UsernameEmpty/PasswordEmpty
2017-09-09 18:56:52 Peer Info:
IV_GUI_VER=net.open***.connect.ios 1.1.1-212
IV_VER=3.1.2
IV_PLAT=ios
IV_NCP=2
IV_TCPNL=1
IV_PROTO=2
IV_LZO=1
IV_AUTO_SESS=1
2017-09-09 18:56:52 VERIFY OK: depth=1
cert. version : 3
serial number : 00
issuer name : C=US, ST=My State, L=My City, O=My org, emailAddress=info@nguvu.org, CN=internal-ca
subject name : C=US, ST=My State, L=My City, O=My org, emailAddress=info@nguvu.org, CN=internal-ca
issued on : 2016-03-02 01:32:46
expires on : 2026-02-28 01:32:46
signed using : RSA with SHA-256
RSA key size : 4096 bits
basic constraints : CA=true
key usage : Key Cert Sign, CRL Sign
2017-09-09 18:56:52 VERIFY OK: depth=0
cert. version : 3
serial number : 02
issuer name : C=US, ST=My State, L=My City, O=My org, emailAddress=info@nguvu.org, CN=internal-ca
subject name : C=US, ST=My State, L=My City, O=My org, emailAddress=info@nguvu.org, CN=Roadwarrior_cert
issued on : 2016-03-02 02:08:49
expires on : 2026-02-28 02:08:49
signed using : RSA with SHA-256
RSA key size : 4096 bits
basic constraints : CA=false
subject alt name : pfsense.local.lan
cert. type : SSL Server
key usage : Digital Signature, Key Encipherment
ext key usage : TLS Web Server Authentication, ???
2017-09-09 18:56:52 SSL Handshake: TLSv1.2/TLS-ECDHE-RSA-WITH-AES-256-GCM-SHA384
2017-09-09 18:56:52 Session is ACTIVE
2017-09-09 18:56:52 EVENT: GET_CONFIG
2017-09-09 18:56:52 Sending PUSH_REQUEST to server...
2017-09-09 18:56:52 OPTIONS:
0 [dhcp-option] [DOMAIN] [local.lan]
1 [dhcp-option] [DNS] [192.168.200.1]
2 [dhcp-option] [NTP] [192.168.200.1]
3 [redirect-gateway] [def1]
4 [comp-lzo] [adaptive]
5 [route-gateway] [192.168.200.1]
6 [topology] [subnet]
7 [ping] [10]
8 [ping-restart] [60]
9 [ifconfig] [192.168.200.2] [255.255.255.0]
10 [peer-id] [0]
11 [cipher] [AES-256-GCM]
2017-09-09 18:56:52 PROTOCOL OPTIONS:
cipher: AES-256-GCM
digest: SHA1
compress: LZO
peer ID: 0
2017-09-09 18:56:52 EVENT: ASSIGN_IP
2017-09-09 18:56:52 Unknown pushed DHCP option: [dhcp-option] [NTP] [192.168.200.1]
2017-09-09 18:56:52 TunPersist: saving tun context:
Session Name: access.nguvu.org
Layer: OSI_LAYER_3
Remote Address: xxxx:xxxx::xx:x:x:xxxx:xxx [IPv6]
Tunnel Addresses:
192.168.200.2/24 -> 192.168.200.1
Reroute Gateway: IPv4=1 IPv6=0 flags=[ ENABLE REROUTE_GW DEF1 IPv4 ]
Block IPv6: no
Add Routes:
Exclude Routes:
DNS Servers:
192.168.200.1
Search Domains:
local.lan
2017-09-09 18:56:52 Connected via tun
2017-09-09 18:56:52 LZO-ASYM init swap=0 asym=0
2017-09-09 18:56:52 EVENT: CONNECTED @access.nguvu.org:443 (xxxx:xxxx::xx:x:x:xxxx:xxx) via /UDPv6 on tun/192.168.200.2/ gw=[192.168.200.1/]
2017-09-09 18:56:52 SetStatus Connected
2017-09-09 18:56:53 NET Internet:ReachableViaWWAN/WR t------
验证功能和性能
导航到Status > Open***
诊断Open***隧道是否按预期进行了连接。
Open***连接
证书过期
有时候你可能需要终止某个设备的***连接,我们只需要让这个设备使用的证书过期就可以了。
导航到System > Cert Manager > Cert Revocation
- 点击Roadwarrior_CRL旁边的修改CRL
- 选择你想要过期的证书,并选择'Add'
Open***证书吊销
该证书现在将被吊销并且拒绝访问。
以上就是一个通过***远程访问pfSense设备的教程,只要你能远程访问pfSense,那么访问pfSense设备后面的服务器、监控摄像头就非常容易了,这些不在本教程讨论范围。
原文地址
|
|
|
 QQ群⑧:
QQ群⑧:


 窥视卡
窥视卡 雷达卡
雷达卡 发表于 2019-1-27 06:20:44


 提升卡
提升卡 置顶卡
置顶卡 沉默卡
沉默卡 喧嚣卡
喧嚣卡 变色卡
变色卡 千斤顶
千斤顶 显身卡
显身卡