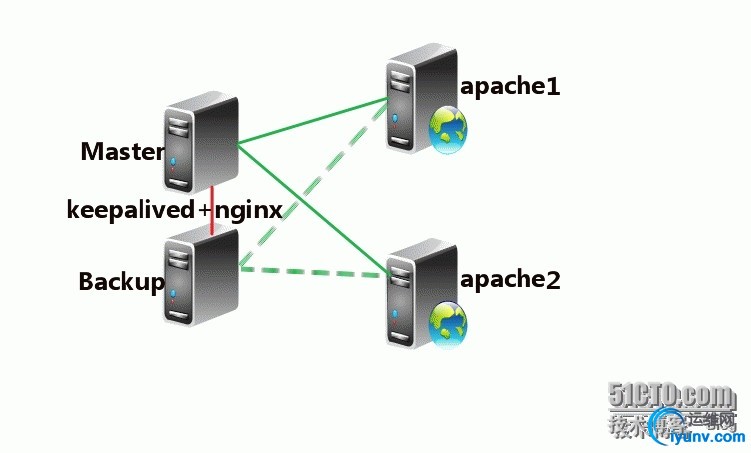
前期准备:
1、实验拓扑图

2、地址规划
Master
| 10.10.0.224(VIP:10.10.0.220) | keepalived、nginx | | Backup | 10.10.0.226(VIP:10.10.0.220) | keepalived、nginx | | Real Server 1(apache1) | 10.10.0.225 | httpd | | Real Server 2(apache2) | 10.10.0.221 | httpd |
一、安装keepalived和nginx
Master和Backup分别安装:
1、安装keepalived
[iyunv@node1 ~]# yum install keepalived -y
2、配置repo源
[iyunv@node1 ~]# vim /etc/yum.repos.d/nginx.repo
[nginx]
name=nginx repo baseurl=http://nginx.org/packages/centos/6/$basearch/ gpgcheck=0 enabled=1 3、安装ngxin
[iyunv@node1 ~]# yum install nginx -y
4、Master修改
(1).修改keepaliaved配置文件
[iyunv@node1 ~]# cp /etc/keepalived/keepalived.conf /etc/keepalived/keepalived.conf.bak
[iyunv@node1 ~]# vim /etc/keepalived/keepalived.conf
! Configuration File for keepalived
global_defs {
notification_email {
root@localhost
}
notification_email_from Alexandre.Cassen@firewall.loc
smtp_server 127.0.0.1
smtp_connect_timeout 30
router_id LVS1
}
vrrp_script chk_nginx{
script "killall -0 nginx"
interval 1
weight -2
fall 2
rise 2
}
vrrp_instance VI_1 {
state MASTER
interface eth0
virtual_router_id 51
priority 100
advert_int 1
authentication {
auth_type PASS
auth_pass 1111
}
virtual_ipaddress {
10.10.0.220 dev eth0 label eth0:0
}
track_script {
chk_nginx
}
}
(3).拷贝一份配置文件到Backup服
[iyunv@node1 ~]# scp -r /etc/keepalived/keepalived.conf root@10.10.0.226:/etc/keepalived/
[iyunv@node1 ~]# scp -r /etc/nginx/nginx.conf root@10.10.0.226:/etc/nginx/
(4).开启服务并开机自动启动
[iyunv@node1 ~]# service keepalived restart
[iyunv@node1 ~]# service nginx restart
[iyunv@node1 ~]# chkconfig keepalived on
[iyunv@node1 ~]# chkconfig nginx on
5、Backup修改
(1).修改keepalived配置文件
[iyunv@node2 ~]# vim /etc/keepalived/keepalived.conf
! Configuration File for keepalived
global_defs {
notification_email {
root@localhost
}
notification_email_from Alexandre.Cassen@firewall.loc
smtp_server 127.0.0.1
smtp_connect_timeout 30
router_id LVS2 #修改唯一标识
}
vrrp_script chk_nginx{
script "killall -0 nginx"
interval 1
weight -2
fall 2
rise 2
}
vrrp_instance VI_1 {
state BACKUP
interface eth0
virtual_router_id 51
priority 90
advert_int 1
authentication {
auth_type PASS
auth_pass 1111
}
virtual_ipaddress {
10.10.0.220 dev eth0 label eth0:0
}
track_script {
chk_nginx
}
}
(2).开启服务并开机自动启动 [iyunv@node2 ~]# service keepalived restart [iyunv@node2 ~]# service nginx restart [iyunv@node2 ~]# chkconfig keepalived on [iyunv@node2 ~]# chkconfig nginx on
6、Real Server 1 (1).安装httpd [iyunv@realserver1]# yum install httpd -y (2).建立测试页
[iyunv@realserver1]# vim /var/www/html/index.html <h1>real server 1</h1> (3).开启服务 [iyunv@realserver1]# service httpd restart [iyunv@realserver1]# chkconfig httpd on (4).测试 7、Real Server 2 (1).安装httpd [iyunv@realserver2]# yum install httpd -y (2).建立测试页
[iyunv@realserver2]# vim /var/www/html/index.html <h1>real server 2</h1> (3).开启服务 [iyunv@realserver2]# service httpd restart [iyunv@realserver2]# chkconfig httpd on (4).测试
8、nginx实现后端real server的负载均衡,在Master上配置 (1).修改nginx配置文件 [iyunv@node1 ~]# cp /etc/nginx/nginx.conf /etc/nginx/nginx.conf.bak [iyunv@node1 ~]# vim /etc/nginx/nginx.conf user nginx; worker_processes 1; error_log /var/log/nginx/error.log warn;
pid /var/run/nginx.pid; events {
worker_connections 1024; } http { include /etc/nginx/mime.types; default_type application/octet-stream; log_format main '$remote_addr - $remote_user [$time_local] "$request" ' '$status $body_bytes_sent "$http_referer" ' '"$http_user_agent" "$http_x_forwarded_for"'; access_log /var/log/nginx/access.log main; sendfile on; #tcp_nopush on; keepalive_timeout 65; #gzip on; upstream apacheweb { server 10.10.0.225:80 max_fails=3 fail_timeout=2s; server 10.10.0.221:80 max_fails=3 fail_timeout=2s; server 10.10.0.224:8080 backup; #sorry server,当两个realserver全挂掉后显示。 } server {
listen 8080;
location / {
root /usr/share/nginx/html/a;
index index.html index.html;
# proxy_pass http://apacheweb;
}
}
server { listen 80; server_name localhost; #charset koi8-r; #access_log /var/log/nginx/log/host.access.log main; location / { root /usr/share/nginx/html; index index.html index.htm; } location ~ \.(html|htm|gif|jpg|jpeg|bmp|png|ico|txt|js|css)$ { root /var/www/html; #此处定义后端服务器网页存放路径 proxy_pass http://apacheweb; } #error_page 404 /404.html; # redirect server error pages to the static page /50x.html error_page 500 502 503 504 /50x.html; location = /50x.html { root /usr/share/nginx/html; } } (2).拷贝一份配置文件到Backup (3).重启nginx服务 [iyunv@node1 ~]# service nginx restart [iyunv@node2 ~]# service nginx restart 9、测试 (1).在浏览器中输入vip地址 刷新浏览器之后 (2).模拟故障: [iyunv@realserver1]# service httpd stop 停掉real server 1的apache服务,刷新浏览器发现访问的内容一直是real server2的内容 启用之后real server 1会被加入会话。反之停掉real server 2,访问的内容就一直是real server 1啦 当real server 1和real server 2全部挂掉之后,则显示10.10.0.224:8080虚拟主机里的内容。任何一个real server回归后,则显示正常。
|