|
Nginx负载均衡 常用2种类型 1)、轮询(默认) 每个请求按时间顺序逐一分配到不同的后端服务器,如果后端服务器down掉,能自动剔除。 2)、ip_hash 每个请求按访问ip的hash结果分配,这样每个访客固定访问一个后端服务器,可以解决session的问题。 weight=number 设定服务器的权重,默认是1。 max_fails=number 设定Nginx与服务器通信的尝试失败的次数。在fail_timeout参数定义的时间段内,如果失败的次数达到此值,Nginx就认为服务器不可用。在下一个fail_timeout时间段,服务器不会再被尝试。失败的尝试次数默认是1。设为0就会停止统计尝试次数,认为服务器是一直可用的。你可以通过指令proxy_next_upstream、fastcgi_next_upstream和 memcached_next_upstream来配置什么是失败的尝试。默认配置时,http_404状态不被认为是失败的尝试。 fail_timeout=time 设定 统计失败尝试次数的时间段。在这段时间中,服务器失败次数达到指定的尝试次数,服务器就被认为不可用。 服务器被认为不可用的时间段。 默认情况下,该超时时间是10秒。 backup 标记为备用服务器。当主服务器不可用以后,请求会被传给这些服务器。 down 标记服务器永久不可用,可以跟ip_hash指令一起使用。 例如: 1、 upstream tv_server_pool{ server 192.168.10.1:80 weight=1 max_fails=2fail_timeout=30s; server 192.168.10.2:80 weight=2 max_fails=2fail_timeout=30s; } 解释:来3次请求,1次访问192.168.10.1,2次访问192.168.10.2,30s内检测2次,失效就找下一个服务器。
2、 upstream 192.168.10.200 { ip_hash; server 192.168.10.1:80; server 192.168.10.2:80; }
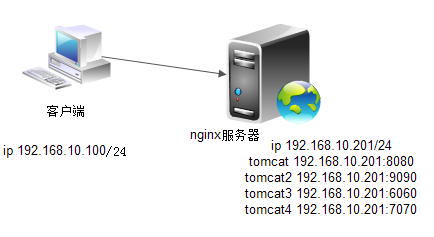
案例nginx为tomcat做负载均衡 拓扑图:

软件环境:centos6.464位 所需软件:jdk、tomcat、nginx 安装步骤: 1、下载最新的源码包: nginx-1.5.2.tar.gz、apache-tomcat-7.0.42.tar.gz、jdk-7u25-linux-x64.tar.gz

2、解压jdk

3、编辑环境变量

export JAVA_HOME=/usr/local/jdk1.7.0_25 exportCLASSPATH=.:$JAVA_HOME/lib/tools.jar:$JAVA_HOME/lib/dt.jar export PATH=$JAVA_HOME/bin:$PATH

更新环境变量

查看java的版本 [iyunv@localhost ~]# java -version

4、安装tomcat 解压 [iyunv@localhost ~]# tar -zxvfapache-tomcat-7.0.42.tar.gz -C /usr/local/

将tomcat重命名

编辑环境变量
[iyunv@localhost local]# vim /etc/profile export TOMCAT_HOME=/usr/local/tomcat export CATALINA_HOME=/usr/local/tomcat export CATALINA_BASE=/usr/local/tomcat

更新
[iyunv@localhost local]# source /etc/profile
编辑tomcat的配置文件 [iyunv@localhost local]# vim/usr/local/tomcat/conf/server.xml

编辑它的启动文件 [iyunv@localhost local]# vim/usr/local/tomcat/bin/startup.sh export CATALINA_HOME=$CATALINA_HOME export CATALINA_BASE=$CATALINA_BASE

编辑它的停止文件 [iyunv@localhost local]# vim/usr/local/tomcat2/bin/shutdown.sh export CATALINA_HOME=$CATALINA_HOME export CATALINA_BASE=$CATALINA_BASE

同理产生并配置tomcat2、tomcat3、tomcat4 [iyunv@localhost local]# cp -rapache-tomcat-7.0.42/ tomcat2 [iyunv@localhost local]# vim /etc/profile export TOMCAT_2_HOME=/usr/local/tomcat2 export CATALINA_2_HOME=/usr/local/tomcat2 export CATALINA_2_BASE=/usr/local/tomcat2

[iyunv@localhost local]# source /etc/profile [iyunv@localhost local]# vim /usr/local/tomcat2/conf/server.xml


122 123 125

[iyunv@localhost local]# vim/usr/local/tomcat2/bin/startup.sh 61 export CATALINA_HOME=$CATALINA_2_HOME 62export CATALINA_BASE=$CATALINA_2_BASE

[iyunv@localhost local]# vim/usr/local/tomcat2/bin/shutdown.sh
61 export CATALINA_HOME=$CATALINA_2_HOME 62export CATALINA_BASE=$CATALINA_2_BASE

[iyunv@localhost local]# cp -rapache-tomcat-7.0.42/ tomcat3 [iyunv@localhost local]# vim /etc/profile
export TOMCAT_3_HOME=/usr/local/tomcat3 export CATALINAP_3_HOME=/usr/local/tomcat3 export CATALINA_3_BASE=/usr/local/tomcat3

[iyunv@localhost local]# source /etc/profile [iyunv@localhost local]# vim/usr/local/tomcat3/conf/server.xml


[iyunv@localhost local]# vim/usr/local/tomcat3/bin/startup.sh export CATALINA_HOME=$CATALINA_3_HOME export CATALINA_BASE=$CATALINA_3_BASE

[iyunv@localhost local]# vim/usr/local/tomcat3/bin/shutdown.sh
export CATALINA_HOME=$CATALINA_3_HOME export CATALINA_BASE=$CATALINA_3_BASE

[iyunv@localhost local]# cp -rapache-tomcat-7.0.42/ tomcat4 [iyunv@localhost local]# vim /etc/profile
export TOMCAT_4_HOME=/usr/local/tomcat4 export CATALINA_4_HOME=/usr/local/tomcat4 export CATALINA_4_BASE=/usr/local/tomcat4

[iyunv@localhost local]# source /etc/profile [iyunv@localhost local]# vim/usr/local/tomcat4/conf/server.xml


[iyunv@localhost local]# vim/usr/local/tomcat4/bin/startup.sh export CATALINA_HOME=$CATALINA_4_HOME export CATALINA_BASE=$CATALINA_4_BASE

[iyunv@localhost local]# vim/usr/local/tomcat4/bin/shutdown.sh export CATALINA_HOME=$CATALINA_4_HOME export CATALINA_BASE=$CATALINA_4_BASE

启动tomcat [iyunv@localhost local]#/usr/local/tomcat/bin/startup.sh

停止tomcat [iyunv@localhost local]#/usr/local/tomcat/bin/shutdown.sh

5、安装pcre-devel (pcre的开发包) 切换的我们的光盘中 [iyunv@localhost ~]# cd /mnt/cdrom/Packages/ [iyunv@localhost Packages]# rpm -ivh pcre-devel-7.8-6.el6.x86_64.rpm

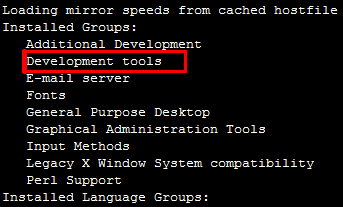
6、安装nginx 在安装之前查看有没有装开发工具 [iyunv@localhost ~]# yum grouplist |less

如果没有安装,可以通过yum安装 [iyunv@localhost ~]# yum groupinstall"Development tools"
解压 [iyunv@localhost ~]# tar -zxvf nginx-1.5.2.tar.gz-C /usr/local/src/ [iyunv@localhost ~]# cd/usr/local/src/nginx-1.5.2/ 创建用户 [iyunv@localhost nginx-1.5.2]#useradd -s /sbin/nologin -M nginx [iyunv@localhost nginx-1.5.2]# 定制 [iyunv@localhost nginx-1.5.2]#./configure --prefix=/usr/local/nginx --user=nginx --group=nginx--with-http_ssl_module --with-http_gzip_static_module --without-http_uwsgi_module--without-http_scgi_module --without-http_upstream_ip_hash_module--with-http_perl_module --with-pcre
checking for PCRE JIT support ... not found checking for OpenSSL library ... not found 它提示没有发现OpenSSLlibrary 安装 [iyunv@localhost Packages]# yum installopenssl-devel
./configure: error: perl moduleExtUtils::Embed is required 又提示没有perlmodule ExtUtils 安装 [iyunv@localhost Packages]# yum installperl-ExtUtils-Embed 编译 [iyunv@localhost nginx-1.5.2]#make 安装 [iyunv@localhost nginx-1.5.2]#make install 7、编辑配置文件 A、基于轮循的 [iyunv@localhost ~]# vim/usr/local/nginx/conf/nginx.conf user nginx; worker_processes 8;
pid /usr/local/nginx/logs/nginx.pid; worker_rlimit_nofile 65535;
events { use epoll; worker_connections 65535; } http{ include mime.types; default_type application/octet-stream; server_names_hash_bucket_size 128; client_header_buffer_size 32k; large_client_header_buffers 4 32k; client_max_body_size 8m; sendfile on; tcp_nopush on; keepalive_timeout 60; tcp_nodelay on; fastcgi_connect_timeout 300; fastcgi_send_timeout 300; fastcgi_read_timeout 300; fastcgi_buffer_size 64k; fastcgi_buffers 4 64k; fastcgi_busy_buffers_size 128k; fastcgi_temp_file_write_size 128k; gzip on; gzip_min_length 1k; gzip_buffers 4 16k; gzip_http_version 1.0; gzip_comp_level 2; gzip_types text/plain application/x-javascripttext/css application/xml; gzip_vary on;
upstream 192.168.10.201 { server 192.168.10.201:8080 weight=5; server 192.168.10.201:9090 weight=5; server 192.168.10.201:6060 weight=5; server 192.168.10.201:7070 weight=5; } server { listen 80; server_name 192.168.10.201; location / { root html ; index index.jsp index.htm index.html; proxy_redirect off; proxy_set_header Host $host; proxy_set_header X-Real-IP$remote_addr; proxy_set_header X-Forwarded-For$proxy_add_x_forwarded_for; proxy_pass http://192.168.10.201; }
location /nginx { access_log on; auth_basic "NginxStatus"; #auth_basic_user_file/usr/local/nginx/htpasswd; }
log_format access '$remote_addr -$remote_user [$time_local] "$request" ' '$status $body_bytes_sent"$http_referer" ' '"$http_user_agent"$http_x_forwarded_for'; access_log logs/access.log access;
} }
启动nginx [iyunv@localhostconf]# /usr/local/nginx/sbin/nginx
[iyunv@localhostconf]# cd /usr/local/www/web1 创建主页面 [iyunv@localhostweb1]# vim index.jsp
web1
同理创建其他站点主页
8、配置防火墙 添加一条允许访问80端口 [iyunv@localhost~]# vim /etc/sysconfig/iptables -A INPUT -mstate --state NEW -m tcp -p tcp --dport 80 -j ACCEPT

重启 [iyunv@localhost~]# service iptables restart

关闭selinux [iyunv@localhost~]# vim /etc/sysconfig/selinux

查看 [iyunv@localhost~]# getenforce

启动
[iyunv@localhost~]# /usr/local/nginx/sbin/nginx
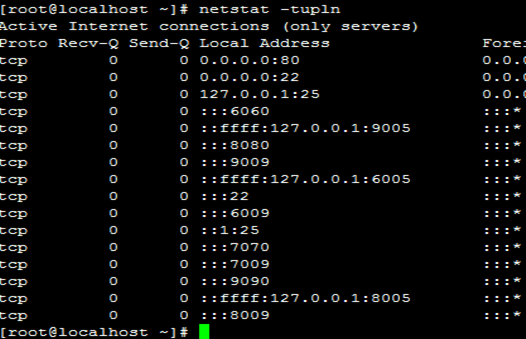
查看端口

测试

B、基于ip_hash
[iyunv@localhost~]# vim /usr/local/nginx/conf/nginx.conf user nginx; worker_processes 8; pid /usr/local/nginx/logs/nginx.pid; worker_rlimit_nofile 51200; events { use epoll; worker_connections 51200; } http{ include mime.types; default_type application/octet-stream; server_names_hash_bucket_size 128; client_header_buffer_size 32k; large_client_header_buffers 4 32k; client_max_body_size 8m; sendfile on; tcp_nopush on; keepalive_timeout 60; tcp_nodelay on; fastcgi_connect_timeout 300; fastcgi_send_timeout 300; fastcgi_read_timeout 300; fastcgi_buffer_size 64k; fastcgi_buffers 4 64k; fastcgi_busy_buffers_size 128k; fastcgi_temp_file_write_size 128k; gzip on; gzip_min_length 1k; gzip_buffers 4 16k; gzip_http_version 1.0; gzip_comp_level 2; gzip_types text/plain application/x-javascripttext/css application/xml; gzip_vary on;
upstream 192.168.10.201 { ip_hash; server 192.168.10.201:8080; server 192.168.10.201:9090; server192.168.10.201:6060; server 192.168.10.201:7070; } server { listen 80; server_name 192.168.10.201; location / { root html ; index index.php index.htm index.html; proxy_redirect off; proxy_set_header Host $host; proxy_set_header X-Real-IP $remote_addr; proxy_set_header X-Forwarded-For$proxy_add_x_forwarded_for; proxy_pass http://192.168.10.201; }
location /nginx { access_log off; auth_basic "NginxStatus"; #auth_basic_user_file/usr/local/nginx/htpasswd; }
log_format access '$remote_addr -$remote_user [$time_local] "$request" ' '$status $body_bytes_sent"$http_referer" ' '"$http_user_agent"$http_x_forwarded_for'; access_log logs/access.log access; } } [iyunv@localhost~]# /usr/local/nginx/sbin/nginx 测试

|