LAMP的简介:
lAMP平台的构成组件:
Linux:作为LAMP架构的基础,提供用于支撑web站点的操作系统,能够与其他三个组件提供更好地稳定性、兼容性。 Apache:作为LAMP架构前端,是一款功能强大、稳定性好的web服务器程序,该服务器直接面向用户提供网站访问,发送网页、图片等内容。 Mysql:作为LAMP架构后端,是一款流行的开源关系数据库系统。 PHP:作为三种开发动态网页的编程语言,负责解释动态网页文件,并提供web应用程序的开发和运行环境。
LAMP平台的应用优势: 1. 成本低廉 2. 可定制 3. 易于开发 4. 方便易用 5. 安全和稳定
构建PHP运行环境: PHP即“PHP Hypertext Preprocessor”(超文本预处理语言)的缩写,是一种服务器端的HTML嵌入式脚本语言,PHP的语法混合了C、Java、Perl以及部分自创的新语法,拥有更好地网页执行速度,更重要的是PHP几乎支持所有流行的数据库,在数据库层面的操作功能十分强大,而且能够支持UNIX、Windows、Linux等多种操作系统。
准备工作: 首先,应该准备一台能够解析PHP网页,支持数据库的网站服务器,其中Apache、PHP、MySQL组件的版本应符合Discuz!系统的最低要求,这里以此前源代码编译构建的LAMP平台为例,默认首页为index.php。
最后,启动httpd、mysqld服务器程序,并创建数据库及授权用户。Discuz!论坛系统需要使用MySQL数据库来存放各种信息,因此在安装之前提供一个可用的库,以及能够读写该数据库的用户。
实验要求:
使用redhat6.0以上的版本
服务器的IP地址 192.168.100.20
安装Apache
1
2
3
4
5
6
7
8
9
10
11
12
13
14
15
16
17
18
19
20
21
22
23
24
25
26
27
28
29
30
31
32
33
34
35
36
37
38
39
40
41
42
43
44
45
46
47
48
49
50
51
52
53
54
55
56
57
58
59
60
61
62
63
64
65
66
67
68
69
70
71
72
73
74
75
76
77
78
79
80
81
82
83
84
85
86
87
88
89
90
91
92
93
94
95
96
97
| ## 挂载光盘到mnt目录下
[mount /dev/sr0 /mnt
##使用命令tar进行解压缩,并指定解压后的路径为/opt下
tar xzvf http-2.4.2.tar.gz -C /opt
tar xzvf apr-1.4.6.tar.gz -C /opt
tar xzvf apr-util-1.4.1.tar.gz -C /opt
##切换到opt下,可以看到被解压缩的包
[iyunv@server02 lamp]# cd /opt/
[iyunv@server02 opt]# ls
apr-1.4.6 apr-util-1.4.1 httpd-2.4.2 lzo-2.09
##将apr和apr-util以解压过后的文件拷贝到httpd-2.4.2/srclib/,在进行编译
cp -R apr-1.4.6/ httpd-2.4.2/srclib/apr
cp -R apr-util-1.4.1/ httpd-2.4.2/srclib/apr-util
##使用命令切换到yum.repo.d/下,编辑abc.repo ,
[iyunv@server02 opt]# cd /etc/yum.repos.d/
[iyunv@server02 yum.repos.d]# vi abc.repo
[iyunv@server02 yum.repos.d]# cat abc.repo
[abc]
name=test
baseurl=file:///mnt
enabled=1
gpgcheck=0
##在手工编译之前,首先要安装gcc gcc-c++ 环境,这里安装需要依赖性关系,所以使用yum 进行安装
[iyunv@server02 yum.repos.d]# cd
[iyunv@server02 ~]# yum install gcc gcc-c++ -y
##安装pcre-devel包,这个包是根据系统的,比如系统是64位的,就安装64位的包
[iyunv@server02 ~]# rpm -ivh /mnt/Packages/pcre-devel-7.8-3.1.el6.x86_64.rpm
warning: /mnt/Packages/pcre-devel-7.8-3.1.el6.x86_64.rpm: Header V3 RSA/SHA256 Signature, key ID fd431d51: NOKEY
Preparing... ########################################### [100%]
1:pcre-devel ########################################### [100%]
##安装make包,系统一般都带你安装好的,可以是rpm 进行查看,
[iyunv@server02 ~]# rpm -q make
make-3.81-19.el6.x86_64
##切换到opt下的http-2.4.2/,使用./configure 进行配置,只有切换到相对应的子目录才能进行配置。
[iyunv@server02 ~]#
[iyunv@server02 ~]# cd /opt/httpd-2.4.2/
[iyunv@server02 httpd-2.4.2]# ./configure
> --prefix=/usr/local/apache
> --enable-so
> --enable-rewrite
> --enable-mods-shared=most
> --with-mpm=worker
> --disable-cgid
> --disable-cgi
## 完成配置后,执行“make”进行编译,将源代码转换为可执行的程序;然后执行“make install”完成最后的安装过程。(其中make的过程可能需要较长的时间)
[iyunv@server02 httpd-2.4.2]# make
[iyunv@server02 httpd-2.4.2]# make install
##将以下目录重定向到etc/init.d/httpd中,以便service进行管理。
[iyunv@server02 httpd-2.4.2]# grep -v "#" /usr/local/apache/bin/apachectl > /etc/init.d/httpd
## 在文件最前面插入下面的行,使其支持chkconfig命令:
[iyunv@server02 httpd-2.4.2]# vim /etc/init.d/httpd
#!/bin/sh
# chkconfig:2345 85 15
# description:Apache is a World Wide Web server.
## 保存后退出vi编辑器,执行下面的命令增加httpd服务控制脚本执行权限:
[iyunv@server02 httpd-2.4.2]# chmod +x /etc/init.d/httpd
## 执行下面的命令将http的服务加入到系统服务:
[iyunv@server02 httpd-2.4.2]# chkconfig --add httpd
## 执行下列命令将开启http的3、5级别
[iyunv@server02 httpd-2.4.2]# chkconfig --level 35 httpd on
[iyunv@server02 httpd-2.4.2]# chkconfig --list httpd
httpd 0:关闭1:关闭2:关闭3:启用4:关闭5:启用6:关闭
[iyunv@server02 httpd-2.4.2]# ln -s /usr/local/apache/conf/httpd.conf /etc/httpd.conf
[iyunv@server02 httpd-2.4.2]# vi /etc/httpd.conf
Listen 192.168.100.20:80 ##设置服务器监听的IP和端口
#Listen 80 ##把ipv6的监听端口注释
ServerName server02.benet.com:80 ##设置服务器用于辨识自己的主机名和端口号(用IP代替)。
##查看80端口是否开启
[iyunv@server02 httpd-2.4.2]# netstat -ntap | grep 80
tcp 0 0 192.168.100.20:80 0.0.0.0:* LISTEN 58090/httpd
[iyunv@server02 httpd-2.4.2]# service httpd start ##开启服务
##关闭防火墙和SELinux
[iyunv@server02 httpd-2.4.2]# service iptables stop
iptables:清除防火墙规则: [确定]
iptables:将链设置为政策 ACCEPT:filter [确定]
iptables:正在卸载模块: [确定]
[iyunv@server02 httpd-2.4.2]# setenforce 0
[iyunv@server02 httpd-2.4.2]#
##这时就可以在客户端进行访问了,(注:每做一步都要进行测试,方便以下配置过程中进行排错)
|
配置DNS:
1
2
3
4
5
6
7
8
9
10
11
12
13
14
15
16
17
18
19
20
21
22
23
24
25
26
27
28
29
30
31
32
33
34
35
36
37
38
39
40
41
42
43
| ————————DNS配置————————-
##上面访问网站都是通过IP地址进行访问,下面做的DNS把IP地址解析成域名进行访问。
##它的作用在这里就不多做介绍了,如有需要请看前几篇
查询bind是否安装
rpm -q bind
如果没安装,则直接安装,
//使用RPM进行安装
[iyunv@server02 ~]# rpm -ivh /mnt/Packages/bind-9.7.3-8.P3.el6.x86_64.rpm
warning: /mnt/Packages/bind-9.7.3-8.P3.el6.x86_64.rpm: Header V3 RSA/SHA256 Signature, key ID fd431d51: NOKEY
Preparing... ########################################### [100%]
1:bind ########################################### [100%]
##编辑主配置文件,将监听端口的地址,改为本机的ip地址,允许所有人进行访问;
[iyunv@server02 ~]# vim /etc/named.conf
options {
listen-on port 53 { 192.168.100.20; };
listen-on-v6 port 53 { ::1; };
directory "/var/named";
dump-file "/var/named/data/cache_dump.db";
statistics-file "/var/named/data/named_stats.txt";
memstatistics-file "/var/named/data/named_mem_stats.txt";
allow-query { any; };
recursion yes;
##编辑区域配置文件:正向区域benet.com,类型为主区域
[iyunv@server02 ~]# vim /etc/named.rfc1912.zones
zone "benet.com" IN {
type master;
file "benet.com.zone";
allow-update { none; };
##这边就不做详细解释了,如有需要请看前几篇
[iyunv@server02 ~]# cd /var/named/
[iyunv@server02 named]# ls
data dynamic named.ca named.empty named.localhost named.loopback slaves
[iyunv@server02 named]# cp -p named.localhost benet.com.zone
[iyunv@server02 named]# vim benet.com.zone
[iyunv@server02 named]# service named start
启动 named: [确定]
[iyunv@server02 named]# host www.benet.com
www.benet.com has address 192.168.100.20
##完成配置后,就可以输入域名进行访问了
|

安装mysql数据库
1
2
3
4
5
6
7
8
9
10
11
12
13
14
15
16
17
18
19
20
21
22
23
24
25
26
27
28
29
30
31
32
33
34
35
36
37
38
39
40
41
42
43
44
45
46
47
48
49
50
51
52
53
54
55
56
57
58
59
60
61
62
63
64
65
66
67
68
69
70
71
72
73
74
75
76
77
78
79
80
81
82
83
84
85
86
87
88
89
90
91
92
93
94
95
96
97
98
99
100
101
102
103
104
105
106
107
108
| ——————————MySQL数据库的安装——————————
##将MySQL压缩包进行解压
[iyunv@server02 lamp]# tar zxvf mysql-5.5.24.tar.gz -C /opt
确认安装 gcc 、 gcc-c++ 、make、cmake
ncurses-devel、
bison、
libaio-devel的软件包
##使用RPM安装以下软件包(必须安装)还有gcc &gcc-c++,上面已经安装过了,所以这里就不需要安装。
[iyunv@server02 lamp]# rpm -ivh /mnt/Packages/cmake-2.6.4-5.el6.x86_64.rpm
warning: /mnt/Packages/cmake-2.6.4-5.el6.x86_64.rpm: Header V3 RSA/SHA256 Signature, key ID fd431d51: NOKEY
Preparing... ########################################### [100%]
1:cmake ########################################### [100%]
r^H^H^H^H^H^H[iyunv@server02 lamp]#
[iyunv@server02 lamp]# rpm -ivh /mnt/Packages/ncurses-devel-5.7-3.20090208.el6.x86_64.rpm
warning: /mnt/Packages/ncurses-devel-5.7-3.20090208.el6.x86_64.rpm: Header V3 RSA/SHA256 Signature, key ID fd431d51: NOKEY
Preparing... ########################################### [100%]
1:ncurses-devel ########################################### [100%]
[iyunv@server02 lamp]# rpm -ivh /mnt/Packages/bison-2.4.1-5.el6.x86_64.rpm
warning: /mnt/Packages/bison-2.4.1-5.el6.x86_64.rpm: Header V3 RSA/SHA256 Signature, key ID fd431d51: NOKEY
Preparing... ########################################### [100%]
1:bison ########################################### [100%]
[iyunv@server02 lamp]# rpm -ivh /mnt/Packages/libaio-devel-0.3.107-10.el6.x86_64.rpm
warning: /mnt/Packages/libaio-devel-0.3.107-10.el6.x86_64.rpm: Header V3 RSA/SHA256 Signature, key ID fd431d51: NOKEY
Preparing... ########################################### [100%]
1:libaio-devel ########################################### [100%]
##创建mysql用户,并不允许登录到系统
[iyunv@server02 lamp]# useradd -s /sbin/nologin mysql
[iyunv@server02 lamp]# mkdir -p /usr/local/mysql
[iyunv@server02 lamp]# cd /opt/mysql-5.5.24/
Mysql的安装方法:
##切换到相对应的子目录进行配置,这里不同往常,使用的是cmake进行配置,而不是./configure。
[iyunv@server02 lamp]#
cmake -DCMAKE_INSTALL_PREFIX=/usr/local/mysql //安装目录//
-DMYSQL_UNIX_ADDR=/home/mysql/mysql.sock //指定数据库连接文件位置//
-DDEFAULT_CHARSET=utf8 //字符集设定//
-DDEFAULT_COLLATION=utf8_general_ci
-DWITH_EXTRA_CHARSETS=all //支持扩展字符集//
-DWITH_MYISAM_STORAGE_ENGINE=1 //开启引擎模块//
-DWITH_INNOBASE_STORAGE_ENGINE=1
-DWITH_MEMORY_STORAGE_ENGINE=1
-DWITH_READLINE=1 //启用readline库//
-DENABLED_LOCAL_INFILE=1 //支持读取本地数据//
-DMYSQL_DATADIR=/home/mysql //数据库文件家目录//
-DMYSQL_USER=mysql //指定用户//
-DMYSQL_TCP_PORT=3306 //指定端口//
Make & makd install
在make与make install的时候可以看到进度百分比,感觉这一点要比configure方式要好
chown -R mysql.mysql /usr/local/mysql //更改属主和属组//
[iyunv@server02 mysql-5.5.24]# cp /usr/local/mysql/support-files/my-medium.cnf /etc/my.cnf
cp:是否覆盖"/etc/my.cnf"? y
[iyunv@server02 mysql-5.5.24]# cp /usr/local/mysql/support-files/mysql.server /etc/init.d/mysqld
[iyunv@server02 mysql-5.5.24]# chmod 755 /etc/init.d/mysqld //mysql脚本添加权限//
//添加mysqld服务项到chkconfig中//
[iyunv@server02 mysql-5.5.24]# chkconfig --add /etc/init.d/mysqld
[iyunv@server02 mysql-5.5.24]# chkconfig mysqld --level 35 on //3.5级别开机自启动
##初始化数据库
[iyunv@server02 mysql-5.5.24]# /usr/local/mysql/scripts/mysql_install_db
> --user=mysql
> --ldata=/var/lib/mysql
> --basedir=/usr/local/mysql
> --datadir=/home/mysql
ln -s /var/lib/mysql/mysql.sock /home/mysql/mysql.sock /*直接建立软连接*/
[iyunv@server02 mysql-5.5.24]# service mysqld start
Starting MySQL... [确定]
[iyunv@server02 mysql-5.5.24]# export PATH=$PATH:/usr/local/mysql/bin/ *开机时刷新* //更改环境变量//
或者可选择vi /etc/profile 在最后一行加入后 运行source /etc/profile
##完成以上配置后,就可以进入数据库了 ,直接输入mysql即可
[iyunv@server02 mysql-5.5.24]# mysql
Welcome to the MySQL monitor. Commands end with ; or g.
Your MySQL connection id is 2
Server version: 5.5.24-log Source distribution
Copyright (c) 2000, 2011, Oracle and/or its affiliates. All rights reserved.
Oracle is a registered trademark of Oracle Corporation and/or its
affiliates. Other names may be trademarks of their respective
owners.
Type 'help;' or 'h' for help. Type 'c' to clear the current input statement.
mysql> show databases; ##要想知道数据有没有创建成功,可以使用此命令,查看数据库,如下信息表示已创建成功。
+--------------------+
| Database |
+--------------------+
| information_schema |
| #mysql50#.gnome2 |
| #mysql50#.mozilla |
| mysql |
| performance_schema |
| test |
+--------------------+
6 rows in set (0.00 sec)
mysql>
|
配置GD库
1
2
3
4
5
6
7
8
9
10
11
12
13
14
15
16
17
18
19
20
21
22
23
24
25
26
27
| ##首先安装GD库和GD库关联程序 //用来处理和生成图片//
##直接使用yum安装所有需要的包
[iyunv@server02 mysql-5.5.24]# yum install
> libjpeg-devel
> libpng-devel
> freetype-devel
> zlib-devel
> gettext-devel
> libXpm-devel
> libxml2-devel
> fontconfig-devel
> openssl-devel
> bzip2-devel
Complete!
[iyunv@server02 mysql-5.5.24]# cd /lamp/
##使用tar将下载好的包进行解压缩,并释放到统一目录下
[iyunv@server02 lamp]# tar zxvf gd-2.0.35.tar.gz -C /opt
##切换到相对应的子目录进行配置,
[iyunv@server02 lamp]# cd /opt/gd/
[iyunv@server02 gd]# ls
2.0.35
[iyunv@server02 gd]# cd 2.0.35/
[iyunv@server02 2.0.35]# ./configure --prefix=/usr/local/gd
[iyunv@server02 2.0.35]# make
[iyunv@server02 2.0.35]# make install
|
安装php
1
2
3
4
5
6
7
8
9
10
11
12
13
14
15
16
17
18
19
20
21
22
23
24
25
26
27
28
29
30
31
32
33
34
35
36
37
38
39
40
41
42
43
44
45
46
47
48
49
50
51
52
53
54
55
56
57
58
59
60
61
62
63
64
65
66
67
68
| ——————PHP配置————————————--——————————
[iyunv@server02 2.0.35]# cd /lamp/
[iyunv@server02 lamp]# tar jxvf php-5.4.5.tar.bz2 -C /opt
[iyunv@server02 lamp]# cd /opt/php-5.4.5/
[iyunv@server02 php-5.4.5]# ./configure
> --prefix=/usr/local/php
> --with-apxs2=/usr/local/apache/bin/apxs 这是加入apache中为DSO模块的位置
> --with-gd #支持GD库
> --with-mysql=/usr/local/mysql
> --with-config-file-path=/etc
> --enable-sqlite-utf8
> --with-zlib-dir
> --with-libxml-dir
> --with-freetype-dir
> --with-jpeg-dir
> --with-png-dir
> --with-ttf
> --with-iconv
> --with-openssl
> --with-gettext
> --enable-mbstring
> --enable-gd-native-ttf
> --enable-gd-jis-conv
> --enable-static
> --enable-zend-multibyte
> --enable-inline-optimization
> --enable-sockets
> --enable-soap
> --enable-ftp
> --disable-ipv6
[iyunv@server02 php-5.4.5]# make
[iyunv@server02 php-5.4.5]# make install
find -name CMakeCache.txt
rm -f ./CMakeCache.txt //报错处理//
//优化调整PHP//
[iyunv@server02 php-5.4.5]# cp php.ini-production /etc/php.ini
cp:是否覆盖"/etc/php.ini"? Y
##让Apache支持php
[iyunv@server02 php-5.4.5]# vi /usr/local/apache/conf/httpd.conf
找到 AddType application/x-gzip .gz .tgz 在下面添加如下内容
AddType application/x-httpd-php .php
AddType application/x-httpd-php-source .phps
DirectoryIndex index.php index.html //调整首页文件设置
[iyunv@server02 php-5.4.5]# service httpd stop
[iyunv@server02 php-5.4.5]# service httpd start
##切换到主页中,把原有的删掉,加入以下命令,用来测试php。
[iyunv@server02 php-5.4.5]# cd /usr/local/apache/htdocs/
[iyunv@server02 htdocs]# vi index.html
phpinfo();
?>
##把以html结尾的改为php结尾的后缀,
[iyunv@server02 htdocs]# mv index.html index.php
[iyunv@server02 htdocs]# ls
Index.php
[iyunv@server02 htdocs]#
##还需要进入主配置文件中,加入index.php
DirectoryIndex index.html index.html.var index.php
##这时就可以在客户端上进行测试php,以下表示php成功完成;
|

安装Discuz论坛
1
2
3
4
5
6
7
8
9
10
11
12
13
14
15
16
17
18
19
20
21
22
23
24
25
26
27
28
29
30
31
32
33
34
35
36
37
38
39
40
41
42
43
44
45
46
47
48
49
50
51
52
53
54
55
56
57
58
59
60
61
62
63
64
65
66
67
68
69
| -------------------------安装论坛--------------------------------------------
[iyunv@server02 htdocs]# mysql
Welcome to the MySQL monitor. Commands end with ; or g.
Your MySQL connection id is 3
Server version: 5.5.24-log Source distribution
Copyright (c) 2000, 2011, Oracle and/or its affiliates. All rights reserved.
Oracle is a registered trademark of Oracle Corporation and/or its
affiliates. Other names may be trademarks of their respective
owners.
Type 'help;' or 'h' for help. Type 'c' to clear the current input statement.
mysql> CREATE DATABASE bbs; //创建一个数据库//
Query OK, 1 row affected (0.09 sec)
//把bbs数据库里面所有表的权限授予给bbsuser,并设置密码//
mysql> GRANT all ON bbs.* TO 'bbsuser'@'%' IDENTIFIED BY 'admin123';
Query OK, 0 rows affected (0.13 sec)
mysql> flush privileges; //刷新数据库//
Query OK, 0 rows affected (0.00 sec)
mysql> quit
Bye
##将下载好的包进行解压缩:
[iyunv@server02 htdocs]# cd /lamp/
[iyunv@server02 lamp]# unzip Discuz_X2.5_SC_UTF8.zip -d /opt/dis
[iyunv@server02 lamp]# cd /opt/dis/
[iyunv@server02 dis]# ls
readme upload utility
[iyunv@server02 dis]# cp -r upload/ /usr/local/apache/htdocs/bbs
##修改以下四个文件的的属主为daemon
[iyunv@server02 dis]# cd /usr/local/apache/htdocs/bbs
[iyunv@server02 bbs]# chown -R daemon ./config
[iyunv@server02 bbs]# chown -R daemon ./data
[iyunv@server02 bbs]# chown -R daemon ./uc_client
[iyunv@server02 bbs]# chown -R daemon ./uc_server/data
[iyunv@server02 bbs]# ls -l
总用量 116
-rw-r--r--. 1 root root 2603 5月 15 23:56 admin.php
drwxr-xr-x. 11 root root 4096 5月 15 23:56 api
-rw-r--r--. 1 root root 727 5月 15 23:56 api.php
drwxr-xr-x. 2 root root 4096 5月 15 23:56 archiver
drwxr-xr-x. 2 daemon root 4096 5月 15 23:56 config
-rw-r--r--. 1 root root 922 5月 15 23:56 connect.php
-rw-r--r--. 1 root root 253 5月 15 23:56 cp.php
-rw-r--r--. 1 root root 106 5月 15 23:56 crossdomain.xml
drwxr-xr-x. 13 daemon root 4096 5月 15 23:56 data
-rw-r--r--. 1 root root 5558 5月 15 23:56 favicon.ico
-rw-r--r--. 1 root root 2110 5月 15 23:56 forum.php
-rw-r--r--. 1 root root 823 5月 15 23:56 group.php
-rw-r--r--. 1 root root 1223 5月 15 23:56 home.php
-rw-r--r--. 1 root root 5448 5月 15 23:56 index.php
drwxr-xr-x. 5 root root 4096 5月 15 23:56 install
-rw-r--r--. 1 root root 1040 5月 15 23:56 member.php
-rw-r--r--. 1 root root 1381 5月 15 23:56 misc.php
-rw-r--r--. 1 root root 1757 5月 15 23:56 plugin.php
-rw-r--r--. 1 root root 985 5月 15 23:56 portal.php
-rw-r--r--. 1 root root 582 5月 15 23:56 robots.txt
-rw-r--r--. 1 root root 1158 5月 15 23:56 search.php
drwxr-xr-x. 10 root root 4096 5月 15 23:56 source
drwxr-xr-x. 6 root root 4096 5月 15 23:56 static
drwxr-xr-x. 3 root root 4096 5月 15 23:56 template
drwxr-xr-x. 6 daemon root 4096 5月 15 23:56 uc_client
drwxr-xr-x. 13 root root 4096 5月 15 23:56 uc_server
-rw-r--r--. 1 root root 1691 5月 15 23:56 userapp.php
[iyunv@server02 bbs]#
|
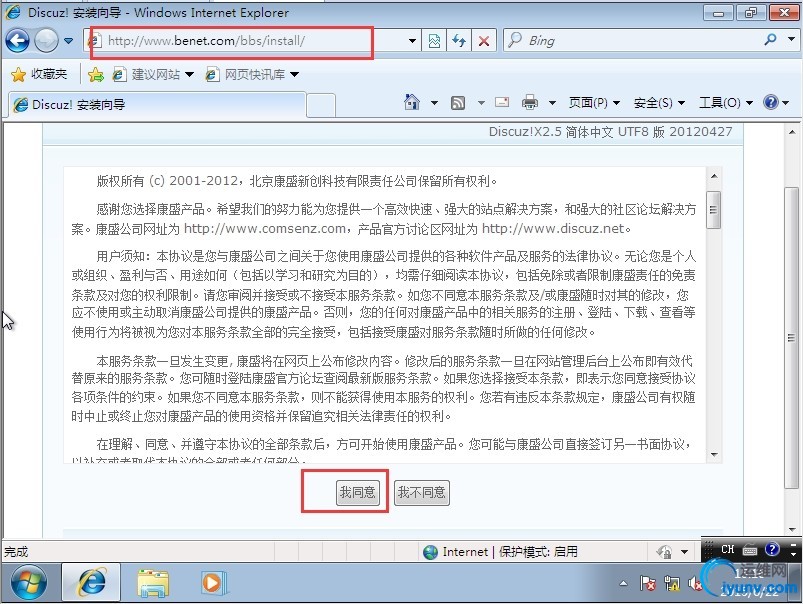
##输入www.benet.com/bbs ,就可以登录安装界面,图形化安装,很友好。单击“我同意”即可

接下来在正式安装之前,安装程序会检查软件需求,磁盘空间、目录和文件权限、PHP函数支持等是否满足条件。

##在填写数据库信息中;输入已创建的数据库名、用户名、密码,进行登录
##在填写管理员信息中;输入admin、密码自定义


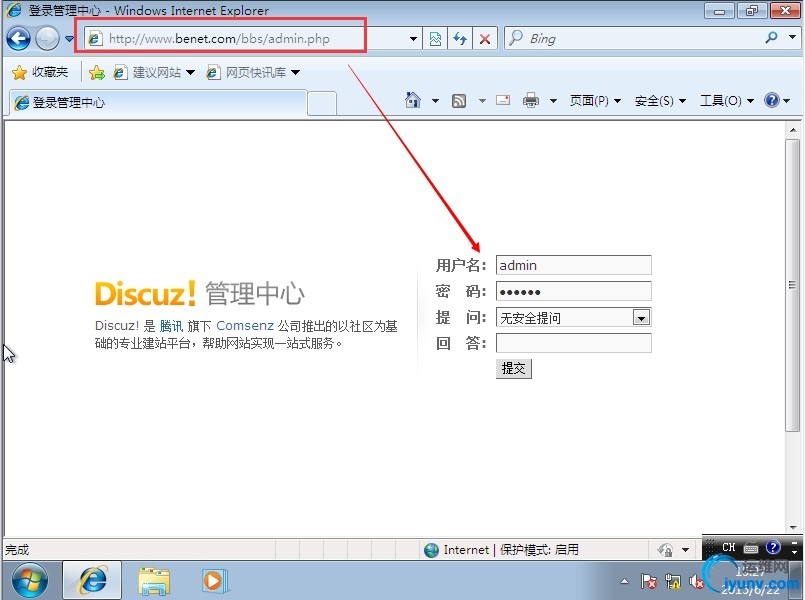
##网站的后台;输入www.benet.com/bbs/admin.php


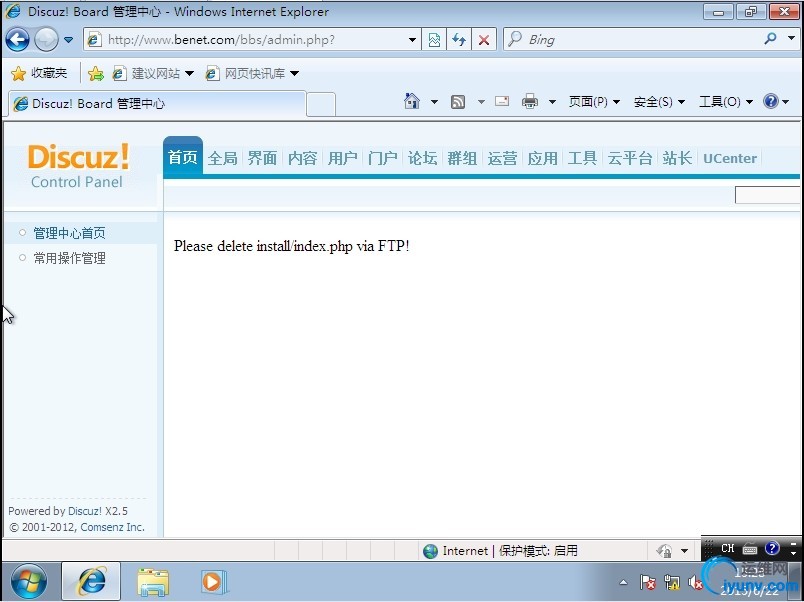
现在是以管理员的身份登录的,要想使用另一个账号登录,退出即可,重新注册。

此时,已经安装完毕了,我们就可以使用了
MySQL脚本
mkdir /opt/lamp
mount.cifs //192.168.10.50/LAMP /opt/lamp
tar zxvf /opt/lamp/mysql-5.5.24.tar.gz -C /opt/
---------------安装环境包-----------------
确认安装 gcc 、 gcc-c++ 、make、cmake
ncurses-devel、
bison、
libaio-devel的软件包
---------------添加mysql用户并加入到mysql组----------------
groupadd mysql
useradd -g mysql -s /sbin/nologin mysql
mkdir -p /usr/local/mysql
cd /opt/mysql-5.5.24.tar.gz
cmake -DCMAKE_INSTALL_PREFIX=/usr/local/mysql //安装目录//
-DMYSQL_UNIX_ADDR=/home/mysql/mysql.sock //指定数据库连接文件位置//
-DDEFAULT_CHARSET=utf8 //字符集设定//
-DDEFAULT_COLLATION=utf8_general_ci
-DWITH_EXTRA_CHARSETS=all //支持扩展字符集//
-DWITH_MYISAM_STORAGE_ENGINE=1 //开启引擎模块//
-DWITH_INNOBASE_STORAGE_ENGINE=1
-DWITH_MEMORY_STORAGE_ENGINE=1
-DWITH_READLINE=1 //启用readline库//
-DENABLED_LOCAL_INFILE=1 //支持读取本地数据//
-DMYSQL_DATADIR=/home/mysql //数据库文件家目录//
-DMYSQL_USER=mysql //指定用户//
-DMYSQL_TCP_PORT=3306 //指定端口//
make & make install
find -name CMakeCache.txt
rm -f ./CMakeCache.txt //报错处理//
chown -R mysql.mysql /usr/local/mysql //更改属主和属组//
export PATH=$PATH:/usr/local/mysql/bin/ *开机时刷新* //更改环境变量//
或者可选择vi /etc/profile 在最后一行加入后 运行source /etc/profile
rcp /usr/local/mysql/support-files/my-medium.cnf /etc/my.cnf //指定配置文件路径//
cp /usr/local/mysql/support-files/mysql.server /etc/init.d/mysqld //便于service进行管理//
chmod 755 /etc/init.d/mysqld //mysql脚本添加权限//
chkconfig --add /etc/init.d/mysqld //添加mysqld服务项到chkconfig中//
chkconfig mysqld --level 35 on //3.5级别开机自启动//
--------------初始化数据库------------------------------------------------
/usr/local/mysql/scripts/mysql_install_db
--user=mysql
--ldata=/var/lib/mysql
--basedir=/usr/local/mysql
--datadir=/home/mysql
ln -s /var/lib/mysql/mysql.sock /home/mysql/mysql.sock /*直接建立软连接*/
vi /etc/init.d/mysqld
basedir=/usr/local/mysql
datadir=/home/mysql
service mysqld start
netstat -tnl 3306
---------------------------------------------------------------
mysql>show databases;
PHP脚本
首先安装GD库和GD库关联程序 //用来处理和生成图片//
yum install
libjpeg-devel
libpng-devel
freetype-devel
zlib-devel
gettext-devel
libXpm-devel
libxml2-devel
fontconfig-devel
openssl-devel
bzip2-devel
tar xzvf gd-2.0.35.tar.gz -C /opt
cd /opt/gd/2.0.35
./configure --prefix=/usr/local/gd
make
make install
tar xjvf /opt/lamp/php-5.4.5.tar.bz2 -C /opt
-------------PHP 配置---------------------------
./configure
--prefix=/usr/local/php
--with-apxs2=/usr/local/apache/bin/apxs
--with-gd
--with-mysql=/usr/local/mysql
--with-config-file-path=/etc
--enable-sqlite-utf8
--with-zlib-dir
--with-libxml-dir
--with-freetype-dir
--with-jpeg-dir
--with-png-dir
--with-ttf
--with-iconv
--with-openssl
--with-gettext
--enable-mbstring
--enable-gd-native-ttf
--enable-gd-jis-conv
--enable-static
--enable-zend-multibyte
--enable-inline-optimization
--enable-sockets
--enable-soap
--enable-ftp
--disable-ipv6
make
make install
--------解决make过程中的错误--------
vi /usr/local/gd/include/gd_io.h
void (*gd_free) (struct gdIOCtx *);
void (*data); //添加//
}
gdIOCtx;
cp php.ini-production /etc/php.ini //优化调整PHP//
--------让apache 支持php-----------------------------------
vi /usr/local/apache/conf/httpd.conf
找到 AddType application/x-gzip .gz .tgz 在下面添加如下内容
AddType application/x-httpd-php .php
AddType application/x-httpd-php-source .phps
LoadModule php5_module modules/libphp5.so //添加
DirectoryIndex index.php index.html //调整首页文件设置
service httpd stop
service httpd start
phpinfo();
?>
------------------安装论坛-----------------
mysql> CREATE DATABASE bbs; //创建一个数据库//
mysql> GRANT all ON bbs.* TO 'bbsuser'@'%' IDENTIFIED BY 'admin123'; //把bbs数据库里面所有表的权限授予给bbsuser,并设置密码//
mysql>flush privileges; //刷新数据库//
unzip /opt/lamp/Discuz_X2.5_SC_UTF8.zip -d /opt/dis
cd /opt/dis
cp -r upload/ /usr/local/apache/htdocs/bbs
cd /usr/local/apache/htdocs/bbs
chown -R daemon ./config
chown -R daemon ./data
chown -R daemon ./uc_client
chown -R daemon ./uc_server/data
----------------下面可以忽略------------------------------------------------
查看bbs数据库中的表
use bbs;
show tables;
--------下面测试数据库工作是否正常-----
$link=mysql_connect('主机IP','bbsuser','admin123');
if($link) echo "Success!!";
else echo "Fail!!";
mysql_close();
?>
--------以下是优化内容,可以不理会-----------
date
Warning: phpinfo(): It is not safe to rely on the system's timezone settings.
You are *required* to use the date.timezone setting or the date_default_timezone_set() function.
In case you used any of those methods and you are still getting this warning, you most likely misspelled
the timezone identifier. We selected the timezone 'UTC' for now, but please set date.timezone to select your timezone.
in /usr/local/apache/htdocs/index.php on line 2
上面的内容翻译后如下:
日期
警告:phpinfo()函数:这是不是安全依赖于系统的时区设置。您需要使用的的date.timezone设置或
date_default_timezone_set()函数。如果你用任何方法,你仍然得到这样的警告,您最有可能的拼写错误时区标识符。
我们选择了现在的时区'UTC',但请选择您的时区设置date.timezone。中的/ usr /本地/阿帕奇/ htdocs中/的index.php上线2
在访问PHP的时候有这样的警告,解决方法如下:
[iyunv@ling ~]# vi /etc/php.ini
date.timezone = UTC //将这一行前面的“;”给去掉,添加UTC
|