|
|
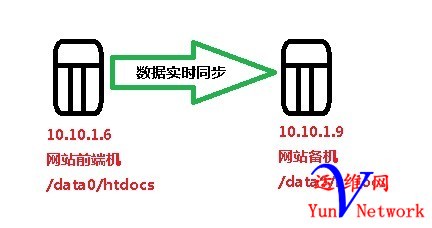
起初用rsync进行数据备份是利用计划任务,定时执行一下命令实现rsync的同步,但最近开发这边修改比较频繁,看来需要实时同步备份来完善备份机制!所以需要利用inotify触发器来改善!

说明:
10.10.1.6 (rsync+inotify)----------网站程序(/data0/htdocs/)
10.10.1.9 (rsync)---------------------网站程序备份(/data0/htdocs/)
目的:
实时自动同步:10.10.1.6------->10.10.1.9到目录:/data0/htdocs
一、web服务器10.10.1.6 (rsync+inotify)
1、准备软件包
# mkdir /data/ftpdata
# wget http://rsync.samba.org/ftp/rsync/rsync-3.0.9.tar.gz
# wget http://cloud.github.com/download ... y-tools-3.14.tar.gz
2、安装Rsync
# tar -zxvf rsync-3.0.9.tar.gz
# cd rsync-3.0.9
# ./configure --prefix=/usr/local/rsync
# make;make install
建立密码认证文件
[iyunv@ftp ~]# echo "111111">/etc/rsyncd/rsyncd.secrets
*其中111111可以自己设置密码,rsyncd.secrets名字也可以自己设置;
权限:要将/etc/rsyncd/rsyncd.secrets设置为root拥有, 且权限为600。
# chmod 600 /etc/rsyncd/rsyncd.secrets
# ll /etc/rsyncd/rsyncd.secrets
-rw------- 1 root root 7 Jun9 21:24 /etc/rsyncd.secrets
3、安装inotify
# tar -zxvf inotify-tools-3.14.tar.gz
# cd inotify-tools-3.14
# ./configure --prefix=/usr/local/inotify
# make;make install
4、创建rsync复制脚本
此项功能主要是将ftp端的目录/data0/htdocs/里的内容,如果修改了(无论是添加、修改、删除文件)能够通过inotify监控到,并通过rsync实时的同步给10.10.1.9的/data0/htdocs里,下面是通过shell脚本实现的。
[iyunv@web ~]# vim /root/shell/rsync.sh
#!/bin/bash
host=10.10.1.9
src=/data0/htdocs/
/usr/local/inotify/bin/inotifywait -mrq --timefmt '%d/%m/%y %H:%M' --format '%T %w%f%e' –e modify,delete,create,attrib $src| while read files
do
/usr/bin/rsync -vzrtopg --delete --password-file=/etc/rsyncd/rsyncd.secrets $src root@$host::htdocs> /dev/null
echo "${files} was rsynced" >>/var/log/rsync.log 2>&1
done
[iyunv@web ~]# chmod u+x /root/shell/rsync.sh
[iyunv@web ~]# setsid /root/shell/rsync.sh & 后台运行脚本,关闭shell终端继续后台运行
rsync.sh脚本加入开机启动项
# echo "/root/shell/rsync.sh" >> /etc/rc.local
防火墙开启rsync端口:873
添加:
iptables -A INPUT -m state --state NEW -m tcp -p tcp --dport 873 -jACCEPT
重启:
# /etc/init.d/iptables restart
二、备份服务器10.10.1.9(rsync)
1、准备工作
创建备份目录:
# mkdir /data0/htdocs
2、安装rsync(备份主机只安装rsync)
# tar -zxvf rsync-3.0.9.tar.gz
# cd rsync-3.0.9
# ./configure --prefix=/usr/local/rsync
# make;make install
3、建立用户与密码认证文件
[iyunv@backup ~]# echo "root:111111" > /etc/ rsyncd/rsyncd.secrets
[iyunv@backup ~]# less /etc/rsyncd/rsyncd.secrets
root:111111
注意:
请记住,在10.10.1.6端建立的密码文件,只有密码,没有用户名;而在10.10.1.9里建立的密码文件,用户名与密码都有。
权限:要将/etc/rsyncd/rsyncd.secrets设置为root拥有, 且权限为600。
#chmod 600 /etc/rsyncd/rsyncd.secrets
4、建立rsync配置文件
[iyunv@backup ~]# vim /etc/rsyncd/rsyncd.conf
pid file = /var/run/rsyncd.pid
port = 873
address = 10.10.1.9
#uid = nobody
#gid = nobody
uid = root
gid = root
use chroot = no
read only = no
#limit access to private LANs
hosts allow=10.10.1.0/255.255.255.0
hosts deny=*
max connections = 5
motd file = /etc/rsyncd/rsyncd.motd
#This will give you a separate log file
log file = /var/log/rsync.log
#transfer logging = yes
log format = %t %a %m %f %b
syslog facility = local3
timeout = 300
[htdocs]
path = /data0/htdocs
list=yes
ignore errors
auth users = root
secrets file = /etc/rsyncd/rsyncd.secrets
#comment = rsync htdocs
启动rsync服务
# /usr/local/rsync/bin/rsync --daemon --config=/etc/rsyncd.conf
# ps -ef |grep rsync
Rsync服务加入开机启动项
# echo "/usr/local/rsync/bin/rsync --daemon --config=/etc/rsyncd.conf" >> /etc/rc.local
防火墙开启rsync端口:873
添加:
iptables -A INPUT -m state --state NEW -m tcp -p tcp --dport 873 -jACCEPT
重启:
# /etc/init.d/iptables restart
完成!
|
|
|