|
|
这篇文章将总结下如何将自己开发的列表、Web部件、事件接收器等元素部署到SharePoint的服务器。因水平有限,我的做法未必是最佳实践,会有些错误理解和疏漏,欢迎各位高手批评指正——但一定要能给出更好的方案。如果您是SharePoint开发的新手,希望能和我一起积极的思考,也欢迎您的讨论。
首先写个简单的通过PowerShell部署Web部件的例子。当我写了一个SharePoint 2013 的可视化Web部件,在Visual Studio 2012发布后,将得到一个wsp文件(这是个压缩文件),例如叫VisualWebPartProject1.wsp。然后我们打开SharePoint 2013 Management Shell,输入下面的命令,这个Web部件就可以使用了!
Add-SPSolution –LiteralPath C:\VisualWebPartProject1.wsp
Install-SPSolution -Identity VisualWebPartProject1.wsp -WebApplication "SharePoint - 80" -GACDeployment –FullTrustBinDeployment
Enable-SPFeature -Identity c63aa2e6-527e-4de4-8e99-1729f2d052aa -Url http://sp2013-01:80/
从上面的PowerShell命令,我们可以看出做了三件事儿:1、添加解决方案包(Add-SPSolution); 2、部署解决方案包(Install-SPSolution); 3、激活功能(Enable-SPFeature)。(参数细节请参考http://technet.microsoft.com/zh-cn/library/ee906565.aspx)。
一定有很多人会觉得PowerShell部署已经很简单,但是我总觉得PowerShell命令不好记也不好写。而且有时需要技术不专业的人帮忙(例如客户IT)会多费不少口舌,不如把它做成一个exe文件,把参数写到XML里配置好,这样实施人员一双击执行文件就OK了。
下面我们就研究下如何用C#代码完成这部署三大步骤,不过之前要介绍几个重要的.NET类型!
1、SPFarm:服务器场, 可通过SPFarm.Local获取本地服务器场对象。
2、SPWebApplication:Web应用程序,可以通过SPWebService.ContentService.WebApplications获取它们的集合,也可以在这个集合中用它的Name属性找到您想要的对象。
3、SPSite:网站集,可以传参网站集URL给SPSite的构造方法创建对象,也可以通过SPWebApplication对象的Sites属性获取集合。
4、SPWeb:网站/子网站,每个SPSite对象有一个RootWeb属性,是它的根网站;还有个AllWebs属性,是它的所有网站。每个SPWeb对象也有个Webs属性,是这个网站的子网站。
5、SPSolution:解决方案,我们开发项目生成的wsp文件就靠它来管理,SPFarm对象有个Solutions的属性,是解决方案的集合。在SharePoint管理中心主页(SharePoint 2013 Central Administration)-〉系统设置(System Settings)-〉场管理(Farm Management)-〉管理场解决方案(Manage farm solutions)能看到已上传的解决方案。更多了解解决方案包请参考http://technet.microsoft.com/zh-cn/library/cc262995(v=office.14).aspx。
6、SPFeatureDefinition:功能定义,SPFarm对象有个FeatureDefinitions的属性,是功能定义的集合。PSite、SPWeb对象也有FeatureDefinitions属性,从SPFeature(功能)对象的FeatureDefinitionScope属性还能获取到一个SPFeatureDefinitionScope枚举值。
7、SPFeature:功能,SPWebApplication、SPSite、SPWeb都有一个Features属性,是它们的功能集合。在SharePoint页面的设置-〉系统设置-〉网站集管理-〉网站集功能 能看到网站集的功能;在SharePoint页面的设置-〉系统设置-〉网站操作-〉管理网站功能看到网站的功能。更多了功能请参考http://technet.microsoft.com/zh-cn/library/ff607883(v=office.14).aspx。
接下来要准备写代码了,用Visual Studio 2012创建一个控制台应用程序,为项目添加新项-〉数据-〉XML文件,为这个文件取一个温暖的名字——这是部署信息的配置文件,我这里就叫DeploymentInfo.xml了。文件属性-〉高级-〉复制到输出目录选择“如果较新就复制”。然后加入类似下面的内容:
<configuration>
<solution literalPath="WSPPackage\SharePointSolution1.wsp" webApplicationName="SharePoint - 80" isForceInstall="true" >
<feature featureId="cc7c09d1-023c-4917-82ab-b82b846631a8" siteUrl="http://sharepointsiteurl/" webName="" isForceInstall="true" />
<feature featureId="74f7c14b-dcca-4d4f-b2f7-7be3e7955bd1" siteUrl="http://sharepointsiteurl/" webName="" isForceInstall="true" />
</solution>
<solution literalPath="WSPPackage\SharePointSolution2.wsp" webApplicationName="SharePoint - 80" isForceInstall="true" >
<feature featureId="f60f8bfe-5d65-43de-86b4-cc10fbcab800" siteUrl="http://sharepointsiteurl/" webName="webName" isForceInstall="true" />
<feature featureId="963241f7-b33e-4c3e-bf00-cbcaf1c22412" siteUrl="http://sharepointsiteurl/" webName="webName" isForceInstall="true" />
<feature featureId="26dab42a-0f42-449b-84c0-111a8474dbc4" siteUrl="http://sharepointsiteurl/" webName="webName" isForceInstall="true" />
</solution>
</configuration>
一个solution节点对应一个解决方案包,可以配置部署多个解决方案;一个feature节点对应一个功能,feature节点在solution节点下,也可以有N个。
再解释下配置参数:literalPath是解决方案包的路径,我会在程序文件夹下再放个WSPPackage文件夹,发布生成的wsp文件就放在这里;featureId是功能的ID;webApplicationName是web应用程序的名称,siteUrl是网站集的URL,webName是网站的名称,这三个参数如果没有将遍历全部(根网站的webName是空字符串)。isForceInstall是是否强制参数,其实我们在Visual Studio里可以设置这个参数,但是默认是"False ",我不愿意改它。
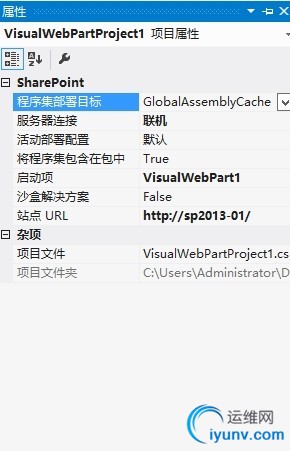
在Web部件代码Visual Studio解决方案管理器里选中项目-〉属性窗口可以看到解决方案的属性。

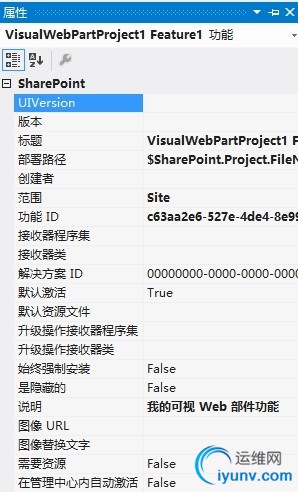
双击Features文件夹下的某个Feature文件,在属性窗口就能看到功能的属性,包括功能ID。

我们程序代码要做的事就是利用这些部署信息将开发元素的解决方案包添加部署,功能激活。
下面正式要上C#代码了,进入代码文件Program.cs 的Main方法,先来段简单的配置文件遍历,取出解决方案和功能信息,要引用命名空间 System.Xml.Linq:
using System;
using System.Collections.Generic;
using System.Linq;
using System.Xml.Linq;
namespace SharePointWspDeployApplication
{
class Program
{
static void Main(string[] args)
{
XElement root = XElement.Load("DeploymentInfo.xml");
IEnumerable<XElement> solutionXElements = root.Elements("solution");
foreach (XElement solutionXElement in solutionXElements)
{
string literalPath = solutionXElement.Attribute("literalPath") != null ? solutionXElement.Attribute("literalPath").Value : null;
XElement[] featureXElements = solutionXElement.Elements("feature").ToArray();
foreach (var featureXElement in featureXElements)
{
Guid featureId = new Guid(featureXElement.Attribute("featureId").Value);
}
}
}
}
}
这里解决方案添加只要为场对象添加就行,我直接调用SPFarm对象的SPSolutionCollection类型Solutions属性的Add方法,传给wsp文件的路径。(SPSite、SPWeb对象也有Solutions属性,但是SPUserSolutionCollection类型)。添加完成后我们可以到SharePoint配置数据库SharePoint_Config的Objects表里找到两条name是wsp文件名的记录(wsp文件名是小写的),有一条能够在 Binaries表中找到对应记录(Id和ObjectId关联),用下面的方法可以把wsp文件取出来。
private static void GetFileFromConfigDataBase(string fileName,string path)
{
byte[] file = null;
const string connectionString = "data source=.;initial catalog=SharePoint_Config;Trusted_Connection=Yes;";
const string commandText = "SELECT [FileImage] FROM [Objects] INNER JOIN [Binaries] ON [Objects].[Id] = [Binaries].[ObjectId] WHERE [name] = @fileName";
using (SqlConnection sqlConnection = new SqlConnection(connectionString))
{
using (SqlCommand sqlCommand = new SqlCommand(commandText, sqlConnection))
{
sqlCommand.Parameters.Add(new SqlParameter("@fileName", fileName));
sqlConnection.Open();
using (SqlDataReader sqlDataReader = sqlCommand.ExecuteReader(CommandBehavior.SingleRow))
{
if (sqlDataReader.Read())
{
file = (byte[])sqlDataReader[0];
}
}
}
}
if (file != null)
{
using (FileStream fileStream = new FileStream(Path.Combine(path,fileName), FileMode.CreateNew))
{
fileStream.Write(file, 0, file.Length);
fileStream.Close();
}
}
}
文件取出来后,我们可以把这个wsp文件解压,和上传之前的对比下。我的电脑上的解压缩软件可以直接解压,如果不行可尝试把扩展名改成cab的。解压缩后可以看到文件夹里有manifest.xml文件、DLL文件、Feature文件夹。
部署解决方案稍微复杂些,SPSolution对象有两个部署方法LocalDeploy和Deploy(Deploy要传个时间点启用Timer job,是多个Web前端服务器可用部署方式),每个部署方法又有个重载。
在Visual Studio项目属性窗口有个程序集部署目标的属性,可选择GlobalAssemblyCache或WebApplication,如果沙盒解决方案选择“True”,这个属性就不能选了。那么我们直接用Visual Studio部署时如果选择了GlobalAssemblyCache会是什么样呢?我试着将一个Web部件项目属性的程序集部署目标设置为GlobalAssemblyCache,然后选择项目右键部署,再到SharePoint管理中心主页的管理场解决方案列表,发现Deployed To列是个URL而不是“Globally deployed.”!
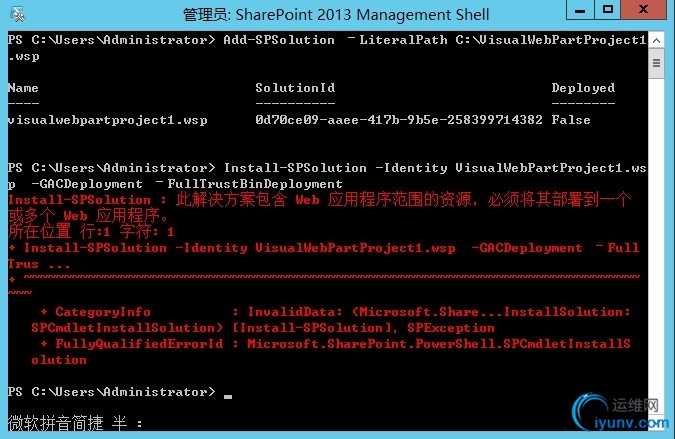
然后我在SharePoint 2013 Management Shell执行下面的命令部署(未指定Web应用程序):
Install-SPSolution -Identity VisualWebPartProject1.wsp -GACDeployment –FullTrustBinDeployment
执行后发现也报错!

看来是我理解乱了。原来这个程序集部署目标的属性决定的是DLL的部署位置,如果我们选择GlobalAssemblyCache,将在盘符:\Windows\Microsoft.NET\assembly\GAC_MSIL\ 找到对应文件;选择WebApplication,则在盘符:\inetpub\wwwroot\wss\VirtualDirectories\80\bin\找到对应文件。SPSolution对象有个ContainsGlobalAssembly属性,程序集部署目标如果选择了GlobalAssemblyCache,它就是“true”。
为了避免上述 “此解决方案包含Web应用程序范围的资源,必须将其部署到一个或多个Web应用程序。”的异常,可以通过SPSolution对象的ContainsWebApplicationResource属性来判断,如果为“True”,部署时要指定Web应用程序,即使用带Collection<SPWebApplication>参数的部署重载方法。
解决方案的添加和部署操作代码要写在外层对解决方案信息节点遍历的foreach循环里。下面是我添加和部署解决方案的代码(要添加程序集-扩展-Microsoft.SharePoint引用,命名空间要引入Microsoft.SharePoint.Administration,如果系统是64位的,生成-目标平台也要改成x64):
XElement root = XElement.Load("DeploymentInfo.xml");
IEnumerable<XElement> solutionXElements = root.Elements("solution");
SPWebApplicationCollection spWebApplicationCollection = SPWebService.ContentService.WebApplications;
foreach (XElement solutionXElement in solutionXElements)
{
string literalPath = solutionXElement.Attribute("literalPath") != null ? solutionXElement.Attribute("literalPath").Value : null;
XAttribute webApplicationNameAttribute = solutionXElement.Attribute("webApplicationName");
SPWebApplication[] spWebApplications;
if (webApplicationNameAttribute != null && !string.IsNullOrEmpty(webApplicationNameAttribute.Value))
{
spWebApplications = new[] { spWebApplicationCollection[webApplicationNameAttribute.Value] };
}
else
{
spWebApplications = spWebApplicationCollection.ToArray();
}
Console.WriteLine("开始添加解决方案:");
string wspName = Path.GetFileName(literalPath).ToLower();
SPSolution spSolution = SPFarm.Local.Solutions[wspName];
if (spSolution != null)
{
if (spSolution.Deployed)
{
if (spSolution.ContainsWebApplicationResource)
{
Console.WriteLine("正在从Web应用程序回收解决方案 “{0}”...", spSolution.Name);
spSolution.RetractLocal(spSolution.DeployedWebApplications);
}
else
{
Console.WriteLine("正在回收解决方案 “{0}”...", spSolution.Name);
spSolution.RetractLocal();
}
}
Console.WriteLine("正在删除解决方案 “{0}”...", spSolution.Name);
spSolution.Delete();
}
if (!string.IsNullOrEmpty(literalPath) && File.Exists(literalPath))
{
Console.WriteLine("正在添加解决方案 “{0}”...", wspName);
spSolution = SPFarm.Local.Solutions.Add(literalPath);
bool isForceInstall = false;
if (solutionXElement.Attribute("isForceInstall") != null)
{
isForceInstall = string.Equals("true", solutionXElement.Attribute("isForceInstall").Value, StringComparison.OrdinalIgnoreCase);
}
if (spSolution.ContainsWebApplicationResource)
{
Console.WriteLine(@"正在部署解决方案 “{0}” 到 Web应用程序 “{1}”...", spSolution.Name, string.Join(",", spWebApplications.Select(a => a.DisplayName).ToArray()));
spSolution.DeployLocal(spSolution.ContainsGlobalAssembly, new Collection<SPWebApplication>(spWebApplications), isForceInstall);
}
else
{
Console.WriteLine("正在部署解决方案 “{0}”...", spSolution.Name);
spSolution.DeployLocal(spSolution.ContainsGlobalAssembly, isForceInstall);
}
}
else
{
Console.WriteLine("literalPath为空或指定路径文件不存在!");
}
}
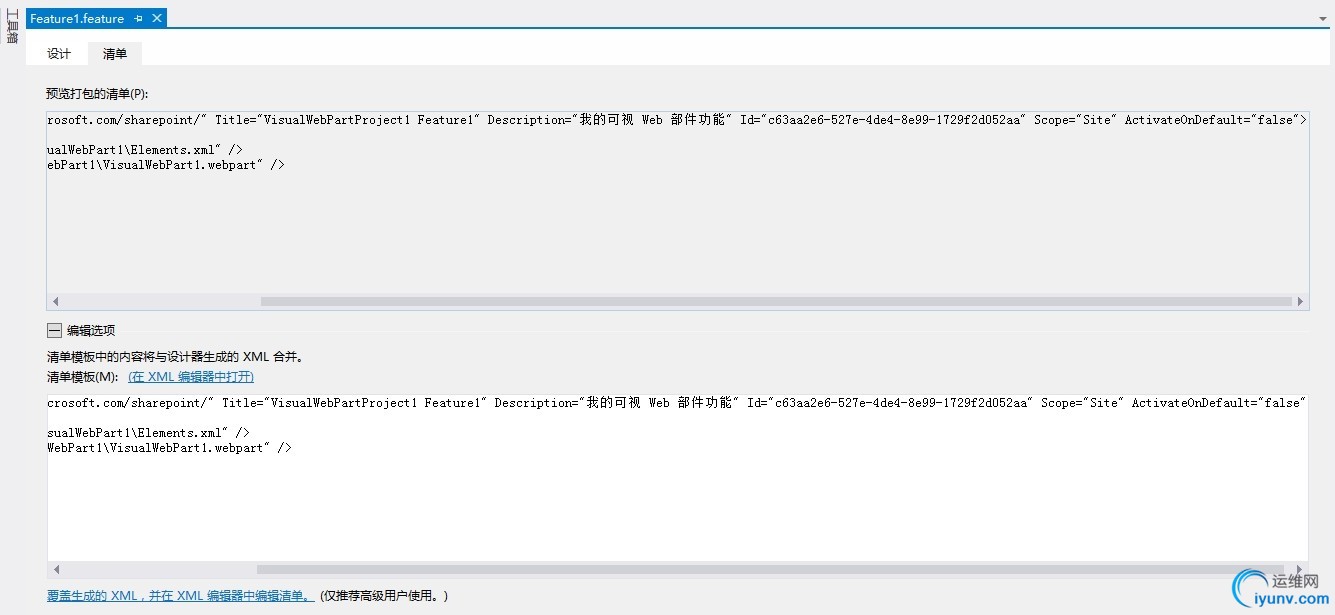
解决方案添加并部署后,可以到激活功能了。我们在开发时设置的功能属性可以通过SPFeatureDefinition的对象得到(这个SPFeatureDefinition对象可以用SPFarm对象的FeatureDefinitions属性以功能ID或名称作索引获取)。例如始终强制安装,应该对应SPFeatureDefinition对象的AlwaysForceInstall属性;ActivationDependencies属性应该对应功能激活依赖项集合。还有个默认激活(Activate On Default)的属性,我本以为就是SPFeatureDefinition对象的ActivateOnDefault属性,但是在属性窗口改了一下发现竟然没效果!后来我在功能清单的XML里找到了个ActivateOnDefault="true"描述。一般的情况下,您修改功能的属性后,这个manifest.xml里的内容要跟着变的,但是这个默认激活属性在我当前的Visual Studio版本怎么设置都没反应。不过您如果在下面的编辑选项里强制更改ActivateOnDefault="false"还是有效果的。

功能有个重要的范围属性——SPFeatureDefinition对象的Scope,可选择Farm、WebApplication、Site或Web,在代码里这是个SPFeatureScope枚举。我的Web部件如果选择的不是Site,在发布的时候会报类似“错误 1 无法通过具有 WebApplication 范围的功能部署项目项‘VisualWebPart1’。”的错误。因为SPWebApplication、SPSite、SPWeb对象都有一个Features的属性,我们只要根据范围调用SPFeatureCollection的Add方法添加就可以了。下面是添加功能的代码(Farm和WebApplication范围的功能我还没有实际使用和验证过,抱歉!):
Console.WriteLine("开始激活功能:");
foreach (var featureXElement in featureXElements)
{
Guid featureId = new Guid(featureXElement.Attribute("featureId").Value);
SPFeatureDefinition definition =
SPFarm.Local.FeatureDefinitions[featureId];
if (definition != null)
{
if (definition.ActivateOnDefault)
{
bool isForceInstall = definition.AlwaysForceInstall;
if (featureXElement.Attribute("isForceInstall") != null)
{
isForceInstall = string.Equals("true", featureXElement.Attribute("isForceInstall").Value, StringComparison.OrdinalIgnoreCase);
}
if (definition.Scope == SPFeatureScope.Site)
{
XAttribute siteUrlAttribute = featureXElement.Attribute("siteUrl");
if (siteUrlAttribute != null && !string.IsNullOrEmpty(siteUrlAttribute.Value))
{
using (SPSite spSite = new SPSite(siteUrlAttribute.Value))
{
Console.WriteLine("正在激活功能“{0}”到网站集 “{1}”...", definition.DisplayName, spSite.Url);
spSite.Features.Add(featureId, isForceInstall);
}
}
else
{
foreach (SPSite spSite in spWebApplications.SelectMany(a => a.Sites))
{
Console.WriteLine("正在激活功能“{0}”到网站集“{1}”...", definition.DisplayName, spSite.Url);
spSite.Features.Add(featureId, isForceInstall);
}
}
}
else if (definition.Scope == SPFeatureScope.Web)
{
XAttribute siteUrlAttribute = featureXElement.Attribute("siteUrl");
XAttribute webNameAttribute = featureXElement.Attribute("webName");
if (siteUrlAttribute != null)
{
using (SPSite spSite = new SPSite(siteUrlAttribute.Value))
{
if (webNameAttribute != null)
{
using (SPWeb spWeb = spSite.AllWebs[webNameAttribute.Value])
{
Console.WriteLine("正在激活功能“{0}”到网站“{1}”...", definition.DisplayName, spWeb.Title);
spWeb.Features.Add(featureId, isForceInstall);
}
}
else
{
foreach (SPWeb spWeb in spSite.AllWebs)
{
using (spWeb)
{
Console.WriteLine("正在激活功能 “{0}”到 网站“{1}”...", definition.DisplayName, spWeb.Title);
spWeb.Features.Add(featureId, isForceInstall);
}
}
}
}
}
else
{
foreach (SPWeb spWeb in spWebApplications.SelectMany(a => a.Sites.SelectMany(s => s.AllWebs)))
{
Console.WriteLine("正在激活功能“{0}”到 网站“{1}”...", definition.DisplayName, spWeb.Title);
spWeb.Features.Add(featureId, isForceInstall);
}
}
}
else if (definition.Scope == SPFeatureScope.WebApplication)
{
foreach (SPWebApplication spWebApplication in spWebApplications)
{
Console.WriteLine("正在激活功能“{0}”到 Web应用程序 “{1}”...", definition.DisplayName, spWebApplication.DisplayName);
spWebApplication.Features.Add(featureId, isForceInstall);
}
}
else if (definition.Scope == SPFeatureScope.Farm)
{
//TODO:还未找到方案
}
else
{
//TODO:还未找到方案
}
}
else
{
Console.WriteLine("ID为{0}的功能默认不在安装期间激活!", featureId.ToString());
}
}
else
{
Console.WriteLine("未找到ID为{0}的功能定义!", featureId.ToString());
}
}
功能成功被添加后,在盘符:\Program Files\Common Files\microsoft shared\Web Server Extensions\15\TEMPLATE\FEATURES下找到了对应的功能文件夹,这个路径可以通过SPFeatureDefinition对象的属性获取。
下面是删除功能和功能定义的代码:
Console.WriteLine("开始回收功能:");
foreach (var featureXElement in featureXElements)
{
Guid featureId = new Guid(featureXElement.Attribute("featureId").Value);
SPFeatureDefinition definition =
SPFarm.Local.FeatureDefinitions[featureId];
if (definition != null)
{
bool isForceInstall = definition.AlwaysForceInstall;
if (featureXElement.Attribute("isForceInstall") != null)
{
isForceInstall = string.Equals("true", featureXElement.Attribute("isForceInstall").Value, StringComparison.OrdinalIgnoreCase);
}
if (definition.Scope == SPFeatureScope.Site)
{
XAttribute siteUrlAttribute = featureXElement.Attribute("siteUrl");
if (siteUrlAttribute != null && !string.IsNullOrEmpty(siteUrlAttribute.Value))
{
using (SPSite spSite = new SPSite(siteUrlAttribute.Value))
{
Console.WriteLine("正在从网站集“{0}”回收功能“{1}”...", spSite.Url, definition.DisplayName);
SPFeature spFeature = spSite.Features[featureId];
if (spFeature != null)
{
spSite.Features.Remove(featureId, isForceInstall);
}
}
}
else
{
foreach (SPSite spSite in spWebApplications.SelectMany(a => a.Sites))
{
Console.WriteLine("正在从网站集“{0}”回收功能“{1}”...", spSite.Url, definition.DisplayName);
SPFeature spFeature = spSite.Features[featureId];
if (spFeature != null)
{
spSite.Features.Remove(featureId, isForceInstall);
}
}
}
}
else if (definition.Scope == SPFeatureScope.Web)
{
XAttribute siteUrlAttribute = featureXElement.Attribute("siteUrl");
XAttribute webNameAttribute = featureXElement.Attribute("webName");
if (siteUrlAttribute != null)
{
using (SPSite spSite = new SPSite(siteUrlAttribute.Value))
{
if (webNameAttribute != null)
{
using (SPWeb spWeb = spSite.AllWebs[webNameAttribute.Value])
{
Console.WriteLine("正在从网站“{0}”回收功能“{1}”...", spWeb.Title, definition.DisplayName);
SPFeature spFeature = spWeb.Features[featureId];
if (spFeature != null)
{
spWeb.Features.Remove(featureId, isForceInstall);
}
}
}
else
{
foreach (SPWeb spWeb in spSite.AllWebs)
{
using (spWeb)
{
Console.WriteLine("正在从网站“{0}”回收功能“{1}”...", spWeb.Title, definition.DisplayName);
SPFeature spFeature = spWeb.Features[featureId];
if (spFeature != null)
{
spWeb.Features.Remove(featureId, isForceInstall);
}
}
}
}
}
}
else
{
foreach (SPWeb spWeb in spWebApplications.SelectMany(a => a.Sites.SelectMany(s => s.AllWebs)))
{
Console.WriteLine("正在从网站“{0}”回收功能“{1}”...", spWeb.Title, definition.DisplayName);
SPFeature spFeature = spWeb.Features[featureId];
if (spFeature != null)
{
spWeb.Features.Remove(featureId, isForceInstall);
}
}
}
}
else if (definition.Scope == SPFeatureScope.WebApplication)
{
foreach (SPWebApplication spWebApplication in spWebApplications)
{
Console.WriteLine("正在从Web应用程序“{0}”回收功能“{1}” ...", spWebApplication.DisplayName, definition.DisplayName);
SPFeature spFeature = spWebApplication.Features[featureId];
if (spFeature != null)
{
spWebApplication.Features.Remove(featureId, isForceInstall);
}
}
}
else if (definition.Scope == SPFeatureScope.Farm)
{
//TODO:还未找到方案
}
else
{
//TODO:还未找到方案
}
Console.WriteLine("正在删除功能定义“{0}”...", definition.DisplayName);
string featurePath = definition.RootDirectory;
definition.Delete();
}
}
遗憾的是,上面的代码不能够完美解决部署冲突的问题。例如部署过Web部件后我又修改了.webpart文件里的Title,用这种方式重新部署之后不会马上体现更改,而Visual Studio的部署功能却有这个能力——在输出窗口能看到“已找到 1 个部署冲突。正在解决冲突.. 已从服务器中删除文件“.../_catalogs/wp/VisualWebPartProject1_VisualWebPart1.webpart”。”的信息。现在需要个很笨的方法——先到网站设置->Web设计器库->Web部件库把对应的Web部件删掉。
现在一个简单的SharePoint开发包部署程序就给大家介绍完了。不过这个程序还有很多的不足,例如: 我只用它部署过列表、Web部件和事件接收器,不能支持用户解决方案(SPUserSolution),不能部署网站模板;部署的环境只是针对一个Web前端服务器的本地部署,需要使用SharePoint管理员权限运行;另外对部署冲突和功能依赖项的处理还没有找到比较满意的办法。我会继续研究总结并和大家分享。最后,还希望各位高手专家看过此文能够不惜赐教,多多指点!
SharePoint开发包部署程序下载地址:
http://files.cnblogs.com/CSharpDevelopers/SharePointWspDeployApplication.zip
参考资料:
http://technet.microsoft.com/zh-cn/library/cc263205(v=office.15).aspx
http://msdn.microsoft.com/zh-cn/library/microsoft.sharepoint.administration(v=office.12).aspx
|
|