一、Xen简介
1、Xen简介
Xen 英国剑桥大学研发,开源的VMM,是一种类型 1 虚拟机管理程序,它创建系统资源的逻辑池,使许多虚拟机可共享相同的物理资源。 Xen 是一个直接在系统硬件上运行的虚拟机管理程序。Xen 在系统硬件与虚拟机之间插入一个虚拟化层,将系统硬件转换为一个逻辑计算资源池,Xen 可将其中的资源动态地分配给任何操作系统或应用程序。在虚拟机中运行的操作系统能够与虚拟资源交互,就好象它们是物理资源一样。
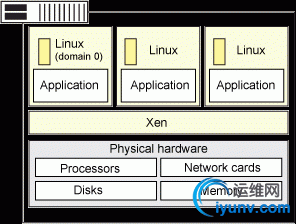
Xen 架构
Xen 运行 3 个虚拟机。每个虚拟机与其他虚拟机都独自运行一个来宾操作系统和应用程序,同时共享相同的物理资源。 2、Xen的组件
1)Xen Hypervisor
分配cpu、内存、interrupt(中断)
2)Dom0
特权域,I/O分配:
网络设备:net-front(guestOS),net-backend
块设备:block-front(guestOS),block-backend
linux kernel:2.6.37支持Dom0 原始支持
3.0对关键特性进行了优化
提供管理DomU工具栈,用于实现对虚拟机进行添加,启动,快照,停止,删除等操作
3)Domu
非特权域,无权直接访问硬件资源
根据其虚拟化方式实现的方式,有多种类型
PV:半虚拟化
HVM:完全虚拟化
PV on HVM:I/O半虚拟化但cpu完全虚拟化
Xen的PV技术:不依赖于CPU的HVM特性,但要求GuestOS的内核作出修改以知晓自己运行于PV环境,
运行于DomU中的OS:linux(2.6.24+),NetBSD,FreeBSD,OpenSolaris
Xen的HVM技术:依赖于Intel VT或AMD AMD-V,还要依赖于Qemu来模拟IO设备
运行于DomU中的OS:几乎所有支持此X86平台的OS
PV on HVM:CPU为HVM模式运行,IO设备为PV模式运行
运行于DomU中的OS:只要OS能驱动PV接口类型的IO设备:net-front,block-front
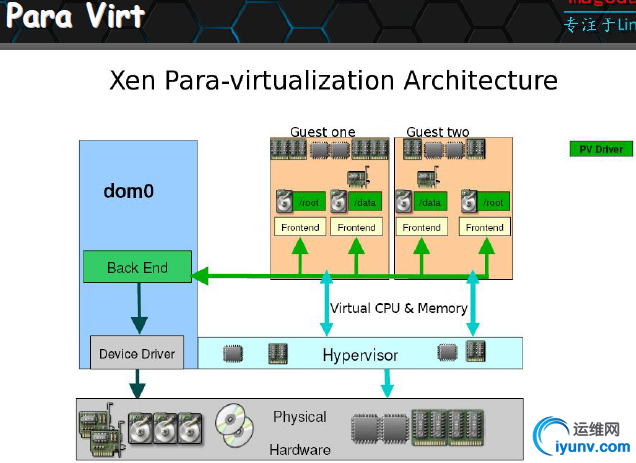
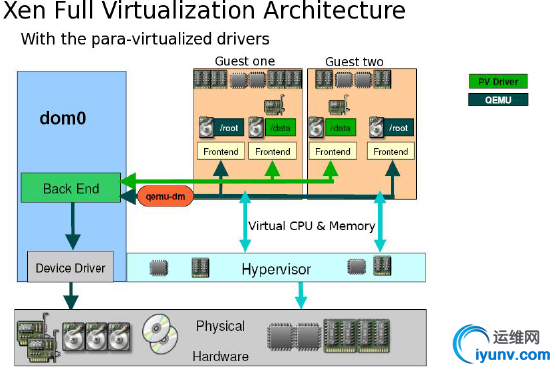
3、CentOS对Xen的支持 RHEL 5.7-:默认的虚拟化技术为xen kernel version:2.6.18 不能运行在Dom0上,要运行Dom0上需要安装补丁,RHEL提供了安装补丁后的内核 kernel-xen:
5.8:同时支持Xen和kvm
6+:仅支持kvm
Dom0:不支持
DomU:支持
那如何在CentOS6上使用Xen?
1)编译3.0以上版本的内核,启动对Dom0的支持
2)编译Xen程序
制作好相关程序包的项目:
xen made easy
xen4centos:xen官方提供,每个centos镜像站中已经提供了,
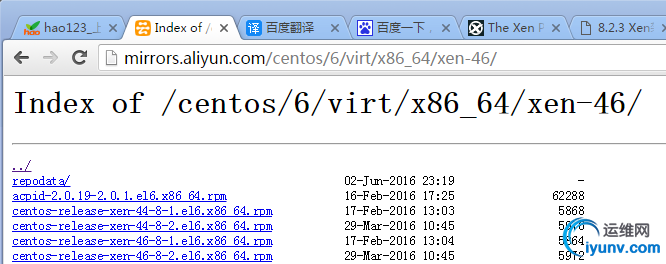
我们可以自定义一个yum源
1
2
3
4
5
6
7
8
9
10
11
12
13
14
15
16
17
18
19
20
21
22
23
24
| [iyunv@BAIYU_175 ~]# cd /etc/yum.repos.d/
[iyunv@BAIYU_175 yum.repos.d]# ls
bak Centos-6.repo epel-6.repo Xen-6.repo Xen-6.repo.orig
[iyunv@BAIYU_175 yum.repos.d]# vi Xen-6.repo
[iyunv@BAIYU_175 yum.repos.d]# cat Xen-6.repo
# CentOS-Base.repo
#
# The mirror system uses the connecting IP address of the client and the
# update status of each mirror to pick mirrors that are updated to and
# geographically close to the client. You should use this for CentOS updates
# unless you are manually picking other mirrors.
#
# If the mirrorlist= does not work for you, as a fall back you can try the
# remarked out baseurl= line instead.
#
#
[Xenbase]
name=CentOS-$releasever - Base - mirrors.aliyun.com
failovermethod=priority
baseurl=http://mirrors.aliyun.com/centos/6/virt/x86_64/xen-46
#mirrorlist=http://mirrorlist.centos.org/?release=$releasever&arch=$basearch&repo=os
#gpgcheck=1
#gpgkey=
|
1
2
3
4
5
6
7
8
9
10
11
12
13
14
15
16
17
18
19
20
21
22
23
24
25
26
27
28
29
30
31
32
33
34
35
36
| 依赖关系解决
================================================================================================================
软件包 架构 版本 仓库 大小
================================================================================================================
正在安装:
xen x86_64 4.6.1-11.el6 Xenbase 111 k
为依赖而安装:
SDL x86_64 1.2.14-7.el6_7.1 base 193 k
glusterfs x86_64 3.7.5-19.el6 base 392 k
glusterfs-api x86_64 3.7.5-19.el6 base 56 k
glusterfs-client-xlators x86_64 3.7.5-19.el6 base 942 k
glusterfs-libs x86_64 3.7.5-19.el6 base 303 k
kernel x86_64 3.18.34-20.el6 Xenbase 37 M
libxslt x86_64 1.1.26-2.el6_3.1 base 452 k
mesa-dri-drivers x86_64 11.0.7-4.el6 base 4.1 M
mesa-dri-filesystem x86_64 11.0.7-4.el6 base 17 k
mesa-dri1-drivers x86_64 7.11-8.el6 base 3.8 M
mesa-libGL x86_64 11.0.7-4.el6 base 142 k
mesa-private-llvm x86_64 3.6.2-1.el6 base 6.5 M
python-lxml x86_64 2.2.3-1.1.el6 base 2.0 M
qemu-img x86_64 2:0.12.1.2-2.491.el6 base 836 k
usbredir x86_64 0.5.1-3.el6 base 41 k
xen-hypervisor x86_64 4.6.1-11.el6 Xenbase 927 k
xen-libs x86_64 4.6.1-11.el6 Xenbase 532 k
xen-licenses x86_64 4.6.1-11.el6 Xenbase 85 k
xen-runtime x86_64 4.6.1-11.el6 Xenbase 16 M
yajl x86_64 1.0.7-3.el6 base 27 k
为依赖而更新:
kernel-firmware noarch 3.18.34-20.el6 Xenbase 6.4 M
libdrm x86_64 2.4.65-2.el6 base 136 k
事务概要
================================================================================================================
Install 21 Package(s)
Upgrade 2 Package(s)
|
然后修改/etc/grub.conf配置文件 1
2
3
4
5
6
7
8
9
10
11
12
13
14
15
16
17
18
19
20
21
22
23
24
| [iyunv@BAIYU_175 ~]# cat /etc/grub.conf
# grub.conf generated by anaconda
#
# Note that you do not have to rerun grub after making changes to this file
# NOTICE: You have a /boot partition. This means that
# all kernel and initrd paths are relative to /boot/, eg.
# root (hd0,0)
# kernel /vmlinuz-version ro root=/dev/sda2
# initrd /initrd-[generic-]version.img
#boot=/dev/sda
default=0
timeout=5
splashimage=(hd0,0)/grub/splash.xpm.gz
hiddenmenu
title (3.18.34-20.el6.x86_64)
root (hd0,0)
kernel /xen.gz dom0_mem=1024M cpufreq=xen dom0_max_vcpus=2 dom0_vcpus_pin
module /vmlinuz-3.18.34-20.el6.x86_64 ro root=UUID=d393efa7-a8b5-4758-bbf5-2eaead07f8c3 rd_NO_LUKS KEYBOARDTYPE=pc KEYTABLE=us LANG=zh_CN.UTF-8 rd_NO_MD SYSFONT=latarcyrheb-sun16 rd_NO_LVM crashkernel=auto rhgb quiet rd_NO_DM rhgb quiet
module /initramfs-3.18.34-20.el6.x86_64.img
title CentOS 6 (2.6.32-573.el6.x86_64)
root (hd0,0)
kernel /vmlinuz-2.6.32-573.el6.x86_64 ro root=UUID=d393efa7-a8b5-4758-bbf5-2eaead07f8c3 rd_NO_LUKS KEYBOARDTYPE=pc KEYTABLE=us LANG=en_US.UTF-8 rd_NO_MD SYSFONT=latarcyrheb-sun16 rd_NO_LVM crashkernel=auto rhgb quiet rd_NO_DM rhgb quiet
initrd /initramfs-2.6.32-573.el6.x86_64.img
[iyunv@BAIYU_175 ~]#
|
然后重启 1
2
3
4
5
| [iyunv@BAIYU_175 ~]# uname -r
3.18.34-20.el6.x86_64
[iyunv@BAIYU_175 ~]# xl list #查看运行的虚拟机,注意此时我们操作的是Dom0,虚拟化平台已经安装完毕,可以创建虚拟机了,
Name ID Mem VCPUs State Time(s)
Domain-0 0 1024 2 r----- 36.7
|
4、Xen的管理工具栈
xm/xend:在Xen Hypervisor的Dom0中要启动xend服务,重量级
xm:命令行管理工具,有诸多子命令:
create,destroy,stop,pause...
xl:libxenlight提供的Xen的轻量化工具,Xen 4.2 xm和xl同时提供,4.3 xm提示被废弃,
xe/xapi:提供了对Xen管理的api,因此多用于cloud环境: Xen Server, XCP
virsh/libvrit: python语言研发
在每一个hyper上安装libvrit库,并启动libvritd服务,就可以用virsh管理它们
5、XenSrore
为各Domain提供的共享信息存储空间:有着层级结构的名称空间:位于Dom0
二、Xen的使用
1、xl命令详解
1
2
3
4
5
6
7
8
9
10
11
12
13
14
15
16
17
18
19
20
21
22
23
24
25
26
27
28
29
30
31
32
33
34
35
36
37
38
39
40
41
42
43
44
45
46
47
48
49
50
51
52
53
54
55
56
57
58
59
60
61
62
63
64
65
66
67
68
69
70
71
72
73
74
75
76
77
78
79
80
81
82
83
84
85
86
87
88
89
90
91
| [iyunv@BAIYU_175 ~]# xl
Usage xl [-vfN] <subcommand> [args]
xl full list of subcommands: #子命令完整列表
create Create a domain from config file <filename>
config-update Update a running domain's saved configuration, used when rebuilding the domain after reboot.
WARNING: xl now has better capability to manage domain configuration, avoid using this command when possible
list List information about all/some domains #列出所有或某个Dom的信息
destroy Terminate a domain immediately #之间关掉虚拟机的电源
shutdown Issue a shutdown signal to a domain #正常关机
reboot Issue a reboot signal to a domain #正常重启
pci-attach Insert a new pass-through pci device #增加一个pci设备,热插拔
pci-detach Remove a domain's pass-through pci device #拆除一个pci设备,热插拔
pci-list List pass-through pci devices for a domain #查看虚拟机pci设备,除了网卡,查看网卡有专门的命令
pci-assignable-add Make a device assignable for pci-passthru
pci-assignable-remove
Remove a device from being assignable
pci-assignable-list List all the assignable pci devices
pause Pause execution of a domain #暂停虚拟机,保存在内存中
unpause Unpause a paused domain #解除暂停
console Attach to domain's console #连接虚拟机的控制台
vncviewer Attach to domain's VNC server.
save Save a domain state to restore later
#将DomU的内存中的数据转至指定的磁盘文件中,相当于挂起
migrate Migrate a domain to another host#将虚拟机迁移到另一台物理机上
restore Restore a domain from a saved state
#从指定磁盘文件中恢复DomU的内存数据,
migrate-receive Restore a domain from a saved state
dump-core Core dump a domain #转存内核?
cd-insert Insert a cdrom into a guest's cd drive #插入光盘
cd-eject Eject a cdrom from a guest's cd drive #弹出光盘
mem-max Set the maximum amount reservation for a domain
#内存最大上限
mem-set Set the current memory usage for a domain
#内存大小
button-press Indicate an ACPI button press to the domain
vcpu-list List the VCPUs for all/some domains #显示虚拟cpu
vcpu-pin Set which CPUs a VCPU can use
vcpu-set Set the number of active VCPUs allowed for the domain
vm-list List guest domains, excluding dom0, stubdoms, etc.
info Get information about Xen host
sharing Get information about page sharing
sched-credit Get/set credit scheduler parameters
sched-credit2 Get/set credit2 scheduler parameters
sched-rtds Get/set rtds scheduler parameters
domid Convert a domain name to domain id
domname Convert a domain id to domain name
rename Rename a domain #重命名
trigger Send a trigger to a domain
sysrq Send a sysrq to a domain
debug-keys Send debug keys to Xen
dmesg Read and/or clear dmesg buffer #虚拟机启动时的引导信息
top Monitor a host and the domains in real time
network-attach Create a new virtual network device
network-list List virtual network interfaces for a domain
network-detach Destroy a domain's virtual network device
channel-list List virtual channel devices for a domain
block-attach Create a new virtual block device #增加一块硬盘
block-list List virtual block devices for a domain#查看硬盘
block-detach Destroy a domain's virtual block device #删除一块硬盘
vtpm-attach Create a new virtual TPM device
vtpm-list List virtual TPM devices for a domain
vtpm-detach Destroy a domain's virtual TPM device
uptime Print uptime for all/some domains
claims List outstanding claim information about all domains
tmem-list List tmem pools
tmem-freeze Freeze tmem pools
tmem-thaw Thaw tmem pools
tmem-set Change tmem settings
tmem-shared-auth De/authenticate shared tmem pool
tmem-freeable Get information about how much freeable memory (MB) is in-use by tmem
cpupool-create Create a new CPU pool
cpupool-list List CPU pools on host
cpupool-destroy Deactivates a CPU pool
cpupool-rename Renames a CPU pool
cpupool-cpu-add Adds a CPU to a CPU pool
cpupool-cpu-remove Removes a CPU from a CPU pool
cpupool-migrate Moves a domain into a CPU pool
cpupool-numa-split Splits up the machine into one CPU pool per NUMA node
getenforce Returns the current enforcing mode of the Flask Xen security module
setenforce Sets the current enforcing mode of the Flask Xen security module
loadpolicy Loads a new policy int the Flask Xen security module
remus Enable Remus HA for domain
devd Daemon that listens for devices and launches backends
psr-hwinfo Show hardware information for Platform Shared Resource
psr-cmt-attach Attach Cache Monitoring Technology service to a domain
psr-cmt-detach Detach Cache Monitoring Technology service from a domain
psr-cmt-show Show Cache Monitoring Technology information
psr-cat-cbm-set Set cache capacity bitmasks(CBM) for a domain
psr-cat-show Show Cache Allocation Technology information
|
1)xl list 显示Domain的相关信息
1
2
3
| [iyunv@BAIYU_175 ~]# xl list
Name ID Mem VCPUs State Time(s) 运行时间
Domain-0 0 1024 2 r----- 65.2
|
xen虚拟机状态:
r: running
b: 阻塞
p: 暂停 #并不等同挂起,数据都在内存中没有保存在磁盘中
s: 停止 #
c: 崩溃
d: dying, 正在关闭的过程中
xl的其它常用命令
shutdown: 关机
reboot:重启
pause: 暂停
unpause: 解除暂停
1
2
3
4
5
6
7
8
9
10
11
12
13
14
15
16
| [iyunv@BAIYU_175 ~]# xl pause -h
Usage: xl [-vf] pause <Domain>
Pause execution of a domain.
[iyunv@BAIYU_175 ~]# xl pause --help
Usage: xl [-vf] pause <Domain>
Pause execution of a domain.
[iyunv@BAIYU_175 ~]# xl pause anyfish-001
[iyunv@BAIYU_175 ~]# xl list
Name ID Mem VCPUs State Time(s)
Domain-0 0 1024 2 r----- 125.8
anyfish-001 10 256 2 --p--- 4.2
anyfish-002 12 256 2 -b---- 8.7
|
save: 将DomU的内存中的数据转存至指定的磁盘文件中;
xl [-vf] save [options] <Domain> <CheckpointFile> [<ConfigFile>]
restore: 从指定的磁盘文件中恢复DomU内存数据;
xl [-vf] restore [options] [<ConfigFile>] <CheckpointFile>
1
2
3
4
5
6
7
8
9
10
11
12
13
14
15
16
17
18
19
20
21
22
23
24
25
26
27
28
| [iyunv@BAIYU_175 ~]# xl save help
'xl save' requires at least 2 arguments.
Usage: xl [-vf] save [options] <Domain> <CheckpointFile> [<ConfigFile>]
Save a domain state to restore later.
Options:
-h Print this help.
-c Leave domain running after creating the snapshot.
-p Leave domain paused after creating the snapshot.
[iyunv@BAIYU_175 ~]# xl save anyfish-002 /tmp/anyfish-002
Saving to /tmp/anyfish-002 new xl format (info 0x3/0x0/1024)
xc: info: Saving domain 12, type x86 PV
xc: Frames: 65536/65536 100%
xc: End of stream: 0/0 0%
[iyunv@BAIYU_175 ~]# xl restore /tmp/anyfish-002
Loading new save file /tmp/anyfish-002 (new xl fmt info 0x3/0x0/1024)
Savefile contains xl domain config in JSON format
Parsing config from <saved>
xc: info: Found x86 PV domain from Xen 4.6
xc: info: Restoring domain
xc: info: Restore successful
xc: info: XenStore: mfn 0x22a3a, dom 0, evt 1
xc: info: Console: mfn 0x22a39, dom 0, evt 2
|
vcpu-list 列出虚拟cpu
vcpu-pin 把虚拟cpu固定在物理核心上
vcpu-set 设置虚拟机的活跃vcpu的个数
1
2
3
4
5
6
7
8
9
10
11
12
13
14
| [iyunv@BAIYU_175 ~]# xl vcpu-list -h
Usage: xl [-v] vcpu-list [Domain, ...]
List the VCPUs for all/some domains.
[iyunv@BAIYU_175 ~]# xl vcpu-list
Name ID VCPU CPU State Time(s) Affinity(亲和) (Hard / Soft)
Domain-0 0 0 0 -b- 236.4 0 / all
Domain-0 0 1 1 r-- 310.0 1 / all
anyfish-002 17 0 2 -b- 8.9 all / all
anyfish-002 17 1 0 -b- 10.5 all / all
anyfish-001 18 0 3 -b- 10.1 all / all
anyfish-001 18 1 2 -b- 10.8 all / all
#运行在哪个物理核心上
|
info: 当前xen hypervisor的摘要信息
domid
domname
top: 查看domain资源占用排序状态的命令
network-list: 查看指定域使用网络及接口;
network-attach:热插
network-detach:热拔
block-list: 查看指定域使用的块设备的列表;
block-attach
block-detach
uptime: 运行时长
三、如何创建xen pv模式
1)kernel #DomU的内核文件可以放在Dom0中也可以放在DomU中
2)initrd或initramfs
3)DomU内核模块
4)根文件系统
5)swap设备
将上述内容定义在DomU的配置文件
注意:xm与xl启动DomU使用的配置文件略有不同;
xl.conf是xl命令的通用配置文件
xl.cfg是启动某个DomU虚拟机的配置文件
对于xl而言,其创建DomU使用的配置指令可通过“man xl.cfg”获取
常用指令:
name: 域惟一的名称
builder:指明虚拟机的类型,generic表示pv,hvm表示hvm
vcpus:虚拟cpu个数;
maxcpus:最大虚拟cpu个数
cpus:vcpu可运行于其上物理CPU列表
memory=MBYTES: 内存大小
maxmem=MBYTES:可以使用的最大内存空间
on_poweroff:指明关机时采取的action
destroy 断电, restart 重启, preserve 保留域
on_reboot="ACTION": 指明“重启”DomU时采取的action
on_crash="ACTION":虚拟机意外崩溃时采取的action
uuid:DomU的惟一标识; #不是必选项
disk=[ "DISK_SPEC_STRING", "DISK_SPEC_STRING", ...]: 指明磁盘设备,列表,
vif=[ "NET_SPEC_STRING", "NET_SPEC_STRING", ...]:指明网络接口,列表,
vfb=[ "VFB_SPEC_STRING", "VFB_SPEC_STRING", ...]:指明virtual frame buffer(显示设备),列表;
pci=[ "PCI_SPEC_STRING", "PCI_SPEC_STRING", ... ]: pci设备的列表
PV模式专用指令:
kernel="PATHNAME":内核文件路径,此为Dom0中的路径;
ramdisk="PATHNAME":为kernel指定内核提供的ramdisk文件路径;
root="STRING":指明根文件系统;
extra="STRING":额外传递给内核引导时使用的参数;
bootloader="PROGRAM":如果DomU使用自己的kernel及ramdisk,此时需要一个Dom0中的应用程序来实现其bootloader功能;
磁盘参数指定方式:
官方文档:http://xenbits.xen.org/docs/unst ... k-configuration.txt
[<target>, [<format>, [<vdev>, [<access>]]]]
<target>表示磁盘映像文件或设备文件路径:/images/xen/linux.img,/dev/myvg/linux
<format>表示磁盘格式,如果映像文件,有多种格式,例如raw, qcow, qcow2
vdev: 此设备在DomU被识别为硬件设备类型,支持hd[x], xvd[x], sd[x]
access: 访问权限,
ro, r: 只读
rw, w: 读写
例如:
disk=[ "/images/xen/linux.img,raw,xvda,rw", ]
使用qemu-img管理磁盘映像:
create [-f fmt] [-o options] filename [size]
-f 指明创建磁盘的格式
-o 特定格式支持的选项
可创建sparse格式的磁盘映像文件,慢慢扩展到指定的大小
2、创建一个pv格式的vm
(1) 准备磁盘文件
qemu-img create -f raw -o size=2G /images/xen/busybox.img
mke2fs -t ext2 /images/xen/busybox.img
1
2
3
4
5
6
7
8
9
10
11
| [iyunv@BAIYU_175 ~]# mkdir /images/xen/busybox.img -pv
mkdir: 已创建目录 "/images"
mkdir: 已创建目录 "/images/xen"
mkdir: 已创建目录 "/images/xen/busybox.img"
[iyunv@BAIYU_175 ~]# qemu-img create -f raw -o size=2G /images/xen/busybox.img
Formatting '/images/xen/busybox.img', fmt=raw size=2147483648
[iyunv@BAIYU_175 ~]# ls /images/xen/
busybox.img
[iyunv@BAIYU_175 ~]# ll /images/xen/
总用量 0
-rw-r--r-- 1 root root 2147483648 7月 14 23:52 busybox.img
|
1
2
3
4
| [iyunv@BAIYU_175 xen]# mke2fs -t ext2 busybox.img #为什么要用ext2格式?
[iyunv@BAIYU_175 xen]# du -sh busybox.img
97M busybox.img
|
1
2
3
| [iyunv@BAIYU_175 xen]# mount -o loop /images/xen/busybox.img /mnt
[iyunv@BAIYU_175 xen]# ls /mnt
lost+found
|
(2) 提供根文件系统
编译busybox,并复制到busybox.img映像中
cp -a $BUSYBOX/_install/* /mnt
mkdir /mnt/{proc,sys,dev,var}
1
2
3
| [iyunv@BAIYU_175 busybox-1.22.1]# yum groupinstall "Development tools" "Server Platform Development" #安装编译过程中可以用到的包
[iyunv@BAIYU_175 busybox-1.22.1]# yum install glibc-static #为了方便移植busybox,把busybox编译成静态链接格式,不让它依赖额外的其它库,需要依赖这个包
[iyunv@BAIYU_175 busybox-1.22.1]# make menuconfig
|
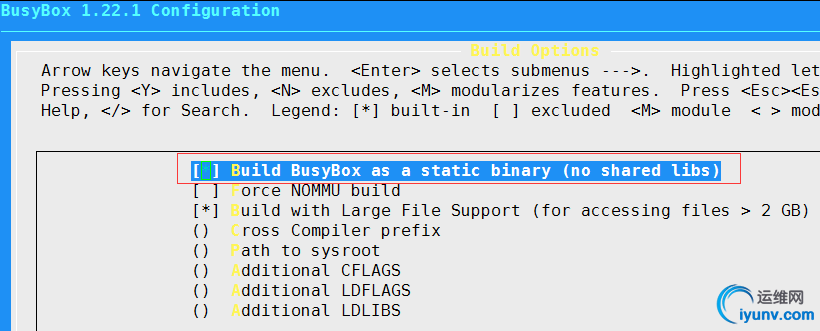
勾选编译成静态链接格式
1
2
3
4
5
6
7
8
9
10
11
12
| [iyunv@BAIYU_175 busybox-1.22.1]# make
[iyunv@BAIYU_175 busybox-1.22.1]# make install
[iyunv@BAIYU_175 busybox-1.22.1]# ls
AUTHORS Makefile.flags applets busybox_unstripped debianutils include miscutils scripts
Config.in Makefile.help applets_sh busybox_unstripped.map docs init modutils selinux
INSTALL README arch busybox_unstripped.out e2fsprogs libbb networking shell
LICENSE TODO archival configs editors libpwdgrp printutils sysklogd
Makefile TODO_unicode busybox console-tools examples loginutils procps testsuite
Makefile.custom _install busybox.links coreutils findutils mailutils runit util-linux
[iyunv@BAIYU_175 busybox-1.22.1]# ls _install/ #默认安装的目录
bin linuxrc sbin usr
|
复制文件到/mnt目录下
1
2
3
4
5
6
7
8
9
10
11
12
13
14
15
16
17
18
19
20
21
22
23
24
25
26
27
| [iyunv@BAIYU_175 busybox-1.22.1]# cp -a _install/* /mnt
[iyunv@BAIYU_175 busybox-1.22.1]# ls /mnt
bin linuxrc lost+found sbin usr
[iyunv@BAIYU_175 busybox-1.22.1]# cd /mnt
[iyunv@BAIYU_175 mnt]# mkdir proc sys dev etc var boot home
[iyunv@BAIYU_175 mnt]# ll
total 56
drwxr-xr-x 2 root root 4096 Jul 15 12:22 bin
drwxr-xr-x 2 root root 4096 Jul 15 12:25 boot
drwxr-xr-x 2 root root 4096 Jul 15 12:25 dev #一定需要
drwxr-xr-x 2 root root 4096 Jul 15 12:25 etc #一定需要
drwxr-xr-x 2 root root 4096 Jul 15 12:25 home
lrwxrwxrwx 1 root root 11 Jul 15 12:22 linuxrc -> bin/busybox
drwx------ 2 root root 16384 Jul 15 11:01 lost+found
drwxr-xr-x 2 root root 4096 Jul 15 12:25 proc #一定需要
drwxr-xr-x 2 root root 4096 Jul 15 12:22 sbin
drwxr-xr-x 2 root root 4096 Jul 15 12:25 sys #一定需要
drwxr-xr-x 4 root root 4096 Jul 15 12:22 usr
drwxr-xr-x 2 root root 4096 Jul 15 12:25 var
[iyunv@BAIYU_175 mnt]# chroot /mnt /bin/sh
/ # ls
bin dev home lost+found sbin usr
boot etc linuxrc proc sys var
/ # ls boot/
/ # ls dev
/ # exit #能正常使用说明这个根文件系统创建成功
|
(3) 提供配置DomU配置文件
name = "busybox-001"
kernel = "/boot/vmlinuz"
ramdisk = "/boot/initramfs.img"
extra = "selinux=0 init=/bin/sh"
memory = 256
vcpus = 2
disk = [ '/images/xen/busybox.img,raw,xvda,rw' ]
root = "/dev/xvda ro"
1
2
3
4
5
6
7
8
9
10
11
12
13
14
15
16
17
18
19
20
21
22
23
24
25
26
27
28
29
30
31
32
33
34
35
36
37
38
39
40
41
42
43
44
45
| [iyunv@BAIYU_175 ~]# cd /boot
[iyunv@BAIYU_175 boot]# ll
total 76456
-rw-r--r--. 1 root root 2585052 Jul 24 2015 System.map-2.6.32-573.el6.x86_64
-rw-r--r-- 1 root root 3208657 May 27 20:18 System.map-3.18.34-20.el6.x86_64
-rw-r--r--. 1 root root 107134 Jul 24 2015 config-2.6.32-573.el6.x86_64
-rw-r--r-- 1 root root 155205 May 27 20:18 config-3.18.34-20.el6.x86_64
drwxr-xr-x. 3 root root 4096 Oct 24 2015 efi
drwxr-xr-x. 2 root root 4096 Jul 14 23:47 grub
-rw-------. 1 root root 27609239 Oct 24 2015 initramfs-2.6.32-573.el6.x86_64.img
-rw------- 1 root root 29366666 Jul 14 18:07 initramfs-3.18.34-20.el6.x86_64.img
-rw------- 1 root root 4330884 Jan 2 2016 initrd-2.6.32-573.el6.x86_64kdump.img
drwx------. 2 root root 16384 Oct 24 2015 lost+found
-rw-r--r--. 1 root root 205998 Jul 24 2015 symvers-2.6.32-573.el6.x86_64.gz
-rw-r--r-- 1 root root 285315 May 27 20:18 symvers-3.18.34-20.el6.x86_64.gz
-rwxr-xr-x. 1 root root 4220560 Jul 24 2015 vmlinuz-2.6.32-573.el6.x86_64
-rwxr-xr-x 1 root root 5267744 May 27 20:18 vmlinuz-3.18.34-20.el6.x86_64
-rw-r--r-- 1 root root 893598 May 26 18:58 xen-4.6.1-11.el6.gz
lrwxrwxrwx 1 root root 19 Jul 14 18:06 xen-4.6.gz -> xen-4.6.1-11.el6.gz
lrwxrwxrwx 1 root root 19 Jul 14 18:06 xen.gz -> xen-4.6.1-11.el6.gz
[iyunv@BAIYU_175 boot]# ln -sv vmlinuz-2.6.32-573.el6.x86_64 vmlinuz
`vmlinuz' -> `vmlinuz-2.6.32-573.el6.x86_64'
[iyunv@BAIYU_175 boot]# ln -sv initramfs-2.6.32-573.el6.x86_64.img initramfs.img
`initramfs.img' -> `initramfs-2.6.32-573.el6.x86_64.img'
[iyunv@BAIYU_175 boot]# ll
total 76456
-rw-r--r--. 1 root root 2585052 Jul 24 2015 System.map-2.6.32-573.el6.x86_64
-rw-r--r-- 1 root root 3208657 May 27 20:18 System.map-3.18.34-20.el6.x86_64
-rw-r--r--. 1 root root 107134 Jul 24 2015 config-2.6.32-573.el6.x86_64
-rw-r--r-- 1 root root 155205 May 27 20:18 config-3.18.34-20.el6.x86_64
drwxr-xr-x. 3 root root 4096 Oct 24 2015 efi
drwxr-xr-x. 2 root root 4096 Jul 15 13:57 grub
-rw-------. 1 root root 27609239 Oct 24 2015 initramfs-2.6.32-573.el6.x86_64.img
-rw------- 1 root root 29366666 Jul 14 18:07 initramfs-3.18.34-20.el6.x86_64.img
lrwxrwxrwx 1 root root 35 Jul 15 13:59 initramfs.img -> initramfs-2.6.32-573.el6.x86_64.img
-rw------- 1 root root 4330884 Jan 2 2016 initrd-2.6.32-573.el6.x86_64kdump.img
drwx------. 2 root root 16384 Oct 24 2015 lost+found
-rw-r--r--. 1 root root 205998 Jul 24 2015 symvers-2.6.32-573.el6.x86_64.gz
-rw-r--r-- 1 root root 285315 May 27 20:18 symvers-3.18.34-20.el6.x86_64.gz
lrwxrwxrwx 1 root root 29 Jul 15 13:57 vmlinuz -> vmlinuz-2.6.32-573.el6.x86_64
-rwxr-xr-x. 1 root root 4220560 Jul 24 2015 vmlinuz-2.6.32-573.el6.x86_64
-rwxr-xr-x 1 root root 5267744 May 27 20:18 vmlinuz-3.18.34-20.el6.x86_64
-rw-r--r-- 1 root root 893598 May 26 18:58 xen-4.6.1-11.el6.gz
lrwxrwxrwx 1 root root 19 Jul 14 18:06 xen-4.6.gz -> xen-4.6.1-11.el6.gz
lrwxrwxrwx 1 root root 19 Jul 14 18:06 xen.gz -> xen-4.6.1-11.el6.gz
|
根据xen给定的pv示例配置文件修改:
1
2
3
4
5
6
7
8
9
10
11
12
13
14
15
| [iyunv@BAIYU_175 boot]# cd /etc/xen/
[iyunv@BAIYU_175 xen]# ls
auto cpupool scripts xl.conf xlexample.hvm xlexample.pvlinux
[iyunv@BAIYU_175 xen]# cp xlexample.pvlinux busybox
[iyunv@BAIYU_175 xen]# grep -v '^#\|^$' busybox #修改后的配置参数
name = "anyfish-001"
kernel = "/boot/vmlinuz"
ramdisk = "/boot/initramfs.img"
extra = "selinux=0 init=/bin/sh"
memory = 521
vcpus = 2
vif = [ '' ]
disk = [ '/images/xen/busybox.img,raw,xvda,rw' ]
root = "/dev/xvda ro"
|
(4) 启动实例
xl [-v] create <DomU_Config_file> -n
xl create <DomU_Config_file> -c
1
2
3
4
5
6
7
8
9
10
11
12
13
14
15
16
17
18
19
20
21
22
23
24
25
26
27
28
29
30
31
32
33
34
| [iyunv@BAIYU_175 xen]# xl help create
Usage: xl [-vfN] create <ConfigFile> [options] [vars]
#-v 表示详细信息,
-f 指定xl命令的配置文件
ConfigFile 是DomU的配置文件
Create a domain from config file <filename>.
Options:
-h Print this help.
-p Leave the domain paused after it is created.
-c Connect to the console after the domain is created.
-f FILE, --defconfig=FILE
Use the given configuration file.
-q, --quiet Quiet.
-n, --dryrun Dry run - prints the resulting configuration #并不真正创建虚拟机,只是空跑一遍,就是测试咯,
(deprecated in favour of global -N option).
-d Enable debug messages.
-F Run in foreground until death of the domain.
-e Do not wait in the background for the death of the domain.
-V, --vncviewer Connect to the VNC display after the domain is created.
-A, --vncviewer-autopass
Pass VNC password to viewer via stdin.
[iyunv@BAIYU_175 ~]# umount /mnt
[iyunv@BAIYU_175 xen]# xl -v create /etc/xen/busybox
[iyunv@BAIYU_175 xen]# xl list
Name ID Mem VCPUs State Time(s)
Domain-0 0 1024 2 r----- 85.7
anyfish-001 24 256 2 -b---- 1.4
[iyunv@BAIYU_175 xen]# xl console anyfish-001 #连接虚拟控制台
/ # ls
bin dev home lost+found sbin usr
boot etc linuxrc proc sys var 按crtl + ]退回到Dom0,输入exit会删除掉anyfish-001这个虚拟机
|
(5)添加网卡
如何配置网络接口?
vif = [ '<vifspec>', '<vifspec>', ... ]
vifspec: [<key>=<value>|<flag>,]
常用的key:
mac=:指定mac地址,要以“00:16:3e”开头;
bridge=<bridge>:指定此网络接口在Dom0被关联至哪个桥设备上;
model=<MODEL>:
vifname=: 接口名称,在Dom0中显示的名称;
script=:执行的脚本;
ip=:指定ip地址,会注入到DomU中;
rate=: 指明设备传输速率,通常为"#UNIT/s"格式
UNIT: GB, MB, KB, B for bytes.
Gb, Mb, Kb, b for bits.
1)创建xenbr0
# brctl addbr br0 # brctl stp br0 on # ifconfig eth0 0 up # brctl addif br0 eth0 # ifconfig br0 IP/NETMASK up # route add default gw GW 1
2
3
4
| [iyunv@BAIYU_175 ~]# brctl show
bridge name bridge id STP enabled interfaces
xenbr0 8000.000c29efbbd4 yes eth0
#在这步后,系统死机了,可能3.18的内核bridge功能有bug,用3.7.4版本的内核没问题
|
2)在配置文件/etc/xen/busybox中添天网卡相关配置,并复制驱动程序到DomU中 1
| vif = [ 'bridge=xenbr0' ]
|
1
2
3
4
5
6
7
8
9
10
11
12
13
14
15
16
17
18
19
20
21
22
23
24
25
26
27
28
29
30
31
32
33
34
35
36
37
38
39
40
41
42
43
44
45
46
47
48
49
50
51
52
53
54
55
56
57
58
59
60
61
62
63
64
65
66
67
68
69
| [iyunv@BAIYU_175 ~]# cd /lib/modules/2.6.32-573.el6.x86_64/kernel/drivers/ #驱动文件的路径
[iyunv@BAIYU_175 drivers]# ls
acpi char gpio infiniband mfd platform serial vhost
ata cpufreq gpu input misc power ssb video
atm crypto hid isdn mmc powercap staging virtio
auxdisplay dca hv leds mtd pps target watchdog
bcma dma hwmon md net ptp thermal xen
block edac i2c media parport regulator uio
bluetooth firewire idle memstick pci rtc usb
cdrom firmware ieee802154 message pcmcia scsi uwb
[iyunv@BAIYU_175 drivers]# cd net/
[iyunv@BAIYU_175 net]# ls
3c59x.ko cnic.ko ifb.ko netxen r6040.ko tg3.ko
8139cp.ko cxgb3 igb niu.ko r8169.ko tlan.ko
8139too.ko cxgb4 igbvf ns83820.ko s2io.ko tulip
8390.ko cxgb4vf ipg.ko pch_gbe sc92031.ko tun.ko
acenic.ko dl2k.ko ixgb pcmcia sfc typhoon.ko
amd8111e.ko dnet.ko ixgbe pcnet32.ko sis190.ko usb
atl1c dummy.ko ixgbevf phy sis900.ko veth.ko
atl1e e1000 jme.ko ppp_async.ko skge.ko via-rhine.ko
atlx e1000e macvlan.ko ppp_deflate.ko sky2.ko via-velocity.ko
b44.ko e100.ko macvtap.ko ppp_generic.ko slhc.ko virtio_net.ko
benet enic mdio.ko ppp_mppe.ko slip.ko vmxnet3
bna epic100.ko mii.ko pppoe.ko smsc9420.ko vxge
bnx2.ko ethoc.ko mlx4 pppol2tp.ko starfire.ko vxlan.ko
bnx2x fealnx.ko mlx5 pppox.ko sundance.ko wan
bonding forcedeth.ko myri10ge ppp_synctty.ko sungem.ko wimax
can hyperv natsemi.ko qla3xxx.ko sungem_phy.ko wireless
cassini.ko i40e ne2k-pci.ko qlcnic sunhme.ko xen-netfront.ko
chelsio i40evf netconsole.ko qlge tehuti.ko
[iyunv@BAIYU_175 net]# modinfo xen-netfront.ko
filename: xen-netfront.ko
alias: xennet
alias: xen:vif
license: GPL
description: Xen virtual network device frontend
srcversion: 5C6FC78BC365D9AF8135201
depends: #查看此模块依赖的模块,如果有要一起复制过去
vermagic: 2.6.32-573.el6.x86_64 SMP mod_unload modversions
[iyunv@BAIYU_175 net]# cp xen-netfront.ko /mnt/l
linuxrc lost+found/
[iyunv@BAIYU_175 net]# cp xen-netfront.ko /mnt/l
linuxrc lost+found/
[iyunv@BAIYU_175 net]# mkdir -pv /mnt/lib/modules
mkdir: 已创建目录 "/mnt/lib"
mkdir: 已创建目录 "/mnt/lib/modules"
[iyunv@BAIYU_175 net]# cp xen-netfront.ko /mnt/lib/modules
mkdir: 已创建目录 "/mnt/lib/modules"
[iyunv@BAIYU_175 net]# cp xen-netfront.ko /mnt/lib/modules
[iyunv@BAIYU_175 net]# umount /mnt
[iyunv@BAIYU_175 net]# xl create /etc/xen/busybox -c
/ # insmod /lib/modules/xen-netfront.ko #手动装载驱动程序
Initialising Xen virtual ethernet driver.
/ # ifconfig
/ # ifconfig -a
eth0 Link encap:Ethernet HWaddr 00:16:3E:50:D3:20
BROADCAST MULTICAST MTU:1500 Metric:1
RX packets:0 errors:0 dropped:0 overruns:0 frame:0
TX packets:0 errors:0 dropped:0 overruns:0 carrier:0
collisions:0 txqueuelen:1000
RX bytes:0 (0.0 B) TX bytes:0 (0.0 B)
Interrupt:18
lo Link encap:Local Loopback
LOOPBACK MTU:65536 Metric:1
RX packets:0 errors:0 dropped:0 overruns:0 frame:0
TX packets:0 errors:0 dropped:0 overruns:0 carrier:0
collisions:0 txqueuelen:0
RX bytes:0 (0.0 B) TX bytes:0 (0.0 B)
|
此时在Dom0上也可以看到虚拟机网卡的后半段
1
2
3
4
5
6
7
8
9
10
11
12
13
14
15
16
17
18
19
20
21
22
23
24
25
26
27
28
29
30
31
32
33
34
35
36
37
38
39
40
41
42
43
44
45
46
47
48
49
50
51
52
53
54
55
56
57
58
59
60
61
| [iyunv@BAIYU_175 ~]# xl list
Name ID Mem VCPUs State Time(s)
Domain-0 0 1024 2 r----- 78.6
anyfish-001 9 256 2 -b---- 3.0
[iyunv@BAIYU_175 ~]# brctl show
bridge name bridge id STP enabled interfaces
xenbr0 8000.000c29efbbd4 yes eth0
vif9.0
[iyunv@BAIYU_175 ~]# ifconfig
eth0 Link encap:Ethernet HWaddr 00:0C:29:EF:BB:D4
inet6 addr: fe80::20c:29ff:feef:bbd4/64 Scope:Link
UP BROADCAST RUNNING MULTICAST MTU:1500 Metric:1
RX packets:20797 errors:0 dropped:0 overruns:0 frame:0
TX packets:563 errors:0 dropped:0 overruns:0 carrier:0
collisions:0 txqueuelen:1000
RX bytes:1332243 (1.2 MiB) TX bytes:62352 (60.8 KiB)
eth1 Link encap:Ethernet HWaddr 00:0C:29:EF:BB:DE
inet addr:172.16.11.199 Bcast:172.16.11.255 Mask:255.255.255.0
inet6 addr: fe80::20c:29ff:feef:bbde/64 Scope:Link
UP BROADCAST RUNNING MULTICAST MTU:1500 Metric:1
RX packets:26507 errors:0 dropped:0 overruns:0 frame:0
TX packets:3142 errors:0 dropped:0 overruns:0 carrier:0
collisions:0 txqueuelen:1000
RX bytes:2899642 (2.7 MiB) TX bytes:457705 (446.9 KiB)
lo Link encap:Local Loopback
inet addr:127.0.0.1 Mask:255.0.0.0
inet6 addr: ::1/128 Scope:Host
UP LOOPBACK RUNNING MTU:65536 Metric:1
RX packets:0 errors:0 dropped:0 overruns:0 frame:0
TX packets:0 errors:0 dropped:0 overruns:0 carrier:0
collisions:0 txqueuelen:0
RX bytes:0 (0.0 b) TX bytes:0 (0.0 b)
vif9.0 Link encap:Ethernet HWaddr FE:FF:FF:FF:FF:FF #9是虚拟机的ID号,.0表示第一块网卡
inet6 addr: fe80::fcff:ffff:feff:ffff/64 Scope:Link
UP BROADCAST RUNNING MULTICAST MTU:1500 Metric:1
RX packets:0 errors:0 dropped:0 overruns:0 frame:0
TX packets:46 errors:0 dropped:0 overruns:0 carrier:0
collisions:0 txqueuelen:32
RX bytes:0 (0.0 b) TX bytes:2548 (2.4 KiB)
xenbr0 Link encap:Ethernet HWaddr 00:0C:29:EF:BB:D4
inet addr:192.168.100.175 Bcast:192.168.100.255 Mask:255.255.255.0
inet6 addr: fe80::20c:29ff:feef:bbd4/64 Scope:Link
UP BROADCAST RUNNING MULTICAST MTU:1500 Metric:1
RX packets:727 errors:0 dropped:0 overruns:0 frame:0
TX packets:292 errors:0 dropped:0 overruns:0 carrier:0
collisions:0 txqueuelen:0
RX bytes:55541 (54.2 KiB) TX bytes:18796 (18.3 KiB)
#DomU上,
/ # ping 192.168.100.180
PING 192.168.100.180 (192.168.100.180): 56 data bytes
ping: sendto: Network is unreachable
/ # ifconfig eth0 192.168.100.181
/ # ping 192.168.100.180
PING 192.168.100.180 (192.168.100.180): 56 data bytes
64 bytes from 192.168.100.180: seq=0 ttl=64 time=16.589 ms
64 bytes from 192.168.100.180: seq=1 ttl=64 time=0.912 ms
|
上面这种方式创建的网卡是桥接,那我们怎么创建一个虚拟通道呢(相当于VMware Workstation网卡设置中的VMnet1,...VMnet19)?
1
2
3
4
5
6
7
8
9
10
11
12
13
14
15
16
17
18
19
20
21
22
23
24
25
26
27
28
29
30
31
32
33
34
35
36
37
38
39
40
41
42
43
44
45
46
47
48
49
50
51
52
53
54
55
56
57
58
59
60
61
62
63
64
65
66
67
68
69
70
71
72
73
74
75
76
77
78
79
80
81
82
83
84
85
86
87
88
89
90
91
92
93
94
95
96
97
98
99
100
101
102
103
104
105
106
107
108
109
110
111
112
113
114
115
116
117
118
119
120
121
122
123
124
125
126
127
128
129
130
131
132
133
134
135
136
137
138
139
140
141
142
143
144
145
146
147
148
149
150
151
152
153
154
155
156
157
158
159
160
161
162
163
164
165
166
| [iyunv@BAIYU_175 ~]# xl list
Name ID Mem VCPUs State Time(s)
Domain-0 0 1024 2 r----- 100.7
anyfish-001 9 256 2 -b---- 12.5
[iyunv@BAIYU_175 ~]# xl destroy anyfish-001 #立即终止域,相当于拔电源
[iyunv@BAIYU_175 ~]# xl list
Name ID Mem VCPUs State Time(s)
Domain-0 0 1024 2 r----- 101.4
[iyunv@BAIYU_175 ~]# cp /images/xen/busybox.img /images/xen/busybox2.img
[iyunv@BAIYU_175 ~]# ls /etc/xen/
auto busybox.orig scripts vm2.orig xlexample.hvm
busybox cpupool vm2 xl.conf xlexample.pvlinux
[iyunv@BAIYU_175 ~]# brctl add xenbr1
[iyunv@BAIYU_175 ~]# ifconfig xenbr1 up
[iyunv@BAIYU_175 ~]# ifconfig
eth0 Link encap:Ethernet HWaddr 00:0C:29:EF:BB:D4
inet6 addr: fe80::20c:29ff:feef:bbd4/64 Scope:Link
UP BROADCAST RUNNING MULTICAST MTU:1500 Metric:1
RX packets:30305 errors:0 dropped:0 overruns:0 frame:0
TX packets:4219 errors:0 dropped:0 overruns:0 carrier:0
collisions:0 txqueuelen:1000
RX bytes:2008392 (1.9 MiB) TX bytes:387507 (378.4 KiB)
eth1 Link encap:Ethernet HWaddr 00:0C:29:EF:BB:DE
inet addr:172.16.11.199 Bcast:172.16.11.255 Mask:255.255.255.0
inet6 addr: fe80::20c:29ff:feef:bbde/64 Scope:Link
UP BROADCAST RUNNING MULTICAST MTU:1500 Metric:1
RX packets:34311 errors:0 dropped:0 overruns:0 frame:0
TX packets:3552 errors:0 dropped:0 overruns:0 carrier:0
collisions:0 txqueuelen:1000
RX bytes:3744076 (3.5 MiB) TX bytes:501793 (490.0 KiB)
lo Link encap:Local Loopback
inet addr:127.0.0.1 Mask:255.0.0.0
inet6 addr: ::1/128 Scope:Host
UP LOOPBACK RUNNING MTU:65536 Metric:1
RX packets:0 errors:0 dropped:0 overruns:0 frame:0
TX packets:0 errors:0 dropped:0 overruns:0 carrier:0
collisions:0 txqueuelen:0
RX bytes:0 (0.0 b) TX bytes:0 (0.0 b)
xenbr0 Link encap:Ethernet HWaddr 00:0C:29:EF:BB:D4
inet addr:192.168.100.175 Bcast:192.168.100.255 Mask:255.255.255.0
inet6 addr: fe80::20c:29ff:feef:bbd4/64 Scope:Link
UP BROADCAST RUNNING MULTICAST MTU:1500 Metric:1
RX packets:2656 errors:0 dropped:0 overruns:0 frame:0
TX packets:994 errors:0 dropped:0 overruns:0 carrier:0
collisions:0 txqueuelen:0
RX bytes:163430 (159.5 KiB) TX bytes:111633 (109.0 KiB)
xenbr1 Link encap:Ethernet HWaddr 42:5B:43:45:2B:D2
inet6 addr: fe80::405b:43ff:fe45:2bd2/64 Scope:Link
UP BROADCAST RUNNING MULTICAST MTU:1500 Metric:1
RX packets:0 errors:0 dropped:0 overruns:0 frame:0
TX packets:2 errors:0 dropped:0 overruns:0 carrier:0
collisions:0 txqueuelen:0
RX bytes:0 (0.0 b) TX bytes:168 (168.0 b)
[iyunv@BAIYU_175 ~]# cp /etc/xen/busybox /etc/xen/busybox2
[iyunv@BAIYU_175 xen]# vi busybox
[iyunv@BAIYU_175 xen]# grep -v '^#\|^$' busybox
name = "anyfish-001"
kernel = "/boot/vmlinuz"
ramdisk = "/boot/initramfs.img"
extra = "selinux=0 init=/bin/sh"
memory = 256
vcpus = 2
vif = [ 'bridge=xenbr1' ]
disk = [ '/images/xen/busybox.img,raw,xvda,rw' ]
root = "/dev/xvda ro"
[iyunv@BAIYU_175 xen]# vi busybox2
[iyunv@BAIYU_175 xen]# grep -v '^#\|^$' busybox2
name = "anyfish-002"
kernel = "/boot/vmlinuz"
ramdisk = "/boot/initramfs.img"
extra = "selinux=0 init=/bin/sh"
memory = 256
vcpus = 2
vif = [ 'bridge=xenbr1' ]
disk = [ '/images/xen/busybox2.img,raw,xvda,rw' ]
root = "/dev/xvda ro"
[iyunv@BAIYU_175 xen]# xl create /etc/xen/busybox
Parsing config from /etc/xen/busybox
[iyunv@BAIYU_175 xen]# xl create /etc/xen/busybox2
Parsing config from /etc/xen/busybox2
[iyunv@BAIYU_175 xen]# xl list
Name ID Mem VCPUs State Time(s)
Domain-0 0 1024 2 r----- 112.8
anyfish-001 10 256 2 -b---- 1.2
anyfish-002 12 256 2 -b---- 1.2
[iyunv@BAIYU_175 xen]# xl console anyfish-001
# ifconfig -a
lo Link encap:Local Loopback
LOOPBACK MTU:65536 Metric:1
RX packets:0 errors:0 dropped:0 overruns:0 frame:0
TX packets:0 errors:0 dropped:0 overruns:0 carrier:0
collisions:0 txqueuelen:0
RX bytes:0 (0.0 B) TX bytes:0 (0.0 B)
/ # insmod /lib/modules/xen-netfront.ko
Initialising Xen virtual ethernet driver.
/ # ifconfig -a
eth0 Link encap:Ethernet HWaddr 00:16:3E:7C:8B:F0
BROADCAST MULTICAST MTU:1500 Metric:1
RX packets:0 errors:0 dropped:0 overruns:0 frame:0
TX packets:0 errors:0 dropped:0 overruns:0 carrier:0
collisions:0 txqueuelen:1000
RX bytes:0 (0.0 B) TX bytes:0 (0.0 B)
Interrupt:18
lo Link encap:Local Loopback
LOOPBACK MTU:65536 Metric:1
RX packets:0 errors:0 dropped:0 overruns:0 frame:0
TX packets:0 errors:0 dropped:0 overruns:0 carrier:0
collisions:0 txqueuelen:0
RX bytes:0 (0.0 B) TX bytes:0 (0.0 B)
/ # ifconfig eth0 192.168.100.181 up
/ # ifconfig
eth0 Link encap:Ethernet HWaddr 00:16:3E:7C:8B:F0
inet addr:192.168.100.181 Bcast:192.168.100.255 Mask:255.255.255.0
UP BROADCAST RUNNING MULTICAST MTU:1500 Metric:1
RX packets:6 errors:0 dropped:0 overruns:0 frame:0
TX packets:0 errors:0 dropped:0 overruns:0 carrier:0
collisions:0 txqueuelen:1000
RX bytes:384 (384.0 B) TX bytes:0 (0.0 B)
Interrupt:18
/ # ifconfig -a
eth0 Link encap:Ethernet HWaddr 00:16:3E:7C:8B:F0
inet addr:192.168.100.181 Bcast:192.168.100.255 Mask:255.255.255.0
UP BROADCAST RUNNING MULTICAST MTU:1500 Metric:1
RX packets:6 errors:0 dropped:0 overruns:0 frame:0
TX packets:0 errors:0 dropped:0 overruns:0 carrier:0
collisions:0 txqueuelen:1000
RX bytes:384 (384.0 B) TX bytes:0 (0.0 B)
Interrupt:18
lo Link encap:Local Loopback
LOOPBACK MTU:65536 Metric:1
RX packets:0 errors:0 dropped:0 overruns:0 frame:0
TX packets:0 errors:0 dropped:0 overruns:0 carrier:0
collisions:0 txqueuelen:0
RX bytes:0 (0.0 B) TX bytes:0 (0.0 B)
/ # ifconfig
eth0 Link encap:Ethernet HWaddr 00:16:3E:7C:8B:F0
inet addr:192.168.100.181 Bcast:192.168.100.255 Mask:255.255.255.0
UP BROADCAST RUNNING MULTICAST MTU:1500 Metric:1
RX packets:6 errors:0 dropped:0 overruns:0 frame:0
TX packets:0 errors:0 dropped:0 overruns:0 carrier:0
collisions:0 txqueuelen:1000
RX bytes:384 (384.0 B) TX bytes:0 (0.0 B)
Interrupt:18
[iyunv@BAIYU_175 ~]# xl console anyfish-002
/ # insmod /lib/modules/xen-netfront.ko
Initialising Xen virtual ethernet driver.
/ # ifcofnig eth0 192.168.100.182
/bin/sh: ifcofnig: not found
/ # ifconfig eth0 192.168.100.182 up
/ # ping 192.168.100.181
PING 192.168.100.181 (192.168.100.181): 56 data bytes
64 bytes from 192.168.100.181: seq=0 ttl=64 time=3.144 ms
64 bytes from 192.168.100.181: seq=1 ttl=64 time=0.567 ms
|
此时虚拟通道创建完成,虚拟机之间可以互相通信,而虚拟机不能和物理机及外界通信
|