|
1. 下载DNS服务 yum -y install bind bind-chroot bind-util bind-libs
2. 配置主DNS服务器 步骤一:vi /etc/named.conf 修改listen-on port 53 { any; }; allow-query { any; } 如下图所示:
整体的配置如下: 1
2
3
4
5
6
7
8
9
10
11
12
13
14
15
16
17
18
19
20
21
22
23
24
25
26
27
28
29
30
31
32
33
34
35
36
37
38
39
40
41
| options {
listen-on port 53 { any; };
listen-on-v6 port 53 { none; };
directory "/var/named";
dump-file "/var/named/data/cache_dump.db";
statistics-file "/var/named/data/named_stats.txt";
memstatistics-file "/var/named/data/named_mem_stats.txt";
allow-query { any; };
recursion yes;
dnssec-enable yes;
dnssec-validation yes;
dnssec-lookaside auto;
/* Path to ISC DLV key */
bindkeys-file "/etc/named.iscdlv.key";
managed-keys-directory "/var/named/dynamic";
};
logging {
channel default_debug {
file "data/named.run";
severity dynamic;
};
};
include "/etc/named/clients.acl";
//zone "." IN {
// type hint;
// file "named.ca";
//};
#include "/etc/named.rfc1912.zones";
#include "/etc/named.root.key";
view "nj01" {
match-clients {
localhost;
nj01;
};
allow-update {
nj01;
};
recursion yes;
include "/etc/named/named.conf";
include "/etc/named/named_nj01.conf";
};
|
options:控制服务器的全局配置选项和为其它语句设置默认值. directory "/var/name" 定义bind的工作目录为/var/name,配置文件中所有使用的相对路径,指的都在这里配置的目录下,比如后面配置文件中的file "archermind.org.hosts"。 根据需要添加的conf文件都需要修改,这里就不一一列出来了。
named.rfc1912.zones文件: 1
2
3
4
5
6
7
8
9
10
11
12
13
14
15
16
17
18
19
20
21
22
23
24
25
| zone "localhost.localdomain" IN {
type master;
file "named.localhost";
allow-update { none; };
};
zone "localhost" IN {
type master;
file "named.localhost";
allow-update { none; };
};
zone "1.0.0.0.0.0.0.0.0.0.0.0.0.0.0.0.0.0.0.0.0.0.0.0.0.0.0.0.0.0.0.0.ip6.arpa" IN {
type master;
file "named.loopback";
allow-update { none; };
};
zone "1.0.0.127.in-addr.arpa" IN {
type master;
file "named.loopback";
allow-update { none; };
};
zone "0.in-addr.arpa" IN {
type master;
file "named.empty";
allow-update { none; };
};
|
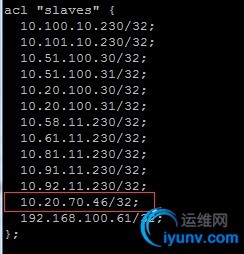
步骤二:修改/etc/named/clients.acl(最好所有的clients.acl一起修改,包括var目录和从服务器的) 加入你的从DNS服务器IP,如下图:

步骤三:修改/etc/named/named.conf,如下
1
2
3
4
5
6
7
8
9
10
11
12
13
14
15
16
17
18
19
20
21
22
23
24
25
| zone "archermind.com" IN {
type forward;
forwarders {
192.168.100.101;
192.168.100.102;
};
forward only;
};
zone "archermind.cn" IN {
type master;
file "archermind.cn.hosts";
allow-transfer { slaves; };
};
zone "archermind.org" IN {
type master;
file "archermind.org.hosts";
allow-transfer { slaves; };
};
zone "amtbaas.com" IN {
type forward;
forwarders {
192.168.100.101;
192.168.100.102;
};
};
|
1.type forward是转发域名给其他服务器分析。
2.主服务器的type设置为master,如果有DNS从服务器,要设置allow-transfer。
3.zone:定义一个域,比如正解析域和反解析域。
步骤四:
全部设置完以后service named restart。
.
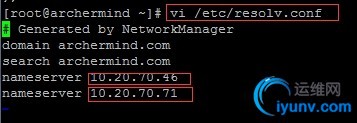
3. 配置从DNS服务器 步骤一:vi /etc/resolv.conf

上面是本机IP
下面是DNS主服务器IP
步骤二:
- 和主服务器配置一样的/etc/named.conf
- 配置/etc/name/named.conf
1
2
3
4
5
6
7
8
9
10
11
12
13
14
15
16
17
18
19
20
| zone "archermind.com" IN {
type forward;
forwarders {
192.168.100.101;
192.168.100.102;
};
forward only;
};
zone "archermind.cn" IN {
type slave;
masters {10.20.70.71;};
file "archermind.cn.hosts";
};
zone "archermind.org" IN {
type slave;
masters {10.20.70.71;};
file "archermind.org.hosts";
};
|
和主DNS服务器类似,type填写的不一样。
步骤三:
service dhcpd restart
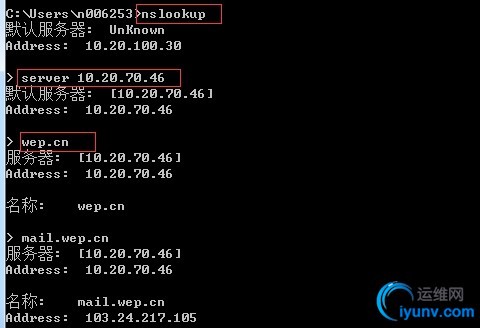
3. 验证从服务器的DNS域名解析 cmd->nslookup->server xxx(从服务器IP)->输入网址。
如下图:

|