|
|
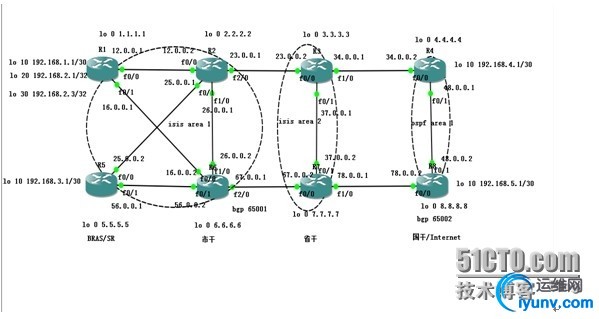
使用GNS3 0.8.6版本模拟器(c3725-adventerprisek9-mz.124-15.T5.image)实验拓扑:
实验要求:
1. 通过ISIS协议将AS内部的直连和环回口路由宣告。
2.通过配置IBGP协议建立邻居将所有的用户业务路由(大客户和PPOE拨号)宣告。
3.通过配置路由反射器实现市内、省内业务路由互传。
4.通过建立EBGP邻居实现全省和国干互联网路由互传。
5.通过配置黑洞路由实现用户业务网段聚合。
6.实现城域网网络架构由ipv4向ipv6平滑过渡。
实验步骤及验证:
1.接口及ip地址规划:
路由器
| 接口
| ip地址
| R1
| F0/0
| 12.0.0.1/30
| R1
| F0/1
| 16.0.0.1/30
| R1
| Loopback 0
| 1.1.1.1/32
| R1
| Loopback 10
| 192.168.1.1/30
| R1
| Loopback 20
| 192.168.2.1/32
| R1
| Loopback 30
| 192.168.2.3/32
| R2
| F0/0
| 12.0.0.2/30
| R2
| F2/0
| 23.0.0.1/30
| R2
| F0/1
| 25.0.0.1/30
| R2
| F1/0
| 26.0.0.1/30
| R2
| loopback 0
| 2.2.2.2/32
| R3
| F0/0
| 23.0.0.2/30
| R3
| F1/0
| 34.0.0.1/30
| R3
| F0/1
| 37.0.0.1/30
| R3
| loopback 0
| 3.3.3.3/32
| R4
| F0/0
| 34.0.0.2/30
| R4
| F0/1
| 48.0.0.1/30
| R4
| loopback 0
| 4.4.4.4/32
| R4
| loopback 10
| 192.168.4.1/30
| R5
| F0/0
| 25.0.0.2/30
| R5
| F0/1
| 56.0.0.1/30
| R5
| Loopback 0
| 5.5.5.5/32
| R5
| Loopback 10
| 192.168.3.1/30
| R6
| F0/1
| 56.0.0.2/30
| R6
| F0/0
| 16.0.0.2/30
| R6
| F1/0
| 26.0.0.2/30
| R6
| F2/0
| 67.0.0.1/30
| R6
| loopback 0
| 6.6.6.6/32
| R7
| F0/0
| 67.0.0.2/30
| R7
| F0/1
| 37.0.0.2/30
| R7
| F1/0
| 78.0.0.1/30
| R7
| loopback 0
| 7.7.7.7/32
| R8
| F0/0
| 78.0.0.2/30
| R8
| F0/1
| 48.0.0.2/30
| R8
| loopback 0
| 8.8.8.8/32
| R8
| loopback 10
| 192.168.5.1/30
|
2.配置脚本:
R1
R1(config)#int f0/0
R1(config-if)#ip add 12.0.0.1255.255.255.252
R1(config-if)#no sh
R1(config)#int f0/1
R1(config-if)#ip add16.0.0.1 255.255.255.252
R1(config-if)#no sh
R1(config-if)#int lo 0
R1(config-if)#ip add1.1.1.1 255.255.255.255
R1(config-if)#int lo 10 //模拟下挂的30位掩码静态大客户业务网段//
R1(config-if)#ip add192.168.1.1 255.255.255.252
R1(config-if)#int lo 20 //模拟下挂的32位掩码PPOE用户//
R1(config-if)#ip add192.168.2.1 255.255.255.255
R1(config-if)#int lo 30 //模拟下挂的32位掩码PPOE用户//
R1(config-if)#ip add192.168.2.3 255.255.255.255
R2
R2(config)#int f0/0
R2(config-if)#ip add 12.0.0.2 255.255.255.252
R2(config-if)#no sh
R2(config-if)#int f0/1
R2(config-if)#ip add 25.0.0.1 255.255.255.252
R2(config-if)#no sh
R2(config-if)#int f1/0
R2(config-if)#ip add 26.0.0.1 255.255.255.252
R2(config-if)#no sh
R2(config-if)#int f2/0
R2(config-if)#ip add 23.0.0.1 255.255.255.252
R2(config-if)#no sh
R2(config-if)#int lo 0
R2(config-if)#ip add 2.2.2.2 255.255.255.255
R3
R3(config)#int f0/0
R3(config-if)#ip add 23.0.0.2255.255.255.252
R3(config-if)#no sh
R3(config-if)#int f0/1
R3(config-if)#ip add 37.0.0.1255.255.255.252
R3(config-if)#no sh
R3(config-if)#int f1/0
R3(config-if)#ip add 34.0.0.1255.255.255.252
R3(config-if)#no sh
R3(config-if)#int lo 0
R3(config-if)#ip add 3.3.3.3255.255.255.255
R4
R4(config)#int f0/0
R4(config-if)#ip add 34.0.0.2255.255.255.252
R4(config-if)#no sh
R4(config-if)#int f0/1
R4(config-if)#ip add 48.0.0.1255.255.255.252
R4(config-if)#no sh
R4(config-if)#int lo 0
R4(config-if)#ip add 4.4.4.4255.255.255.255
R4(config-if)#intlo 10 //模拟下挂的30位掩码静态大客户业务网段//
R4(config-if)#ip add 192.168.4.1255.255.255.252
R5
R5(config)#int f0/0
R5(config-if)#ip add 25.0.0.2255.255.255.252
R5(config-if)#no sh
R5(config-if)#int f0/1
R5(config-if)#ip add 56.0.0.1255.255.255.252
R5(config-if)#no sh
R5(config-if)#intlo 10 //模拟下挂的30位掩码静态大客户业务网段//
R5(config-if)#ip add 192.168.3.1255.255.255.252
R5(config-if)#int lo 0
R5(config-if)#ip add 5.5.5.5255.255.255.255
R6
R6(config)#int f0/1
R6(config-if)#ip add 56.0.0.2255.255.255.252
R6(config-if)#no sh
R6(config-if)#int f0/0
R6(config-if)#ip add 16.0.0.2255.255.255.252
R6(config-if)#no sh
R6(config-if)#int f1/0
R6(config-if)#ip add 26.0.0.2255.255.255.252
R6(config-if)#no sh
R6(config-if)#int f2/0
R6(config-if)#ip add 67.0.0.1 255.255.255.252
R6(config-if)#no sh
R6(config-if)#int lo 0
R6(config-if)#ip add 6.6.6.6255.255.255.255
R7
R7(config)#int f0/0
R7(config-if)#ip add 67.0.0.2255.255.255.252
R7(config-if)#no sh
R7(config-if)#int f0/1
R7(config-if)#ip add 37.0.0.2255.255.255.252
R7(config-if)#no sh
R7(config-if)#int f1/0
R7(config-if)#ip add 78.0.0.1255.255.255.252
R7(config-if)#no sh
R7(config)#int lo 0
R7(config-if)#ip add 7.7.7.7255.255.255.255
R8
R8(config)#int f0/0
R8(config-if)#ip add 78.0.0.2255.255.255.252
R8(config-if)#no sh
R8(config-if)#int f0/1
R8(config-if)#ip add 48.0.0.2255.255.255.252
R8(config-if)#no sh
R8(config-if)#intlo 10 //模拟下挂的30位掩码静态大客户业务网段//
R8(config-if)#ip add 192.168.5.1255.255.255.252
R8(config-if)#int lo 0
R8(config-if)#ip add 8.8.8.8255.255.255.255
---------------------------以上是ip地址配置----------------------------------
R1
R1(config)#router isis //开启ISIS协议//
R1(config-router)#net 49.0001.0010.0100.1001.00 //通过环回口翻译得出net地址//
R1(config-router)#is-type level-1 //指定R1为L1型路由器//
R1(config)#int range f0/0 - 1 ,lo 0
R1(config-if-range)#ip router isis //在R1的互连接口和环回口下通告ISIS协议//
R2 //R2上ISIS配置同R1这里就不再赘述了//
R2(config)#router isis
R2(config-router)#net 49.0001.0020.0200.2002.00
R2(config-router)#is-type level-1-2 //指定R2为L1-2路由器//
R2(config)#int range f0/0 - 1 ,f1/0 ,f2/0 ,lo 0
R2(config-if-range)#ip router isis
R3 //R3上ISIS配置同R1这里就不再赘述了//
R3(config)#router isis
R3(config-router)#net 49.0002.0030.0300.3003.00
R3(config-router)#is-type level-2 //指定R3为L2路由器//
R3(config)#int range f0/0 - 1 ,lo 0
R3(config-if-range)#ip router isis
R5 //R5上ISIS配置同R1这里就不再赘述了//
R5(config)#router isis
R5(config-router)#net 49.0001.0050.0500.5005.00
R5(config-router)#is-type level-1 //指定R5为L1路由器//
R5(config)#int range f0/0 - 1 ,lo 0
R5(config-if-range)#ip router isis
R6 //R6上ISIS配置同R1这里就不再赘述了//
R6(config)#router isis
R6(config-router)#net 49.0001.0060.0600.6006.00
R6(config-router)#is-type level-1-2 //指定R6为L1-2路由器//
R6(config)#int range f0/0 - 1 ,f1/0 ,f2/0 ,lo 0
R6(config-if-range)#ip router isis
R7 //R7上ISIS配置同R1这里就不再赘述了//
R7(config)#router isis
R7(config-router)#net 49.0002.0070.0700.7007.00
R7(config-router)#is-type level-2 //指定R7为L2路由器//
R7(config)#int range f0/0 - 1 ,lo 0
R7(config-if-range)#ip router isis
---------------------------以上是IS-IS路由配置----------------------------
实验验证:
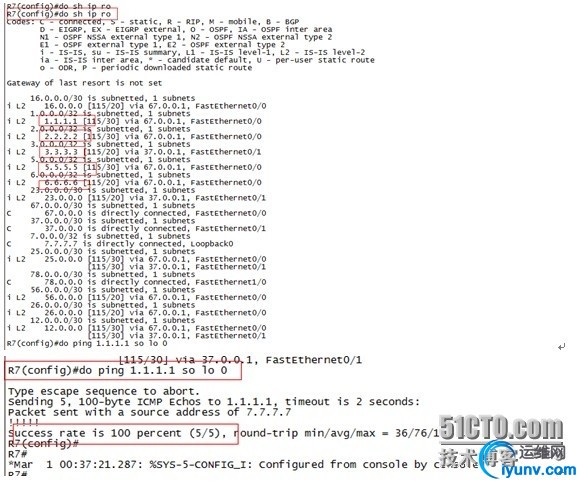
在R7上查看路由表发现可以学到通告了ISIS的路由器的环回口地址,Ping 1.1.1.1可以通信,证明ISIS协议内部互连接口及环回口间可以通信。
------------------------以上是IS-IS AS内部互通验证---------------------------
R4
R4(config)#router ospf 110 //开启OSPF协议进程号为110//
R4(config-router)#router-id 4.4.4.4 //使用环回口地址作为RID//
R4(config-router)#network 4.4.4.4 0.0.0.0 area 1
R4(config-router)#network 48.0.0.0 0.0.0.3 area 1 //通告互连接口及环回口//
R8 //R8上OSPF配置同R4这里就不再赘述了//
R8(config)#router ospf 110
R8(config-router)#router-id 8.8.8.8
R8(config-router)#network 48.0.0.0 0.0.0.3 area 1
R8(config-router)#network 8.8.8.8 0.0.0.0 area 1

在R8上ping R4的环回口(4.4.4.4)可以通信,证明OSPF内部互连接口及环回口间可以通信。
------------------------以上是OSPF AS内部互通验证---------------------------
注意:
在配置中,两个AS间关口局设备的互连接口不需要通告到IGP中。
R1
R1(config)#router bgp 65001 //在R1上开启BGP协议//
R1(config-router)#bgp router-id 1.1.1.1 //指定BGP的RID//
R1(config-router)#neighbor 2.2.2.2 remote-as 65001 //R1作为BRAS/SR设备需要和所有市干/省干设备(本例中为R2,6,3,7)建立IBGP邻居关系以传递下挂业务网段路由,所以remote-as为同一AS号//
R1(config-router)#neighbor 2.2.2.2 update-source lo 0 //使用自身的环回口(环回口更加稳定)和对放建立IBGP邻居关系//
R1(config-router)#neighbor 6.6.6.6 remote-as 65001
R1(config-router)#neighbor 6.6.6.6 update-source lo 0
R1(config-router)#neighbor 3.3.3.3 remote-as 65001
R1(config-router)#neighbor 3.3.3.3 update-source lo 0
R1(config-router)#neighbor 7.7.7.7 remote-as 65001
R1(config-router)#neighbor 7.7.7.7 update-source lo 0
注意:
BGP的邻居关系需手工双向建立(即两相情愿型),在建立邻居的对端设备上也要手工指定邻居。
R2//R2作为市干设备需要和所有BARS/SR设备建立邻居关系以获得业务网段路由,同时还需和直连路由器建立邻居关系以提供路由的冗余,R2建立IBGP邻居关系配置同R1这里就不再赘述了//
R2(config)#router bgp 65001
R2(config-router)#bgp router-id 2.2.2.2
R2(config-router)#neighbor 1.1.1.1 remote-as 65001
R2(config-router)#neighbor 1.1.1.1 update-source lo 0
R2(config-router)#neighbor 5.5.5.5 remote-as 65001
R2(config-router)#neighbor 5.5.5.5 update-source lo 0
R2(config-router)#neighbor 6.6.6.6 remote-as 65001
R2(config-router)#neighbor 6.6.6.6 update-source lo 0
R2(config-router)#neighbor 3.3.3.3 remote-as 65001
R2(config-router)#neighbor 3.3.3.3 update-source lo 0
R3//R3作为省干设备需要和所有BARS/SR设备建立邻居关系以获得业务网段路由,同时还需和直连路由器建立邻居关系以提供路由的冗余,R3建立IBGP邻居关系配置同R1这里就不再赘述了//
R3(config)#router bgp 65001
R3(config-router)#bgp router-id 3.3.3.3
R3(config-router)#neighbor 1.1.1.1 remote-as 65001
R3(config-router)#neighbor 1.1.1.1 update-source lo 0
R3(config-router)#neighbor 5.5.5.5 remote-as 65001
R3(config-router)#neighbor 5.5.5.5 update-source lo 0
R3(config-router)#neighbor 2.2.2.2 remote-as 65001
R3(config-router)#neighbor 2.2.2.2 update-source lo 0
R3(config-router)#neighbor 7.7.7.7 remote-as 65001
R3(config-router)#neighbor 7.7.7.7 update-source lo 0
R5 //R5作为BRAS/SR设备需要和所有市干/省干设备(本例中为R2,6,3,7)建立IBGP邻居关系以传递下挂业务网段路由,R5配置同R1,在此就不再赘述了//
R5(config)#router bgp 65001
R5(config-router)#bgp router-id 5.5.5.5
R5(config-router)#neighbor 2.2.2.2 remote-as 65001
R5(config-router)#neighbor 2.2.2.2 update-source lo 0
R5(config-router)#neighbor 6.6.6.6 remote-as 65001
R5(config-router)#neighbor 6.6.6.6 update-source lo 0
R5(config-router)#neighbor 3.3.3.3 remote-as 65001
R5(config-router)#neighbor 3.3.3.3 update-source lo 0
R5(config-router)#neighbor 7.7.7.7 remote-as 65001
R5(config-router)#neighbor 7.7.7.7 update-source lo 0
R6//R6作为市干设备需要和所有BARS/SR设备建立邻居关系以获得业务网段路由,同时还需和直连路由器建立邻居关系以提供路由的冗余,R6建立IBGP邻居关系配置同R1这里就不再赘述了//
R6(config)#router bgp 65001
R6(config-router)#bgp router-id 6.6.6.6
R6(config-router)#neighbor 1.1.1.1 remote-as 65001
R6(config-router)#neighbor 1.1.1.1 update-source lo 0
R6(config-router)#neighbor 5.5.5.5 remote-as 65001
R6(config-router)#neighbor 5.5.5.5 update-source lo 0
R6(config-router)#neighbor 2.2.2.2 remote-as 65001
R6(config-router)#neighbor 2.2.2.2 update-source lo 0
R6(config-router)#neighbor 7.7.7.7 remote-as 65001
R6(config-router)#neighbor 7.7.7.7 update-source lo 0
R7//R7作为省干设备需要和所有BARS/SR设备建立邻居关系以获得业务网段路由,同时还需和直连路由器建立邻居关系以提供路由的冗余,R7建立IBGP邻居关系配置同R1这里就不再赘述了//
R7(config)#router bgp 65001
R7(config-router)#bgp router-id 7.7.7.7
R7(config-router)#neighbor 1.1.1.1 remote-as 65001
R7(config-router)#neighbor 1.1.1.1 update-source lo 0
R7(config-router)#neighbor 5.5.5.5 remote-as 65001
R7(config-router)#neighbor 5.5.5.5 update-source lo 0
R7(config-router)#neighbor 6.6.6.6 remote-as 65001
R7(config-router)#neighbor 6.6.6.6 update-source lo 0
R7(config-router)#neighbor 3.3.3.3 remote-as 65001
R7(config-router)#neighbor 3.3.3.3 update-source lo 0
R1
R1(config)#ip route 192.168.2.0 255.255.255.0 null 0 //指定一条到PPOE用户汇总网段的静态路由下一跳为null 0(黑洞路由,数据到这就会被丢弃)//

R1(config)#router bgp 65001 //在BGP下宣告路由//
R1(config-router)#network 192.168.1.0 mask 255.255.255.252
R1(config-router)#network 192.168.2.0 mask 255.255.255.0
注意:
通过建立BGP邻居关系传递路由时,前提条件是路由器的路由表中一定要有该条路由条目,并且必须是匹配的(即网络号和掩码必须相同)。
R5
R5(config)#router bgp 65001 //在R5上把下挂的30位掩码大客户路由通过BGP宣告//
R5(config-router)#network 192.168.3.0 mask 255.255.255.252
注意:
因为IBGP的水平分割原则,从一个IBGP邻居收到的路由不会发给另一个IBGP邻居,所以需要在市干设备(R2,R6上)指定所有BARS/SR设备为自己的路由反射器客户端,使得每一台BARS/SR设备上都所有业务网段的路由。
R2 //在R2上指定所有BARS/SR设备为自己的路由反射器客户端//
R2(config-router)#neighbor 1.1.1.1 route-reflector-client
R2(config-router)#neighbor 5.5.5.5 route-reflector-client
R2(config-router)# bgp cluster-id 123 //配置同一层设备相同的组ID使得客户端设备认为路由信息是同一设备传给它的//
R6 //在R6上指定所有BARS/SR设备为自己的路由反射器客户端//
R6(config-router)#neighbor 1.1.1.1 route-reflector-client
R6(config-router)#neighbor 5.5.5.5 route-reflector-client
//配置同一层设备相同的组ID使得客户端设备认为路由信息是同一设备传给它的//
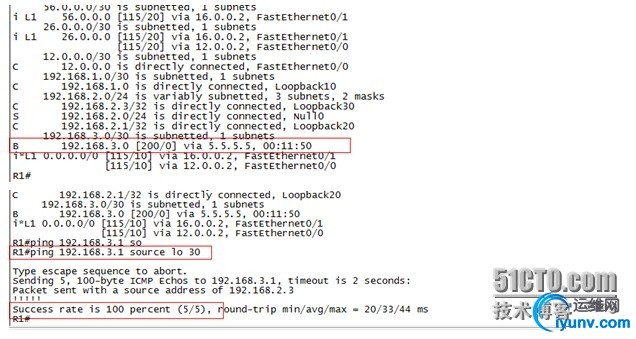
在R1上查看路由表可以看到通过BGP学习到了同为BARS/SR设备的R5下的业务路由,在R1上ping 192.168.3.1(R5的lo 10模拟下挂业务网段)可以通信,至此全省省内的路由可达,实现省内互通。
---------------------------以上通过IBGP实现省内互通--------------------------
R4 //在国干设备R4上与同一BGP AS中的国干设备R8建立IBGP邻居关系产地业务路由,具体原理及配置上文有详细介绍,这里不再赘述//
R4(config)#router bgp 65002
R4(config-router)#bgp router-id 4.4.4.4
R4(config-router)#neighbor 8.8.8.8 remote-as 65002
R4(config-router)#neighbor 8.8.8.8 update-source lo 0
R8 //在国干设备R8上与同一BGP AS中的国干设备R4建立IBGP邻居关系产地业务路由,具体原理及配置上文有详细介绍,这里不再赘述//
R8(config)#router bgp 65002
R8(config-router)#bgp router-id 8.8.8.8
R8(config-router)#neighbor 4.4.4.4 remote-as 65002
R8(config-router)#neighbor 4.4.4.4 update-source lo 0
注意:
需要在两个BGP AS间配置EBGP邻居来传递两省间跨越互联网(国干)的通信,EBGP邻居建立的条件是邻居间可以通信,所以需要在两个AS的关口局设备上互指静态路由。
R3
R3(config)#ip route 4.4.4.4 255.255.255.255 34.0.0.2
R4
R4(config)#ip route 3.3.3.3 255.255.255.255 34.0.0.1
//在关口局设备R3,R4上互指静态路由//
R7
R7(config)#ip route 8.8.8.8 255.255.255.255 78.0.0.2
R8
R8(config)#ip route 7.7.7.7 255.255.255.255 78.0.0.1
//在关口局设备R7,R8上互指静态路由//
R3
R3(config)#router bgp 65001
R3(config-router)#neighbor 4.4.4.4 remote-as 65002 //和另一个BGP AS建立EBGP邻居//
R3(config-router)#neighbor 4.4.4.4 update-source lo 0
R3(config-router)#neighbor 4.4.4.4 ebgp-multihop 2 //EBGP默认有跳数为1的限制所以需要手动将跳数设置为2//
R4
R4(config)#router bgp 65002
R4(config-router)#neighbor 3.3.3.3 remote-as 65001 //和另一个BGP AS建立EBGP邻居//
R4(config-router)#neighbor 3.3.3.3 update-source lo 0
R4(config-router)#neighbor 3.3.3.3 ebgp-multihop 2 //EBGP默认有跳数为1的限制所以需要手动将跳数设置为2//
R7 //这里R7配置同R3,就不再赘述//
R7(config)#router bgp 65001
R7(config-router)#neighbor 8.8.8.8 remote-as 65002
R7(config-router)#neighbor 8.8.8.8 update-source lo 0
R7(config-router)#neighbor 8.8.8.8 ebgp-multihop 2
R8 //这里R8配置同R4,就不再赘述//
R8(config)#router bgp 65002
R8(config-router)#neighbor 7.7.7.7 remote-as 65001
R8(config-router)#neighbor 7.7.7.7 update-source lo 0
R8(config-router)#neighbor 7.7.7.7 ebgp-multihop 2
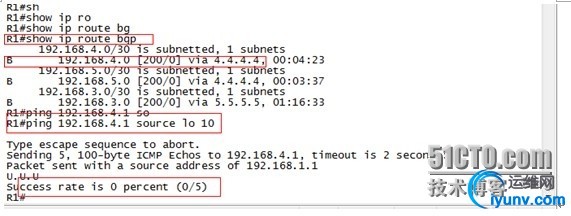
在R1上查看BGP的路由表发现到达192.168.4.0/30子网的路由已经被优化放入路由表中,但在R1上ping R4的lo 10(192.168.4.1模拟业务网段)不通,继续查看路由表可以找出原因。
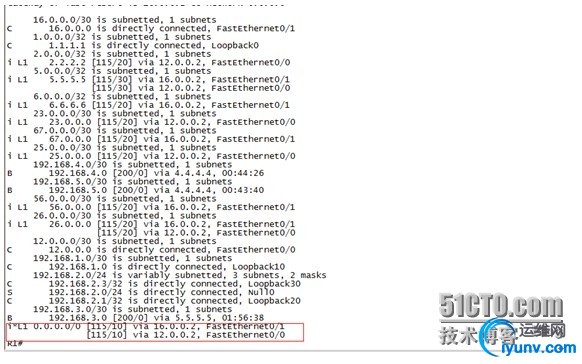
这是因为R1上有一条由ISIS的L1-2路由器下发给它的默认路由,所以R1会认为到达192.168.4.0/30子网的下一跳4.4.4.4可达,所以就会优化将此 放入路由表,但是我们继续看路由表可以发现并没有到达4.4.4.4的明细路由,故虽然控制层面的路由有了,但数据层面仍然是不通的。
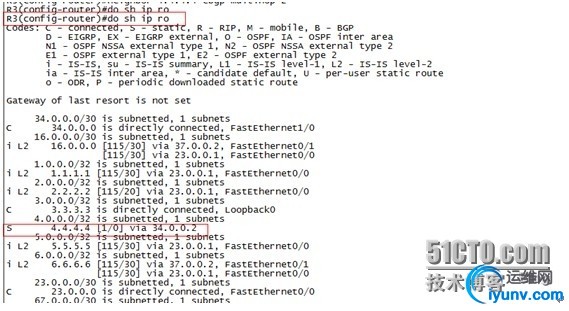
查看R3路由表发现R3因为配置了静态路由,R3是知道如何到4.4.4.4的,而R3的环回口是通过IGP(ISIS)通告的,所以R1是知道如何到R3的,因此我们可以采用跳板,在R3上告诉所有的IBGP邻居下一跳为自己,在R7上也一样,在市干设备(R2,R6)上同样要告诉所有BARS/SR设备下一跳为自己,同时为了路由冗余,同层设备之间也要相互宣告。
R2
R2(config-router)#neighbor 1.1.1.1 next-hop-self
R2(config-router)#neighbor 5.5.5.5 next-hop-self
R2(config-router)#neighbor 6.6.6.6 next-hop-self
R6
R6(config-router)#neighbor 1.1.1.1 next-hop-self
R6(config-router)#neighbor 5.5.5.5 next-hop-self
R6(config-router)#neighbor 2.2.2.2 next-hop-self
R3
R3(config-router)#neighbor 1.1.1.1 next-hop-self
R3(config-router)#neighbor 2.2.2.2 next-hop-self
R3(config-router)#neighbor 7.7.7.7 next-hop-self
R3(config-router)#neighbor 5.5.5.5 next-hop-self
R7
R7(config-router)#neighbor 1.1.1.1 next-hop-self
R7(config-router)#neighbor 5.5.5.5 next-hop-self
R7(config-router)#neighbor 6.6.6.6 next-hop-self
R7(config-router)#neighbor 3.3.3.3 next-hop-self
注意:
假设R3与R4之间链路故障,则R3与R4不可以建立EBGP邻居关系,只有R4通过IBGP邻居关系将业务路由传递给R8,R8通过EBGP邻居关系将路由传给R7,R7会通过IBGP邻居关系传路由给R3,R6,但R3,R6因为IBGP的水平分割原则将不会传路由给R2有可能出现两省间业务网段通信问题,所以需要将所有的市干设备作为省干设备的路由反射器客户端,打破水平分割从而传路由。
R3
R3(config-router)#neighbor 2.2.2.2 route-reflector-client
R3(config-router)#bgp cluster-id 321 //配置同一层设备相同的组ID使得客户端设备认为路由信息是同一设备传给它的//
R7
R7(config-router)#neighbor 6.6.6.6 route-reflector-client
R7(config-router)#bgp cluster-id 321 //配置同一层设备相同的组ID使得客户端设备认为路由信息是同一设备传给它的//
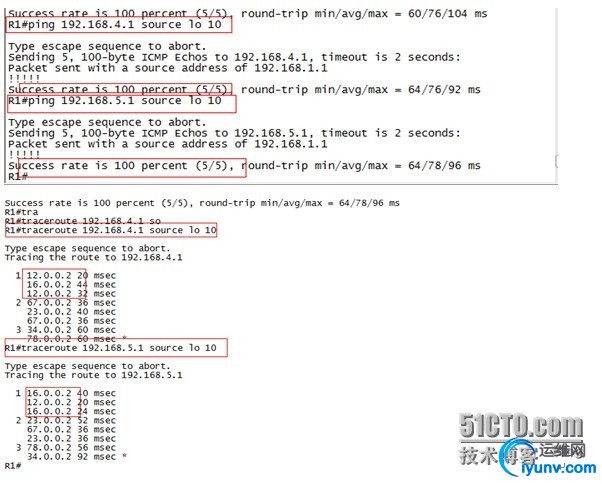
在R1上使用loopback 10作为源(模拟的30位掩码大客户业务网段)Ping R4的loopback 10(模拟的其他省业务网段),R8的loopback 10(模拟的其他省业务网段)可以通信,同时traceroute可以发现实现了路由的冗余和负载,至此实现跨越互联网的两省通信,实验完成。
——————————以上为ipv4环境下配置—————————
ipv6技术的重要性:
由于全球互联网的不断发展,ipv4地址短缺问题日益严重,虽然通过PAT等技术可以一定程度上延缓ipv4地址耗尽速度,但是并不能根本上解决ipv4地址短缺问题,所以未来ipv6将会是主流(ipv6地址总长度为128位,可以从根本上解决ip地址短缺的问题)。
//因ipv6下原理及配置思路同ipv4,所以实验只完成上面一排路由器的ipv6配置(R1,R2,R3,R4)//
1.接口及ipv6地址规划:
路由器
| 接口
| ipv6地址
| R1
| Loopback 10
| 110::1/64
| R1
| Loopback 0
| 111::1/128
| R1
| F0/0
| 12::1/64
| R2
| F0/0
| 12::2/64
| R2
| Loopback 0
| 222::2/128
| R2
| F2/0
| 23::1/64
| R3
| F0/0
| 23::2/64
| R3
| loopback 0
| 333::3/128
| R3
| F1/0
| 34::1/64
| R4
| F0/0
| 34::2/64
| R4
| loopback 0
| 444::4/128
| R4
| loopback 10
| 120::1/64
|
2.配置脚本及验证:
R1
R1(config)#ipv6 unicast-routing //开启ipv6单播路由//
R1(config)#int lo 10 //配置loopback 10模拟BRAS/SR下挂的业务网段//
R1(config-if)#ipv6 add 110::1/64
R1(config-if)#no sh
R1(config-if)#int lo 0
R1(config-if)#ipv6 add 111::1/128
R1(config-if)#no sh
R1(config-if)#int f0/0
R1(config-if)#ipv6 add 12::1/64
R1(config-if)#no sh
R2
R2(config)#ipv6 unicast-routing //开启ipv6单播路由//
R2(config)#int f0/0
R2(config-if)#ipv6 add 12::2/64
R2(config-if)#no sh
R2(config-if)#int lo 0
R2(config-if)#ipv6 add 222::2/128
R2(config-if)#int f2/0
R2(config-if)#ipv6 add 23::1/64
R2(config-if)#no sh
R3
R3(config)#ipv6 unicast-routing //开启ipv6单播路由//
R3(config)#int f0/0
R3(config-if)#ipv6 add 23::2/64
R3(config-if)#no sh
R3(config-if)#int lo 0
R3(config-if)#ipv6 add 333::3/128
R3(config-if)#int f1/0
R3(config-if)#ipv6 add 34::1/64
R3(config-if)#no sh
R4
R4(config)#ipv6 unicast-routing //开启ipv6单播路由//
R4(config)#int f0/0
R4(config-if)#ipv6 add 34::2/64
R4(config-if)#no sh
R4(config-if)#int lo 0
R4(config-if)#ipv6 add 444::4/128
R4(config-if)#int lo 10 //配置loopback 10模拟另外一个省下挂的业务网段//
R4(config-if)#ipv6 add 120::1/64
————————以上为接口ipv6地址配置——————————
R1
R1(config)#ipv6 router ospf 110 //开启ospf v3//
R1(config)#int lo 0 //注意:ipv6下ospfv3要在接口下宣告网段//
R1(config-if)#ipv6 ospf 110 area 0
R1(config-if)#int f0/0
R1(config-if)#ipv6 ospf 110 area 0
R2 //R2上ospfv3配置同R1,就不再赘述//
R2(config)#ipv6 router ospf 110
R2(config)#int f0/0
R2(config-if)#ipv6 ospf 110 area 0
R2(config-if)#int lo 0
R2(config-if)#ipv6 ospf 110 area 0
R2(config)#int f2/0
R2(config-if)#ipv6 ospf 110 area 0
R3 //R3上ospfv3配置同R1,就不再赘述//
R3(config)#ipv6 router ospf 110
R3(config)#int f0/0
R3(config-if)#ipv6 ospf 110 area 0
R3(config-if)#int lo 0
R3(config-if)#ipv6 ospf 110 area 0

在R1上查看ipv6的ospf 邻居关系表,可以看到邻居关系应经是full,在R1上Ping R3的loopback 0可以通信,证明AS内部可以通信。
————————以上为ospf v3 AS内部配置—————————
R1
R1(config)#router bgp 65001 //在R1上开启BGP协议//
R1(config-router)#address-family ipv6 unicast //指定为ipv6的BGP//
R1(config-router-af)#neighbor 222::2 remote-as 65001 //R1需要和R2,R3建立ipv6的IBGP邻居关系//
R1(config-router-af)#neighbor 222::2 update-source lo 0
R1(config-router-af)#neighbor 333::3 remote-as 65001
R1(config-router-af)#neighbor 333::3 update-source lo 0
R1(config-router-af)#network 110::/64 //在R1上通过IBGP宣告下挂的业务网段//
R2 //R2上IBGP配置同R1,这里不再赘述//
R2(config)#router bgp 65001
R2(config-router)#address-family ipv6 unicast
R2(config-router-af)#neighbor 111::1 remote-as 65001
R2(config-router-af)#neighbor 111::1 update-source lo 0
R2(config-router-af)#neighbor 333::3 remote-as 65001
R2(config-router-af)#neighbor 333::3 update-source lo 0
R3 //R3上IBGP配置同R1,这里不再赘述//
R3(config)#router bgp 65001
R3(config-router)#address-family ipv6 unicast
R3(config-router-af)#neighbor 111::1 remote-as 65001
R3(config-router-af)#neighbor 111::1 update-source lo 0
R3(config-router-af)#neighbor 222::2 remote-as 65001
R3(config-router-af)#neighbor 111::1 update-source lo 0
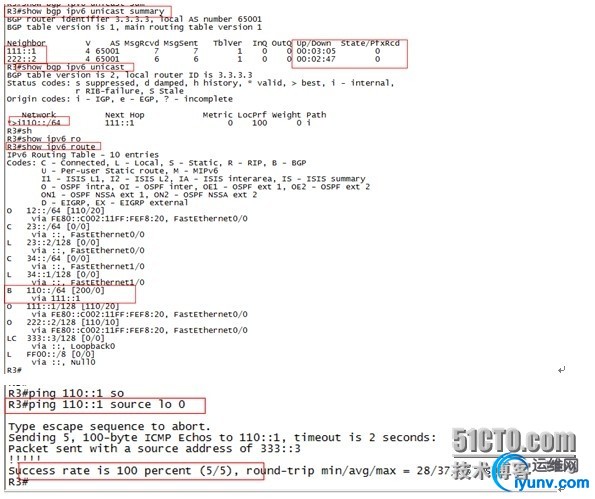
在R3上查看BGP邻居关系表,可以看到R3与R1,R2的邻居关系已经建立,再查看BGP表可以看到到达R1下挂业务网段路由已经优化,在ipv6路由表中可以看到通过IBGP邻居学习到的路由,在R3上pingR1下挂的业务网段(loopback 10)可以通信,证明R1下挂的业务网段通过IBGP邻居关系被ospf AS内部的路由器学习到。
R3
R3(config)#ipv6 route 444::4/128 34::2
R4
R4(config)#ipv6 route 333::3/128 34::1 //建立BGP邻居的条件是双方可以通信,所以要在两个AS间的关口局设备上互指静态路由//

在R4上可以ping通R3的环回口,证明两者间可以通信。
R3
R3(config)#router bgp 65001
R3(config-router)#address-family ipv6 unicast
R3(config-router-af)#neighbor 444::4 remote-as 65002 //R3与R4间建立EBGP邻居关系//
R3(config-router-af)#neighbor 444::4 update-source lo 0
R3(config-router-af)#neighbor 444::4 ebgp-multihop 2 //EBGP邻居关系默认跳数限制为1,需要手动指定为2//
R4 //R4上EBGP配置同R3,这里不再赘述//
R4(config)#router bgp 65002
R4(config-router)#address-family ipv6 unicast
R4(config-router-af)#neighbor 333::3 remote-as 65001
R4(config-router-af)#neighbor 333::3 update-source lo 0
R4(config-router-af)#neighbor 333::3 ebgp-multihop 2
R4(config-router-af)#network 120::/64 //把R4下挂业务网段通过EBGP宣告出去//
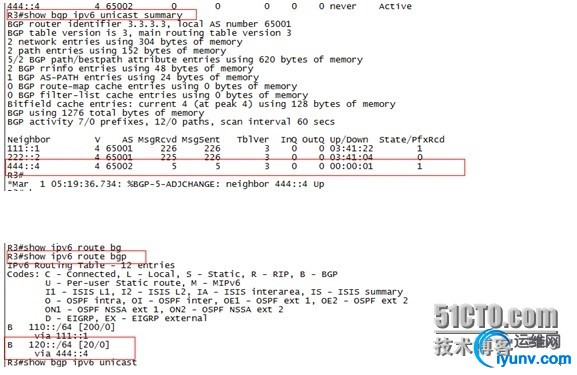
在R3上查看邻居表可以看到R3与R4的EBGP邻居关系已经建立,在路由表中可以看到到达R4下业务网段的路由,证明通过EBGP邻居传递路由成功。
R2 //在R2上需告诉R1为自己的路由反射器客户端,并且指明下一跳为自己//
R2(config-router-af)#neighbor 111::1 next-hop-self
R2(config-router-af)#neighbor 111::1 route-reflector-client
R3 //在R3上需告诉R2为自己的路由反射器客户端,并且向R1,R2指明下一跳为自己//
R3(config-router-af)#neighbor 111::1 next-hop-self
R3(config-router-af)#neighbor 222::2 next-hop-self
R3(config-router-af)#neighbor 222::2 route-reflector-client

在R1上以loopback 10作为源pingR4下挂的业务网段(loopback 10)可以通信,证明两省下挂业务网段跨越互联网可以通信,实验完成。
实验总结:
1.ISIS协议因为其收敛快速,易于扩展,通常在运营商的架构中用来作为IGP运行设备互联接口和环回口间的通信。
2.BGP协议作为目前唯一的EGP主要用来传递业务路由到AS内部以及在AS间传递业务路由。
3.目前城域网网络架构已经具备从ipv4向ipv6平滑过渡的能力,可以说ipv6时代真的要来了。
|
|