我们在上博文“运维工程师必备之负载均衡集群及LVS详解”中详细介绍了负载均衡和集群的基本理论和类别,此处不在详细介绍,在本篇博文中则主要以LB负载均衡集群的类别:NAT和DR模型的web网络架构进行实例介绍,以便我们进一步了解负载均衡集群的理论架构和应用场景!
一、架构平台环境:
[backcolor=rgb(224, 224, 224) !important][size=1em]1
[backcolor=white !important][size=1em]2
[backcolor=rgb(224, 224, 224) !important][size=1em]3
[backcolor=white !important][size=1em]4
[backcolor=rgb(224, 224, 224) !important][size=1em]5
[backcolor=white !important][size=1em]6
[backcolor=rgb(224, 224, 224) !important][size=1em]7
| [size=1em][backcolor=rgb(224, 224, 224) !important][size=1em]平台:RedHat Enterprise Linux 5.8 ipvsadm ipvs
[backcolor=white !important][size=1em]相关服务和名字的定义:
[backcolor=rgb(224, 224, 224) !important][size=1em]Director:负载调度集群的主机,也简称DR
[backcolor=white !important][size=1em]VIP:Virtual IP,向外提供服务的IP
[backcolor=rgb(224, 224, 224) !important][size=1em]RIP:Real Server IP,内部真正提供服务的
[backcolor=white !important][size=1em]DIP:与内部主机通信的IP,在DR主机上
[backcolor=rgb(224, 224, 224) !important][size=1em]CIP:客户端IP
|
[backcolor=white !important]二、架构类型模型的简介 [backcolor=white !important] ⑴、NAT模型 NAT模型:地址转换类型,主要是做地址转换,类似于iptables的DNAT类型,它通过多目标地址转换,来实现负载均衡,一个Director最多负载提供10个Real Server主机 特点和架构要求: 1、LVS上面需要双网卡:DIP和VIP 2、内网的Real Server主机的IP必须和DIP在同一个网络中,并且要求其网关都需要指向DIP的地址 3、RIP都是私有IP地址,仅用于各个节点之间的通信 4、Director位于client和Real Server之间,负载处理所有的进站、出站的通信 5、支持端口映射 6、通常应用在较大规模的应用场景中,但Director易成为整个架构的瓶颈!
[backcolor=white !important] ⑵、DR模型 DR模型:直接路由模型,每个Real Server上都有两个IP:VIP和RIP,但是VIP是隐藏的,就是不能提高解析等功能,只是用来做请求回复的源IP的,Director上只需要一个网卡,然后利用别名来配置两个IP:VIP和DIP Director在接受到外部主机的请求的时候转发给Real Server的时候并不更改目标地址,只是通过arp解析的MAC地址进行封装然后转给Real Server,Real Server在接受到信息以后拆除MAC帧封装,然后直接回复给CIP。 企业中最常用的就是LB架构就是DR模型 特点和架构要求: 1、各个集群节点必须和Director在同一个物理网络中 2、RIP地址不能为私有地址,可以实现便捷的远程管理和监控 3、Director仅仅负责处理入站请求,响应报文则由Real Server直接发往客户端 4、集群节点Real Server 的网关一定不能指向DIP,而是指向外部路由 5、Director不支持端口映射 6、Director能够支持比NAT多很多的Real Server 注意:由于在负载均衡集群和高可用集群的时候要求服务器的时间必须一致,否则将会出现服务不协调等致命性的错误,我们这里把DR设置成为时间服务器,来为RS1和RS2提供时间校准,从而来保证负载均衡集群的正常运行!(关于时间服务器NTP-SERVER的搭建和配置我会在后两天的时间里发表博文详细介绍时间服务器的安装和配置),当然如果没有时间服务器也可以自己手动设置各个服务器的时间来保证时间的一致性!
[backcolor=white !important]三、LB基于LVS的web架构之NAT实现web服务的负载均衡 ⑴、方案规划和架构图 Director需要两个网卡:DIP和VIP RS上各需一个网卡即可
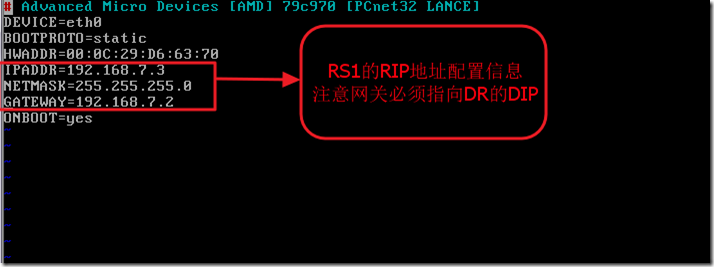
由于此处是在虚拟机中测试实验,为了便于实验和搭建,此处的CIP和VIP没有选择公网内的IP,现实的搭建中选择公网IP的时候路由会自动寻路的,这里选择同一个网络中是为了不在设置路由信息了。可以直接搭建环境进行测试 ⑵、架构步骤 WEB-RS1: 配置web1的RIP [backcolor=rgb(224, 224, 224) !important][size=1em]1
[backcolor=white !important][size=1em]2
[backcolor=rgb(224, 224, 224) !important][size=1em]3
[backcolor=white !important][size=1em]4
[backcolor=rgb(224, 224, 224) !important][size=1em]5
[backcolor=white !important][size=1em]6
[backcolor=rgb(224, 224, 224) !important][size=1em]7
| [size=1em][backcolor=rgb(224, 224, 224) !important][size=1em]vim /etc/sysconfig/network-scripts/ifcfg-eth0 #编辑网络配置,配置如下
[backcolor=white !important][size=1em]DEVICE=eth0
[backcolor=rgb(224, 224, 224) !important][size=1em]BOOTPROTO=static
[backcolor=white !important][size=1em]ONBOOT=yes
[backcolor=rgb(224, 224, 224) !important][size=1em]IPADDR=192.168.7.3
[backcolor=white !important][size=1em]NETMASK=255.255.255.0
[backcolor=rgb(224, 224, 224) !important][size=1em]GATEWAY=192.168.7.2
|
[backcolor=white !important]然后重启网络服务即可 [backcolor=white !important]service network restart [backcolor=white !important]

[backcolor=white !important]为了服务出问题,我们这里先把selinux给关闭了 [backcolor=white !important]

[backcolor=white !important] 时间校准: [backcolor=white !important] ntpdate 192.168.7.2 #注意时间的同步,我这里把DR和NTPserver设置在了同一台服务器上了!若没ntp-server也可也手动设置时间,只要保证各个服务器之间的时间相同就行! [backcolor=white !important] 然后来安装我们的httpd服务吧! yum –y install httpd #利用yum安装httpd服务
echo "web1.chris.com" > /var/www/html/index.html #设置主页内容
[backcolor=white !important] 至此web1上的基本配置基本完成!下面在web2上进行相关的配置吧! WEB-RS2 配置web2的RIP [backcolor=rgb(224, 224, 224) !important][size=1em]1
[backcolor=white !important][size=1em]2
[backcolor=rgb(224, 224, 224) !important][size=1em]3
[backcolor=white !important][size=1em]4
[backcolor=rgb(224, 224, 224) !important][size=1em]5
[backcolor=white !important][size=1em]6
[backcolor=rgb(224, 224, 224) !important][size=1em]7
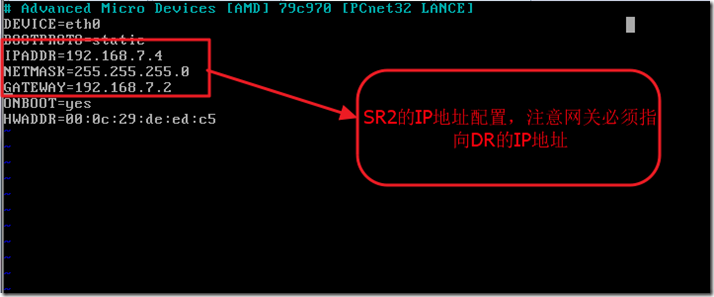
| [size=1em][backcolor=rgb(224, 224, 224) !important][size=1em]vim /etc/sysconfig/network-scripts/ifcfg-eth0 #编辑网络配置,配置如下
[backcolor=white !important][size=1em]DEVICE=eth0
[backcolor=rgb(224, 224, 224) !important][size=1em]BOOTPROTO=static
[backcolor=white !important][size=1em]ONBOOT=yes
[backcolor=rgb(224, 224, 224) !important][size=1em]IPADDR=192.168.7.4
[backcolor=white !important][size=1em]NETMASK=255.255.255.0
[backcolor=rgb(224, 224, 224) !important][size=1em]GATEWAY=192.168.7.2
|
[backcolor=white !important]

[backcolor=white !important]然后重启网络服务即可 [backcolor=white !important]service network restart [backcolor=white !important]关闭selinux [backcolor=white !important] setenforce 0 [backcolor=white !important]永久关闭 [backcolor=white !important] vim /etc/selinux/config 设置内容SELINUX=permissive [backcolor=white !important]校准时间 [backcolor=white !important]

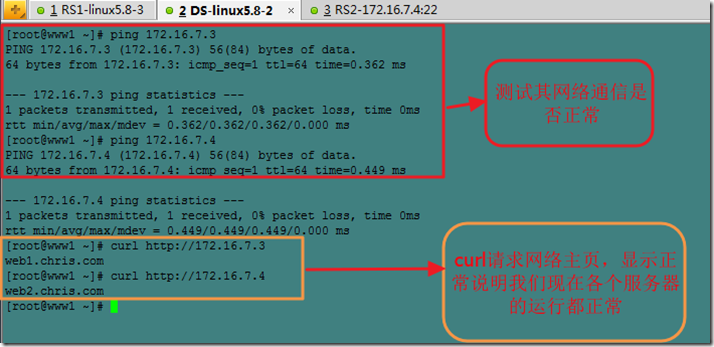
[backcolor=white !important]安装httpd服务 [backcolor=white !important] yum -y install httpd [backcolor=white !important] echo "web2.chris.com" > /var/www/html/index.html #设置主页内容 [backcolor=white !important]至此我们web-RS2上的基本设置基本完成了 [backcolor=white !important]⑵、测试web-RS1和web-RS2上的web服务能够正常工作 [backcolor=white !important]在RS1和RS2上启动httpd服务: [backcolor=white !important] service httpd start [backcolor=white !important]在DR服务器上进行httpd的服务的测试: [backcolor=white !important]

[backcolor=white !important]⑶、DR上面的配置 [backcolor=white !important]1、先配置网络:eth0-DIP和eth1-VIP [backcolor=rgb(224, 224, 224) !important][size=1em]1
[backcolor=white !important][size=1em]2
[backcolor=rgb(224, 224, 224) !important][size=1em]3
[backcolor=white !important][size=1em]4
[backcolor=rgb(224, 224, 224) !important][size=1em]5
[backcolor=white !important][size=1em]6
[backcolor=rgb(224, 224, 224) !important][size=1em]7
[backcolor=white !important][size=1em]8
[backcolor=rgb(224, 224, 224) !important][size=1em]9
[backcolor=white !important][size=1em]10
[backcolor=rgb(224, 224, 224) !important][size=1em]11
[backcolor=white !important][size=1em]12
[backcolor=rgb(224, 224, 224) !important][size=1em]13
[backcolor=white !important][size=1em]14
[backcolor=rgb(224, 224, 224) !important][size=1em]15
[backcolor=white !important][size=1em]16
| [size=1em][backcolor=rgb(224, 224, 224) !important][size=1em]vim /etc/sysconfig/network-scripts/ifcfg-eth0 设置内容如下:
[backcolor=white !important][size=1em]# Advanced Micro Devices [AMD] 79c970 [PCnet32 LANCE]
[backcolor=rgb(224, 224, 224) !important][size=1em]DEVICE=eth0
[backcolor=white !important][size=1em]BOOTPROTO=static
[backcolor=rgb(224, 224, 224) !important][size=1em]ONBOOT=yes
[backcolor=white !important][size=1em]IPADDR=172.16.7.1 #DIP地址
[backcolor=rgb(224, 224, 224) !important][size=1em]NETMASK=255.255.0.0
[backcolor=white !important][size=1em]GATEWAY=172.16.7.49 #此网关设置需要根据实际需要设置,我这里设置的是利用我物理卷的IP进行网络访问来架设NTP-SERVER了!
[backcolor=rgb(224, 224, 224) !important][size=1em]HWADDR=00:0c:29:84:7c:a6
[backcolor=white !important][size=1em]vim /etc/sysconfig/network-scripts/ifcfg-eth1 设置内容如下:
[backcolor=rgb(224, 224, 224) !important][size=1em]DEVICE=eth1
[backcolor=white !important][size=1em]BOOTPROTO=static
[backcolor=rgb(224, 224, 224) !important][size=1em]IPADDR=192.168.7.2 #VIP地址
[backcolor=white !important][size=1em]NETMASK=255.255.255.0
[backcolor=rgb(224, 224, 224) !important][size=1em]ONBOOT=yes
[backcolor=white !important][size=1em]HWADDR=00:0c:29:84:7c:b0
|
[backcolor=white !important]

[backcolor=white !important]2、关闭selinux [backcolor=white !important]和上面的设置一样 [backcolor=white !important]临时关闭selinux [backcolor=white !important]setenforce 0 [backcolor=white !important]永久关闭 [backcolor=white !important]vim /etc/selinux/config 设置内容SELINUX=permissive [backcolor=white !important]时间同步: [backcolor=white !important]现在192.168.7.2自己本身就是NTP时间服务器,它的时间就是标准时间不需要同步! [backcolor=white !important]⑶、LVS基于NAT的配置 [backcolor=white !important]1、LVS模块:内核模块ipvs和用户空间命令ipvsadm的安装。 [backcolor=white !important] 在linux 2.4.23之后及2.4.23的内核中i已经内置了ipvs模块,不需要我们自己再手动编译为内核打补丁了,利用grep -i 'ip_vs' /boot/config-2.6.18-308.el5 可以查看内核编译的时候是否编译了ipvs功能 [backcolor=white !important]

[backcolor=white !important]OK!那我们只需要为安装我们的用户模块:ipvsadm即可 [backcolor=white !important]yum –y install ipvsadm #安装ipvsadm [backcolor=white !important]

2、配置LVS基于NAT实现负载均衡集群 [backcolor=rgb(224, 224, 224) !important][size=1em]1
[backcolor=white !important][size=1em]2
[backcolor=rgb(224, 224, 224) !important][size=1em]3
| [size=1em][backcolor=rgb(224, 224, 224) !important][size=1em]ipvsadm -A -t 172.16.7.1:80 -s rr #添加集群
[backcolor=white !important][size=1em]ipvsadm -a -t 172.16.7.1:80 -r 192.168.7.3 –m #添加节点
[backcolor=rgb(224, 224, 224) !important][size=1em]ipvsadm -a -t 172.16.7.1:80 -r 192.168.7.4 –m #添加节点
|
[backcolor=white !important]

[backcolor=white !important]到此我们基本的配置已经完成,下面来测试下吧 [backcolor=white !important]

[backcolor=white !important] 此时我们请求的页面Directorserver会利用轮询的方式依次交换让web服务器来提供页面的响应,但是有时候我们的服务器的性能差异比较大,这时候希望服务器性能比较好的服务器来响应更多的请求,则是就需要修改写负载均衡的算法了,把rr修改为wrr给其加上权重! [backcolor=white !important]

[backcolor=white !important]此时在进行页面测试,效果如下 [backcolor=white !important]

[backcolor=white !important]OK,至此,我们的LVS基于NAT模式来实现web服务的负载均衡就已经搭建完成了,下面我们进行基于DR模式的负载均衡把!
[backcolor=white !important]四、LB基于LVS的web架构之DR实现web服务的负载均衡 ⑴、方案规划和架构图 每个服务器上需要一个网卡即可,Director的VIP在eth0:0上,DIP在ETH0上,而RS上的DIP在eth0上,VIP配置在lo:0上,而且VIP和DIP都必须为公网的IP。这样才能实现以RS直接回复客户端的请求! 关于DR模型有两种: DR的DIP和VIP、RIP都是在同一网段内的服务器 VIP为公网地址,DIP和RIP为私有地址,则此时需要把RS的网关指向另外一个路由接口,来利用arp解析RS的发送报文,来保证eth0结构能够与外部网络通信。 我们这里就以所有IP地址否是公网IP来进行试验了 ⑵、通信原理: 每个Real Server上都有两个IP:VIP和RIP,但是VIP是隐藏的,就是不能提高解析等功能,只是用来做请求回复的源IP的,Director上只需要一个网卡,然后利用别名来配置两个IP:VIP和DIP Director在接受到外部主机的请求的时候转发给Real Server的时候并不更改目标地址,只是通过arp解析的MAC地址进行封装然后转给Real Server,Real Server在接受到信息以后拆除MAC帧封装,然后直接回复给CIP。 而此时需要关闭RS上的基于VIP的arp解析,在linux内核2.4以后,内核中都内置了这种功能,通过一些设置可以关闭其arp的功能: arp_ignore:定义接收到ARP请求时的响应级别
0:默认,只用本地配置的有响应地址都给予响应
1:仅仅在目标IP是本地地址,并且是配置在请求进来的接口上的时候才给予响应(仅在请求的目标地址配置请求到达的接口上的时候,才给予响应)
arp_announce:定义将自己的地址向外通告时的级别
0:默认,表示使用配置在任何接口的任何地址向外通告
1:试图仅向目标网络通告与其网络匹配的地址
2:仅向与本地接口上地址匹配的网络进行通告
注意:要想让其功能生效,必须先设置相关设置,然后在配置IP地址等信息 ⑶、架构步骤 1、DR1-web服务器的设置 与上面的设置相同,具体步骤如下,其设置不在详细介绍! ①、关闭arp请求响应---这个必须先设置在再设置IP不然就不能生效了 echo 2 > /proc/sys/net/ipv4/conf/all/arp_announce #设置地址向外通告时的级别
echo 2 > /proc/sys/net/ipv4/conf/eth0/arp_announce
echo 1 > /proc/sys/net/ipv4/conf/eth0/arp_ignore #定义接收到ARP请求时的响应级别
echo 1 > /proc/sys/net/ipv4/conf/all/arp_ignore 注意:此处通过定义这两个才能实现关闭lo上的arp解析功能的响应 这时来自director上面的两个网卡lo和eth0,通告和解析的时候都是通过eth0来进行解析实现的,这样通过关闭此功能来实现用户请求的报文的网卡和IP不在同一个接口上的时候不予响应--arp-ignore
linux中有一种行为,数据报文从哪个接口出去就是使用哪个接口作为源地址进行数据封装。所以此处转发的时候的响应报文就不符合规则了,此时需要通过添加一条路由规则来实现数据的目标地址做为源地址。所以我们需要通过添加一条路由来解决这个问题,在下面我们配置ip的时候再说吧! ②、配置ip地址 [backcolor=rgb(224, 224, 224) !important][size=1em]1
[backcolor=white !important][size=1em]2
[backcolor=rgb(224, 224, 224) !important][size=1em]3
[backcolor=white !important][size=1em]4
[backcolor=rgb(224, 224, 224) !important][size=1em]5
[backcolor=white !important][size=1em]6
[backcolor=rgb(224, 224, 224) !important][size=1em]7
| [size=1em][backcolor=rgb(224, 224, 224) !important][size=1em]DEVICE=eth0
[backcolor=white !important][size=1em]BOOTPROTO=static
[backcolor=rgb(224, 224, 224) !important][size=1em]IPADDR=172.16.7.3
[backcolor=white !important][size=1em]NETMASK=255.255.0.0
[backcolor=rgb(224, 224, 224) !important][size=1em]GATEWAY=172.16.7.49 #此时的网关不再需要指向DS的DIP
[backcolor=white !important][size=1em]ONBOOT=yes
[backcolor=rgb(224, 224, 224) !important][size=1em]HWADDR=00:0c:29:29:c4:5a
|
[backcolor=white !important]

[backcolor=white !important]而后重启网络服务并在lo:0上配置VIP [backcolor=white !important]

[backcolor=white !important]③、安装并配置httpd服务,上面的已经配置过,这里不在重新设置 [backcolor=white !important]2、DR2-web服务器的设置 [backcolor=white !important]

[backcolor=white !important]重启网络服务,然后设置本机的arp请求解析级别并设置VIP [backcolor=white !important]

[backcolor=white !important]③、安装并配置httpd服务,上面的已经配置过,这里不在重新设置。 [backcolor=white !important]3、DS服务器的设置 [backcolor=white !important]配置网络地址: [backcolor=rgb(224, 224, 224) !important][size=1em]1
[backcolor=white !important][size=1em]2
[backcolor=rgb(224, 224, 224) !important][size=1em]3
[backcolor=white !important][size=1em]4
[backcolor=rgb(224, 224, 224) !important][size=1em]5
[backcolor=white !important][size=1em]6
[backcolor=rgb(224, 224, 224) !important][size=1em]7
[backcolor=white !important][size=1em]8
[backcolor=rgb(224, 224, 224) !important][size=1em]9
| [size=1em][backcolor=rgb(224, 224, 224) !important][size=1em]在eth0上的DIP:172.16.7.2/16
[backcolor=white !important][size=1em]DEVICE=eth0
[backcolor=rgb(224, 224, 224) !important][size=1em]BOOTPROTO=static
[backcolor=white !important][size=1em]ONBOOT=yes
[backcolor=rgb(224, 224, 224) !important][size=1em]IPADDR=172.16.7.2
[backcolor=white !important][size=1em]NETMASK=255.255.0.0
[backcolor=rgb(224, 224, 224) !important][size=1em]GATEEAY=172.16.7.49
[backcolor=white !important][size=1em]HWADDR=00:0c:29:84:7c:a6
[backcolor=rgb(224, 224, 224) !important][size=1em]在eth0:0上的VIP:172.16.7.1/16
|
[backcolor=white !important]

[backcolor=white !important]在RS1和RS2上分别启动httpd服务,然后在DS上测试其是否能工作正常 [backcolor=white !important]service httpd start [backcolor=white !important]

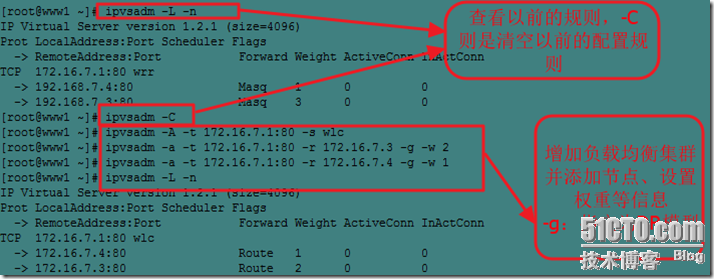
[backcolor=white !important]OK,基本的网络设置我们已经配置完成了,那么下面来进行LVS基于DR模型的设置吧,其实也很简单,命令如下: [backcolor=white !important]

[backcolor=white !important]下面来测试下我们的效果吧 [backcolor=white !important]

[backcolor=white !important]OK,到此我们就实现了LVS基于DR模型的架构来实现web服务的负载均衡集群!下面再介绍下LVS的持久连接的相关内容吧!
[backcolor=white !important]五、LVS的持久连接 [backcolor=white !important] 1、基本原理和简介 [backcolor=white !important] 在互联网购物、网上银行进行交易的时候,需要用到持久连接,那么什么是持久连接呢? [backcolor=white !important] LVS的持久连接,是一种不基于算法,来实现在一段时间内,将来自于同一个客户端的请求都派发给同一个real server。 [backcolor=white !important] 其工作机制是:在内存缓存区内,其中记录了每个客户端及其分配给它的RS的映射关系。 [backcolor=white !important] 2、开启LVS的长连接 ipvsadm -A|E ... -p timeout; 利用-p timeout关键字就可以开启LVS的长连接 其中timeout默认时长是300秒,默认单位秒 3、LVS的类型 PPC:持久端口连接、将来自于同一个客户端的同一个服务的请求始终定向到同一个real server fg:ipvsadm -A -t 172.16.7.1:80 -s rr –p PCC:持久客户端连接,将来自于同一个客户端的所有服务都始终定向至此前选定的RS fg:ipvsadm -A -t 172.16.7.1:0 -s rr –p (0代表所有端口),只用使用了PCC,就是把所有端口统统定义为集群服务,一律向RS转发,PCC定义的是所有端口 PNMPP:持久防火墙标记连接,能够定义端口间的引擎关系的。通过PREROUTING上对端口进行打标纪,来实现部分端口的集群,把几个毫不相关的服务绑在一起实现集群 fg: iptables -t mangle -A PREROUTING -d 172.16.7.1 -i eth0 -p tcp --dport 80 – j MARK --set-mark 8 #prerouting代表在进入主机之前就打好标记
iptables -t mangle -A PREROUTING -d 172.16.7.1 -i eth0 -p tcp --dport 443 -j MARK --set-mark 8 在lVS内启用PNMPP
ipvsadm -A -f 8 -s rr
ipvsadm -a -f 8 -r 172.16.7.3 -g -w 2
ipvsadm -a -f 8 -r 172.16.7.4 -g -w 3 持久性连接的配置上上面的集群负载均衡的配置一样,只是增加了个参数而已,这里不在举例说名了,还望谅解~
[backcolor=white !important] 上面只是我们实现的比较简单的集群功能,当然这样简单的集群式构建后来的高可用集群的基础,必须要能熟练搭建,但是此时的负载均衡看着还是比较脆弱的,例如:RS1挂了,这是DS还是利用我们指定的规则来提供服务的,当轮到RS1的时候我们的网络就无法访问到了,这是我们就需要来利用相关脚本来实现对服务器健康状况的健康,从而来保证服务的不间断性,是不是有点像高可用集群了,哎~写脚本需要时间来慢慢的推敲,并进行多方的测试,才能用在生成环境中,当然我们后面的高可用负载均衡是可以很容易解决这个问题的,如果你想锻炼锻炼自己的思维能力,就自己动手写个脚本吧~我的还没写出来~嘿嘿,脑子不是很好啊!等过两天写好了在分享给大家,到时候还望各位多提点优化的意见! [backcolor=white !important] 此时我们的负载均衡服务器还可以结合存储服务器来保证数据的安全性和一致性!例如利用一个nfs服务器来保证我们无论访问的是那个主机其主页面都是一样的,这个是很简单的,大致步骤为下: [backcolor=white !important] 1、配置nfs共享目录 [backcolor=white !important] 2、RS1和RS2分别把共享目录挂载到主页目录放置的位置/var/www/html/下,在其共享目录上提供主页面即可!
[backcolor=white !important] 以上内容仅是我个人对LVS架构的所有理解,总结的还不够全面,还望各位大神见谅并提出补充!谢谢~
|